XPS and Epoxy

Canvas covered foamies (Thrifty Alternatives...)

Moderator: eaglesdare

Re: XPS and Epoxy

Postby fonsan » Tue Jan 24, 2023 6:25 pm

tony.latham wrote:Is the axle in the middle of the chassis frame? It looks like it needs to be moved a bit aft?

Tony


Does this look ok?

Screenshot 2023-01-25 at 00.24.02.png
Screenshot 2023-01-25 at 00.24.02.png (292.49 KiB) Viewed 388 times
Screenshot 2023-01-25 at 00.18.57.png
Screenshot 2023-01-25 at 00.18.57.png (200.83 KiB) Viewed 388 times
fonsan
Teardrop Inspector
 
Posts: 18
Joined: Sun Jan 22, 2023 6:38 pm

Re: XPS and Epoxy

Postby fonsan » Tue Jan 24, 2023 6:30 pm

The axel position is representative in the Sketchup drawing but the way the axel is mounted to the frame and how the frame looks is approximated
fonsan
Teardrop Inspector
 
Posts: 18
Joined: Sun Jan 22, 2023 6:38 pm

Re: XPS and Epoxy

Postby tony.latham » Tue Jan 24, 2023 6:57 pm

Does this look ok?


As long as you get greater than 50% of the weight ahead of the axle.

Tony
User avatar
tony.latham
Gold Donating Member
 
Posts: 6899
Images: 17
Joined: Mon Jul 08, 2013 4:03 pm
Location: Middle of Idaho on the edge of nowhere
Top

Re: XPS and Epoxy

Postby kstills » Wed Jan 25, 2023 6:47 am

Here’s the back side of my test piece. No surface prep, yes the basement is dirty and no, I’m not concerned with the appearance because this is for compression testing, not final surface. Don’t judge me. I applied a layer of epoxy smoothed with a stick then 'soaked' the 6oz glass into it. I smoothed it with the same stick, then put it up in a vertical position to cure.

IMG_0710.jpg
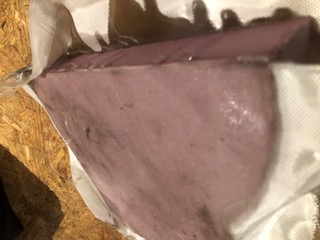
IMG_0710.jpg (20.49 KiB) Viewed 358 times


This is the previously applied side, I took my leftover epoxy and smoothed it out over the glass with an old brass hinge. I said don’t judge me. You can’t really see it well but the surface is very smooth, but there are raised and lowered areas. If I had created a tape dam around the edges and poured on the epoxy I’m confident it would have flowed out and formed a uniform surface suitable for interior work. I realize this application will not provide any durability as the base layer of epoxy had already cured, but again I’m going for effect here, not utility.

IMG_0708.jpg
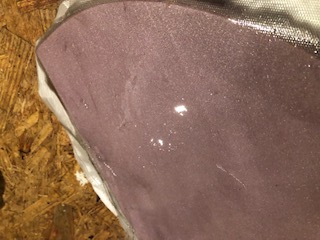
IMG_0708.jpg (26 KiB) Viewed 358 times


I have two more days for full cure, then put a bolt and washer through it and see how much I can crush the foam.
kstills
Teardrop Builder
 
Posts: 34
Joined: Wed Dec 21, 2022 10:23 am
Top

Re: XPS and Epoxy

Postby fonsan » Wed Jan 25, 2023 8:01 am

kstills wrote:Here’s the back side of my test piece. No surface prep, yes the basement is dirty and no, I’m not concerned with the appearance because this is for compression testing, not final surface. Don’t judge me. I applied a layer of epoxy smoothed with a stick then 'soaked' the 6oz glass into it. I smoothed it with the same stick, then put it up in a vertical position to cure.

IMG_0710.jpg


This is the previously applied side, I took my leftover epoxy and smoothed it out over the glass with an old brass hinge. I said don’t judge me. You can’t really see it well but the surface is very smooth, but there are raised and lowered areas. If I had created a tape dam around the edges and poured on the epoxy I’m confident it would have flowed out and formed a uniform surface suitable for interior work. I realize this application will not provide any durability as the base layer of epoxy had already cured, but again I’m going for effect here, not utility.

IMG_0708.jpg


I have two more days for full cure, then put a bolt and washer through it and see how much I can crush the foam.


Excellent!

Here is a video https://www.youtube.com/watch?v=VRNhN8SavUM but it is unclear which weights that are used
fonsan
Teardrop Inspector
 
Posts: 18
Joined: Sun Jan 22, 2023 6:38 pm
Top

Re: XPS and Epoxy

Postby tony.latham » Wed Jan 25, 2023 11:23 am

I smoothed it with the same stick...


When you get ready for the real deal, get some squeegees.

Image

Some yahoo once wrote this for a book about the subject:

The squeegee is your stethoscope. It will vibrate over starved cloth and glide over areas of excess epoxy. Keep looking at the layup from a low angle for dull or shiny spots. If a spot looks whitish, it needs more resin. Properly saturated cloth is transparent. Adding resin to saturated cloth doesn’t increase the strength.

Pay attention to the edges of the wall and ensure you have good saturation. If you have a raised spot in the fiberglass, work it flat with the squeegee.

When you think you’re done, take a twenty-minute break and then check to make sure that some of the cloth hasn’t lifted. You can push those spots down with the squeegee. Additional epoxy can be added as long as it’s still tacky.


:frightened:

Tony
User avatar
tony.latham
Gold Donating Member
 
Posts: 6899
Images: 17
Joined: Mon Jul 08, 2013 4:03 pm
Location: Middle of Idaho on the edge of nowhere
Top

Re: XPS and Epoxy

Postby kstills » Wed Jan 25, 2023 11:43 am

Tony,

Are you applying the epoxy over the glass, or the glass over the epoxy? When I add a layer of epoxy and put the glass over it, there is very little I need to do to get the glass to lay flat into the liquid. The term I'm using is 'soaks in', as the epoxy tends to 'pull' the glass onto the XPS. I do smooth it some, but I would bet that buy adding the proper amount of epoxy to the XPS I wouldn't have to.

Now, ask me what 'the proper amount of epoxy' is.....
kstills
Teardrop Builder
 
Posts: 34
Joined: Wed Dec 21, 2022 10:23 am
Top

Re: XPS and Epoxy

Postby tony.latham » Wed Jan 25, 2023 1:00 pm

Are you applying the epoxy over the glass...?


Yes, it's common practice.


Sometimes folks will apply a layer of epoxy to wood, let it tack up a bit, and then apply the glass, and then apply the epoxy to the cloth.

Tony
User avatar
tony.latham
Gold Donating Member
 
Posts: 6899
Images: 17
Joined: Mon Jul 08, 2013 4:03 pm
Location: Middle of Idaho on the edge of nowhere
Top

Re: XPS and Epoxy

Postby fonsan » Wed Jan 25, 2023 1:04 pm

tony.latham wrote:
Are you applying the epoxy over the glass...?


Yes, it's common practice.


Sometimes folks will apply a layer of epoxy to wood, let it tack up a bit, and then apply the glass, and then apply the epoxy to the cloth.

Tony


This is to "seal it" and prevent the wood from soaking up to much epoxy and to prevent pinholes as gas bubbles coming from the wood pores will not bubble upp through the fiberglass ply
fonsan
Teardrop Inspector
 
Posts: 18
Joined: Sun Jan 22, 2023 6:38 pm
Top

Re: XPS and Epoxy

Postby kstills » Wed Jan 25, 2023 1:08 pm

tony.latham wrote:
Are you applying the epoxy over the glass...?


Yes, it's common practice.


Sometimes folks will apply a layer of epoxy to wood, let it tack up a bit, and then apply the glass, and then apply the epoxy to the cloth.

Tony


There are some videos from the countertop guys who use epoxy and glass for XPS countertops, they apply the epoxy first and then the glass. Then they pour the second coat of epoxy to get the finish they are looking for. That's what I'm after. The second coat they hit with a flame to remove the bubbles and make it smooth as polished stone. Another guy was building boats the same way, epoxy first, glass second, epoxy last.

And to reiterate, I'm doing interior only, the structural need will be next to nothing compared to using this method on the walls, ceilings and floors.
kstills
Teardrop Builder
 
Posts: 34
Joined: Wed Dec 21, 2022 10:23 am
Top

Re: XPS and Epoxy

Postby Pmullen503 » Wed Jan 25, 2023 2:37 pm

The epoxy will soak through the glass so you can apply the glass dry and epoxy through it.

It's not as important on flat surfaces but if you have compound surfaces (like boat hulls) you definitely want to start with dry fabric so you can shape it to the compound curve before you wet it out. You can still move it around a bit when wet but it would MUCH harder to move, shape the glass as much as you need to on a compound curve.
Pmullen503
1000 Club
1000 Club
 
Posts: 1108
Images: 67
Joined: Sun Nov 23, 2014 1:33 pm
Location: Fond du Lac, WI
Top

Re: XPS and Epoxy

Postby kstills » Wed Jan 25, 2023 2:59 pm

Pmullen503 wrote:The epoxy will soak through the glass so you can apply the glass dry and epoxy through it.

It's not as important on flat surfaces but if you have compound surfaces (like boat hulls) you definitely want to start with dry fabric so you can shape it to the compound curve before you wet it out. You can still move it around a bit when wet but it would MUCH harder to move, shape the glass as much as you need to on a compound curve.


Point taken.

Related to that, best practice for coating the edges? I'm thinking I cut strips, apply them same as the larger surfaces, then fix the defects with the second coat or with putty of some kind prior to painting.

Thoughts?
kstills
Teardrop Builder
 
Posts: 34
Joined: Wed Dec 21, 2022 10:23 am
Top

Re: XPS and Epoxy

Postby Pmullen503 » Wed Jan 25, 2023 4:13 pm

I would trim the straight edges at the gel stage. (I'm assuming you are going to do the panels before assembly laying flat.)

After assembly, apply bias cut strips of glass to the corners. Keep working it down to keep the glass from lifting until it gels. Then lay down a narrower strip over that one and again keep checking to make sure it doesn't lift. I've done as many as 5 layers of cloth on the ends of cedar strip canoes. It can take all day to do in one continuous lay up. The goal there was to make it absolutely clear, so no entrapped air. You don't have to be as careful if you plan to paint.

It's much easier if the corners are radiused. You can also use more layers of lighter glass for the corners if the thicker glass just will not conform to the corners.
Pmullen503
1000 Club
1000 Club
 
Posts: 1108
Images: 67
Joined: Sun Nov 23, 2014 1:33 pm
Location: Fond du Lac, WI
Top

Re: XPS and Epoxy

Postby fonsan » Thu Jan 26, 2023 8:15 am

Fresh off the tube

https://www.youtube.com/watch?v=QBriMQFAGp0

Using 6 oz cloth
fonsan
Teardrop Inspector
 
Posts: 18
Joined: Sun Jan 22, 2023 6:38 pm
Top

Re: XPS and Epoxy

Postby kstills » Fri Jan 27, 2023 7:03 am

Pics of the compression test. The bolt might be a tad bigger than required for the intended application, however it did allow me to tighten it with a socket wrench. Front and back sides (clear epoxy on front) and you can just make out from the picks that the washer was compressing the XPS as it was tightened. I could very easily have tightened the bolt so that the XPS would have been substantially thinner in this area.
Attachments
IMG_0713.jpg
IMG_0713.jpg (18.54 KiB) Viewed 173 times
IMG_0714.jpg
IMG_0714.jpg (17.06 KiB) Viewed 173 times
kstills
Teardrop Builder
 
Posts: 34
Joined: Wed Dec 21, 2022 10:23 am
Top

PreviousNext

Return to Foamies

Who is online

Users browsing this forum: No registered users and 11 guests