Page 1 of 1

Skin seams

PostPosted: Tue Feb 09, 2021 12:29 pm
by Melle.17
My trailer is about 6 feet wide so I will have some seams on the top skin. I will be skinning with 1/4 birch plywood. Ultimately the exterior will be treated with the mix (polyurethane) and then painted with Monstaliner. What is the best way to handle the seams to make sure they are watertight and the least visible?

Re: Skin seams

PostPosted: Tue Feb 09, 2021 2:54 pm
by tony.latham
Melle.17 wrote:My trailer is about 6 feet wide so I will have some seams on the top skin. I will be skinning with 1/4 birch plywood. Ultimately the exterior will be treated with the mix (polyurethane) and then painted with Monstaliner. What is the best way to handle the seams to make sure they are watertight and the least visible?


You may have guessed my answer; I would suggest fiberglassing it. It's not that big of a deal.


But you'll need to find some 72' wide fiberglass to avoid seams. I see Raka is out of it. Look for 2 oz or 4oz.

If you do use the "mix" for sealing the wood, make sure it's gloss and not flat or semi-gloss. Those products have wax in them. (At one point in my discussions with Magnet Paints--Monstaliner––that's what they told me).

1/4" plywood may be a challenge to bend depending on your curve. :frightened:

:thinking:

Tony

Re: Skin seams

PostPosted: Tue Feb 09, 2021 10:22 pm
by troubleScottie
Most likely a good solution is a double seam of about 1/8". Not perfect, but relatively simple and small. This seam is directional as water could enter. It might be possible to add some sort of sealer to keep water out.


Ideally you would need a break press. However there are ways to do this with hand tools. Examples below

https://www.youtube.com/watch?v=SIcHhKUcOnc

https://www.youtube.com/watch?v=3aIfVuBn9Ak

Possible other tools:
sheet metal hand seamer metal brake

seam profiler

Re: Skin seams

PostPosted: Wed Feb 10, 2021 7:31 am
by Pmullen503
+1 on fiberglass cloth and epoxy. Even if only a couple inches either side of the seam. That will prevent that seam from opening up over the years.

Re: Skin seams

PostPosted: Thu Feb 11, 2021 2:07 pm
by twisted lines
I am going down this path,


soon,

again

:thinking:

Re: Skin seams

PostPosted: Sat Feb 27, 2021 12:43 am
by bartek
If you can't find the fiberglass wide enough, another option is lapping the fiberglass as well.
I ended up using 50 inch wide and just lapping it an inch or so on the sides of each plywood joint. Since the plywood was 48 inch wide, it worked well and I'm planning some sort of trim to cover all the joints anyway

Image

Re: Skin seams

PostPosted: Sat Mar 13, 2021 3:49 pm
by nbcarey
I would suggest scarfing your panels together to make a sheet the size you need. The process is simple. Put an 8:1 (at a minimum - 12:1 is better) bevel on each sheet to be joined, and glue it together with thickened marine epoxy.

The advantage of a proper scarf joint is that it largely eliminates any stress riser or hard spots. The ply will curve and behave as if it we're a single piece.

There's multiple ways to do this. You can use a router with a fixture to guide it. You can use a plane (hand or power), a belt sander. A hand plane is simplest: stack the 2 workpieces to be scarfed face to face. Slide the top sheet back be 8, 10, or 12 times the thickness of the plywood. Start planing across the edge, taking a fine cut. The plus will guide you: if you're cutting a flat bevel, the plus will be of uniform thickness.

Put a piece of plastic on the assembly table. It doesn't have to cover the entire table, just a strip wide enough to protect against squeeze-out. Place one piece on the table with the bevel over the plastic.

Apply a coat of unthickened marine epoxy to each faying surface. Then mix another batch of marine epoxy, thickened with wood flour or fumed silica (structural thickeners, do not used microballoons). Apply a coat to the bottom piece. Address the top piece to the bottom piece. Put another bit of plastic over the top and clamp. You can use weights, but the easiest way might be to use a piece of scrap plywood or 1x stock large enough to more than span the entire joint on all sides. Drive some drywall screws through both pieces of ply outside of the joint and drive them home to draw the joint tight. Walk away until it cures. Remove the screws and clean up the joint. The screw holes can be plugged with more thickened epoxy. Use wood flour, as that will give you a wood colored plug.

https://boatbuildproject.com/scarfing-p ... and-plane/

https://sandypointboatworks.com/boat-bu ... ng-joinery

Image


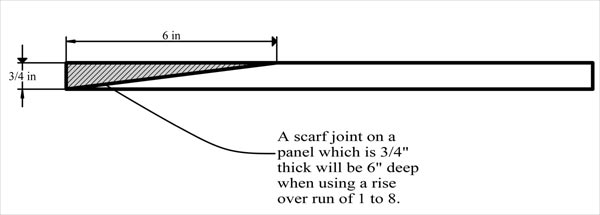
[youtube]https://youtu.be/P4cSEqyk_7A[/youtube]

Re: Skin seams

PostPosted: Sat Mar 13, 2021 4:05 pm
by nbcarey
Another technique is Harold "Dynamite" Payson's poor man's scarf. Butt the two pieces to be joined together. Sand a shallow hollow across the joint, slightly deeper and wider than the 'glass tape you'll be using. Wet out the joint with unthickened marine epoxy, apply the tape, and completely wet the tape out with more unthickened marine epoxy. Once it's cured, you can clean up the joint and fill the hollow with marine epoxy thickened with microballoons. After it's cured, block it out with sandpaper to bring it completely level with the ply.

Might want to consider his book. Lot's of useful techniques. https://www.amazon.com/Instant-Boatbuil ... 071836748/

Here's Dynamite Payson's explanation:

Image