Disaster struck

General Discussion about almost anything Teardrop or camping related

Re: Disaster struck

Postby Jdw2717 » Tue Jul 09, 2013 6:44 pm

I built mine very similar to NoBody's. I used the 3/4" birch plywood with 1/8" birch plywood on the inside and out. I cut the curved ribs close to the shape needed and then used a flush cutting router bit to make them match the sides. I then glued on the outside plywood and then the inside after the outside sheet dried. This will give it the strength that you will need, much like a hollow core door. You may even consider doubling up some plywood rib material in the area that it is breaking since this seems to be where most of the bending force is. You will probably not need to double it up in the lower flat sections so you can save weight that is affecting the curved area. I hope this helps.
"Twenty years form now you will be more disappointed by the things that you didn't do than by the ones you did. So throw off the bowlines... Explore. Dream. Discover" Mark Twain

John & Tatanya
User avatar
Jdw2717
Teardrop Master
 
Posts: 180
Images: 34
Joined: Tue Feb 14, 2012 8:34 pm
Location: Knoxville, TN

Re: Disaster struck

Postby Roly Nelson » Wed Jul 10, 2013 12:30 am

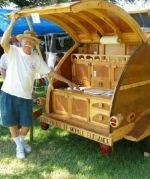
It's sad to put in a lot of work into a galley hatch, and then have it split across the grain that way. There is nothing more that I can add, that hasn't already been posted, but multi-layered birch or baltic plywood, is really the answer. I use that material all of the time on my builds, and you just can't beat the strength in that material. Good luck on your repairs.
8) :cry: :thinking: Roly, the li'l ol' So Calif woody TD guy
See the little 1/2 Nelson Woody constructions pics at: http://gages-56.com/roly.html
User avatar
Roly Nelson
L'il Ol' Woody Builder
 
Posts: 2971
Images: 13
Joined: Sun Jan 30, 2005 12:45 pm
Location: Wildomar, Calif

Re: Disaster struck

Postby markhusbands » Wed Jul 10, 2013 8:46 am

I used five 3/4 inch thick plywood ribs - 1.5" wide - and covered the edge with iron on laminate so that it would look halfway decent exposed. I put solid oak blocks in between ribs. Then I used a single sheet of 1/8 inch ply for the skin, which I will cover with aluminum. I built it in place on the back of the tear body. So far, it has been stable as I have moved it around and messed with it. It isn't very heavy and is reasonably stiff.
133923
User avatar
markhusbands
Teardrop Master
 
Posts: 285
Images: 58
Joined: Tue Jul 03, 2012 3:17 pm
Location: Denver, Colorado, USA
Top

Re: Disaster struck

Postby aggie79 » Wed Jul 10, 2013 9:29 am

I pretty much agree with all that has been said. If you used 1/4" plywood, you may want to consider two layers of 1/8" plywood instead of a single layer of 1/4".

If you can, it helps to "fit" your hatch framing in place. I used 1/4" mdf spacers all around.

Image

When I built my hatch my bulkhead is not solid (framed but not skinned), so I could access the hatch area from inside the teardrop. This allowed me to temporarily fasten my hatch framing to my sidewalls and then glue/fasten the plywood skin in place. After that I crawled into the galley area and remove the temporary screws.

Image

Image

By fitting everything in place, I ended up with a pretty good fitting hatch and no springback.
Tom (& Linda)
For build info on our former Silver Beatle teardrop:
Build Thread

93503
User avatar
aggie79
Super Duper Lifetime Member
 
Posts: 5405
Images: 686
Joined: Tue Aug 07, 2007 5:42 pm
Location: Watauga, Texas
Top

Re: Disaster struck

Postby Nobody » Thu Jul 11, 2013 9:18 am

rufi0h wrote:Thank you everyone for your replies. I am going to build the next ribs out of plywood and laminate them together. Now the hard part of trying to salvage my Aluminum that is stuck on there pretty well with contact cement.


If you use a good grade of 3/4" cabinet plywood there'll be no need to laminate. Quality cabinet grade plywood has 9-11 plies, all oriented perpendicular to each other. If you make each rib at least 1 1/2" deep (vertically) you'll have plenty of strength to avoid twisting, warping, splitting...

Carl's advice on removing the aluminum skin should work, just take your time.

As Aggie79 pointed out, building 'in place' if possible is good practice. If not possible, repeated dry fitting & using enough & correct fasteners to insure correct orientation of parts will make a big difference.
Harvey -

- - - - - - - - - - - - - - - -

Doing the right thing ain't always easy but, . . . it's always right!
User avatar
Nobody
1000 Club
1000 Club
 
Posts: 1196
Images: 342
Joined: Wed Jan 25, 2006 1:09 pm
Location: Benton, Arkansas
Top

Re: Disaster struck

Postby 2bits » Thu Jul 11, 2013 11:18 pm

Definitely need more ribs, two along the edge beg to twist. I am thinking it can be salvaged in place as well though, Just use what is in place, and frame the crap out of it in 2 foot squares to shore it up. That's first being ribs from top to bottom and then adding the spars. This means pulling your existing spars and maybe the two ribs since they are cracked, but personally I would keep the busted existing ribs as a base since they are already in place and Let the other ribs and framing pull it together.

But at the same time, since this is already not your first rebuild of the hatch you might be ready to do it completely over with the good advice here. The key is more Ribs.

Image
Thomas

Image
User avatar
2bits
2bit Member
 
Posts: 5132
Images: 8
Joined: Thu Dec 27, 2007 6:04 pm
Location: Lake Tawakoni, TX
Top

Re: Disaster struck

Postby Fyddler » Fri Jul 12, 2013 10:48 pm

I followed the instructions in the generic benroy plans, built the heck out of it, no spring back!
To err is human, to really foul up requires a computer

Build Log: http://www.tnttt.com/viewtopic.php?f=50&t=55017
User avatar
Fyddler
The 300 Club
 
Posts: 349
Joined: Sat Sep 01, 2012 9:52 am
Location: Port Orchard, WA
Top

Previous

Return to General Discussion

Who is online

Users browsing this forum: No registered users and 8 guests