Hybrid Foamie in Southern Alberta

...ask your questions in the appropriate forums BUT document your build here...preferably in a single thread...dates for updates, are appreciated....

Re: Hybrid Foamie in Southern Alberta

Postby Shar » Sat May 17, 2014 4:17 pm

Will do, Randy! :thumbsup:
Sheryl
If all these people did it, so can I.
My build thread: Hybrid Foamie in Southern Alberta
User avatar
Shar
Teardrop Master
 
Posts: 276
Images: 8
Joined: Thu Oct 24, 2013 5:20 pm
Location: Alberta, Canada

Re: Hybrid Foamie in Southern Alberta

Postby Shar » Mon May 19, 2014 5:59 pm

Yesterday was a day given to the family (primarily a baby shower for one of my daughters) but I am back to work on the trailer today. The weather looked iffy but I decided to try working outside, as the living room is getting crowded. The sunshine held up fine! :)
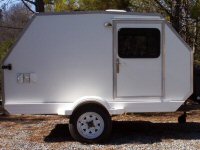
I framed the back wall (the one that will have a door) and cut the pieces of 1/8 ply that will cover the inside of that wall. I also glued canvas to the outside of the front wall, leaving 8" at the bottom for "tucking under" later.
This means that I now have 4 walls, in various stages of completion! :woohoo:
The back wall has a piece of ply across the bottom, just to keep it square for now. I will remove that once I attach that wall to the trailer. It's almost suppertime, so I'm quitting for now. After supper I will glue & screw the 1/8 ply to the new wall framing, and let it dry overnight. Tomorrow, on to other trailer tasks! Luckily, I have 3 days off from my job. :)
Attachments
dozuki with maple ply.JPG
dozuki with maple ply.JPG (37.91 KiB) Viewed 1587 times
back wall with ply.JPG
back wall with ply.JPG (46.26 KiB) Viewed 1587 times
back wall with ply brace.JPG
back wall with ply brace.JPG (36.28 KiB) Viewed 1587 times
Sheryl
If all these people did it, so can I.
My build thread: Hybrid Foamie in Southern Alberta
User avatar
Shar
Teardrop Master
 
Posts: 276
Images: 8
Joined: Thu Oct 24, 2013 5:20 pm
Location: Alberta, Canada

Re: Hybrid Foamie in Southern Alberta

Postby Shar » Tue May 20, 2014 12:23 am

A little report about weights. So far:
Trailer frame: 260 lbs
Floor: 100 lbs
Completed wood & foam front wall (5'x4 1/4'), 20 lbs
Side wall, 5'x8', just the foam: 10 lbs
Side wall, foam and 1/8 ply: 22 lbs

It looks like each wall will be about 20 lbs. That's like a little sack of potatoes! The windows are 10 lbs each, so that's another 20 lbs, and I figure the roof will be close to 20 lbs as well. I'm estimating the finished weight of the main cabin at 130 lbs, for a total trailer weight of less than 500 lbs. I will continue to weigh the panels as I prefab them. 8)
Sheryl
If all these people did it, so can I.
My build thread: Hybrid Foamie in Southern Alberta
User avatar
Shar
Teardrop Master
 
Posts: 276
Images: 8
Joined: Thu Oct 24, 2013 5:20 pm
Location: Alberta, Canada
Top

Re: Hybrid Foamie in Southern Alberta

Postby Shar » Wed May 21, 2014 1:23 pm

Yesterday the second side wall got laminated, and the inside of the back wall got skinned with 1/8 ply. Later in the day I also cut and fit the pieces of foam that fit in the framing on the back wall. Today I glued said foam into place, with the help of heavy bricks and so on...

My next task is to mark and cut the holes for the windows. When I bought the windows from the rv place, I paid no attention to how they would fit into the wall. It turns out they come with an extra frame, which is meant to go on the inside of the wall. This frame has pre-drilled holes in it, and it looks like, in its previous life, this window worked by having screws driven through those holes on the inside frame, and INTO the metal of the window frame proper. The window attached to itself, with the wall sandwiched between. The holes left by those screws are quite small, making me think the screws were narrow ones.

I could try to use this same system for my trailer, or I could drill new holes in the flange on the outside, turning the flanges into nailing fins. I haven't decided which way to go. In either case, my first step is to cut a hole. And insert some sort of wooden framing.
Attachments
holes in window frame.JPG
holes in window frame.JPG (37.98 KiB) Viewed 1530 times
window frame.JPG
window frame.JPG (40.1 KiB) Viewed 1530 times
used window.JPG
used window.JPG (43.67 KiB) Viewed 1530 times
Sheryl
If all these people did it, so can I.
My build thread: Hybrid Foamie in Southern Alberta
User avatar
Shar
Teardrop Master
 
Posts: 276
Images: 8
Joined: Thu Oct 24, 2013 5:20 pm
Location: Alberta, Canada
Top

Re: Hybrid Foamie in Southern Alberta

Postby KCStudly » Wed May 21, 2014 4:04 pm

Find the correct screws and use the clamp rings. That way you have a lot less holes going through that you need to worry about staying water proof.

You will have to make sure that the window/clamp ring combo is compatible with your wall thickness. If not some people will make a spacer/shim ring to take up the difference. You may also be able to invert the rings.
Last edited by KCStudly on Thu May 22, 2014 1:17 pm, edited 1 time in total.
KC
My Build: The Poet Creek Express Hybrid Foamie

Poet Creek Or Bust
Engineering the TLAR way - "That Looks About Right"
TnTTT ORIGINAL 200A LANTERN CLUB = "The 200A Gang"
Green Lantern Corpsmen
User avatar
KCStudly
Donating Member
 
Posts: 9640
Images: 8169
Joined: Mon Feb 06, 2012 10:18 pm
Location: Southeastern CT, USA
Top

Re: Hybrid Foamie in Southern Alberta

Postby Shar » Thu May 22, 2014 12:39 pm

Thanks, KC! I will keep all that in mind. Today I work an aft/eve shift at my job, so I just had time to cut the holes for the windows. In one of these pics, I have a window stuck in (on the wrong side of the wall) to test the fit. Funny thing, when I cut the first piece out (with jigsaw) it fell softly to the ground (like a feather) because it was so light. The second one got stuck in the hole and had to be gently pushed out. Now I wonder what to do with these 2 piece of 2" foam with 1/8 ply laminated to them. :)
Attachments
foam piece on floor.JPG
foam piece on floor.JPG (45.81 KiB) Viewed 1496 times
window in wall.JPG
window in wall.JPG (38.64 KiB) Viewed 1496 times
wall with window opening.JPG
wall with window opening.JPG (34.82 KiB) Viewed 1496 times
Sheryl
If all these people did it, so can I.
My build thread: Hybrid Foamie in Southern Alberta
User avatar
Shar
Teardrop Master
 
Posts: 276
Images: 8
Joined: Thu Oct 24, 2013 5:20 pm
Location: Alberta, Canada
Top

Re: Hybrid Foamie in Southern Alberta

Postby KCStudly » Thu May 22, 2014 1:25 pm

Shar wrote:Now I wonder what to do with these 2 piece of 2" foam with 1/8 ply laminated to them.


I did a test piece that is basically the same thing. It makes a very good cutting mat and protects my work bench when I am cutting out router templates using the razor knife and/or chisel. I also use it like a tray for holding small parts during finishing. Tape some butchers paper to it, brush poly on a handful of parts, set them on the "tray" (sometimes on little scraps to hold the pieces up so they don't stick); then I can move the tray and all the parts as one to another part of the bench and move on to larger parts that are lined up in the "finish me" queue.
KC
My Build: The Poet Creek Express Hybrid Foamie

Poet Creek Or Bust
Engineering the TLAR way - "That Looks About Right"
TnTTT ORIGINAL 200A LANTERN CLUB = "The 200A Gang"
Green Lantern Corpsmen
User avatar
KCStudly
Donating Member
 
Posts: 9640
Images: 8169
Joined: Mon Feb 06, 2012 10:18 pm
Location: Southeastern CT, USA
Top

Re: Hybrid Foamie in Southern Alberta

Postby Shar » Sat May 24, 2014 11:33 pm

Working a lot (at my job) this weekend, and trying to do little prep jobs on the panels during my off hours (which are few). I foresee that very soon it will be time to assemble the precious thing! :shock:
I will see if anyone else in the family is available to help with that; Mark will help of course, but I imagine that certain tasks will be easier with three pairs of hands, and I have several grown children. When attaching the big side walls, for example, it would be nice to have two people holding the wall in place and the third (me) attaching the clamps, screws, straps, etc. to hold it all in place while the glue dries.
Randy, this could be my big chance to glue myself to the foam. I will keep the camera handy. :lol:
Sheryl
If all these people did it, so can I.
My build thread: Hybrid Foamie in Southern Alberta
User avatar
Shar
Teardrop Master
 
Posts: 276
Images: 8
Joined: Thu Oct 24, 2013 5:20 pm
Location: Alberta, Canada
Top

Re: Hybrid Foamie in Southern Alberta

Postby Wolffarmer » Sun May 25, 2014 12:08 am

Will keep an eye out for future postings.

8) Randy
"these guys must be afraid of the dark"
User avatar
Wolffarmer
Donating Member
 
Posts: 4612
Images: 309
Joined: Wed May 02, 2007 1:32 pm
Location: Idaho Rupert
Top

Re: Hybrid Foamie in Southern Alberta

Postby Shar » Wed May 28, 2014 4:18 pm

Yesterday, I finished prepping the back wall panel, and prepared the BIG pieces of canvas for the side walls. Today, I've suddenly got the flu and can't do anything. :Oh Brother:
Tomorrow, exciting things can happen if I'm feeling a lot better by then! We shall see.
Attachments
vinyl spackling.JPG
vinyl spackling.JPG (38.61 KiB) Viewed 1401 times
Sheryl
If all these people did it, so can I.
My build thread: Hybrid Foamie in Southern Alberta
User avatar
Shar
Teardrop Master
 
Posts: 276
Images: 8
Joined: Thu Oct 24, 2013 5:20 pm
Location: Alberta, Canada
Top

Re: Hybrid Foamie in Southern Alberta

Postby Shar » Sat May 31, 2014 8:07 pm

Well, that window did not open, as the flu didn't go away till Friday. Now I have the weekend off, but Mark has to work so we can't start assembling the structure yet. I am hoping for that to happen Monday evening after I get home from work. I decided, for Sat and Sun, to do as much work as I can on all 4 wall panels, so that on Monday, as much as possible, it will all come together like Lego!
My daughter and granddaughter came over today, and with my daughter's help I was able to test-fit each of the walls and drill the guide holes for the screws I will be using when I "glue & screw" it all later. I found I had to cut out some foam from the side panels to allow for the fenders, and notch the foam next to the brake lights, and even (sob) cut a small piece out of the plywood to allow for the presence of the hinge joint near the middle of the trailer frame. We also did a bunch of sanding, to round off the foam at the bottom of the walls and around the fenders. Tomorrow I will do more sanding and maybe glue canvas on. I can't glue the canvas at the edges of the walls, because it isn't all fitted together yet, but maybe I can glue the centers and leave the edges flapping for now?? :NC
Here I am sanding foam with one of my helpers.
Attachments
sanding with a helper.JPG
sanding with a helper.JPG (49.22 KiB) Viewed 1414 times
Sheryl
If all these people did it, so can I.
My build thread: Hybrid Foamie in Southern Alberta
User avatar
Shar
Teardrop Master
 
Posts: 276
Images: 8
Joined: Thu Oct 24, 2013 5:20 pm
Location: Alberta, Canada
Top

Re: Hybrid Foamie in Southern Alberta

Postby Shar » Sun Jun 01, 2014 9:13 pm

Another day of working on the wall panels (gluing canvas on, painting plywood, painting canvas) No exciting steps forward, but steady progress. Funny, the paint colour we chose for the inside canvas is almost the same colour as the foam. :D
Attachments
blue paint on wall panel.JPG
blue paint on wall panel.JPG (44.26 KiB) Viewed 1382 times
Sheryl
If all these people did it, so can I.
My build thread: Hybrid Foamie in Southern Alberta
User avatar
Shar
Teardrop Master
 
Posts: 276
Images: 8
Joined: Thu Oct 24, 2013 5:20 pm
Location: Alberta, Canada
Top

Re: Hybrid Foamie in Southern Alberta

Postby Shar » Tue Jun 03, 2014 4:09 pm

Last night after work, and this morning, was our first chance in recent days to work on the trailer together- this part required 2 pairs of hands. I came down with a nasty cold at the same time, but we persevered and got the wooden parts of the cabin and roof framed. There are a few details not done, such as the frame for the roof vent, but I can do those later in the week when I'm not so sick. :no:
Thursday is our next chance, and I'm hoping we can attach the side walls then. In the meantime I will glue the sections of foam together for the roof (they will sit on top of the spars you can see in the pics).
It started raining again this afternoon, but we had baby all nestled in tarps so things should be ok. The ply braces you see in the pics are to hold it steady till the foam side walls are attached.
Attachments
hm, needs walls.JPG
hm, needs walls.JPG (42.58 KiB) Viewed 1347 times
framing 2.JPG
framing 2.JPG (67.09 KiB) Viewed 1347 times
framing 1.JPG
framing 1.JPG (70.67 KiB) Viewed 1347 times
Sheryl
If all these people did it, so can I.
My build thread: Hybrid Foamie in Southern Alberta
User avatar
Shar
Teardrop Master
 
Posts: 276
Images: 8
Joined: Thu Oct 24, 2013 5:20 pm
Location: Alberta, Canada
Top

Re: Hybrid Foamie in Southern Alberta

Postby Shar » Thu Jun 05, 2014 6:26 pm

I wonder if most people who attempt a project like this reach a point where it seems impossible. In my case, I hoped to have the trailer campable by July 1st. We are going on a road trip on July 15th, and a July 1st completion date would give us time to do a shorter "shakedown" trip first. I am fairly sure, now, that this will not happen.
I have no garage, so I can prefab things inside the house, but actual assembly of the trailer has to be done outside. Since the snow went away at the beginning of May, I have been rained out repeatedly, gotten sick twice, and had to wait at critical points where I needed another pair of hands and none were available. In short, my luck has been bad. :(
On Monday night, Mark and I assembled the wooden part of the trailer, which will allow us all the anchoring points (inside and out) that I wanted. Then we both got sick (see, "bad luck" above). Tomorrow morning we will try to attach one (or perhaps two) of the foam walls, unless we get rained out again.
I am confident I will finish the trailer this year. But July 1st is looking more and more dubious. :disappointed:
Attachments
two walls & half a roof.JPG
two walls & half a roof.JPG (42.58 KiB) Viewed 1317 times
Sheryl
If all these people did it, so can I.
My build thread: Hybrid Foamie in Southern Alberta
User avatar
Shar
Teardrop Master
 
Posts: 276
Images: 8
Joined: Thu Oct 24, 2013 5:20 pm
Location: Alberta, Canada
Top

Re: Hybrid Foamie in Southern Alberta

Postby Shar » Fri Jun 06, 2014 11:19 pm

I was able to attach another wall today. This was one of the foam side walls, which I glued to the floor and the end walls with Gorilla Glue, using clamps and some 3 inch screws with washers on them to hold the surfaces together. That was all we had time to do before I had to go to work.
Someday soon we will attach the other wall, and in the meantime I can make the door, prepare the roof foam, and do any gap-filling and sanding needed on the 3 walls that are in place. I will not do any more canvasing till all the walls and roof are on. It occurred to me today that it might be possible to fill small gaps by putting some GG in there, then spraying in some water. The glue should foam up and fill the gap. Bigger gaps will need GS instead, I suppose.
Here are some views of what we did today, and how it's looking inside. The blue inside surface is painted canvas.
Attachments
washer.JPG
washer.JPG (44.44 KiB) Viewed 1284 times
3 walls now.JPG
3 walls now.JPG (47.43 KiB) Viewed 1284 times
inside.JPG
inside.JPG (37.98 KiB) Viewed 1284 times
Sheryl
If all these people did it, so can I.
My build thread: Hybrid Foamie in Southern Alberta
User avatar
Shar
Teardrop Master
 
Posts: 276
Images: 8
Joined: Thu Oct 24, 2013 5:20 pm
Location: Alberta, Canada
Top

PreviousNext

Return to Build Journals

Who is online

Users browsing this forum: No registered users and 1 guest