Cabinet door construction

Anything to do with mechanical, construction etc

Cabinet door construction

Postby Creamcracker » Fri Jun 29, 2007 9:11 am

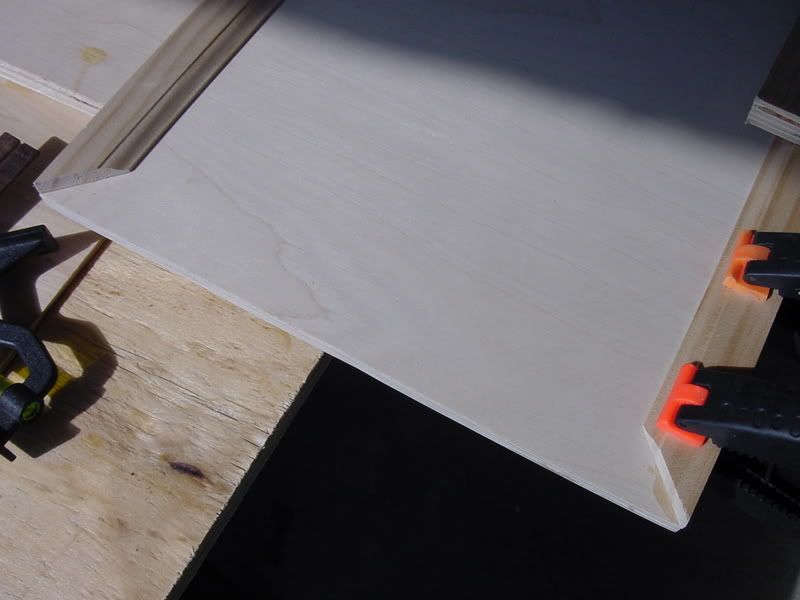
Just wanted to hear what methods people have used to construct cabinet doors --- either for the galley area or inside. I notice diverguy has the side rails of his doors mitered and they look pretty good. I want mine to have an inset panel onto which I'm going to affix those old metal signs that you can buy almost anywhere these days. For the galley I have three signs of the same size that I'm going to incorporate but am as yet undecided on door construction.
Philip
Image Image
3rd Annual Out of Control Shop Winner :)
User avatar
Creamcracker
Teardrop Graduate
 
Posts: 1126
Images: 142
Joined: Fri Sep 22, 2006 7:38 am
Location: VA Culpeper

Postby pauld3 » Fri Jun 29, 2007 9:21 am

what metal signs?

Lynn :thinking:
Paul & Lynn Donovan
The Toad Drop Inn
Liberal, KS
Image
User avatar
pauld3
The 300 Club
 
Posts: 432
Images: 94
Joined: Wed Jan 24, 2007 2:00 pm
Location: Kansas, Liberal

Postby bobhenry » Fri Jun 29, 2007 9:36 am

pauld3 wrote:what metal signs?

Lynn :thinking:
[url]http://stores.ebay.co.uk/iposters-Poster-and-Print-Shop_Metal-Signs_W0QQcolZ4QQdirZQ2d1QQfsubZ9QQftidZ2QQtZkm[/url] them signs
Last edited by bobhenry on Fri Jun 29, 2007 9:37 am, edited 1 time in total.
Growing older but not up !
User avatar
bobhenry
Ten Grand Club
Ten Grand Club
 
Posts: 10368
Images: 2623
Joined: Fri Feb 09, 2007 7:49 am
Location: INDIANA, LINDEN
Top

Postby Mary K » Fri Jun 29, 2007 9:37 am

Philip,

I sandwiched (glued) 2 pieces of 3/16" birch ply, and glued moulding (with 45* mitered cuts) around the edges to get that inset panel look.

Image

If you look at page 14 of my Build Picture Link below, you will find more pictures of how I built them.

Good Luck! :thumbsup:

Mk
Mary K

I don't know half of you half as well as I should like; and I like less than half of you half as well as you deserve. Bilbo Baggins
User avatar
Mary K
6000 Club
6000 Club
 
Posts: 6425
Images: 44
Joined: Wed Aug 02, 2006 3:07 pm
Location: Florida, Pensacola
Top

Postby Steve Frederick » Fri Jun 29, 2007 9:48 am

I made a frame, joined with biscuits, you could use dowels, pockets screws..Image
Then added a panel to a recess milled to the thickness of the ply, with a router.
Image
Glued in place..
Image
Voila!!
Image

I just need to get them installed permanently!! :? :?

A variation with molding applied..
Image
Blessings, Steve
Adirondacks, Upstate New York
Building Journals
The Shop Manual's 8-years old!! Thank's everyone!
New! 'Rondack Lodge Plans!Order Here!
Image
User avatar
Steve Frederick
Custom Teardrop Builder
 
Posts: 1984
Images: 29
Joined: Thu Apr 15, 2004 5:02 pm
Location: Upstate New York, Adirondacks (Great Sacandaga Lake)
Top

Postby NightCap » Fri Jun 29, 2007 10:01 am

I put mine together with pocket screws on the backs. I used my left over 1/8" skin for the panels. I ran all the rails and styles through my table saw that made a notch just the right width for my panels.

Image

Image
Image
#1 - 100% Done #2 - 100% Done Thinking about #3
User avatar
NightCap
1000 Club
1000 Club
 
Posts: 1131
Images: 259
Joined: Sun Jul 02, 2006 9:28 pm
Location: Iowa, Dayton
Top

Postby Mary K » Fri Jun 29, 2007 10:13 am

Golly, we have a diverse group of builders and styles!! That is just soooooo COOL!!!! :thumbsup:


Mk
Mary K

I don't know half of you half as well as I should like; and I like less than half of you half as well as you deserve. Bilbo Baggins
User avatar
Mary K
6000 Club
6000 Club
 
Posts: 6425
Images: 44
Joined: Wed Aug 02, 2006 3:07 pm
Location: Florida, Pensacola
Top

Postby NightCap » Fri Jun 29, 2007 10:21 am

Mary K wrote:Golly, we have a diverse group of builders and styles!! That is just soooooo COOL!!!! :thumbsup:


Mk


Sort of proves it that there really is more than one way to do just about anything eh?
Image
#1 - 100% Done #2 - 100% Done Thinking about #3
User avatar
NightCap
1000 Club
1000 Club
 
Posts: 1131
Images: 259
Joined: Sun Jul 02, 2006 9:28 pm
Location: Iowa, Dayton
Top

Postby diverguy » Fri Jun 29, 2007 10:21 am

i mittered mine in. frame is simple 45 deg(i just like that better). then cut a slot on the tablesaw the thickness of my 1/4 oak panel. glued and joined together. not perfect but i like the way they look. i think using old signs for the panels is a great idea. sounds like it will give it a route 66 look. :thumbsup:
User avatar
diverguy
The 300 Club
 
Posts: 320
Images: 192
Joined: Wed Mar 07, 2007 11:37 am
Location: Arkansas, Cabot
Top

Postby khutson » Fri Jun 29, 2007 10:28 am

Not sure if you can see it in the pic but I used a router to create the channel that the insert panel would sit in. I'm not sure of all the terms sorry. The I also routered the joints male to female and glued and clamped. No screws used at all.
Image

The whole galley

Image

Ken
Our build blog, We try to keep it current! Check it out!
http://kennoel.blogspot.com/
User avatar
khutson
Donating Member
 
Posts: 127
Images: 3
Joined: Mon Oct 23, 2006 6:09 pm
Location: Texas, Amarillo
Top

Postby Classic Finn » Fri Jun 29, 2007 10:47 am

WOW and Holy Cow ... There are some real nice looking doors on all of the above...Id say we are perdy darn good craftsman if we put the thoughts and work to it...

:applause: :applause: :applause: :applause: :applause: :applause:


Very Nice :thumbsup: :thumbsup: :thumbsup:

Classic Finn ;)
Royal Teardrop Society Scandinavian Bureau Chief of Staff

Image
User avatar
Classic Finn
Midnight Sun Voyager
 
Posts: 17488
Images: 146
Joined: Fri Apr 29, 2005 4:29 am
Location: Country of Finland
Top

Wow -- quick and complete responses

Postby Creamcracker » Fri Jun 29, 2007 11:14 am

These are the signs I have for the galley doors -- there'll be the three of them across the back -- notice we have a theme going on here! Perhaps not exactly original but it's what we wanted. My wife has picked up some great Route 66 fabric to make bedding. Thanks for all the input I just need to decide which way to go now :thinking:

Image
Image Image
3rd Annual Out of Control Shop Winner :)
User avatar
Creamcracker
Teardrop Graduate
 
Posts: 1126
Images: 142
Joined: Fri Sep 22, 2006 7:38 am
Location: VA Culpeper
Top

Postby volfanatic72 » Fri Jun 29, 2007 11:20 am

This is great info. Thanks to all of you for sharing your techniques!!!

:applause:
volfanatic72
Teardrop Advisor
 
Posts: 97
Images: 6
Joined: Fri Feb 23, 2007 9:23 pm
Location: TN - Cleveland
Top

Re: Wow -- quick and complete responses

Postby Classic Finn » Fri Jun 29, 2007 11:29 am

Creamcracker wrote:These are the signs I have for the galley doors -- there'll be the three of them across the back -- notice we have a theme going on here! Perhaps not exactly original but it's what we wanted. My wife has picked up some great Route 66 fabric to make bedding. Thanks for all the input I just need to decide which way to go now :thinking:

Image


Creamcracker now that is DYNOMITE :applause: :applause: Those will really make nice looking doors...way to go.. :thumbsup: :thumbsup:

Where did you pick those sings up at?

Classic Finn ;)
Royal Teardrop Society Scandinavian Bureau Chief of Staff

Image
User avatar
Classic Finn
Midnight Sun Voyager
 
Posts: 17488
Images: 146
Joined: Fri Apr 29, 2005 4:29 am
Location: Country of Finland
Top

Postby Bob Olszewski » Fri Jun 29, 2007 11:47 am

I made mine using full tenons. Its hard to see in the photo but I cut a saw slot in before gluing it up to accept a panel retainer strip after I routered the rabit
Image
ImageImage
View of panel doors
Image
View of back of doors showing retainer strips
Image
The strips are removable so you can change panels. The full morticed frame joints make the door very strong without the use of mechanical fasterers but are a pain to cut.
User avatar
Bob Olszewski
Teardrop Advisor
 
Posts: 54
Images: 59
Joined: Wed Oct 26, 2005 6:16 am
Location: Deerfield, MA
Top

Next

Return to Teardrop Construction Tips & Techniques

Who is online

Users browsing this forum: No registered users and 5 guests