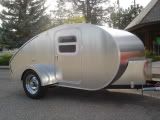
Your outcome on your roof skin.

Anything to do with mechanical, construction etc

Your outcome on your roof skin.

Postby Kykid » Sun May 25, 2008 6:47 am

If you don't mind can you share your experience on skinning your roof.
I have read glue , don't glue, glue but use outdoor carpet glue. Float in the sun so Alum. will expand then snug up when it's cool & not buckle. Jack has shared his knowledge with me and been a great help so far in building my TD. I was just want to hear some other war Stories so I can get this right the first time. One good thing to share, My hatch fit the first time around and this was one of my big concerns.
:D
Thanks and have a great memorial weekend!
PK
I can't wait to see what I might learn next.
User avatar
Kykid
Teardrop Builder
 
Posts: 27
Images: 10
Joined: Wed Mar 15, 2006 11:50 am
Location: Eastwood Ky.

Postby Airspeed » Sun May 25, 2008 8:07 am

Dont bother with glue, I didnt listen to everyone about not needing to glue, I used glue on the sides and after a few weeks it slowly broke free and my sides simply float now. There is no sign that the glue didnt hold, it looks just as good as it did when it was glued.
As for the top, I didnt use glue, I attached one end down with the galley hinge and worked forward ( I think most do it the other way around but I was alone and it was the only way I could do it) I pulled the aluminum around the front curve as tight as I could and used a couple screws to hold it in place until I got the trim on the corners.
My aluminum stays flat no matter what the temp, the glue was a waste of time. I dont know if it made a difference but I applied mine on a hot day thinking the aluminum would be at full expansion during the install. Like I said, I dont know if it made a difference but it stays flat.
Aaron
User avatar
Airspeed
500 Club
 
Posts: 718
Images: 16
Joined: Sun Mar 04, 2007 7:26 pm
Location: North California

Thanks

Postby Kykid » Sun May 25, 2008 8:10 am

Aaron, thanks so much for sharing your experience. This is great because as I learn I can also help others along the way.
PK
I can't wait to see what I might learn next.
User avatar
Kykid
Teardrop Builder
 
Posts: 27
Images: 10
Joined: Wed Mar 15, 2006 11:50 am
Location: Eastwood Ky.
Top

Postby Dean_A » Sun May 25, 2008 11:07 am

I'm just about ready to do my top and sides as well, and for what it's worth, I'm convinced from what I've read here that glue isn't necessary for the sides or the top. I'll be floating mine, but doing it in the sun.
User avatar
Dean_A
Gold Donating Member
 
Posts: 597
Images: 55
Joined: Sat Oct 21, 2006 5:24 pm
Location: San Diego, CA
Top

Postby Kykid » Sun May 25, 2008 11:20 am

Thanks Dean, Mine is sitting out in the sun right now and am about to start on it. Just finished taking trimming the sides down a 1/4" as Jack recommended. I'll try to get some pix on later today. Thanks again.
PK
I can't wait to see what I might learn next.
User avatar
Kykid
Teardrop Builder
 
Posts: 27
Images: 10
Joined: Wed Mar 15, 2006 11:50 am
Location: Eastwood Ky.
Top

Postby madjack » Sun May 25, 2008 12:57 pm

PK, a couple of other thoughts...we do put a bead of sealant under the edge of the roof skin...this is not for adhesive purposes but to add an extra bit of sealage along the edge...we clamp the al at the front edge and do a quick dry fit first...if happy, the sealant goes on and we apply the skin...as we put the skin on, we shoot a staple into the edge to help hold it down (every foot or so)...then comes the trim with sealant...an auto windshield adhesive/sealant(one part product) is used, another good choice(and cheaper) is butyl tape...this is a thicker product that takes a little more effort to get the proper "sqish" than does a tube applied type...DO NOT USE butyl rubber caulk inna tube........
madjack 8)
...I have come to believe that, conflict resolution, through violence, is never acceptable.....................mj
User avatar
madjack
Site Admin
 
Posts: 15128
Images: 177
Joined: Thu Dec 02, 2004 5:27 pm
Location: Central Louisiana
Top

Postby Kykid » Sun May 25, 2008 4:00 pm

Everyone, thank you for your time and thoughts. I posted a pic in my album for you to see the results. Still have not taken time to learn to inbed pix in these post yet. Maybe I'll get the hatch skinned tomorrow. It's getting closer all the time.
PK
I can't wait to see what I might learn next.
User avatar
Kykid
Teardrop Builder
 
Posts: 27
Images: 10
Joined: Wed Mar 15, 2006 11:50 am
Location: Eastwood Ky.
Top

Postby looped » Sun May 25, 2008 4:39 pm

madjack wrote:PK, a couple of other thoughts...we do put a bead of sealant under the edge of the roof skin...this is not for adhesive purposes but to add an extra bit of sealage along the edge...we clamp the al at the front edge and do a quick dry fit first...if happy, the sealant goes on and we apply the skin...as we put the skin on, we shoot a staple into the edge to help hold it down (every foot or so)...then comes the trim with sealant...an auto windshield adhesive/sealant(one part product) is used, another good choice(and cheaper) is butyl tape...this is a thicker product that takes a little more effort to get the proper "sqish" than does a tube applied type...DO NOT USE butyl rubber caulk inna tube........
madjack 8)


Would smearing a bead onto the wood where the edge of the aluminum will sit be overkill? im thinking that would yield extra protection around the staple holes.
"face it man. It's just not possible to fry an egg with a bicycle powered hairdryer!"
- Dave Lister
User avatar
looped
The 300 Club
 
Posts: 392
Images: 31
Joined: Sun Apr 20, 2008 2:03 pm
Location: dfw texas
Top

Postby madjack » Sun May 25, 2008 6:34 pm

looped wrote:
madjack wrote:PK, a couple of other thoughts...we do put a bead of sealant under the edge of the roof skin...this is not for adhesive purposes but to add an extra bit of sealage along the edge...we clamp the al at the front edge and do a quick dry fit first...if happy, the sealant goes on and we apply the skin...as we put the skin on, we shoot a staple into the edge to help hold it down (every foot or so)...then comes the trim with sealant...an auto windshield adhesive/sealant(one part product) is used, another good choice(and cheaper) is butyl tape...this is a thicker product that takes a little more effort to get the proper "sqish" than does a tube applied type...DO NOT USE butyl rubber caulk inna tube........
madjack 8)


Would smearing a bead onto the wood where the edge of the aluminum will sit be overkill? im thinking that would yield extra protection around the staple holes.


....that is exactly what we do for that exact reason....................... 8)
...I have come to believe that, conflict resolution, through violence, is never acceptable.....................mj
User avatar
madjack
Site Admin
 
Posts: 15128
Images: 177
Joined: Thu Dec 02, 2004 5:27 pm
Location: Central Louisiana
Top

Postby madjack » Sun May 25, 2008 6:36 pm

Kykid wrote:Everyone, thank you for your time and thoughts. I posted a pic in my album for you to see the results. Still have not taken time to learn to inbed pix in these post yet. Maybe I'll get the hatch skinned tomorrow. It's getting closer all the time.
PK


....looking good there buddy...I like your paint hi-lite as well.............................. 8)
...I have come to believe that, conflict resolution, through violence, is never acceptable.....................mj
User avatar
madjack
Site Admin
 
Posts: 15128
Images: 177
Joined: Thu Dec 02, 2004 5:27 pm
Location: Central Louisiana
Top

Roof and Sides

Postby ssrjim » Mon May 26, 2008 2:06 am

I glued using Gorilla glue. My buddy and I just got er glued tonight.


Image
93079
User avatar
ssrjim
1000 Club
1000 Club
 
Posts: 1187
Images: 12
Joined: Fri Feb 04, 2005 7:02 pm
Location: Glendale, az
Top

Postby Kykid » Mon May 26, 2008 2:07 pm

Jim, is this your 2nd build?
I can't wait to see what I might learn next.
User avatar
Kykid
Teardrop Builder
 
Posts: 27
Images: 10
Joined: Wed Mar 15, 2006 11:50 am
Location: Eastwood Ky.
Top

My build

Postby ssrjim » Mon May 26, 2008 3:47 pm

This is number 3.
93079
User avatar
ssrjim
1000 Club
1000 Club
 
Posts: 1187
Images: 12
Joined: Fri Feb 04, 2005 7:02 pm
Location: Glendale, az
Top

Postby Kykid » Thu May 29, 2008 5:19 pm

I have friends asking me if I am planning to build another one when this is done. At this point I have no idea, but I really wouldn't mind it. It has to be a little easier the 2nd time around.
I can't wait to see what I might learn next.
User avatar
Kykid
Teardrop Builder
 
Posts: 27
Images: 10
Joined: Wed Mar 15, 2006 11:50 am
Location: Eastwood Ky.
Top

Postby Spadinator » Fri May 30, 2008 2:22 pm

What about a Luan roof skin? Would you not glue and let it float or glue it every where. My coroplast roof skin failed and lifted every where. I am thinking of doing a Luan skin.

:thinking:
Never do anything you don't want to explain to the paramedics.
User avatar
Spadinator
500 Club
 
Posts: 500
Images: 47
Joined: Thu Oct 06, 2005 11:35 am
Location: Westpoint Utah
Top

Next

Return to Teardrop Construction Tips & Techniques

Who is online

Users browsing this forum: No registered users and 7 guests