The Micro Sport trailer

...ask your questions in the appropriate forums BUT document your build here...preferably in a single thread...dates for updates, are appreciated....

The Micro Sport trailer

Postby kc2hje » Tue Apr 20, 2010 10:15 am

So as I have said before in my other thread I am taking a ARE cap and making a small camper out of it

I wanted to show a different build then the norm and can use all the help I can get from this forum

So here are the goals for this trailer

1. Be under 800 Lbs unloaded
2. have a bed for two up and off the ground (the entire reason for building a camper vs a gear hauler
3. minimize setup time
4. be easy to secure for the daytime when we are not there
5. give us some at home features ie sink, hot water fans etc
6. last 10+ years


So the parts I have in my possession at this time are

1. ARE contractor cap (weight 150 Lbs)
2. Carry-on 5x8 trailer (current weight 400 Lbs putting on 50 Lbs diet)

(sad part is putting the trailer on a diet is so much easier then putting myself on one) :cry:


Parts I need to get

10 8 foot 2x3's
2 sheets of 3/4 inch exterior plywood for floor
4 sheets of 1/4 exterior plywood for sides
2 sheets of 1/4 hardwood ply for lower inside walls
2 sheets of coroplast for upper walls and ceiling
4 stabilizer jacks so the trailer stays put during the night
1 AC to DC converter / charger
1 main overhead LED light
2 LED reading lights
1 Fantastic vent fan
3 110 V ac outlets
3 12V outlets
1 smoke detector
1 fire extinguisher
1 kitchen sink
1 3 to 4 inch thick foam mattress
4 extruded table attachments (for two tables)
1 set of pole attachments (for small table for bad weather days)
1 battery for non powered sites ie VT campgrounds
1 hand pump faucet (looking for a removable one)
1 two burner Coleman white gas stove
1 tongue box for stove and white gas (the hot box)

Plan of attack ( subject to change........by the hour :D )

1. Strip trailer of all unneeded parts gate, mesh floor, brackets for gate, light mounting points, and anything that can go will go DONE
2. weld stabilizer jacks up DONE
3. repaint frame thinking white DONE
4. build wood frame out of 2x3's DONE
5. pre assemble as much as possible off trailer
6. bolt bottom and frame together
7. install wiring and pigtail all wiring for upper section
8. bolt upper section on to lower section
9. install fantastic vent
10. run pigtales from step 7. to final location
11. skin lower interior walls
12. build shelving system for storage etc
13. skin upper section
14. install lights speakers etc

15. Take first trip to do a test run

16. implement fixes discover on first trip
17. finished at this point ( I hope )
Ideas suggestions comments are all welcome


Ideas and some ramblings that I have in my head

1. the walls on the outside will be 1/4 inch exterior plywood with tyvek then white aluminum skin hoping to not have a leak and keep it that way for 10 + years

2. uses Coroplast for the upper walls and ceiling as it's Light weight, easy to work with, cheep, prefinished, and will trap some additional air to help the foam insulation too

3. make the battery easy to remove as the finished camper will be stored off site and not have electric access to keep the battery at a constant charge ( this is going to be the driving force in going with the LED lights and the high end fantast fan as i want the lowest current draw and the smallest battery I can get

4. I have three tables in mind that I want to make

4-1. A kitchen sink table to attach to the outside
with a cutout for said sink to drop into for campsites that do not have a central washing location for dishes ( VT again )

4-2. Table for outside for two to eat at

4-3. Table for inside for night time and bad weather days


I will update this thread as I go with pics and such.]


Cost

Trailer 600.00
Tags 18.00
Jacks 80.00
Angle Grinder 60.00
Cutoff wheels 20.00
Sanding wheels 50.00
Paint 50.00 (so far)
Welding 50.00
Wood 35.00
Glue 35.00
Weatherstripping 20.00
Tape 35.00


Total cost to Date ?????
Last edited by kc2hje on Tue Oct 12, 2010 6:25 pm, edited 3 times in total.
kc2hje
Teardrop Builder
 
Posts: 32
Joined: Wed Mar 24, 2010 3:29 pm

Postby jamwius » Thu Apr 22, 2010 6:30 am

Will be interested to see your build. Keeping it at around 800 lbs is always good. It still gives you a couple hundred pounds extra to load up. If it is under 1000 lbs most cars can pull it. It gives you the option to pull it with a economical vehicle that gets good gas mileage. Saves money plus you still get to travel anywhere you want.

John
User avatar
jamwius
Teardrop Builder
 
Posts: 35
Images: 18
Joined: Mon Mar 22, 2010 5:56 am
Location: New Berlin, WI

Postby kc2hje » Tue May 04, 2010 8:44 pm

just a short rant / update in the progress

Trailer is still at the shop waiting to have the jacks welded up :cry:

:worship: hoping to have it this weekend

just about set to order the lumber :) not looking forward to that bill :shock:
stay tuned for more updates and pics soon
kc2hje
Teardrop Builder
 
Posts: 32
Joined: Wed Mar 24, 2010 3:29 pm
Top

Postby kc2hje » Fri May 14, 2010 10:35 am

Getting the trailer Today :awesome: :P :designing:

Saturday will be power washing (house not trailer)

Sunday starts the build

Picking up angle grinder today and paint

pics soon


New parts

Got a sink
kc2hje
Teardrop Builder
 
Posts: 32
Joined: Wed Mar 24, 2010 3:29 pm
Top

Postby steve smoot » Fri May 14, 2010 11:53 am

Ain't T&TTT for fun than you can shake a stick at? 8)
I am not a complete idiot, some parts are missing...
User avatar
steve smoot
Lifetime member
 
Posts: 1355
Images: 62
Joined: Thu Sep 17, 2009 5:42 pm
Location: Boone NC
Top

Postby kc2hje » Thu May 20, 2010 10:20 am

So managed to get an hour on the trailer last night

got the gate off app weight 30 Lbs

Next challenge is getting this mesh floor up to make room for the plywood

Before
Image

After
Image
kc2hje
Teardrop Builder
 
Posts: 32
Joined: Wed Mar 24, 2010 3:29 pm
Top

Postby starleen2 » Thu May 20, 2010 2:48 pm

Save that Back grate! it'll make a fine work table :thinking:
User avatar
starleen2
5th Teardrop Club
 
Posts: 16272
Images: 224
Joined: Sat May 12, 2007 8:26 pm
Location: Pea Ridge ,AR
Top

Postby kc2hje » Thu May 20, 2010 3:14 pm

Yea I didn't toss it yet as I kinda feel bad chucking it yet

Picked up a new angle grinder as the HF one my dad lent me broke in 5 min of use
kc2hje
Teardrop Builder
 
Posts: 32
Joined: Wed Mar 24, 2010 3:29 pm
Top

Postby kc2hje » Fri May 21, 2010 9:00 am

1/2 of the mesh floor up
Image

Really glad I bought the angle grinder as it make the work go
MUCH faster
kc2hje
Teardrop Builder
 
Posts: 32
Joined: Wed Mar 24, 2010 3:29 pm
Top

Postby kc2hje » Thu May 27, 2010 8:24 am

Wood order is being delivered today very happy about that.

the trailer only has one small section of mesh flooring left,
Planning on pulling that and priming today.
kc2hje
Teardrop Builder
 
Posts: 32
Joined: Wed Mar 24, 2010 3:29 pm
Top

Postby mj1angier » Thu May 27, 2010 9:28 am

Man I wish I was close to you, I would buy the old mesh and gate from you. If you don't plan to use it, put it on Craig's list. Sombody will be glad to buy it
Small town NC redneck
User avatar
mj1angier
Teardrop Builder
 
Posts: 37
Images: 12
Joined: Mon May 17, 2010 5:05 pm
Top

Postby starleen2 » Thu May 27, 2010 9:52 am

OOOOOO - :question: 
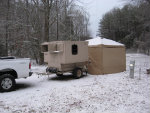
I see the stabilzer jacks installed
User avatar
starleen2
5th Teardrop Club
 
Posts: 16272
Images: 224
Joined: Sat May 12, 2007 8:26 pm
Location: Pea Ridge ,AR
Top

Postby kc2hje » Tue Jun 01, 2010 10:16 am

No pictures for this update yet

But had a very productive weekend

Friday was the final grinding of the welds, splatter etc and started priming.

Monday the rest of the frame was primed and painted, along with the first sighting of sawdust cut the 3/4 inch ply for the floor and undercoated with tar Thanks to the wife for lending a hand :)

Next up is cutting the 2x3 and 2x6's for the walls and the flange for the cap to mount to.
kc2hje
Teardrop Builder
 
Posts: 32
Joined: Wed Mar 24, 2010 3:29 pm
Top

Postby kc2hje » Mon Jul 12, 2010 10:38 am

Just a quick update

Moved to project from the in laws to our house so much more progress to be made soon
kc2hje
Teardrop Builder
 
Posts: 32
Joined: Wed Mar 24, 2010 3:29 pm
Top

Postby kc2hje » Mon Aug 30, 2010 9:15 am

Time for an update .... Finally

Spent about 8 hours working this weekend

All went well until i discovered the walls on the cap are tapered about 2 inches from front to back.

Back to Lowes for more wood, then finished the framing for the walls

Cut the 1/4 inch ply for the exterior skin

Next weekend is attaching the skin and tyvek wrapping

once thats done I will have someone bend the aluminum skin to cover the tyvek and the biggest part of the build is done


I found sawdust
http://img837.imageshack.us/img837/3719/img0524copy.jpg

The work shop in action
http://img840.imageshack.us/img840/2931/img0525copy.jpg

Walls clamped
http://img809.imageshack.us/img809/6910/img0526copy.jpg
http://img205.imageshack.us/img205/2513/img0527copy.jpg

Side doors removed
http://img713.imageshack.us/img713/6973/img0529copy.jpg

Still need to pressure wash the top
http://img843.imageshack.us/img843/1783/img0530copy.jpg

cleaned and packed up wating for the weekend
http://img191.imageshack.us/img191/4586/img0531xk.jpg
Post edited due to image size
kc2hje
Teardrop Builder
 
Posts: 32
Joined: Wed Mar 24, 2010 3:29 pm
Top

Next

Return to Build Journals

Who is online

Users browsing this forum: No registered users and 27 guests