Bending rigid insulation

Anything to do with mechanical, construction etc

Postby CheshyreKatt » Sat Oct 22, 2005 6:39 pm

I wouldn't recommend heating and bending....not good on the foam (some foams, I've seen it "melt" away under the heat.

Many folk have used saw cuts...but that is going to depend on the severity of the bend. Most curves you can get away with cuts ~1-1.5 inches apart about 3/4 of the way through (please check with others, they may have better statistics). I've seen a few posts and some of the other members builds where they've done this.

Another alternative is to put in layers of flex foam rather than rigid foam. Not sure of the performance value though. Or spray in foam...becomes rigid when it cures.
-CK

Truth is not what you seek....it is what you find. What you find...is not what you were looking for.
User avatar
CheshyreKatt
Teardrop Advisor
 
Posts: 64
Images: 11
Joined: Sat Aug 14, 2004 1:56 pm
Location: Everett, WA

Postby goldcoop » Sat Oct 22, 2005 6:57 pm

Powder-

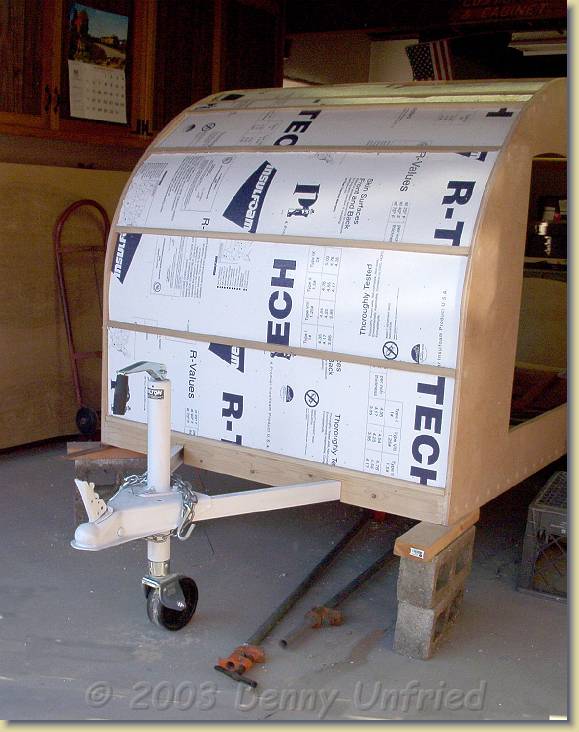
I used the ridgid 1.5 on straight shots, on the curves of my roof I used 2 layers of R TECH by InsulFoam.

At just under 3/4" thick per layer it fills out the 1.5 perfectly.

It is white popcorn styrofaom sheet insulation, has a clear film on one side, a blue film on the other and is sold in sheets AND is extremely FLEXIBLE.

I bent it around my 22" Radius on the front with NO prob.

Oh yea, bought it at Lowes...

Hope this helps!

Cheers,

Coop
User avatar
goldcoop
Silver Donating Member
 
Posts: 1276
Images: 32
Joined: Mon Jul 04, 2005 8:02 pm
Location: Lewisburg, PA

Postby goldcoop » Sat Oct 22, 2005 7:06 pm

Powder-

Just found this thread that may help:

http://tnttt.com/viewto ... highlight=

Cheers,

Coop
User avatar
goldcoop
Silver Donating Member
 
Posts: 1276
Images: 32
Joined: Mon Jul 04, 2005 8:02 pm
Location: Lewisburg, PA
Top

Postby Arne » Sat Oct 22, 2005 7:07 pm

If you have to use rigid, make slots across it.. it wil crack, but the slots should be placed so they will close up when you bend it...
www.freewebs.com/aero-1
---
.
I hope I never get too old to play (Arne, Sept 11, 2010)
.
User avatar
Arne
Mr. Subject Line
 
Posts: 5383
Images: 96
Joined: Fri Aug 13, 2004 12:25 pm
Location: Middletown, CT
Top

Postby asianflava » Sat Oct 22, 2005 7:43 pm

I did the same as Coop. The rigid foam on the sides, the stiff yellowish stuff, and the Rtech on the top, a soft white styrofoam (like packing foam). I also used the stiff stuff for my shelving and bulkheads.

Heres a tip, when cutting the foam for the top bays, cut them slightly large. Then they will have to bow in the bay rather than lay flat.
User avatar
asianflava
8000 Club
8000 Club
 
Posts: 8412
Images: 45
Joined: Mon Aug 02, 2004 5:11 am
Location: CO, Longmont
Top

Postby toypusher » Sat Oct 22, 2005 7:50 pm

I used rigid insulation from Home Depot. It is white with thin plastic film on one side and foil on the other. Just used 3/4" first and then 1/2" over that. My roof spars are approx 12" apart and I had no problems with either thickness bending around the radius. Just my experience!
User avatar
toypusher
Site Admin
 
Posts: 43040
Images: 324
Joined: Fri Jan 28, 2005 12:21 pm
Location: York, PA Area
Top

Postby TomS » Sat Oct 22, 2005 7:58 pm

My roof is 1 1/4" think. I used 2 layers of insulation 1 layer 3/4 " thick and the second 1/2" thick. I kerfed my insulation with a table saw to get it to bend around the curve. After I did this and posted the photos, someone suggested that I should've place the kerfed side on the inside of the curve to eliminate the gaps caused by the kerfing.

Image
Tom Swenson
[email protected]
User avatar
TomS
1000 Club
1000 Club
 
Posts: 1367
Joined: Thu Nov 18, 2004 2:06 pm
Location: Fitchburg, MA
Top

Postby madjack » Sat Oct 22, 2005 8:01 pm

Tom, just think of those gaps as "dead air space"...the almost perfect insulation(under vacum)
madjack 8)
...I have come to believe that, conflict resolution, through violence, is never acceptable.....................mj
User avatar
madjack
Site Admin
 
Posts: 15128
Images: 177
Joined: Thu Dec 02, 2004 5:27 pm
Location: Central Louisiana
Top

Postby TomS » Sat Oct 22, 2005 8:02 pm

madjack wrote:Tom, just think of those gaps as "dead air space"...the almost perfect insulation(under vacum)
madjack 8)


Oh, Kinda like the space between my ears? :lol:
Tom Swenson
[email protected]
User avatar
TomS
1000 Club
1000 Club
 
Posts: 1367
Joined: Thu Nov 18, 2004 2:06 pm
Location: Fitchburg, MA
Top

Postby madjack » Sat Oct 22, 2005 8:16 pm

TomS wrote:
madjack wrote:Tom, just think of those gaps as "dead air space"...the almost perfect insulation(under vacum)
madjack 8)


Oh, Kinda like the space between my ears? :lol:


...hey I didn't say that ...you did...but............ :lol: ;)
madjack 8)
...I have come to believe that, conflict resolution, through violence, is never acceptable.....................mj
User avatar
madjack
Site Admin
 
Posts: 15128
Images: 177
Joined: Thu Dec 02, 2004 5:27 pm
Location: Central Louisiana
Top

Postby TomS » Sat Oct 22, 2005 8:21 pm

Hey, I've got to be able to laugh at myself from time to time. Otherwise, I'd be a pompos miserable S.O.B.
Tom Swenson
[email protected]
User avatar
TomS
1000 Club
1000 Club
 
Posts: 1367
Joined: Thu Nov 18, 2004 2:06 pm
Location: Fitchburg, MA
Top

Postby madjack » Sat Oct 22, 2005 8:32 pm

...hey, if we can't laugh at ourselves then we've no right to laugh at others(or something like that)
madjack 8)
...I have come to believe that, conflict resolution, through violence, is never acceptable.....................mj
User avatar
madjack
Site Admin
 
Posts: 15128
Images: 177
Joined: Thu Dec 02, 2004 5:27 pm
Location: Central Louisiana
Top

Postby Steve Frederick » Sat Oct 22, 2005 8:44 pm

I kerfed two layers of 3/4" pink board. Glued to the headliner, and each other. Works great!
Image
Image
The spacing shown is about 1", this will go around the tightest curve nicely. :thumbsup:
Blessings, Steve
Adirondacks, Upstate New York
Building Journals
The Shop Manual's 8-years old!! Thank's everyone!
New! 'Rondack Lodge Plans!Order Here!
Image
User avatar
Steve Frederick
Custom Teardrop Builder
 
Posts: 1984
Images: 29
Joined: Thu Apr 15, 2004 5:02 pm
Location: Upstate New York, Adirondacks (Great Sacandaga Lake)
Top

Postby Steve Frederick » Sun Oct 23, 2005 3:37 pm

powderburn wrote:Thats great guys
How many kerfs and how deep would I need to do 2" high density foam for a 16" radius?

Dunno!!
But, I came up with my system by taking a sample piece of stock and whittling on it with the circ/saw. When I got the results I needed, I worked on the actual stock for the roof.
BTW, The kerf is through all but about 1/4" of stock.
If your foam has a foil skin on it, go deeper with a wider cut. I'll bet the foil will hold the sheet together 'till you get it glued in place!
Blessings, Steve
Adirondacks, Upstate New York
Building Journals
The Shop Manual's 8-years old!! Thank's everyone!
New! 'Rondack Lodge Plans!Order Here!
Image
User avatar
Steve Frederick
Custom Teardrop Builder
 
Posts: 1984
Images: 29
Joined: Thu Apr 15, 2004 5:02 pm
Location: Upstate New York, Adirondacks (Great Sacandaga Lake)
Top

Postby Denny Unfried » Sun Oct 23, 2005 5:34 pm

I had an inch and a half thickness to fill so used three layers of ½" thick sheets of polystyrene from Lowe's. The stuff bends like rubber and easily conforms to the countour. In the sun at 100°+ heat the headliner doesn't seem to have any heat build-up to the touch.

Denny

Image
aka - "Uncle Denny"
<img src="http://www.uncledennyscorner.com/teardrop/photos/Linux.gif">
User avatar
Denny Unfried
sprint car builder/racer & all that jazz
 
Posts: 411
Joined: Mon Jun 21, 2004 8:54 am
Location: So Bay, CA
Top

Next

Return to Teardrop Construction Tips & Techniques

Who is online

Users browsing this forum: No registered users and 22 guests