Bob's caboose build

Lets talk tiny houses, tumbleweeds etc on wheels

Re: Bob's caboose build

Postby bobhenry » Wed Jun 13, 2012 8:31 am

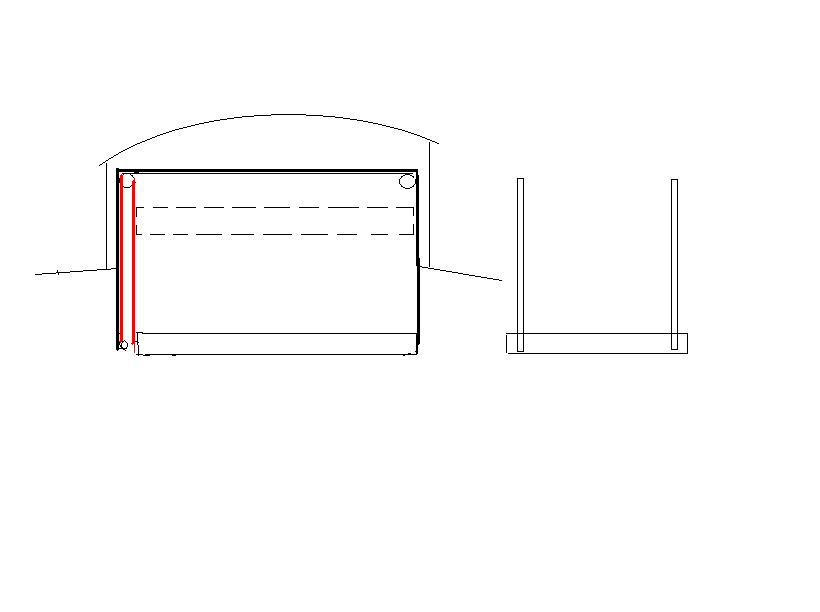
After being drywall lined the cupalo will be aprox 62" long by 81" side to side a queen mattress is 60" x 80" the bed with platform will be winched up into the cupalo for day time storage and let down into position at night.

Image
Growing older but not up !
User avatar
bobhenry
Ten Grand Club
Ten Grand Club
 
Posts: 10355
Images: 2614
Joined: Fri Feb 09, 2007 7:49 am
Location: INDIANA, LINDEN

Re: Bob's caboose build

Postby bobhenry » Fri Jun 15, 2012 6:15 am

Well I have managed to do a tiny bit during the week. here are a few pics......

Image

jigged up for the truss bents. Makes it faster easier and maybe they will even all come out alike
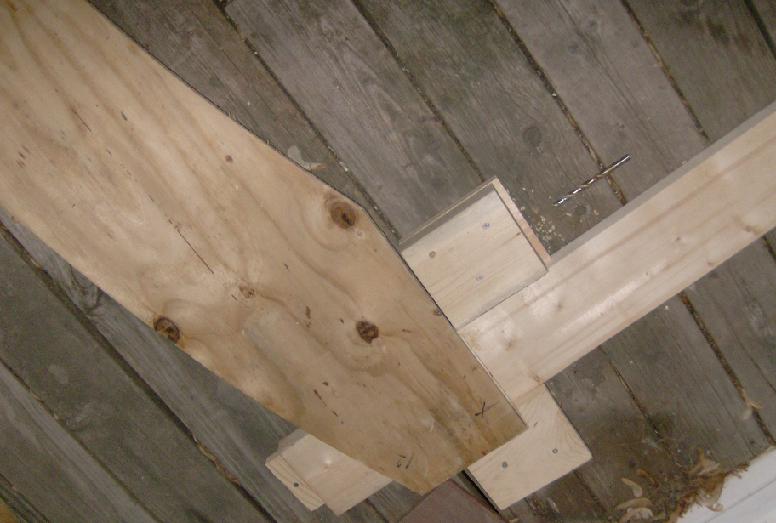
 :lol:

Image

Just a closeup

Image

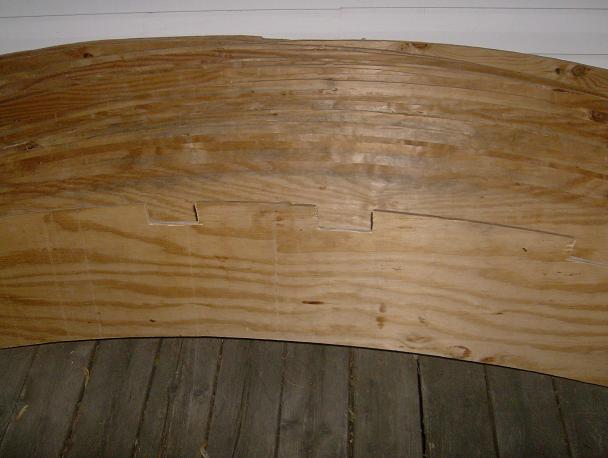
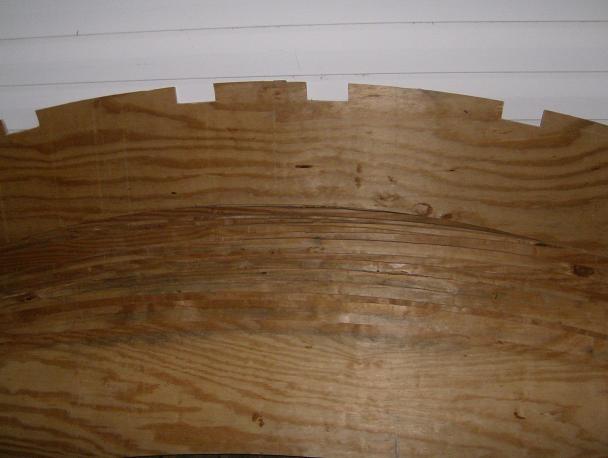
Made a pattern for the cut outs for the perlins that will support the roofing deck

Image

Here you go they show up much better on the white siding.

Trailer is going to a buddies for a weld job. We are extending the rear 30"-36" for the rear observation deck by welding on 2 1/2 x 2 1/2 square tube extentions. I will leave it with him and continue to build all the bents (trusses with legs) for the roof back at home.
Last edited by bobhenry on Fri Jun 15, 2012 12:26 pm, edited 1 time in total.
Growing older but not up !
User avatar
bobhenry
Ten Grand Club
Ten Grand Club
 
Posts: 10355
Images: 2614
Joined: Fri Feb 09, 2007 7:49 am
Location: INDIANA, LINDEN

Re: Bob's caboose build

Postby bobhenry » Fri Jun 15, 2012 6:44 am

Here is a posting from another thread about the potty plans for the caboose.....

I am equiping the caboose build with a composting saw dust toilet. It will be a wooden cabinet similar to a cedar chest profile. The Top will open like a blanket chest and then there will be a standard toilet seat with lid. The seat will be mounted to a 5 gallon plastic bucket lid and the matching bucket recessed into the cabinet. The lid will have the center removed and the snap locks cut away to make removal easy. A second lid will be available to snap on with a couple locks still functional for long term periods of unuse or while in transport. To the immediate right and left of the throne will be small bathroom sized waste baskets resessed into the cabinet with small hinged lids for the cover material complete with a small scoop.

Here are the working parts without the cabinet......

Image
Growing older but not up !
User avatar
bobhenry
Ten Grand Club
Ten Grand Club
 
Posts: 10355
Images: 2614
Joined: Fri Feb 09, 2007 7:49 am
Location: INDIANA, LINDEN
Top

Re: Bob's caboose build

Postby WhitneyK » Fri Jun 15, 2012 7:05 am

bobhenry wrote: To the immediate right and left of the throne will be small bathroom sized waste baskets resessed into the cabinet with small hinged lids for the cover material complete with a small scoop.

Here are the working parts without the cabinet......

Image


So,..... it sounds like you're going to be litter box trained :rofl:

Looks like you have all the "trusses" cut out and ready for notching.
Whitney & Tracie
Crothersville, IN

We never really grow up, we only learn how to act in public.

Do not confuse what you hear with what I mean.

My build: http://www.tnttt.com/viewtopic.php?t=41955

160061-------------------------------101114
States we've drug our
li'l camper through. (44 States + Vancouver Island and over 45,000 miles so far)
User avatar
WhitneyK
Gold Donating Member
 
Posts: 559
Images: 412
Joined: Sun Dec 12, 2010 10:28 pm
Location: IN, Crothersville (36mi N or Louisville)
Top

Re: Bob's caboose build

Postby bobhenry » Fri Jun 15, 2012 7:50 am

Whitney:

I heard tell of a fella that disposed of his solids by launching them from a potato launcher.

Image

Just how far DOES your house set off of I 65 ?????
Growing older but not up !
User avatar
bobhenry
Ten Grand Club
Ten Grand Club
 
Posts: 10355
Images: 2614
Joined: Fri Feb 09, 2007 7:49 am
Location: INDIANA, LINDEN
Top

Re: Bob's caboose build

Postby WhitneyK » Fri Jun 15, 2012 12:56 pm

bobhenry wrote:Whitney:

I heard tell of a fella that disposed of his solids by launching them from a potato launcher.

Just how far DOES your house set off of I 65 ?????


Bob, stop by anytime my friend to SHOOT THE ... uh, ..... er, ..... um, Heeeyyyy, wait a minute, ....... uh, never mind. :NC :shock: :frightened: :lol:
Whitney & Tracie
Crothersville, IN

We never really grow up, we only learn how to act in public.

Do not confuse what you hear with what I mean.

My build: http://www.tnttt.com/viewtopic.php?t=41955

160061-------------------------------101114
States we've drug our
li'l camper through. (44 States + Vancouver Island and over 45,000 miles so far)
User avatar
WhitneyK
Gold Donating Member
 
Posts: 559
Images: 412
Joined: Sun Dec 12, 2010 10:28 pm
Location: IN, Crothersville (36mi N or Louisville)
Top

Re: Bob's caboose build

Postby mezmo » Sat Jun 16, 2012 12:51 am

Hi Bob,

Just curious about a couple things:

Are your roof trusses going to be flat bottomed or curved?
On pg7 they appear flat in the mock-up, then on pg 8 it looks
like you have curved truss bottoms - or is it to be a mixture
depending on location?

Also, are you going to have windows in the cupola area? If so,
on all sides? The flat bottomed trusses in the mock-up don't
look like they allow enough room on the fore and aft walls for windows.

Good to see that the project is now launched.

Cheers,
Norm/mezmo
If you have a house - you have a hobby.
User avatar
mezmo
1000 Club
1000 Club
 
Posts: 1817
Images: 194
Joined: Fri Jan 01, 2010 4:11 am
Location: Columbia, SC
Top

Re: Bob's caboose build

Postby bobhenry » Mon Jun 18, 2012 6:02 am

The Monday update pics may help clear up these questions. However you are correct there is a combinaton of flat bottom and barrelled trusses. The outer truss on each end mounted directly on the walls will be a flat bottomed 2 ply truss. The cupalo trusses will also be flat bottomed. The remainder of the interior trusses will be barrelled. The outer ( flat ) edge is at 7'6" and the top of the barrel is 8'1" (if memory serves me correct). I started cutting the pockets Sunday for the purlins that will run lengthwise to tie the trusses together and offer a surface to attach the roof decking.
Growing older but not up !
User avatar
bobhenry
Ten Grand Club
Ten Grand Club
 
Posts: 10355
Images: 2614
Joined: Fri Feb 09, 2007 7:49 am
Location: INDIANA, LINDEN
Top

Re: Bob's caboose build

Postby bobhenry » Mon Jun 18, 2012 6:14 am

My frame is gone ! :x

Image
Growing older but not up !
User avatar
bobhenry
Ten Grand Club
Ten Grand Club
 
Posts: 10355
Images: 2614
Joined: Fri Feb 09, 2007 7:49 am
Location: INDIANA, LINDEN
Top

Re: Bob's caboose build

Postby bobhenry » Mon Jun 18, 2012 6:17 am

OK OK Ya caught me........

Took it over to a buddies to get the frame extended for the observation platform on the rear. :laughter:


I'll have some pics when I get it back Tues - Wed.
Last edited by bobhenry on Mon Jun 18, 2012 6:26 am, edited 1 time in total.
Growing older but not up !
User avatar
bobhenry
Ten Grand Club
Ten Grand Club
 
Posts: 10355
Images: 2614
Joined: Fri Feb 09, 2007 7:49 am
Location: INDIANA, LINDEN
Top

Re: Bob's caboose build

Postby bobhenry » Mon Jun 18, 2012 6:25 am

Although the frame wasn't home the work went on between rain events over the weekend.


Image

I coated all the 3/4" osb for the sub floor with waterproofing and they are ready to be cut and installed. Yes I will recoat any cut edges to eliminate moisture intrusion.

~~~~~~~~~~~~~~~~~~~~~~~~~~~~~~~~~~~~~~~~~~~~~~~~~~~~~~~~~~~~~~~~~~~~~~~~~~~~

Trusses were ganged up making certain the index marks were all on the left side ( just in case they weren't cut exactly semetrical) and jogged even and them marked with the pattern truss.

Image

They were marked using a framing square

Image

and cut to 1 1/2" deep to recieve the 2x4 purlins.

Image

I used the combination of my biscuit cutter and a jig saw to make the bottom cut.

They are ready to be sandwiched up and then glued and screwed with 1 1/2 spacers ( 2 x 2's)
to strengthen them and offer a attachment point for the purlins and the ceiling.
Growing older but not up !
User avatar
bobhenry
Ten Grand Club
Ten Grand Club
 
Posts: 10355
Images: 2614
Joined: Fri Feb 09, 2007 7:49 am
Location: INDIANA, LINDEN
Top

Re: Bob's caboose build

Postby bobhenry » Mon Jun 18, 2012 6:55 am

mezmo wrote:Hi Bob,

Also, are you going to have windows in the cupola area? If so,
on all sides? The flat bottomed trusses in the mock-up don't
look like they allow enough room on the fore and aft walls for windows.

Good to see that the project is now launched.

Cheers,
Norm/mezmo


Thanks Norm.

The windows are all approx 2' square (plus or minus)

They were my $3.00 each thermopane all vinyl window sashes that I found on Craig's list.

I am still toying with how (and where) to mount them. I am making more work for myself by completely studding and sheathing the box and then appointing the inside with the important creature features. Then and only then will I cut and retro frame for the windows.

I am toying with a center pivot idea oriented either horizontal or vertical or perhaps top hinged as an awning type window. The bottom of the glazing should be at about 4' off of the floor allowing a good 12" above the window before arriving at the upper plate line. Yes there will be an upper plate to tie the truss legs together. Just under the plywood truss a 1x6 trim board will be fancied up for a cornice trim board It will extend clear to the end of the observation platforms.

And yes the cupalo will have windows. small 6 x 12 or maybe 8 x 16 depending on how they look when I mock them up. They will probably be hand framed using the left over lexan from Chubby's roof. The lexan should make them a bit more shatter resistant for small limbs and road missles they might incure.
Growing older but not up !
User avatar
bobhenry
Ten Grand Club
Ten Grand Club
 
Posts: 10355
Images: 2614
Joined: Fri Feb 09, 2007 7:49 am
Location: INDIANA, LINDEN
Top

Re: Bob's caboose build

Postby bobhenry » Thu Jun 21, 2012 6:24 am

Not my normal Monday morning update but I couldn't wait !

LOOK WHAT I FOUND :twisted:

less than a block from my front door.

Image

Image

Image

The note pretty much says it all :lol: :lol:
Growing older but not up !
User avatar
bobhenry
Ten Grand Club
Ten Grand Club
 
Posts: 10355
Images: 2614
Joined: Fri Feb 09, 2007 7:49 am
Location: INDIANA, LINDEN
Top

Re: Bob's caboose build

Postby bobhenry » Mon Jun 25, 2012 6:14 am

Monday morning update ! :D

Well the rubber roof is safely loaded into my pickup after a call early Sat morning.

Finally got the frame back from my welder buddy early Sat A.M. ( just before the roofing call)

I reinstalled the rear floor joist and rim plate section that I had removed so we could weld in the observation platform.

Image

here is the extention

Image

I decided to rewaterproof with this stuff

Image

rear lumber now looks like this

Image

here is a shot of the front ....it was removed , waterproofed with the black goo also and reinstalled then the 1 1/2 of foam insulation was inserted.

Image

Here is a shot of the 4 trusses I was able to get reinstalled as they were removed to transport the trailer to get it welded. I thank my buddy Jimmy for his hour of help to manhandle them into place. (Yes #2 has the plywood truss mounted too high on the legs it will be fixed)

Image

forgot to mention my welder also installed my safety chains

Image

Sunday I finished installing all of the 3/4 osb flooring and removed the temporary bracing on the truss bents and installed drywall blocking to reinforce and straighten the truss legs. All four of the front ones installed are now true and correct. Only 7 more to go :roll:

It was a busy two days but I have a long way to go before the snow flys.
Growing older but not up !
User avatar
bobhenry
Ten Grand Club
Ten Grand Club
 
Posts: 10355
Images: 2614
Joined: Fri Feb 09, 2007 7:49 am
Location: INDIANA, LINDEN
Top

Re: Bob's caboose build

Postby bobhenry » Tue Jun 26, 2012 6:17 am

How about a most unusual Tuesday update.......

Image

One of you made fun of my "storage shed" camper Look who is laughing now :D
~~~~~~~~~~~~~~~~~~~~~~~~~~~~~~~~~~~~~~~~~~~~~~~~~~~~~~~~~~~~~~~~~~~~~
Image

The floor is down and was black gooping it until I ran out !
~~~~~~~~~~~~~~~~~~~~~~~~~~~~~~~~~~~~~~~~~~~~~~~~~~~~~~~~~~~~~~~~~~~~~~~~~~~~~~
Image

Cut and rough shaped the rear observation platform
~~~~~~~~~~~~~~~~~~~~~~~~~~~~~~~~~~~~~~~~~~~~~~~~~~~~~~~~~~~~~~~~~~~~~~~~~~~~~~
Image

even borrowed the barns steps to get an idea and they worked perfectly.
Growing older but not up !
User avatar
bobhenry
Ten Grand Club
Ten Grand Club
 
Posts: 10355
Images: 2614
Joined: Fri Feb 09, 2007 7:49 am
Location: INDIANA, LINDEN
Top

PreviousNext

Return to Tiny Houses on wheels

Who is online

Users browsing this forum: No registered users and 10 guests