Teardrops n Tiny Travel Trailersor t n ttt for short (tnttt.com) |
Citylights' Tear - SOLD! - update 08-01-16
Re: Citylights' Tear
![]() by S. Heisley » Sat Oct 19, 2013 8:39 pm
by S. Heisley » Sat Oct 19, 2013 8:39 pm
...Looking really, really good!!!
...Sharon....
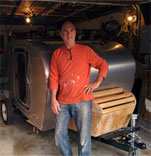
I think I can...I THINK I can...I THINK; I CAN! (I think I did it!)
http://www.doityourselfrv.com/handcraft ... g-trailer/
viewtopic.php?f=50&t=27313&start=555
http://www.squidoo.com/painting-a-campi ... ramebuster

I think I can...I THINK I can...I THINK; I CAN! (I think I did it!)
http://www.doityourselfrv.com/handcraft ... g-trailer/
viewtopic.php?f=50&t=27313&start=555
http://www.squidoo.com/painting-a-campi ... ramebuster
-

S. Heisley - Super Lifetime Member
- Posts: 8774
- Images: 495
- Joined: Mon Sep 17, 2007 10:02 am
- Location: No. California
Re: Citylights' Tear
![]() by citylights » Mon Oct 28, 2013 10:48 pm
by citylights » Mon Oct 28, 2013 10:48 pm
When I thought about an aluminum skin for the teardrop, I thought about big flat sheets of aluminum and a couple pieces of trim.
Hmmm, now I know that is backwards. A couple of big flat sheets and HUNDREDS of pieces of trim!


This is a 6 inch piece of trim that didn't make it. Saw tooth caught it wrong and turned it into a projectile. This is what it looked like after bouncing off the wall behind my head. No wonder why I wear safety glasses when cutting this stuff.

Hmmm, now I know that is backwards. A couple of big flat sheets and HUNDREDS of pieces of trim!
This is a 6 inch piece of trim that didn't make it. Saw tooth caught it wrong and turned it into a projectile. This is what it looked like after bouncing off the wall behind my head. No wonder why I wear safety glasses when cutting this stuff.
-

citylights - 500 Club
- Posts: 591
- Images: 1
- Joined: Sun May 12, 2013 12:27 pm
- Location: Las Vegas, Nevada
 That could've been a big owwwie! Stay safe!