"Silver Nugget" Teardrop Trailer

...ask your questions in the appropriate forums BUT document your build here...preferably in a single thread...dates for updates, are appreciated....

Postby down under tech » Wed Apr 27, 2011 4:48 pm

atahoekid: Thank you Sir. We are glad the wedding is in our past now. Everything went great and we had about 65 people there. The winter was a really bad one this year. I heard on the news that we had 165 percent of our normal snow fall in the Sierras. The drought is OVER. Yea. lol

Cliff: The wedding was a success. All went well except for when I was placing Terry's ring on her finger. I was having a hard time and everyone was getting a chuckle out of it. She reached up with her other hand and finished putting it on.

Doug: Thanks, It is always nice to hear from you the expert. Lurking??? You should be ashamed of yourself... Just kidding, lol I hope to get it "campable" by the end of June so we can take it on our honeymoon.

Dave: Today, I need to get insulation for the roof sections. It is beautiful out there. I intend to use this time wisely...
Last edited by down under tech on Tue May 03, 2011 9:59 pm, edited 1 time in total.
Johnny D.

"If you think you can, you can. If you think you can't, your right !" ... Henry Ford

"The Silver Nugget" Build
viewtopic.php?t=35314&postdays=0&postorder=asc&start=0
User avatar
down under tech
Silver Donating Member
 
Posts: 565
Images: 571
Joined: Sat Feb 06, 2010 10:01 pm
Location: Reno, Nevada

Update, 04-27-2011

Postby down under tech » Wed Apr 27, 2011 10:12 pm

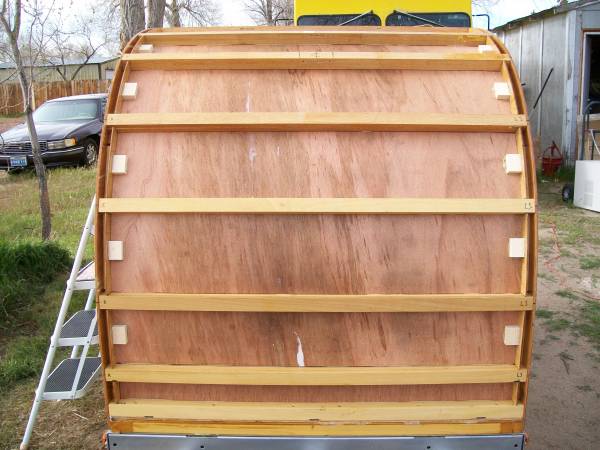
I got the insulation for the roof today. I found out that I forgot to add the blocking to the edges by the roof to support the ceiling at the sides between the spars by the walls. The Kuffel Creek plans said to do this. I glued them in place with PL premium. I guess the insulation can wait until tomorrow.

Image

I had a visit from my building inspector when I got done and she did not have much to say and she seemed a little indifferent to my progress. She was a little aloof.:roll:

Image
Johnny D.

"If you think you can, you can. If you think you can't, your right !" ... Henry Ford

"The Silver Nugget" Build
viewtopic.php?t=35314&postdays=0&postorder=asc&start=0
User avatar
down under tech
Silver Donating Member
 
Posts: 565
Images: 571
Joined: Sat Feb 06, 2010 10:01 pm
Location: Reno, Nevada

Postby atahoekid » Thu Apr 28, 2011 2:03 am

You're getting real close and from the looks of things, It will be something to be very proud of when you're done. Sneak in the work while the weathers' good. Hope for both of our sakes that the good weather comes in after this weekend and stays around for a while. You should be done shortly and hopefully camping soon. If it warms up and the snow melts off quick, I might have the frame dug out by Memorial Day and I can begin the build... (I can dream can't I???) LOL
Mel

"Believe in your abilities... Remember amateurs built the ark, professionals built the Titanic"

"Indecision may or may not be my problem" Jimmy Buffet

Image

The Road Foamie Build Thread: viewtopic.php?t=45698
User avatar
atahoekid
Platinum Donating Member
 
Posts: 1773
Images: 158
Joined: Sat Jul 24, 2010 2:49 am
Location: Incline Village, NV
Top

Update, 05-01-2011

Postby down under tech » Sun May 01, 2011 11:09 pm

Yesterday, Terry and I drove up to Mt. Shasta to go to the Dam Gathering. We just went to check out the TDs and to get ideas to maybe incorporate in my builds. We had a really great time looking at all the TDs. The people were nice and ready to answer any questions we had.

I spent today working on the TD. I installed the first of two layers of 3/4" insulation in the roof. I cut it out on my table saw and I made curf cuts about half way through the insulation so it would easily bend to form to the contour of the Cubby profile. I need to put in the wiring through the spars before I put the second layer of insulation in. That is what I plan on doing on Tuesday after work if the weather cooperates.

Image

Image

Image

:thumbsup: :thumbsup: :thumbsup:
Johnny D.

"If you think you can, you can. If you think you can't, your right !" ... Henry Ford

"The Silver Nugget" Build
viewtopic.php?t=35314&postdays=0&postorder=asc&start=0
User avatar
down under tech
Silver Donating Member
 
Posts: 565
Images: 571
Joined: Sat Feb 06, 2010 10:01 pm
Location: Reno, Nevada
Top

Postby CliffinGA » Sun May 01, 2011 11:19 pm

Looking good Johnny just get Terry out there to help you, I had Sheri out to lend a hand while working on mine today. Gives them pride knowing they helped to build it too.

Cliff
In God we trust, shoot the rest and he will sort out!

My Build:

viewtopic.php?f=50&t=42628
User avatar
CliffinGA
1000 Club
1000 Club
 
Posts: 1499
Images: 207
Joined: Sat Nov 14, 2009 1:29 pm
Location: Jefferson, GA
Top

Postby LDK » Mon May 02, 2011 8:39 am

Nice work. I don't know how I missed this thread. I see where you flipped the axle on your HF trailer, how is that working out for you?
Image

I may flip my axle later on in my build.
LDK
Gold Donating Member
 
Posts: 1419
Images: 1
Joined: Fri Jan 22, 2010 8:29 pm
Top

Postby DMcCam » Mon May 02, 2011 10:24 am

Hi Johnny, it's good to see your insulation getting installed. I noticed you're running single wires for your electrical; what gauge are you using? I'm planning on 10 gauge throughout to keep it simple (12 volt system only). I bet you're very excited to be at this stage! :D

Take Care,

Dave
User avatar
DMcCam
Gold Donating Member
 
Posts: 883
Joined: Wed Jan 06, 2010 8:30 pm
Location: Reno, Nevada
Top

Postby down under tech » Mon May 02, 2011 10:38 pm

atahoekid: You are right about the crappy weather. I wish spring would take hold and then I can finish this thing up. I try to work on it a little each nice day if I have the time to spend on it. I can't wait until you start your build so I can follow along on your TD build.

Cliff: Terry does help me at times when I need an extra hand. She has already made up the curtains and the pillow cases as well as the bed spread. She is just as impatient as I am to get it out for the first time. While I was working on it the other day, she brought out the foam mattress and we place it inside the TD and we laid on it for a while. It was nice to do that. It really made me want to push harder to get it camp-able.

LDK: Thanks for you nice comments about my TD. I am using the Kuffel Creek plans I bought on line. It said to flip the axle. I also did that because I am running 14 inch wheels on it now. This will keep it lower and closer to the ground for less drag. I bought a three inch wider Dexter axle with the bigger USA bearings. With this combination, I have 1/2 inch more clearance between the new tires and the frame on each side of the trailer. You can flip your axle later but don't install your fenders until you do that if you do flip it. I strengthened the tongue and I added a receiver on the rear of the trailer too.

Dave: It fells good to be putting in the roof insulation. That way I have one less thing to do before I get it done. The reason I only have one wire in the top is because I pre-wired the inside overhead lights and to the switches in the wall. I just have to run the ground wires to these lights and I have not done that yet. There will be two wires run to each light, one power and one ground. I will do that next before I put the rest of the insulation in. I am using 14 gauge wire from the fuse box to the different lights and I will use 8 gauge for my main power and grounds to the tongue mounted battery. I plan on using LED bulbs for the light fixtures and 14 gauge wires will be more that enough to powers the lights even if they are the regular incandescent type. 10 gauge is overkill in my opinion and it is expensive to buy that much wire. Most of you car's wiring is 14 gauge as well. Trust me, I am chomping at the bit just to be able to sleep in it soon.

See you guys later... :)
Johnny D.

"If you think you can, you can. If you think you can't, your right !" ... Henry Ford

"The Silver Nugget" Build
viewtopic.php?t=35314&postdays=0&postorder=asc&start=0
User avatar
down under tech
Silver Donating Member
 
Posts: 565
Images: 571
Joined: Sat Feb 06, 2010 10:01 pm
Location: Reno, Nevada
Top

Postby DMcCam » Mon May 02, 2011 10:57 pm

Hi Johnny, thanks for the electrical advise sir. I'm new to 12 volt and read that for the 12 volt recepticals I'd need the 10 gauge so I thought why not use it for everything. Would it still be a good idea to run it for them?

Your build looks great by the way!!

Dave
User avatar
DMcCam
Gold Donating Member
 
Posts: 883
Joined: Wed Jan 06, 2010 8:30 pm
Location: Reno, Nevada
Top

Postby down under tech » Tue May 03, 2011 10:23 pm

Hey Dave: 14 gauge is plenty big for the 12 volt DC system. Try to keep the 12 volt DC for lights and things that don't require a lot of power to operate. If you use LED bulbs you will never have a problem with your wires. Keep in mind that you will need 8 or 10 gauge to go from your battery to your fuse block and the ground back to the battery from your ground buss. This will supply you with the proper current you may draw if you have a lot of items powered by 12 volt DC all on at one time. If you plan on running 110 volt AC then I would use 12 gauge for that for a microwave or coffee pot or a heater if you will need one. These are power hogs and the thicker wires there will hold up to the extra power demands of theses items.

:thumbsup:
Johnny D.

"If you think you can, you can. If you think you can't, your right !" ... Henry Ford

"The Silver Nugget" Build
viewtopic.php?t=35314&postdays=0&postorder=asc&start=0
User avatar
down under tech
Silver Donating Member
 
Posts: 565
Images: 571
Joined: Sat Feb 06, 2010 10:01 pm
Location: Reno, Nevada
Top

Update, 05-04-2011

Postby down under tech » Wed May 04, 2011 8:53 pm

OK, I finished running the needed wires through the spars yesterday & today. I made up a wire schematic that I will keep inside the TD when it is finished for future reference if needed. I realized that I have one more circuit to run. It is for the water pump for the sink. That is no problem because it will run under the counter and I can do it when I need to wire up the pump.

Image

Image

My better half took this picture of me yesterday through the kitchen window when I started to run the first wires. I was wearing the hat because the other day while I was doing the insulation, I got a sun burn right where I part my hair. This gave me a chance to recuperate.


Image

:peace: :peace: :peace: :peace: :peace:
Johnny D.

"If you think you can, you can. If you think you can't, your right !" ... Henry Ford

"The Silver Nugget" Build
viewtopic.php?t=35314&postdays=0&postorder=asc&start=0
User avatar
down under tech
Silver Donating Member
 
Posts: 565
Images: 571
Joined: Sat Feb 06, 2010 10:01 pm
Location: Reno, Nevada
Top

Postby LDK » Wed May 04, 2011 9:31 pm

Hey Johnny

I just noticed that you're running your wiring over the insulation. :thinking: I may try that. Are you planning on putting more insulation over your wires? I'm about at the wiring stage myself now. I drilled a 1/2" hole through my spars about 10" from the edge for running my wiring. I'm just going with 4 circuits with 12 gage stranded wire. I'm also gonna have a tongue mounted battery with my fuse block in the front cabin cabinet. I'm running 10 gage wire from the battery to the fuse block. I think I'm just gonna use 15amp fuses for the 12gage wires and 25amp fuse for the 10 gage wire. I don't want those wires to get warm at all. :lol:
Image
LDK
Gold Donating Member
 
Posts: 1419
Images: 1
Joined: Fri Jan 22, 2010 8:29 pm
Top

Postby down under tech » Wed May 04, 2011 9:53 pm

Larry: I placed the holes in the middle of the doubled up spars so I can run a layer of 3/4" insulation under and on top of the wires. I might need to cut a slight trough in the top layer so the wires won't be pinched by the upper insulation. I will hot glue them between the spars so they don't come in contact with each other and rub through the wires coverings of the one next to each other.

10 Gauge from the battery to the fuse block is just right. Just be sure you use a grounding buss bar (one common ground block) and use 10 gauge wire from it back to your battery. You should use a 30 amp circuit breaker coming from the battery positive before you continue it to the fuse block. This is common procedure that way if you draw too much power it will trip and shut off current to the fuse block and if the wire rubs through against the frame, it will keep you from going up in smoke. 14 gauge wire & 15 amp fuses for each circuit is very acceptable for each of the circuits from the fuse block. The fuse(s) will blow if you have a short in one of those circuits. I know this because I am an ASE Certified Master Auto Technician with 35 years in the field.

If I can help you, just ask. ;)
Johnny D.

"If you think you can, you can. If you think you can't, your right !" ... Henry Ford

"The Silver Nugget" Build
viewtopic.php?t=35314&postdays=0&postorder=asc&start=0
User avatar
down under tech
Silver Donating Member
 
Posts: 565
Images: 571
Joined: Sat Feb 06, 2010 10:01 pm
Location: Reno, Nevada
Top

Postby LDK » Wed May 04, 2011 10:39 pm

Hey Johnny

I'm gonna have a disconnect switch and a 10 gage in-line fuse coming off the positive and hopefully I'll have room in the battery box for it. I'll have the ground going from the battery straight to the frame. I'm using the blue sea 6 circuit fuse block with negative bus. :)
LDK
Gold Donating Member
 
Posts: 1419
Images: 1
Joined: Fri Jan 22, 2010 8:29 pm
Top

Postby DMcCam » Thu May 05, 2011 10:21 am

Hey Johnny, thanks again for the electrical wisdom. I hope to be using it soon. :D Looks like our weather is finally going to cooperate with our teardrop builds.

I've had hot glue melt and fail on me in our summer heat. You must be using a higher temp version? Or do you think that the insulation will protect it enough inside the roof?

Take Care,

Dave
User avatar
DMcCam
Gold Donating Member
 
Posts: 883
Joined: Wed Jan 06, 2010 8:30 pm
Location: Reno, Nevada
Top

PreviousNext

Return to Build Journals

Who is online

Users browsing this forum: No registered users and 27 guests