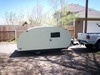
Where or When Jr. --Paint & New Tow Vehicle--update 5/17/15

...ask your questions in the appropriate forums BUT document your build here...preferably in a single thread...dates for updates, are appreciated....

Postby myoung » Wed Dec 29, 2010 7:41 am

Thanks for the advice Bruce.

I had been considering putting a drawer or locker under the fridge to raise its height for less bending to reach items inside. Instead, I will go back to my original plan and vent as you have shown.

I find that a small fan works reasonably well for improving airflow in warm weather in our Airstream. To my surprise, the airflow that works best is downward. I'll make sure I have enough space to add a fan in the future if necessary.

This trailer is designed for just one person. Even so, my wife and I are not uncomfortable on a bed only 39 inches wide as we are both smaller folk (well, I'm not nearly as small as she). Our Westfalia had a width about this size and it was never a problem for us.

Never say never, but resale is not an issue for me. I'd rather not compromise my vision for "Where or When." If I should chose to sell, I only have to find one buyer.
Mike Young
build thread: viewtopic.php?t=40459
User avatar
myoung
500 Club
 
Posts: 644
Images: 250
Joined: Sat Aug 07, 2010 11:21 am
Location: Nipomo, CA

Postby Cliffmeister2000 » Wed Dec 29, 2010 8:04 am

Mike, I'm impressed with your progress! :thumbsup:
God Bless

Cliff

♥God. ♥People.
1 John 4:9-11

My Teardrop build pictures
User avatar
Cliffmeister2000
Titanium Donating Member
 
Posts: 3622
Images: 157
Joined: Thu Jul 26, 2007 10:18 pm
Location: Phoenix, AZ

Postby Miriam C. » Wed Dec 29, 2010 10:05 am

:applause: :thumbsup: Lookin good! I have a full 54" bed across the back and that is plenty of space for us. I like the placement of your appliances. :thumbsup:
“Forgiveness means giving up all hope for a better past.â€
User avatar
Miriam C.
our Aunti M
 
Posts: 19675
Images: 148
Joined: Wed Feb 15, 2006 3:14 pm
Location: Southwest MO
Top

Postby myoung » Wed Dec 29, 2010 6:36 pm

Today, with the excellent advice and assistance of Cliffmeister, we began construction of the walls--rear and front.

I was pleased to see that the spacing of pocket screw holes on the Kreg Jr. was just right for placing two screws in 1-1/2-inch wide strips. This adds more rigidity at this early stage.
Image

Here's the structure of the rear wall with the window inserted for fit.
Image

The front wall consists of two parts. This is the vertical section. Notice that the floor is now bolted securely to the chassis with eight 1/2-inch bolts connecting angle sections of the chassis, the 3/4-inch plywood floor, and the 3/4-inch poplar cleats that surround the perimeter.
Image

Oh, yes. It seldom rains in the Valley of the Sun.

I might have finished the upper section too had my little 3.6 volt screwdriver not run out of juice. Oh, well. I need something to do tomorrow.

Once again, a big thanks to Cliffmeister!!
:thumbsup: :applause:
Mike Young
build thread: viewtopic.php?t=40459
User avatar
myoung
500 Club
 
Posts: 644
Images: 250
Joined: Sat Aug 07, 2010 11:21 am
Location: Nipomo, CA
Top

Postby Shadow Catcher » Wed Dec 29, 2010 7:13 pm

Bruce
One of the problems I have run up against are counterfeit bolts, how can you tell, when they break well before they reach the correct tension (a torque wrench is part of my tool kit at home and for the tear).
I have used grade 8 bolts from tractor supply (sold by the Lb) and so far not had a problem.
User avatar
Shadow Catcher
Donating Member
 
Posts: 5993
Images: 234
Joined: Sat Apr 11, 2009 8:26 pm
Location: Metamora, OH
Top

Postby Weirdnerd » Wed Dec 29, 2010 9:56 pm

so far the only way I know to know if the bolts are kosher or counterfeit is to send shavings to a lab, not cheap.
This is my build thread...
Weirdnerd's teardrop
User avatar
Weirdnerd
The 300 Club
 
Posts: 318
Joined: Thu Sep 23, 2010 3:03 pm
Location: Denver, Co ( USofA)
Top

Postby Cliffmeister2000 » Thu Dec 30, 2010 7:35 am

That floor is bolted down so well, it isn't going anywhere. and the source of the bolts (Ace Hardware) is pretty reliable.

Mike, it was fun helping you! I look forward to the next opportunity! :thumbsup:
God Bless

Cliff

♥God. ♥People.
1 John 4:9-11

My Teardrop build pictures
User avatar
Cliffmeister2000
Titanium Donating Member
 
Posts: 3622
Images: 157
Joined: Thu Jul 26, 2007 10:18 pm
Location: Phoenix, AZ
Top

Postby myoung » Thu Dec 30, 2010 6:11 pm

Again, not particularly exciting or informative pictures, but this is today's accomplishment: framing the pop top. The skylight in the center will be fixed, non-opening.

I deviated from my original design somewhat. In particular, I eliminated the two nearly 8-foot framing pieces that would have been placed on each of the long sides inside the 2-1/2-inch side pieces laid on edge. Eliminating these saved some weight and the rigidity seems satisfactory. I won't have any heavy snow load to contend with.
:)

Image

Oh, I also finished the upper front section left over from yesterday when the screwdriver battery ran out of juice.

Bought lots more wood for framing the last two sides. Work on that will begin tomorrow.
Last edited by myoung on Thu Dec 30, 2010 8:35 pm, edited 1 time in total.
Mike Young
build thread: viewtopic.php?t=40459
User avatar
myoung
500 Club
 
Posts: 644
Images: 250
Joined: Sat Aug 07, 2010 11:21 am
Location: Nipomo, CA
Top

Postby parnold » Thu Dec 30, 2010 7:23 pm

Looking very good Mike, I'm enjoying following your progress!

:thumbsup:
User avatar
parnold
Donating Member
 
Posts: 2344
Images: 302
Joined: Mon Feb 08, 2010 4:49 pm
Location: Northwest New Jersey
Top

Postby bdosborn » Thu Dec 30, 2010 7:37 pm

Mike,

You're build is progressing fast! Nice work. I found that a full size paint can was the same radius as the corners of my windows and worked great for a tracing guide.

Bruce
2009 6.5'X11' TTT - Boxcar
All it takes is a speck of faith and a few kilowatts of sweat and grace.
Image
Boxcar Build
aVANger Build
User avatar
bdosborn
Donating Member
 
Posts: 5495
Images: 776
Joined: Wed May 05, 2004 11:10 pm
Location: CO, Littleton
Top

Postby myoung » Thu Dec 30, 2010 8:29 pm

bdosborn wrote: I found that a full size paint can was the same radius as the corners of my windows and worked great for a tracing guide.


Interesting. I was thinking of just filling the space with foam insulation between the skins that will be radiused. On the three large exit windows, the radii are considerably smaller than they are on the skylight or front window.

We'll see what is sufficient and strong enough to complete the seal around the windows and flanges.
Mike Young
build thread: viewtopic.php?t=40459
User avatar
myoung
500 Club
 
Posts: 644
Images: 250
Joined: Sat Aug 07, 2010 11:21 am
Location: Nipomo, CA
Top

Postby myoung » Thu Dec 30, 2010 8:32 pm

parnold wrote:Looking very good Mike, I'm enjoying following your progress!


Thanks, Paul. It's going much faster than I had hoped. So far, my drawings have been detailed enough to make cuts quickly without any extra thinking or fitting.
Mike Young
build thread: viewtopic.php?t=40459
User avatar
myoung
500 Club
 
Posts: 644
Images: 250
Joined: Sat Aug 07, 2010 11:21 am
Location: Nipomo, CA
Top

Postby YuGun » Fri Dec 31, 2010 12:51 am

:applause: :applause: :applause:
User avatar
YuGun
The 300 Club
 
Posts: 445
Joined: Sun Apr 11, 2010 1:25 pm
Location: Turkey
Top

Postby myoung » Fri Dec 31, 2010 5:01 pm

Lots of cutting and drilling today. Almost every piece of framing that I expect to put into the side walls has been cut and trial-fitted with measurements on adjoining pieces to make assembly easier.

Also, I drilled all the pocket screw holes needed.

Image
Image

Tomorrow and probably Sunday will be gluing and screwing days. Can't wait to put up the sides and see how much volume there is for me.

The next picture is the most interesting one I have taken so far.

What? Are you kidding? What's so interesting about a few scraps of wood?

Well, these are the only pieces of scrap that remain from all the 12-foot lengths of 1-1/2 framing that I used for all four walls, the pop-top, and the cleats around the perimeter. The largest piece is only 8 inches long. I couldn't have planned this more precisely in a million years. Sometimes you just get lucky.

Image
Mike Young
build thread: viewtopic.php?t=40459
User avatar
myoung
500 Club
 
Posts: 644
Images: 250
Joined: Sat Aug 07, 2010 11:21 am
Location: Nipomo, CA
Top

Postby Cliffmeister2000 » Fri Dec 31, 2010 8:30 pm

You could eliminate all the scrap by making some building blocks. Any grandkids? :D
God Bless

Cliff

♥God. ♥People.
1 John 4:9-11

My Teardrop build pictures
User avatar
Cliffmeister2000
Titanium Donating Member
 
Posts: 3622
Images: 157
Joined: Thu Jul 26, 2007 10:18 pm
Location: Phoenix, AZ
Top

PreviousNext

Return to Build Journals

Who is online

Users browsing this forum: No registered users and 13 guests