Terry's TTT Garageable Standy Build modifications

...ask your questions in the appropriate forums BUT document your build here...preferably in a single thread...dates for updates, are appreciated....

Postby synaps3 » Sun Jun 19, 2011 10:34 pm

Awesome build. I'm jealous of your frame; it couldn't be more perfect. The sides look great too. :)
-- Dave

Build log: here
User avatar
synaps3
The 300 Club
 
Posts: 433
Images: 254
Joined: Sun Nov 08, 2009 1:09 am
Location: Marietta, GA

Postby terryjones1 » Tue Jun 21, 2011 10:48 am

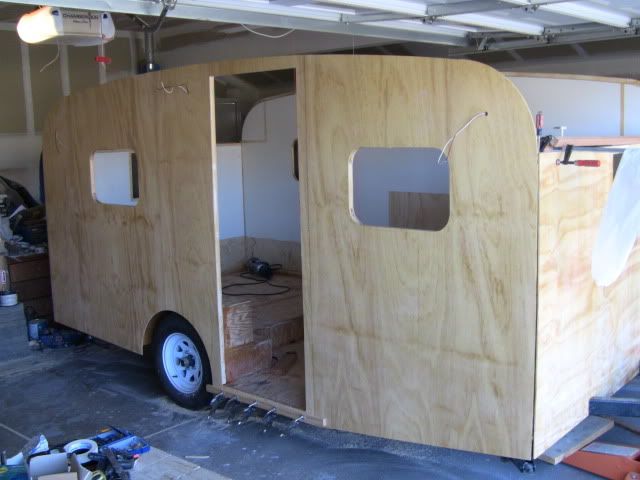
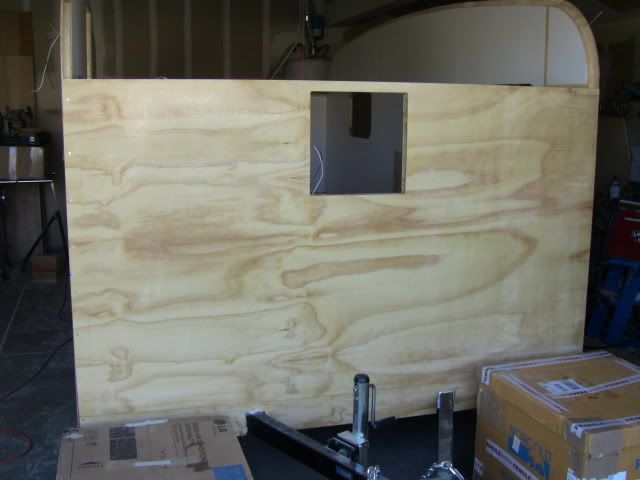
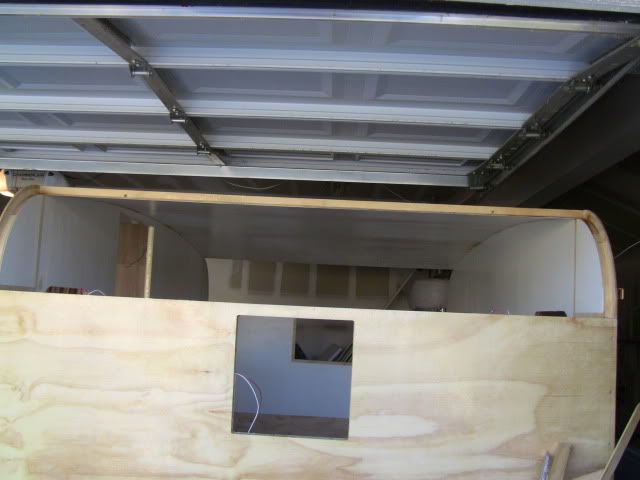
Shown below is a photo of the trial fit of right side wall.
The bottom 3" of the door way still has to be cut out.

Image

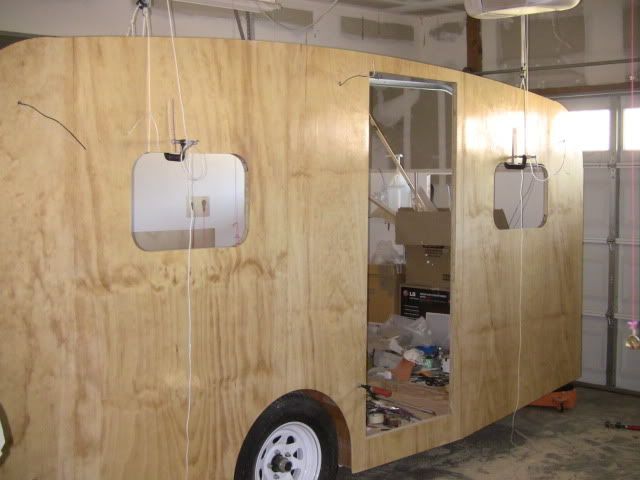
Wall should be installed tomorrow.
My TTT Garageable Standy Build Journal: viewtopic.php?f=50&t=40591
User avatar
terryjones1
Gold Donating Member
 
Posts: 266
Images: 1
Joined: Wed Aug 25, 2010 2:09 pm
Location: Lincoln, Ca

Postby aggie79 » Tue Jun 21, 2011 4:37 pm

Looking great Terry!

Keep up the good work.
Tom (& Linda)
For build info on our former Silver Beatle teardrop:
Build Thread

93503
User avatar
aggie79
Super Duper Lifetime Member
 
Posts: 5405
Images: 686
Joined: Tue Aug 07, 2007 5:42 pm
Location: Watauga, Texas
Top

Postby terryjones1 » Wed Jun 22, 2011 10:51 am

Shown below is a photo of the left wall to floor & fender connection.
In the lower left unpainted area & also, over the fender is where the bed will be.
The vertical connections thru the floor & the 1-1/2" x 1-1/2" cleats are 1/4" x 2-1/2" bolts.
The horizontal connections thru the cleats & into the wall are #12 x 2-1/2" cap screws.
Over the fenders, the connections thru the 5/8" x 1-1/2" cleat are #8 x 2-1/2 screws.
Also, everything has been epoxyed.

Image

Shown below is another view.
The unpainted area to the right is where cabinet will be.

Image

Shown below is another view.
The unpainted area to the right is where a bench will be, which is part of the dinette/2nd bed.

Image
Last edited by terryjones1 on Thu Jun 23, 2011 6:04 pm, edited 1 time in total.
My TTT Garageable Standy Build Journal: viewtopic.php?f=50&t=40591
User avatar
terryjones1
Gold Donating Member
 
Posts: 266
Images: 1
Joined: Wed Aug 25, 2010 2:09 pm
Location: Lincoln, Ca
Top

Postby terryjones1 » Thu Jun 23, 2011 3:32 pm

Shown below is a photo of the right side wall of the trailer, which has been installed.
Again, the front & back walls are not installed.
They are only used for temporary support of the side walls.

Image

Next is installation of front & back walls.
Also, I no longer need to use hoists or pulleys.
They have been taken down.
My TTT Garageable Standy Build Journal: viewtopic.php?f=50&t=40591
User avatar
terryjones1
Gold Donating Member
 
Posts: 266
Images: 1
Joined: Wed Aug 25, 2010 2:09 pm
Location: Lincoln, Ca
Top

Postby terryjones1 » Sat Jun 25, 2011 4:23 pm

Shown below is a photo of the inside of rear wall.
It has been installed.
I have no room to do a photo of the outside of the rear wall.
The large hole is for the air conditioneer.
The small box to the right of the large hole, is for installation of a duplex recepticle for air conditioneer power.


Image

Tomorrow, I install the front wall.
My TTT Garageable Standy Build Journal: viewtopic.php?f=50&t=40591
User avatar
terryjones1
Gold Donating Member
 
Posts: 266
Images: 1
Joined: Wed Aug 25, 2010 2:09 pm
Location: Lincoln, Ca
Top

Postby Cliffmeister2000 » Sun Jun 26, 2011 3:17 am

It's starting to look like something, Terry! :thumbsup:
God Bless

Cliff

♥God. ♥People.
1 John 4:9-11

My Teardrop build pictures
User avatar
Cliffmeister2000
Titanium Donating Member
 
Posts: 3622
Images: 157
Joined: Thu Jul 26, 2007 10:18 pm
Location: Phoenix, AZ
Top

Postby b.bodemer » Sun Jun 26, 2011 10:39 am

Terry,
This is a great build to follow!

Barb
User avatar
b.bodemer
1000 Club
1000 Club
 
Posts: 1600
Images: 319
Joined: Mon May 08, 2006 5:43 pm
Location: Lakewood OH
Top

Postby terryjones1 » Sun Jun 26, 2011 11:53 am

Thanks for all the nice comments everyone!

Shown below is a photo of the inside of the front wall.
The wall has been installed.
The large hole is for the Fantastic Vent.
The small hole to the right of the large hole, is for installation of a duplex recepticle.

Image

Shown below is a photo of the outside of the front wall.
The cardboard box on the right holds the Norcold DC0051 12 DCV refrigerator.
The cardboard box on the left holds the LG 7000 btu window air Conditioneer.

Image

Next, I tackle installation of the roof.
My TTT Garageable Standy Build Journal: viewtopic.php?f=50&t=40591
User avatar
terryjones1
Gold Donating Member
 
Posts: 266
Images: 1
Joined: Wed Aug 25, 2010 2:09 pm
Location: Lincoln, Ca
Top

Postby terryjones1 » Fri Jul 01, 2011 11:47 am

Shown below is a photo of the trailer with the center roof installed.
The front and back curved portion of the roof still needs to be installed.
Also, the outer plywood roof skin needs to be installed.

Image

Shown below is a detail of how the roof is resting on the wall shelf.
There are thirteen 1" V x 3/4" H spars on the roof.
2-1/2" # 8 flathead Screws and epoxy were used to attach spars to the shelf on the walls.
The spars had previously been epoxyed to the 1/4" interior skin.
There is about 5'-11" of clearance, roof to floor, at the drop floor.

Image
My TTT Garageable Standy Build Journal: viewtopic.php?f=50&t=40591
User avatar
terryjones1
Gold Donating Member
 
Posts: 266
Images: 1
Joined: Wed Aug 25, 2010 2:09 pm
Location: Lincoln, Ca
Top

Postby terryjones1 » Fri Jul 08, 2011 10:01 am

Shown below is a photo of the inside of the rear roof curve.

Image

Shown below is a photo of the inside of the front roof curve.

Image

Shown below is a photo of the outside of the front roof curve.
The wires shown, at the curve, are for overhead lights.
The radius of the bend is 14".
The plywood used in the front and back bends is 3/16" "Bendy" plywood.
I had to match that up with the 1/4" plywood that I used for the middle roof and the front & back walls.
The spars used at the front and back bend area are 3/4" W x 1-1/8" H.

Image

Shown below is a photo of roof mounting detail.
The spars are screwed & epoxyed to the side wall shelf.
The front and back edges of the curved panels are attached to the middle roof and the front and back walls with epoxy and screws every 6".

Image
My TTT Garageable Standy Build Journal: viewtopic.php?f=50&t=40591
User avatar
terryjones1
Gold Donating Member
 
Posts: 266
Images: 1
Joined: Wed Aug 25, 2010 2:09 pm
Location: Lincoln, Ca
Top

Postby matt987106 » Fri Jul 08, 2011 12:12 pm

very nice, this is a nice build

a little big for my needs though
matt987106
Teardrop Inspector
 
Posts: 14
Joined: Sat Jan 09, 2010 3:18 pm
Top

Postby aggie79 » Fri Jul 08, 2011 4:05 pm

Terry,

You almost have her all buttoned up. The curves turned out great! Soon, you can focus on the interior.

Take care,
Tom
Tom (& Linda)
For build info on our former Silver Beatle teardrop:
Build Thread

93503
User avatar
aggie79
Super Duper Lifetime Member
 
Posts: 5405
Images: 686
Joined: Tue Aug 07, 2007 5:42 pm
Location: Watauga, Texas
Top

Postby bdosborn » Fri Jul 08, 2011 5:39 pm

Terry,

Its always a big deal for me to get the roof on, I feel like it's finally a trailer. Your trailer is looking great!

Bruce
2009 6.5'X11' TTT - Boxcar
All it takes is a speck of faith and a few kilowatts of sweat and grace.
Image
Boxcar Build
aVANger Build
User avatar
bdosborn
Donating Member
 
Posts: 5498
Images: 776
Joined: Wed May 05, 2004 11:10 pm
Location: CO, Littleton
Top

Postby terryjones1 » Sat Jul 09, 2011 7:06 am

bdosborn wrote:Terry,

Its always a big deal for me to get the roof on, I feel like it's finally a trailer. Your trailer is looking great!

Bruce


As I am sure that you noticed, I used about the same technique as you did to attach the roof to the walls. The center roof was easy. The front and back curves were more difficult.
My TTT Garageable Standy Build Journal: viewtopic.php?f=50&t=40591
User avatar
terryjones1
Gold Donating Member
 
Posts: 266
Images: 1
Joined: Wed Aug 25, 2010 2:09 pm
Location: Lincoln, Ca
Top

PreviousNext

Return to Build Journals

Who is online

Users browsing this forum: Bing [Bot], smeerkees and 14 guests