Whitney's Weakender - Hatch / Galley Lid Redesign - Pg 11

...ask your questions in the appropriate forums BUT document your build here...preferably in a single thread...dates for updates, are appreciated....

Postby bobhenry » Tue Jan 17, 2012 11:15 am

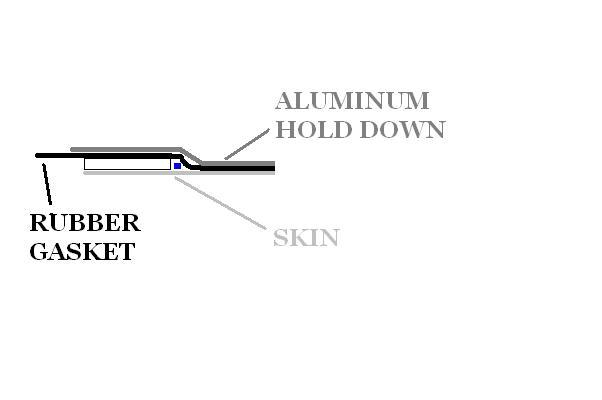
Are you sure you havent created a small alley where the rubber hinge steps off of the edge molding ? ( see the blue dot )

Image

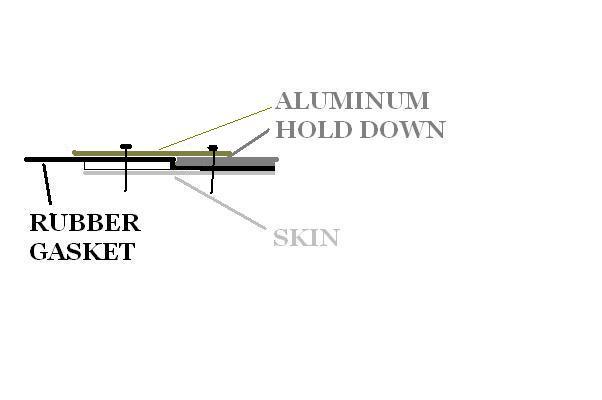
If you cut the hold down just short of the edge trim then add the second (tan) piece it should then close the alleyway and you can still use the same holes.

Image
Growing older but not up !
User avatar
bobhenry
Ten Grand Club
Ten Grand Club
 
Posts: 10355
Images: 2617
Joined: Fri Feb 09, 2007 7:49 am
Location: INDIANA, LINDEN

Postby WhitneyK » Mon Jan 23, 2012 8:50 am

Well, my clear coat didn't turn out so good :shock:
Image

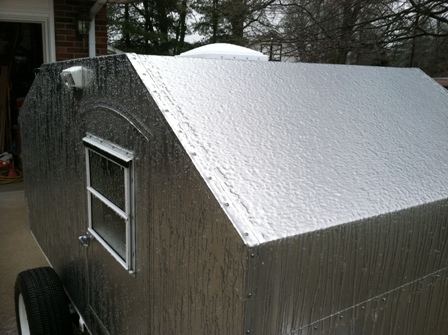
Seriously, ???, I shoved my little camper out in the elements a couple of weeks ago as mentioned in previous post and subjected it to rain, wind, snow, and now ice / freezing rain.

Image

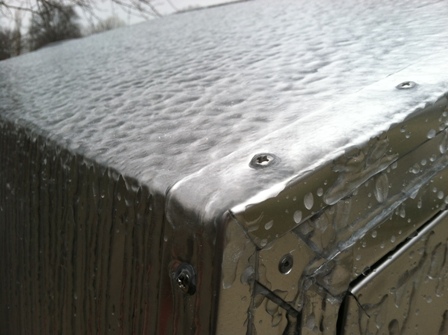
Don't have to worry about the galley hinge leakin' now, no-sir-ee, ain't nothin' gettin' thru that...

Image

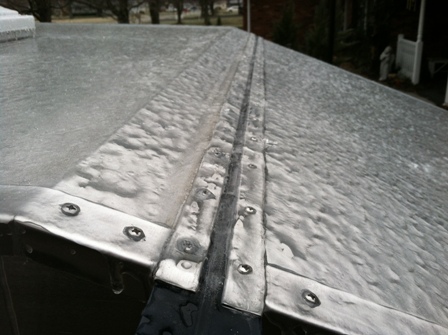
I think I did find the source of my small "water intrusion". I temporarily ukempuggied my screw heads with the sealer I'm using, ...... and .... all appears to be dry. See the shiney spot, yep, I thought it was wet too. Turned out to just be silicone.

Image Image

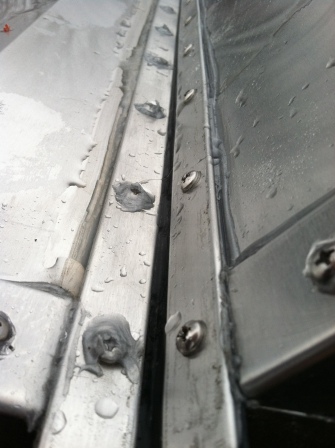
I now have a better picture of how my water is draining away from the camper. This image is "frozen in time". You'll notice under the hinge looks dry. :applause:

Image

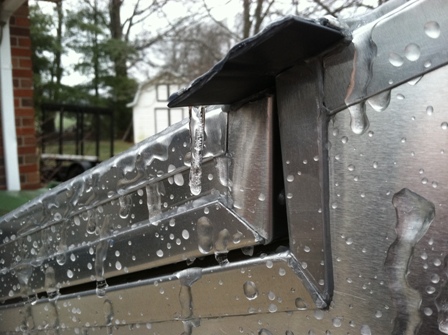
Anyway, just thought I'd post some updates. Still have the "finishing" touches, galley design, tail/running lights, and of course the fenders to install. Need to come up with some kind of gutter / rain diverters for over the doors. I looked at some at CW in Greenwood a week or so ago. Don't know if I want to use the rubber stick-on kind or try to find aluminum one's. Haven't found a lot of options that don't require an arm & a leg shipping to get a $10 part.

Hope everyone's safe, warm, and happy.
Whitney & Tracie
Crothersville, IN

We never really grow up, we only learn how to act in public.

Do not confuse what you hear with what I mean.

My build: http://www.tnttt.com/viewtopic.php?t=41955

160061-------------------------------101114
States we've drug our
li'l camper through. (44 States + Vancouver Island and over 45,000 miles so far)
User avatar
WhitneyK
Gold Donating Member
 
Posts: 559
Images: 412
Joined: Sun Dec 12, 2010 10:28 pm
Location: IN, Crothersville (36mi N or Louisville)

Postby absolutsnwbrdr » Mon Jan 23, 2012 9:55 am

WhitneyK wrote:I temporarily ukempuggied my screw heads with the sealer I'm using


Is that a technical term? :lol:

Nice looking weekender! Glad all is dry and well (on the inside anyway) :thumbsup:
Zach
Coming Soon...
Image Image
User avatar
absolutsnwbrdr
Donating Member
 
Posts: 2657
Images: 412
Joined: Mon Jan 25, 2010 6:10 pm
Location: Hanover, PA
Top

Postby bobhenry » Mon Jan 23, 2012 10:22 am

absolutsnwbrdr wrote:
WhitneyK wrote:I temporarily ukempuggied my screw heads with the sealer I'm using


Is that a technical term? :lol:

quote]

No just a trade name !
Dem Kruthersbill boys just kain't spel !

http://www.akempucky.com/
Growing older but not up !
User avatar
bobhenry
Ten Grand Club
Ten Grand Club
 
Posts: 10355
Images: 2617
Joined: Fri Feb 09, 2007 7:49 am
Location: INDIANA, LINDEN
Top

Postby WhitneyK » Mon Jan 30, 2012 10:17 am

Well, the Sun was shinin' this weekend so I decided to drag my sorry self outside and do a few things on the camper.......

For starters, I finished cuttin' down and "custom fitting" my frames for the window screens. Put the little thumb thingy latches on there so they could be removed? if need be. (sorry for the glare on the picture, haven't seen the sunshine in a while, forgot how to deal with it :lol: )

Image

Since it was a Sunshiny weekend, I decided to go ahead and, hopefully, fix / seal the galley hinge screws right, correctly,... whatever :roll:
I did them the same way I did the trim screws, removed the screw, tapered / champhered the hole, filled the hole with gobble-d-goop (there Bob, is that better! :R ) then reinstall the screws. Run an extra bead of sealer on the front edge of the hinge just for kicks.

Image Image

I'll deal with the "extra" after it dries


Got really ambitious and moved the axle from underneath to on top of the springs. Since I had a mile and a half (sorry, slight exaggeration :oops: ) of threads on my u-bolts, decided to cut them off a little so I didn't "collect" things on 'em. (grass, plastic shopping bags, road kill remnants, etc)

Image

Can't really tell a lot of difference in the pictures, but with the frame leveled to the driveway, it lowered the tallest part (front roof) down to right at chin height (for me anyway). Which puts it at the same roof height as the TV. Pics below are before & after

ImageImage
Wow!! It even changed the looks of the vehicle parked next to it!! Now that's a dramatic change!!! :shock:

Well, I finally decided to start working on my fenders. (must have been too much sunshine getting to me :? ) I know most people don't get this opportunity that often, but, ..... in you all's opinion, do the fenders look OK in this position or should they be higher? lower? tilted forward or backward? level (as they are)? or.....? I tried to keep them evenly spaced away from the tires. Do I bolt them solid to the body / frame? Put a rubber spacer in between? I don't want to order fender welting, too much bother.

Image

As I have mentioned in previous posts, I haven't been attending my PRA meeting (pack rats annonymous). In an attempt to clean up the fenders with my wire rope cup brush on my 9" grinder, I turned to put my fender on my utility trailer to use as a saw horse / work bench / work surface, got my feet tangled up in an old small engine crank laying on the ground, dropped the fender, then proceeded to fall on top of it, ..... Ouch!! :O
Busted my chin on the edge of the fender. Man this gettin' old & clumsy stinks! Good part is, I've learned to just roll with it, don't try to stop the inevitable, it's gonna happen anyway, go ahead and hit the ground and get it over with.

Image

I'm taking the fenders to get sand blasted today, nuts with that sanding/grinding them myself. I've had enough. :surrender:
Last edited by WhitneyK on Mon Jan 30, 2012 10:40 am, edited 1 time in total.
Whitney & Tracie
Crothersville, IN

We never really grow up, we only learn how to act in public.

Do not confuse what you hear with what I mean.

My build: http://www.tnttt.com/viewtopic.php?t=41955

160061-------------------------------101114
States we've drug our
li'l camper through. (44 States + Vancouver Island and over 45,000 miles so far)
User avatar
WhitneyK
Gold Donating Member
 
Posts: 559
Images: 412
Joined: Sun Dec 12, 2010 10:28 pm
Location: IN, Crothersville (36mi N or Louisville)
Top

Postby absolutsnwbrdr » Mon Jan 30, 2012 10:29 am

WhitneyK wrote:Well, I finally decided to start working on my fenders. (must have been too much sunshine getting to me :? ) I know most people don't get this opportunity that often, but, ..... in you all's opinion, do the fenders look OK in this position or should they be higher? lower? tilted forward or backward? level (as they are)? or.....? I tried to keep them evenly spaced away from the tires. Do I bolt them solid to the body / frame? Put a rubber spacer in between? I don't want to order fender welting, too much bother.

Image


Looks good as you have it! :thumbsup:
Zach
Coming Soon...
Image Image
User avatar
absolutsnwbrdr
Donating Member
 
Posts: 2657
Images: 412
Joined: Mon Jan 25, 2010 6:10 pm
Location: Hanover, PA
Top

Postby Martiangod » Mon Jan 30, 2012 11:31 am

Its not a job well done without gettin blood all over the new parts...Trailer looks great
If it ain't broke, fix it till it is

Chris

Deep in the Heart of Nowhere
The topper viewtopic.php?f=50&t=58140, gone to a new home to be converted
into an ice fishing shack...FREEBIE !!! for a nice young family
The trailer viewtopic.php?f=50&t=48156
User avatar
Martiangod
500 Club
 
Posts: 856
Images: 432
Joined: Mon Jan 09, 2012 10:39 pm
Location: Peace River, Alberta
Top

Postby LDK » Mon Jan 30, 2012 2:09 pm

Hey Whitney

The fenders look fine in that position. Maybe you could find some kind of bracket to attach the fender and frame to or just bolt it to the sidewall. I think most people that use the sidewall option use bolts with t-nuts.
Your camper sure looks good. Excellent job. :thumbsup:
LDK
Gold Donating Member
 
Posts: 1419
Images: 1
Joined: Fri Jan 22, 2010 8:29 pm
Top

Postby WhitneyK » Mon Feb 06, 2012 12:26 pm

Well ......

so much for just droppin' my fenders off and gettin' 'em blasted. Local shop wanted $20 each to blast 'em. :shock: Hmmmmm, let see, $20 to blast or $25 for brand new fenders, ... Uuuhhh,..... I DON"T THINK SO!!! :crazy:

I brought 'em back home, put a new 60 grit disc on my grinder and went at it. It's really not as rough as it looks, I'll take the D/A to it with some 120 or 220 grit. After a coat of primer and a couple coats of Rustoleum, it'll be just fine. :D Paint ought ta stick good.
Neighbor brought his blaster over and we were going to do it ourselves, but it rained all weekend and I sure ain't blastin' inside the garage.

Between the rain, wedding, fillin' out taxes, yadda, yadda, yadda, I only got one sanded down (only took about 15-20 minutes).
Anysomeway, here's a before and after, gotta love that purple? paint that was on 'em.

Image

Zach & Larry,
Thanks for the input on the fenders. I think with the lower 2 bolts through the angle iron frame, it shouldn't stress the 2 or 3 bolts through the side wall too much.

Martian,
Thanks for the compliment, looks like your runnin' into some fun with your build, and it's lookin' great too.
Whitney & Tracie
Crothersville, IN

We never really grow up, we only learn how to act in public.

Do not confuse what you hear with what I mean.

My build: http://www.tnttt.com/viewtopic.php?t=41955

160061-------------------------------101114
States we've drug our
li'l camper through. (44 States + Vancouver Island and over 45,000 miles so far)
User avatar
WhitneyK
Gold Donating Member
 
Posts: 559
Images: 412
Joined: Sun Dec 12, 2010 10:28 pm
Location: IN, Crothersville (36mi N or Louisville)
Top

Postby WhitneyK » Fri Feb 10, 2012 9:39 am

Well, it was a good idea to lower the axle to make the side door opening lower for my 5'2" wife, less wind drag, fits better behind the Blazer, looks alot better, etc, etc..... but,.......uh,......... Houston, we have a problem.
Image

I've got a post in the Tips & Techniques section with my thoughts:
http://www.tnttt.com/viewtopic.php?t=36437&start=30

Both fenders are now sanded and ready for the mounting holes to be drilled, then painted. Will 4 bolts in each fender be enough to keep them from bouncing / breaking / cracking / shaking / falling off. The bottom 2 bolts (front & back) will be through the trailer frame, the top 2 will just be through my wall sandwich (.040 al, 1/4 ply, 1/2" foam, luan). Not enough forthought / planning to install wood framing where they would be. Heavens, I had no clue where the fenders were going to mount. Fenders? I didn't even have fenders at that point. :?
Whitney & Tracie
Crothersville, IN

We never really grow up, we only learn how to act in public.

Do not confuse what you hear with what I mean.

My build: http://www.tnttt.com/viewtopic.php?t=41955

160061-------------------------------101114
States we've drug our
li'l camper through. (44 States + Vancouver Island and over 45,000 miles so far)
User avatar
WhitneyK
Gold Donating Member
 
Posts: 559
Images: 412
Joined: Sun Dec 12, 2010 10:28 pm
Location: IN, Crothersville (36mi N or Louisville)
Top

Re: Whitney's Weakender - Small update 2/10 Looking for opin

Postby WhitneyK » Thu Mar 29, 2012 9:48 am

:oops: Gosh, it's been awhile since I last posted anything. Seems like I've just been spinnin' my wheels. Anysomeway, here's the latest.....

First off, I'd like to thank Mike and the other Administrators for the new site. Today is the first time I uploaded pics to my album. Being able to upload more than one pic at a time is FANTASTIC :thumbsup:

.....And now, back to the story......

I finally got the fenders painted and mounted, brushed on rustoleum didn't turn out too shabby. Thought about mounting some of those bullet style lights in the holes left from where they were mounted in their previous life.
ImageImage

My wife had picked up some "outdoorsy" material at GW here while back so her & her mom got busy and made curtains for our lit'l camper. It was my job to figure out how to hang 'em. I got to scroungin' around in my "stuff" and come up with the idea you see pictured below. Works for me, and we shouldn't have to worry about seeing too many like it.
ImageImageImage

I didn't want to spend the money $>, but I went ahead and bought a HF tongue box. The kid behind the counter gave me a 20% coupon, so that made it a little less painful. Had to mount in a littler farther forward than I like, but that's what I had to do to get the lid to fully open.
Image

I put the main electrical components into the box. Shore power comes in on the left side (used a "through the wall" plug holder from Bass Pro, it's originally designed for on-board battery chargers http://www.basspro.com/ProMariner-Pro-Tournament-AC-Plug-Holder/product/39736/127867). While I was at BP I picked up one of those plastic battery trays with the hold down strap (something like this one http://www.basspro.com/Bass-Pro-Shops-Battery-Trays/product/8840/90306) Mounted an AC/DC (NO not the rock band!) inverter / converter (donated by my good neighbor) to the back of the box. 1.5 amp Shumacher battery maintainer so that it charges whenever shore power is hooked up (also have a solar charger if needed). The cord for the plug strip is what is secured into the plug holder through the side. The yellow cord you see goes to another 15 amp plug strip mounted in the rear of the camper that the MW will be plugged into (and hopefully a coffee pot :coffee: ) My thoughts are; if shore power isn't available AND we need to use the MW or CP, then I can simply unplug the yellow cord from the plug strip and plug it into the inv / conv and turn it on. Currently, my inv/conv isn't large enough for the MW, but I have a lead on a more powerfull one. :twisted: I still need to cut in some vents in the back so that it can all "breathe". This leaves room for my extention cord on the left side and my stabilizer jacks on the right. Everything nestled snuggly in it's own little spot. Anyway, here's what the set up looks like along with a couple of close ups:
ImageImageImage

It's kind of hard to see, but on the left (facing) end of the plug strip is a switch. That's the main cut off for the 12V going to the camper along with a 20A breaker. Should be fine since the only thing "normally" on battery power will be the little interior & porch lights, a FF, and the accessory plugs (2) for the laptop or something like that. Still need to put some caps over the studs of the relay to prevent any shorts. Should be OK though, because the camper 12V system is totally seperate from the TV 12V lighting system.

I received some more "donated" items for the build. The new extention cord (50' 12/2) came from a friend of over 35 years (it also is good that we have a wire manufacturer in town) and my good neighbor donated 4 of the aluminum camper stabilizer jack stands.
ImageImage
:dancing :applause: :woohoo:
See, it really does pay to be nice to people :money:

Still working on the galley finalie and the lift shocks for the bach hatch. Until next time.....
Whitney & Tracie
Crothersville, IN

We never really grow up, we only learn how to act in public.

Do not confuse what you hear with what I mean.

My build: http://www.tnttt.com/viewtopic.php?t=41955

160061-------------------------------101114
States we've drug our
li'l camper through. (44 States + Vancouver Island and over 45,000 miles so far)
User avatar
WhitneyK
Gold Donating Member
 
Posts: 559
Images: 412
Joined: Sun Dec 12, 2010 10:28 pm
Location: IN, Crothersville (36mi N or Louisville)
Top

Re: Whitney's Weakender - Update 3/29/12

Postby crumbruiser » Thu Mar 29, 2012 11:31 am

Arrows and shotgun shells, a man after my own heart. 8) Clever and cool and original and maybe even soon to be copied. :R
frank
I am not weird, I am a Limited Edition.
Facebook http://www.facebook.com/profile.php?id=100000303236631
User avatar
crumbruiser
Teardrop Master
 
Posts: 266
Images: 255
Joined: Sun Jul 10, 2011 6:11 pm
Location: Central Ohio
Top

Re: Whitney's Weakender - Update 3/29/12

Postby LDK » Thu Mar 29, 2012 4:41 pm

Hey Whitney

I really love those fenders and the way you did your curtains. That is very cool! :thumbsup: Do you shoot a bow? I recently bought a used

hoyt compound bow on craigslist. I'm gonna get back into bow hunting this next deer season that is if I can find the time. :lol:
LDK
Gold Donating Member
 
Posts: 1419
Images: 1
Joined: Fri Jan 22, 2010 8:29 pm
Top

Re: Whitney's Weakender - Update 3/29/12

Postby WhitneyK » Thu Apr 05, 2012 9:58 am

crumbruiser wrote:Arrows and shotgun shells, a man after my own heart. 8) Clever and cool and original and maybe even soon to be copied. :R
frank

They say Plagiarism is the greatest form of flattery :lol: Didn't notice until I got to looking at the picture that I had that shell upside down! :x More work...

LDK wrote:Hey Whitney

I really love those fenders and the way you did your curtains. That is very cool! :thumbsup: Do you shoot a bow? I recently bought a used

hoyt compound bow on craigslist. I'm gonna get back into bow hunting this next deer season that is if I can find the time. :lol:


Larry, yes, I have a Onieda Strick Eagle and a PSE. Like you commented, haven't had time in a few years to even draw a bow, that includes a Stradivarius Violin I have too. My recent years hunting has been with an inline muzzleloader.

Been scratchin' my head trying to figure out what to do with the back hatch. It's too heavy for my wife to lift so I installed gas shocks. Problem is, it's not "physically" possible to use the gas shocks with the amount of travel needed to clear my head (6'4"+) without having them "custom made" if that's even an option. I have removed the inside ceiling from the hatch, used a hole saw on the 1x4 framework in an effort to lighten the load, and am contemplating my other options. I have a long weekend off (including Monday by the way) so hopefully I can get something figured out. I've even considered using the torsion spring from a garage door and a fulcrum system.?. :NC Possible, but not practical (which is what got me to buildin' a camper in the first place :lol: )
Whitney & Tracie
Crothersville, IN

We never really grow up, we only learn how to act in public.

Do not confuse what you hear with what I mean.

My build: http://www.tnttt.com/viewtopic.php?t=41955

160061-------------------------------101114
States we've drug our
li'l camper through. (44 States + Vancouver Island and over 45,000 miles so far)
User avatar
WhitneyK
Gold Donating Member
 
Posts: 559
Images: 412
Joined: Sun Dec 12, 2010 10:28 pm
Location: IN, Crothersville (36mi N or Louisville)
Top

Re: Whitney's Weakender - Update 3/29/12

Postby Rlowell » Thu Apr 12, 2012 11:11 pm

Whitney,
What a great build!!!!!!! You have the "Touch" of a craftsman and your build shoes it off well.

I love the "Weekender" style as well. My build was the "Ketza Kamper" which was built on a budget as well and with little to no skill and less tools.
Enjoyed every minute of the build.

Rod
Plan your work...work your plan...at least that's the plan. Oh, just do it anyway!
gallery/image_page.php?album_id=1425&image_id=76342
User avatar
Rlowell
2000 Club
2000 Club
 
Posts: 2004
Images: 42
Joined: Wed May 23, 2007 12:39 pm
Location: Orlando, Fl.
Top

PreviousNext

Return to Build Journals

Who is online

Users browsing this forum: No registered users and 50 guests