CrowsWing , So long and thanks for all the fish.

...ask your questions in the appropriate forums BUT document your build here...preferably in a single thread...dates for updates, are appreciated....

Re: CrowsWing offroad benroy build

Postby S. Heisley » Wed Feb 22, 2012 10:00 pm

In the big scheme of things, a week is nothing. It'll all come together and be just as beautiful as you planned it.

I love your new avatar, Elizabeth. :thumbsup:
User avatar
S. Heisley
Super Lifetime Member
 
Posts: 8774
Images: 495
Joined: Mon Sep 17, 2007 10:02 am
Location: No. California

Re: CrowsWing offroad benroy build

Postby Elizabeth C. » Mon Feb 27, 2012 8:28 pm

Thanks for the encouragement, Sharon. :)

I've decided to soldier on and use the extra time to get as much done as possible. We are on a very tight schedule to get this trailer campable by the third week of April. It's a race against the calender..... ready ,set, go!

There is a lot to catch up on. We have spent every weekend for the last month working on the trailer so I will have to post it in sections.

Here is part one:

While waiting for the finish on the drawers to dry I decided to upholster the headboard. I found the instructions to do the diamond pleating here at tufted headboard instructions ( yeah interweb!!) . The fabric is a heavy duty upholstery material which should last for years.

The layout for the buttons was dependent on the pattern, I measured the repeat of the pattern and added 2 inches to account for the depth of the button holes thus arriving at 12 inches between button holes. The pattern was layed out on the foam :

Image

Then the button holes were cut out with a hole saw attached to a drill.
Image

Then the foam was glued to the ½” lightweight MDF.
Image

Then 2 layers of batting were placed over the foam and stapled in place.
Image

Then the fabric was placed over the batting and the button’s attached twine threaded to the back and stapled in place.
Image

Once all the buttons were attached, the fabric was stapled to the back.
Image

And voila!
Image

Here it is in place.
Image.

Should be comfy. And that is all for this little adventure. So back to the woodworking.

Onto part deux.
Dr C-Dawg
Our build in e-book form "The Teardrop Year" available at e-book, book or pdf at book or pdf

Read my Hubbys version here: CrowsWing Teardrop
User avatar
Elizabeth C.
Donating Member
 
Posts: 70
Images: 356
Joined: Mon Feb 07, 2011 6:38 pm
Location: King George, Virginia

Re: CrowsWing offroad benroy build

Postby Elizabeth C. » Mon Feb 27, 2012 9:30 pm

Here’s part 2:

We received our shipment of Raised panel doors from http://www.rawdoors.net . We are very satisfied with our doors. They seem to be sturdy and well made. I was able to order them in the exact sizes that I needed down to a fraction of an inch and received them in less then 2 weeks.

Image

The doors were fitted into the face frames.
Image
Then a jig was used to inset the hinges into the face frames.
Image
Image

Then the doors and rest of the frames were first coated with a grain filler ,that was rubbed down and the next day 2 layers of Minwax red mahogany were applied.

Then all the face frames and doors were hung up and 2 coats of poyurethane were appled
Image

Then 3 coats of epifanes rubbed effect varnish were applied. All very time consuming and smelly, but a necessity .


Uggh! Finishing cabinets is forthe birds.
Image

Onto part 3.
Thanks for looking,
Dr. C-Dawg
Last edited by Elizabeth C. on Mon Feb 27, 2012 10:39 pm, edited 1 time in total.
Our build in e-book form "The Teardrop Year" available at e-book, book or pdf at book or pdf

Read my Hubbys version here: CrowsWing Teardrop
User avatar
Elizabeth C.
Donating Member
 
Posts: 70
Images: 356
Joined: Mon Feb 07, 2011 6:38 pm
Location: King George, Virginia
Top

Re: CrowsWing offroad benroy build

Postby Elizabeth C. » Mon Feb 27, 2012 10:29 pm

Part three:

The next weekend I started the awnings. There will be one for each side. We wanted awnings that would be large enough to shelter the doors so we can sit on the mattress to put our shoes on. It was important to have them attach to the trailer rather than be staked to the ground for ease of set-up.

I was proud of my design, having spent many hours figuring it out. I thought it was pretty original until a few weeks later that I discovered a similar design on a VW camper site. Oh Well! :oops:

Anyway, here it is.

Here are the ingredients:

Image
3 yards of Sunbrella fabric.
4 yards of fiberglass sew-on welting
Sunbrella heavy duty thread
Bias tape to match
4 packs of replacement fiberglass tent poles
½ yard of 2 inch nylon webbing
4 5/8 inch rubber grommets
Heavy duty black thread
¼ inch seaming tape (double sided tape.)
4 six foot aluminum poles
4 90 degree bimini ball joints
4 bimini deck hinges and matching outside eye fittings

First I sewed a 3/8 inch hem around all 4 sides. I used the seaming tape to help keep everything neat.

Then I sewed then awning welt to one of the long sides.

Image
Then I sewed pockets out of the webbing. Simple ones for the near side and longer ones with an extension for the far side. Theses were sewn into the corners.

Image
Then the rubber grommets were placed into the far corners through the webbing and canvas , then they were embroidered into place with the black thread until it was entirely covered.

These grommets are where the tops of the poles that have a 90 degree ball and socket fitting will attach.
Image

Then the fiberglass poles were cut to length and assembled and fitted into the pockets. Then the bias tape was used to make a tie to secure the poles in the middle.

Image
The top fully assemble looks like this ( upside down)

Image
The welt will pass it standard aluminum awning rail that will be attached to the trailer.

Image
Here is a mock up of it on the trailer, the rail is just clamped to the side.

Image

I have other Biminis fittings that attach the bottom of the pole to the trailer body, There will be a pin that can be slid out to easily remove the pole end.

Image

I also will make the poles so they come apart into 2 pieces, so they fit into the storage areas.

I will take more pictures later in the build when I get to that point.

It’s getting late so I will have to post the other parts later this week.

ttfn. (Ta-Ta For Now)
Dr. C-dawg
Our build in e-book form "The Teardrop Year" available at e-book, book or pdf at book or pdf

Read my Hubbys version here: CrowsWing Teardrop
User avatar
Elizabeth C.
Donating Member
 
Posts: 70
Images: 356
Joined: Mon Feb 07, 2011 6:38 pm
Location: King George, Virginia
Top

Re: CrowsWing offroad benroy build

Postby Captain Monkeyshines » Mon Feb 27, 2012 10:46 pm

:awesome:
“When You're Alone”
When you're in the kitchen, you've got to behave
You don't put metal in the microwave
The knobs on the stove are “hands off” no doubt
And when you make toast, don't use a knife to fish it out!
When you're alone, when you're alone
You got to stay safe when you're home all alone.
When you're alone, when you're home all alone
You got to make sure not to die, or choke or burn the house down.
User avatar
Captain Monkeyshines
Teardrop Advisor
 
Posts: 84
Images: 1
Joined: Wed Jan 25, 2012 9:23 pm
Location: A galaxy not too far away
Top

Re: CrowsWing offroad benroy build

Postby S. Heisley » Mon Feb 27, 2012 10:56 pm

:thumbsup: Thanks for all the detail. It will definitely help others in their quests for ideas and ways to make the extras they may want.
That cushioned head board will set your build interior apart from all others! I suspect it will be very comfortable to lean back upon while sitting inside, reading or watching movies, etc. :applause:
User avatar
S. Heisley
Super Lifetime Member
 
Posts: 8774
Images: 495
Joined: Mon Sep 17, 2007 10:02 am
Location: No. California
Top

Re: CrowsWing offroad benroy build

Postby WhitneyK » Tue Feb 28, 2012 3:43 pm

Great job on the awnings! :applause:

Gives me some ideas :thinking:

Maybe I can put this thing to some use.....
Image
Whitney & Tracie
Crothersville, IN

We never really grow up, we only learn how to act in public.

Do not confuse what you hear with what I mean.

My build: http://www.tnttt.com/viewtopic.php?t=41955

160061-------------------------------101114
States we've drug our
li'l camper through. (44 States + Vancouver Island and over 45,000 miles so far)
User avatar
WhitneyK
Gold Donating Member
 
Posts: 559
Images: 412
Joined: Sun Dec 12, 2010 10:28 pm
Location: IN, Crothersville (36mi N or Louisville)
Top

Re: CrowsWing offroad benroy build

Postby mallymal » Tue Feb 28, 2012 4:00 pm

Really COOL build. Love the way you did the headboard - very few builders think of the bed as a 'sit up & read' place, instead only thinking 'have I got room to lie down'.

Great work! Thanks for posting. :)
User avatar
mallymal
The 300 Club
 
Posts: 308
Images: 18
Joined: Fri Sep 26, 2008 4:20 am
Location: manchester, UK
Top

Re: CrowsWing offroad benroy build

Postby Elizabeth C. » Sun Mar 04, 2012 10:06 pm

Thanks everyone for the replies,
Napping is one of my favorite hobbies so it is important that our trailer have the most comfortable sleeping quarters possible.

There is more to update:

Okay here is part 4 :

After working on the awnings my hubby and I spent the day installing the hardware on the drawers in the base cabinets of the galley.

We started with the drawer slides . I followed the directions I found on you tube at :

http://www.youtube.com/watch?v=0E7SqMQSxGg&feature=related


The slides are all stainless steel. The oven drawer is able to hold 75lbs.

Image
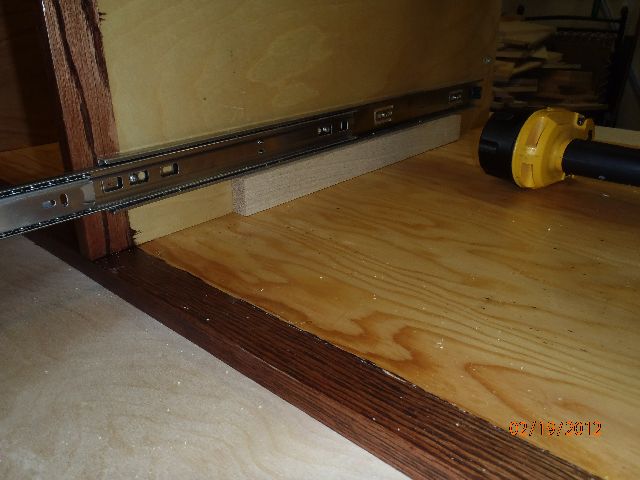
All the slide were installed, thankfully they all fit.

Image
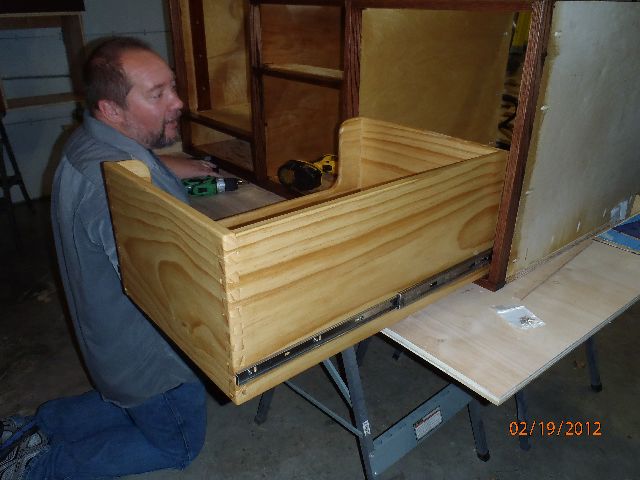
This isn’t the most flattering image of my hubby. He kept making weird faces while I was taking the pictures. :?
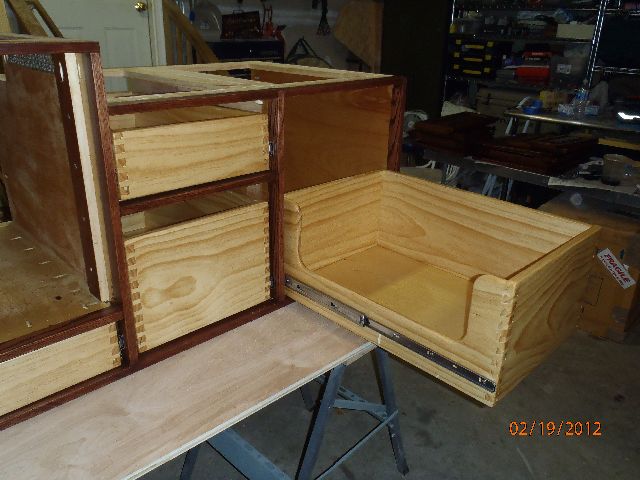

Image

Image
Oven drawer detail


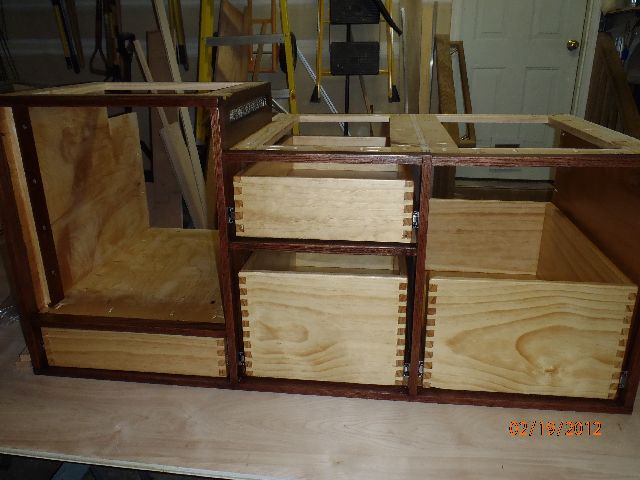
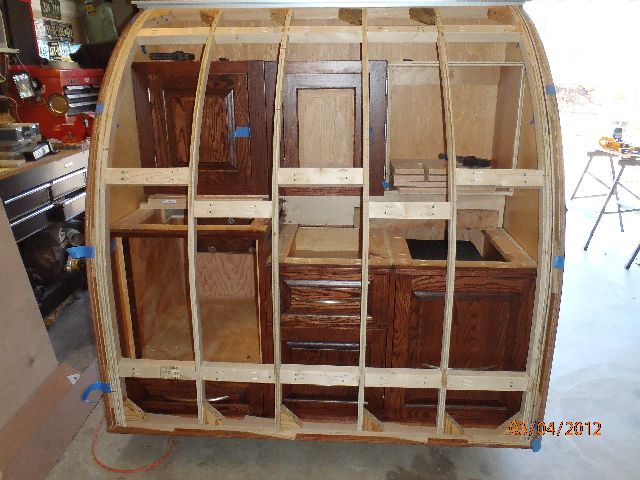
Then we attached the drawer fronts, the hardware is also stainless. We chose as much corrosion resistant fittings as possible as we plan on doing beach time.

Image
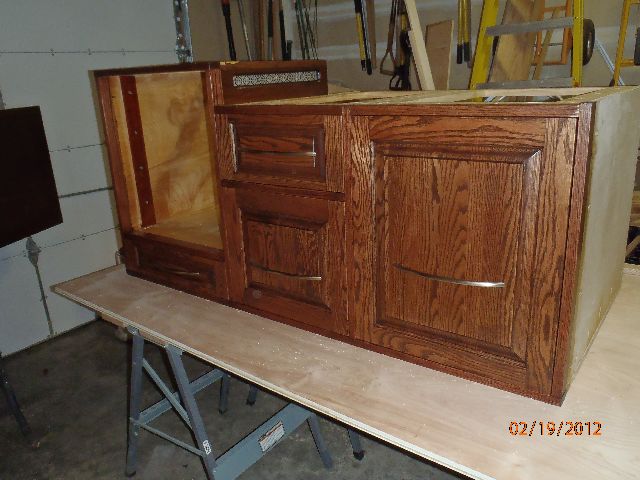
The empty space is where the refrigerator will fit.

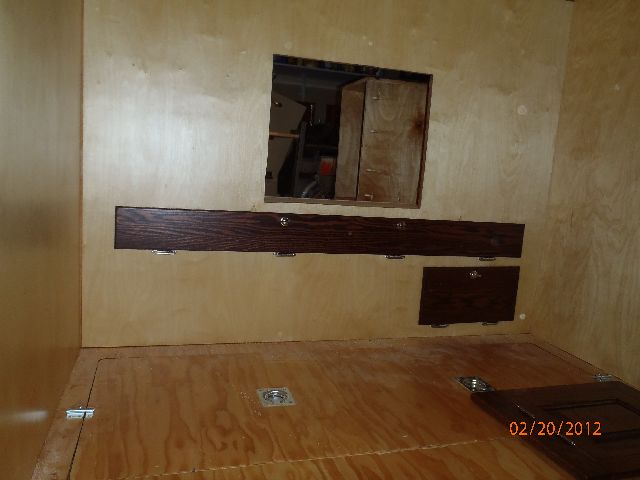
Then we attached the hinges and catches to the electrical and water access drawers.

Image

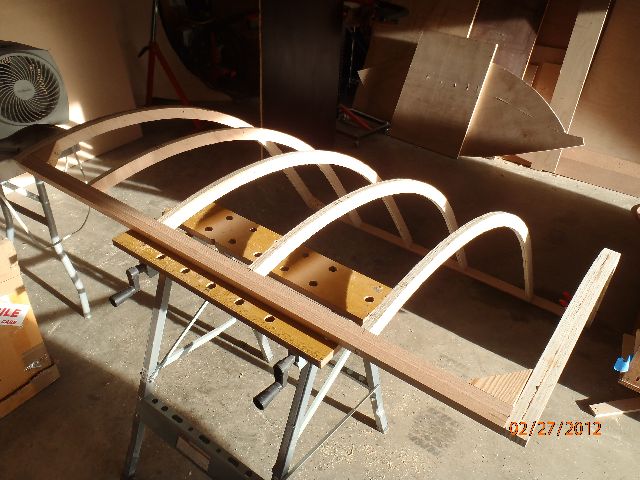
The next step was to work on the hatch. So I traced the shape of the hatch curve onto ¾ inch plywood added 1 ½ inch thickness and cut it out with the saber saw . Then I traced out 7 more. And my hubby rough cut them.

Image

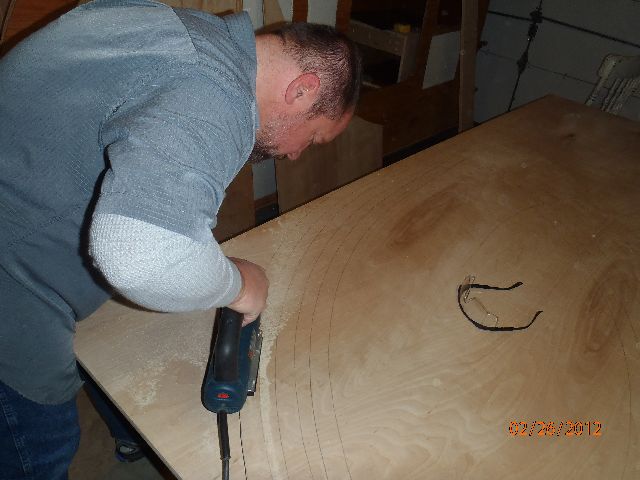
Then I routed them to match the master spar. My better half was absent for this part because he had to take my 16 year old son for driving lessons. I think he had the worse of the two jobs, using a tool that can shred the flesh off your bones is far less scary than driving with a teen.

When he returned we cut the hinge to size. We are using the hinge available from So-cal .

Image

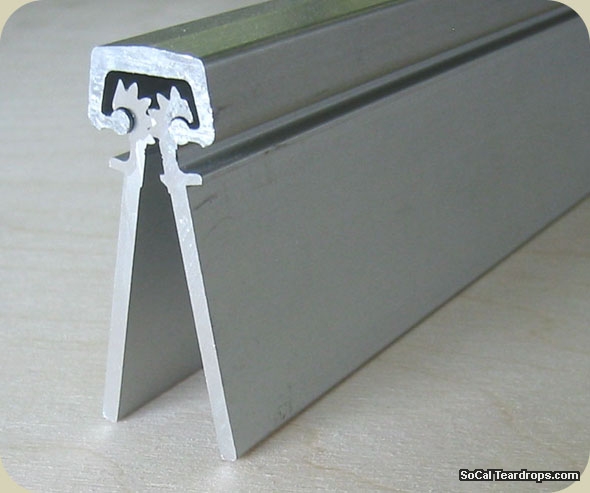
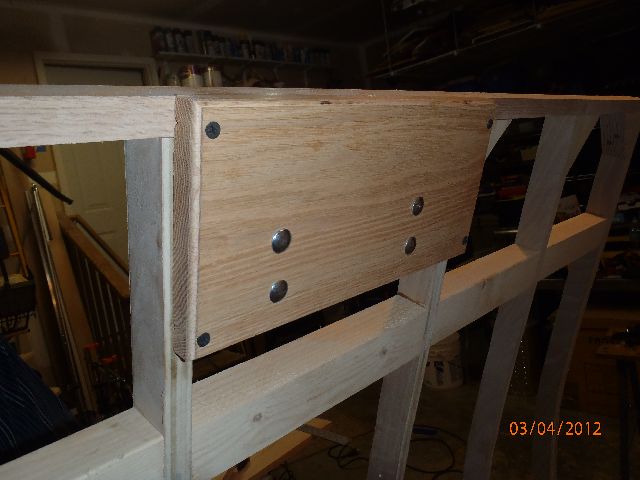
Their directions were very good. We attached the hinge to the trailer side of the galley, so we could fit the cross pieces. Then we assembled the spars to the top and bottom with pocket joints reinforced with triangular blocks.


Image

Image

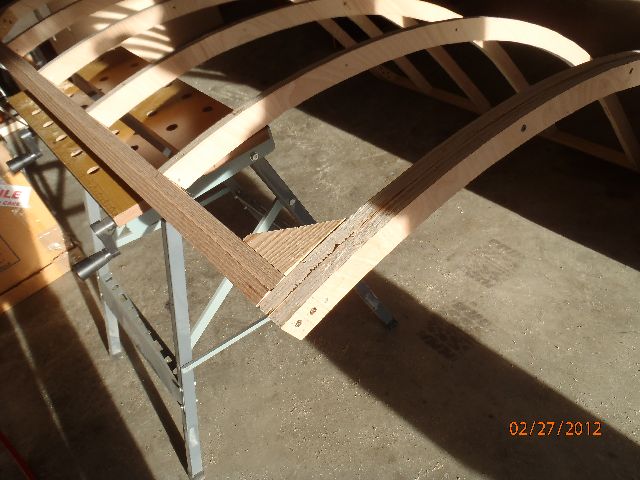
Detail of upper side. Showing double thickness of oak to we used to provide adequate strength to attach hinge.

That was as much as we were able to accomplish that weekend. This weekend we were back on hatch detail. We started by adding cross pieces to strengthen the spars and to provide places to attach edges of the outer skin. At this point I realized I could have just made the hatch 5 foot long and saved ourselves aggravation. Oh well… maybe next build.

Image

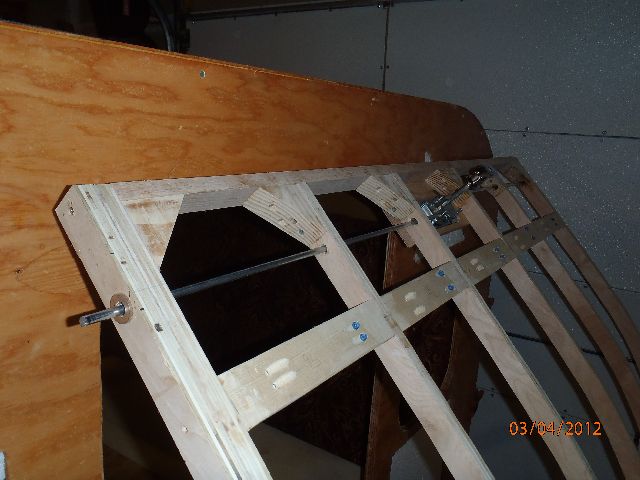
The next step was to sand the hatch skeleton smooth. Then we installed the hatch. We decided that we wanted the T-handled latch workings hidden in the hatch. However at 1/½ inches thick there wasn’t enough room to do that easily. So I cut apiece of oak to fit between the spars and routed out an area to inset the mechanism. The mechanism was bolted to this on the inside and then the whole thing was attached to the spars.

Image

Image

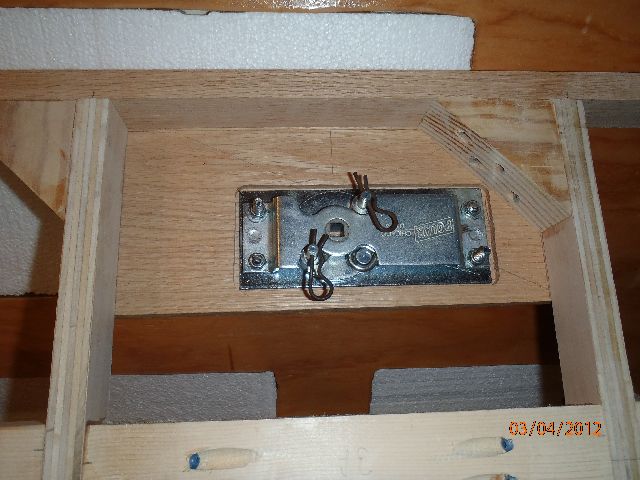
Inside view of latch panel. The drywall screws will be replaced with decorative screws when I remember to get them.

Then holes were drilled to allow the rods to pass. The rods were attached with cotter pins and then cut to length, flush to the sides when the mechanism was set to open.

Image

After the latch was done, we noted the measurements for the location of the t-handle spindle that will need to be drilled later. Then we applied the first layer of Baltic birch . Applying liquid nails to the spars and then clamping and stapling it down.

Image

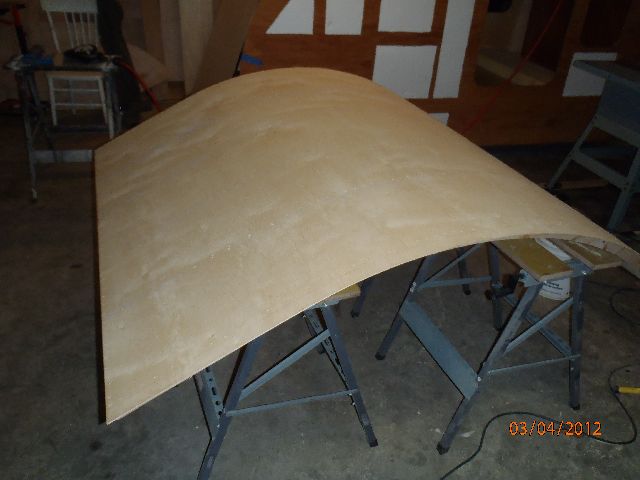
Tomorrow we will put down the second layer.

On another note, we received word from the trailer people that there will be another delay before we can pick up our chassis. Needless to say I became extremely miffed ( I’m sure their ears were burning). :x :x :x It wouldn’t be so bad except we placed the order in September, in November they said they were starting and it would only take a few weeks, come January we still had no word. When we contacted them they said they needed a little more time and that it would be done the second week of February, when we called to confirm the pick-up date they said they needed one more week, another week and a half passed and then we received the latest e-mail that the trailer won’t be done until March 14th. I threw a hissy fit and we sent them an e-mail saying we need the trailer in no more then one more week or we want our money back. They e-mailed back ( it’s been hard to contact them by phone) saying that they would be done by next weekend. All in all it has been very frustrating. I realize this is a custom build, but it seems that a company that advertises itself as a custom fabrication shop could do it in a timely manner without lying to their customers. :thumbdown:


Sorry for the rant... :oops: It’s just that if don’t get this trailer body mounted soon there will be no way we will be done in time for our spring trips. It’s enough to make a person want to march up there and kick rear. ..Is tear-droppers disease a defense you can use in court? :thinking:

I really do try to be the live and let live type of person, but sometimes I have a hard time of keeping my inner bad*** under control.

Image

My inner self is exactly like this but chubbier and more sarcastic, and I don‘t care if the world ends.

Anyways thanks for viewing.

“I became insane, with long intervals of horrible sanity.”
― Edgar Allan Poe

Later y’all
Dr. C-Dawg
Our build in e-book form "The Teardrop Year" available at e-book, book or pdf at book or pdf

Read my Hubbys version here: CrowsWing Teardrop
User avatar
Elizabeth C.
Donating Member
 
Posts: 70
Images: 356
Joined: Mon Feb 07, 2011 6:38 pm
Location: King George, Virginia
Top

Re: CrowsWing offroad benroy build

Postby S. Heisley » Mon Mar 05, 2012 2:53 am

You're doing a beautiful job and you'll get it done enough to use it.
I suspect that there are things that you can hold off doing until later, if you have to.
Sometimes, when a person doesn't get something done, they find a better way to do it, later.
It just has to be done enough to camp in. :thumbsup:

Thanks again for all the detailed descriptions that you are putting into your build thread. :applause:
User avatar
S. Heisley
Super Lifetime Member
 
Posts: 8774
Images: 495
Joined: Mon Sep 17, 2007 10:02 am
Location: No. California
Top

Re: CrowsWing offroad benroy build

Postby Captain Monkeyshines » Mon Mar 05, 2012 8:18 pm

You're doing a bang-up job! That trailer is going to be a work of rolling art when you are done!
.
Sorry about the chassis problems.....I'm sure if the builders knew how bad***ed you're inner self was they'd be shaking so hard they couldn't tig-weld straight. As for me (and a Sarah Connor fan) I'm digging your inner self......hmmm, lady with big guns who knows her way around a woodworking shop.....somebody is a very lucky man!
“When You're Alone”
When you're in the kitchen, you've got to behave
You don't put metal in the microwave
The knobs on the stove are “hands off” no doubt
And when you make toast, don't use a knife to fish it out!
When you're alone, when you're alone
You got to stay safe when you're home all alone.
When you're alone, when you're home all alone
You got to make sure not to die, or choke or burn the house down.
User avatar
Captain Monkeyshines
Teardrop Advisor
 
Posts: 84
Images: 1
Joined: Wed Jan 25, 2012 9:23 pm
Location: A galaxy not too far away
Top

Re: CrowsWing offroad benroy build

Postby Elizabeth C. » Fri Mar 09, 2012 8:53 pm

Well Captain Monkeyshines, the metal shop must have picked up on my vibes because they notified us that our trailer will be ready for pick-up this weekend :D And yes my husband is very lucky, because he won't have to hear me whining about this any longer. :R

They have also built the tongue box and the basement hatches.We'll see how closely they followed the plans:

Image

We'll travel up to PA (7 hour drive) on Sunday and stay the night at my parents. They're planning on fixing something special for dinner...turtle. (Just what kind of wine goes with reptile?) :wine: Yum!!!

Then we'll pick up the trailer 'n stuff on Monday and drive back home.

Next weekend we'll assemble the body onto the new frame and as long as everything goes according to plan,we will be back on schedule. What could possibly go wrong?

Should be smooooth sailin'.
Image

I will try to keep everyone posted.
Dr. C-Dawg
Our build in e-book form "The Teardrop Year" available at e-book, book or pdf at book or pdf

Read my Hubbys version here: CrowsWing Teardrop
User avatar
Elizabeth C.
Donating Member
 
Posts: 70
Images: 356
Joined: Mon Feb 07, 2011 6:38 pm
Location: King George, Virginia
Top

Re: CrowsWing offroad benroy build

Postby S. Heisley » Fri Mar 09, 2012 10:28 pm

Elizabeth (aka 'Rambo'), I don't think your a whiner. A wine-r? Now, that's another story!!!
I'd guess that you'd select wine for turtle the same as for fish: white? Other than that, I don't have a clue.

I hope you don't run into any bad weather on the way to PA...or on the way back!

Stay safe and enjoy your visit!
User avatar
S. Heisley
Super Lifetime Member
 
Posts: 8774
Images: 495
Joined: Mon Sep 17, 2007 10:02 am
Location: No. California
Top

Re: CrowsWing offroad benroy build

Postby Elizabeth C. » Mon Mar 12, 2012 8:49 pm

Well, we're back. Weather was good, the turtle was delicious, we now have the trailer in our possession. It wasn't completely done entirely as we asked, but at this point I think it is close enough. It looked like the custom shop got way in above their head. The owner said It was the first they had done and that he had 250 man hours in its construction ( I felt like I should have been wearing waders because the B.S. was getting pretty deep). All in all it is what I would consider 90% done, the hatches were 0% done ( what they had started was all wrong). I finally told him that I would forget about the hatches if he would give us a full sheet of diamond plate aluminum in exchange.He readily agreed to that, I think he just wanted us to leave.

I am just relieved to have anything at all, I was afraid they had run off with our money , tires,rims, and max coupler hitch ( which we had sent to them). Anyway my hubby has to iron out the suspension,some of the welds need to be ground down, the latches on the tongue box need changed, and we need to add attachment points for the body. Oh yeah I either need to find someone else to make the hatches or build them myself. :?

Here are some pictures:

Image

Image

Image

Image

Well It's getting late, it has been a very long day.
Smell you later.. :goodnight:
Dr C-Dawg
Our build in e-book form "The Teardrop Year" available at e-book, book or pdf at book or pdf

Read my Hubbys version here: CrowsWing Teardrop
User avatar
Elizabeth C.
Donating Member
 
Posts: 70
Images: 356
Joined: Mon Feb 07, 2011 6:38 pm
Location: King George, Virginia
Top

Re: CrowsWing offroad benroy build

Postby Martiangod » Mon Mar 12, 2012 9:29 pm

Looks like a nice trailer and shiney.
Shiney is always good

Now your worst fear is over, on with the fun :beer:
If it ain't broke, fix it till it is

Chris

Deep in the Heart of Nowhere
The topper viewtopic.php?f=50&t=58140, gone to a new home to be converted
into an ice fishing shack...FREEBIE !!! for a nice young family
The trailer viewtopic.php?f=50&t=48156
User avatar
Martiangod
500 Club
 
Posts: 856
Images: 432
Joined: Mon Jan 09, 2012 10:39 pm
Location: Peace River, Alberta
Top

PreviousNext

Return to Build Journals

Who is online

Users browsing this forum: OP827 and 14 guests

cron