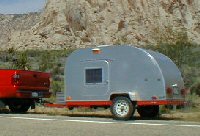
My Foamie Build--Updated --Jul 3 I'm eating an elephant

Canvas covered foamies (Thrifty Alternatives...)

Moderator: eaglesdare

Re: My Foamie Build--Updated -July 30 -- Home Again

Postby Wobbly Wheels » Wed Aug 01, 2012 11:38 am

Even if you weren't cutting away the damaged foam, you would need to round over that corner to wrap glass around it anyway. It looks like most of the damage would be gone then.

So that motor 'walks' up and down the threaded rod ?
User avatar
Wobbly Wheels
Donating Member
 
Posts: 1080
Joined: Tue Mar 15, 2011 9:51 am

Re: My Foamie Build--Updated -July 30 -- Home Again

Postby starleen2 » Wed Aug 01, 2012 4:45 pm

Bonnie - Been thinking about your door situation - maybe do then like they do on the pop ups. Have your door folded over on itself so it can hinge open when lowered for access to the inside. Once the top is raised - flip it up and lock it into place. Trying to make an offset door is going to difficult - you might want to check out the hi - lo manufacturer of RV's to see how they did it.
User avatar
starleen2
5th Teardrop Club
 
Posts: 16272
Images: 224
Joined: Sat May 12, 2007 8:26 pm
Location: Pea Ridge ,AR

Re: My Foamie Build--Updated -July 30 -- Home Again

Postby bonnie » Wed Aug 01, 2012 9:48 pm

starleen2 wrote:Bonnie - Been thinking about your door situation - maybe do then like they do on the pop ups. Have your door folded over on itself so it can hinge open when lowered for access to the inside. Once the top is raised - flip it up and lock it into place. Trying to make an offset door is going to difficult - you might want to check out the hi - lo manufacturer of RV's to see how they did it.


Looking at all my options right now, for the lift. I really want to use the door I have 99% done. Building up the back wall is the only option I see to do it. Still playing around with solutions.

I saw a simple cable roller idea that might work. Getting the current top up and off is the task at hand. I have a feeling it's going to be easier to cut it off where I was going to and then lift the remaining part. I certainly can't do it by myself right now. :thumbdown: It's too heavy.

I'll post something when I get a bit farther along. All of your thoughts and encouragements really help. Thanks! :applause: :applause:
Remember, the turtle won. :)
User avatar
bonnie
Donating Member
 
Posts: 1390
Images: 107
Joined: Sun Jul 24, 2011 4:14 pm
Location: Roxana, IL
Top

Re: My Foamie Build--Updated -- Aug 2nd -- Hit a snag.

Postby bonnie » Thu Aug 02, 2012 7:59 pm

It's only 92 here, so I went out to the garage to try and lift the roof. :thumbdown:

:x :x :x :x I can't lift the roof by my little old self. :x :x :x :x

Makes me want to :cry:

I can't get to the window parts to remove them unless I can get the top safely lifted and supported. No :pictures: either. Might have to make and test out my electric threaded rod lift sooner rather than later. :thinking: Though on the upside, that means the lift will definitely be mechanical/electrical.

OR, take a saw to the roof. Which I may yet do. I was considering measuring down 11" to the very top of the windows, marking the line and cutting the bottom of the side walls away. The windows are plexi and shouldn't suffer too much from the drop. :NC I'm still pondering what to do with the front wall/window. Thinking I might be able to cut it away from the wall without destroying it.

So, for those of you who have hacked up fiberglass and such, could I do that? What would I use? Jig saw, my 2x4 saw? Dremel with cutting blade? Should I put the tie down strap back on to keep the top from shifting as I cut?

Very much ready to take a bath and go to bed. But I think I've talked myself into hacking the roof apart while it sits on the bottom part. Sigh.
Remember, the turtle won. :)
User avatar
bonnie
Donating Member
 
Posts: 1390
Images: 107
Joined: Sun Jul 24, 2011 4:14 pm
Location: Roxana, IL
Top

Re: My Foamie Build--Updated -- Aug 2nd -- Hit a snag.

Postby KCStudly » Thu Aug 02, 2012 8:30 pm

How about working like the Egyptians? Use leverage and/or block and tackle (multiple pulleys and rope).

Leverage: make a series of 2x's of different lengths to prop the roof at different stages and one longer one to use as a lever. Use a step ladder and put the lever through one of the steps. Hoist and prop. Next step, next longer prop.

Block and Tackle: Northern Tool http://www.northerntool.com/shop/tools/product_11839_11839. I use one of these to store my 32 ft extension ladder in the rafters of my garage.

Just a couple of options. Cutting it up in position sounds risky to me. Might make more work than intended.
KC
My Build: The Poet Creek Express Hybrid Foamie

Poet Creek Or Bust
Engineering the TLAR way - "That Looks About Right"
TnTTT ORIGINAL 200A LANTERN CLUB = "The 200A Gang"
Green Lantern Corpsmen
User avatar
KCStudly
Donating Member
 
Posts: 9613
Images: 8169
Joined: Mon Feb 06, 2012 10:18 pm
Location: Southeastern CT, USA
Top

Re: My Foamie Build--Updated -- Aug 2nd -- Hit a snag.

Postby starleen2 » Thu Aug 02, 2012 9:27 pm

bonnie wrote:So, for those of you who have hacked up fiberglass and such, could I do that? What would I use? Jig saw, my 2x4 saw? Dremel with cutting blade? Should I put the tie down strap back on to keep the top from shifting as I cut?


Right now I'm in between replacing a floor on a boat and building a new camper - my experience from cutting out a fiberglass floor is this:

Grinding make a heck of a lot of fiberglass dust :thumbdown:
regular skill saw = a lot of fiberglass dust :thumbdown:
Dremel and Dremel flush cutter = a lot of fiberglass dust :thumbdown:
saws-all, hacksaw, jig saw - minimal amount of fiberglass dust :thumbsup:

The fiberglass dust goes everywhere - make sure you have a respirator or a good dust mask ( read here - NOT El Cheapo!)as a minimum. YOU DON"T WANT TO BREATHE THIS STUFF! Also wear good eye protection. any tool you use will cause some kind of blow back - ether from the tool itself or the motion of the blade. I used a pair of good safety glasses - but the dust just went around it and nearly got into my eyes - I then switched to a full face swim mask to seal all around my eyes. Be sure to either wear long sleeves or you'll get the fiberglass itch. If that happens - the rub some talc on your arms to relieve the irritation - Hope that helps
User avatar
starleen2
5th Teardrop Club
 
Posts: 16272
Images: 224
Joined: Sat May 12, 2007 8:26 pm
Location: Pea Ridge ,AR
Top

Re: My Foamie Build--Updated -- Aug 2nd -- Hit a snag.

Postby starleen2 » Thu Aug 02, 2012 9:34 pm

. . . also when I was building the ladybug - there was a separate discussion on lifting methods for the hatch - might be useful

viewtopic.php?f=2&t=31237&start=15
User avatar
starleen2
5th Teardrop Club
 
Posts: 16272
Images: 224
Joined: Sat May 12, 2007 8:26 pm
Location: Pea Ridge ,AR
Top

Re: My Foamie Build--Updated -- Aug 2nd -- Hit a snag.

Postby Wobbly Wheels » Thu Aug 02, 2012 9:45 pm

A 5" angle grinder with a cutoff wheel is the only way to go, but the epoxy layup should be thin enough to cut with almost anything. Using a grinder won't vibrate the panel at all. Use PPE.
A hacksaw blade in a wooden handle works well, too.

As for the dust - if you grab a cold shower after you're done, your pores will close up and you can wash off the dust without it getting into them and giving you the infamous itch. Using a shop vac as a dust collector works great, but your vac won't last long unless you use bags. Also - anything with a motor will be trashed by the dust - I buy angle grinders for work based solely on price because I go through several in a year.
User avatar
Wobbly Wheels
Donating Member
 
Posts: 1080
Joined: Tue Mar 15, 2011 9:51 am
Top

Re: My Foamie Build--Updated -- Aug 2nd -- Hit a snag.

Postby bonnie » Fri Aug 03, 2012 6:29 am

starleen2 wrote:. . . also when I was building the ladybug - there was a separate discussion on lifting methods for the hatch - might be useful

viewtopic.php?f=2&t=31237&start=15


Did you use this to lift the hatch? When I read through the thread, it didn't seem like anyone tried it. I think it could certainly work for me. I had a thought it would be easier to jack up one end (possibly) and put the pivots through the walls as they sit. Then I could (maybe) use the pulley system in the linked thread to lift the lid up and away. Never mind. That might work for the completed project, but I need to get the top off to work on the bottom part. And I'd like it to be a system that would allow me to do any repairs or maintenance needed in the finished BUB too. The block and tackle looks interesting. Saturday is a work day for me, but Sunday afternoon I may be able to investigate further.

Gotta do some more research and thinking. I did crawl around in BUB last night. It certainly feels huge.
Remember, the turtle won. :)
User avatar
bonnie
Donating Member
 
Posts: 1390
Images: 107
Joined: Sun Jul 24, 2011 4:14 pm
Location: Roxana, IL
Top

Re: My Foamie Build--Updated -- Aug 2nd -- Hit a snag.

Postby rbourne3 » Fri Aug 03, 2012 10:24 am

Not sure exactly what your plans are, but maybe you can cut out the front so you can pivot on the front and just lift the back?
User avatar
rbourne3
Teardrop Builder
 
Posts: 42
Joined: Sat Apr 10, 2010 7:37 pm
Location: Fernandina Beach, FL
Top

Re: My Foamie Build--Updated -- Aug 2nd -- Hit a snag.

Postby GPW » Sat Aug 04, 2012 6:43 am

Bonnie , please forgive me for being somewhat skeptical , but that sounds like a Lot of trouble and expense just to lift the roof , and on such a simple trailer ... My logic is just get somebody to help you lift it :thinking: .... It can’t be That heavy huh ??? Then just pop in some 2x4s, poles , pipes , whatever... Simple , and more fitting with the original intent of the cabin ...
There’s no place like Foam !
User avatar
GPW
Gold Donating Member
 
Posts: 14912
Images: 546
Joined: Thu Feb 09, 2006 7:58 pm
Location: New Orleans
Top

Re: My Foamie Build--Updated -- Aug 2nd -- Hit a snag.

Postby Verna » Sat Aug 04, 2012 6:53 am

Bonnie, I'll be in Southern Illinois next weekend. If you live somewhere close to my route or destination, I'll be more than happy to stop by and help for a while.
Verna
Indianapolis, IN
User avatar
Verna
Gold Donating Member
 
Posts: 1407
Images: 49
Joined: Mon Aug 08, 2011 11:11 am
Location: Indianapolis, IN
Top

Re: My Foamie Build--Updated -- Aug 2nd -- Hit a snag.

Postby mezmo » Tue Aug 07, 2012 2:43 am

Hi Bonnie,

Good to see you've gotten BUB home now,

Just a few fast thoughts:

I think I recall reading that the front of BUB was
modified to what it is now - smaller frontal section
curved/angled back to the original side walls - was
done - for better towing aerodynamics, and that it was
a successful modification for that purpose. So why
not keep that already built benefit as you modify the
top by hinging the present top at its bottom at the front
and do a diagonal cut from that on the sides of the current
top to the height at the rear you want/need. You could keep
the current length of it and have an angled end infill panel
panel from that above the door end, or extend the roof
length some for it to coincide with the end wall when its'
in the lifted position.

Since the main singular feature of your design is the
round door, build/modify the lower rear wall to accommodate
that and don't try to have the door split or fold or
whatever [my impression from a couple of posts] just
keep it in place. If the rear wall is taller than the sides
to do so, that can be accommodated by the tilting roof's
rear sidewall end height so that that can cover the difference
in the new rear wall height and the existing sidewall height
when the roof is in the down position.

I also noticed on a model in your album that you'd proposed
a cut in the lift roof's end wall to evidently allow you to
open the door with the lift roof down. A straight across
end panel without that cut out would probably be stronger
and easier to build, but if you still opt for the cut out I'd
recommend at least 4in depth from the roof above the
highest point of the cutout to the cutout for some rigidity
there. The easiest way to reinforce that would be to use
a good rot resistant [cedar?] 1x4 there [easy, just cut to
needed length] or some plywood [1/4 - 3/4in] ripped down
to either a 4in width or cut to the entire rear lift roof
end panel shape [including the cut out]. It just depends
on the look you want or decide on and the amount of
complexity you want to deal with when you build.

'Hope what I've described is understandable, if not, feel
free to ask for any clarification if needed.

Cheers,
Norm/mezmo
If you have a house - you have a hobby.
User avatar
mezmo
1000 Club
1000 Club
 
Posts: 1817
Images: 194
Joined: Fri Jan 01, 2010 4:11 am
Location: Columbia, SC
Top

Re: My Foamie Build--Updated -- Aug 17 -- Recomendations Nee

Postby bonnie » Fri Aug 17, 2012 12:37 pm

Ok. I'm going to be working on BUB this weekend. I need a recommendation for a dust mask or whatever it is for fiberglass. Links would be lovely. Something I could find local would be helpful too. Thanks!
Remember, the turtle won. :)
User avatar
bonnie
Donating Member
 
Posts: 1390
Images: 107
Joined: Sun Jul 24, 2011 4:14 pm
Location: Roxana, IL
Top

Re: My Foamie Build--Updated -- Aug 17 -- Recomendations Nee

Postby atahoekid » Fri Aug 17, 2012 2:40 pm

I am assuming you want a disposable dust mask for nuisance dust and not a respirator for the fumes. They are two different things. If you are looking for a dust or particle mask look for an N95 mask. These are the "paper" disposable masks with two elastic bands. I think the big box stores carry them. I know there are disposable masks that also filter out nuisance odors but not sure you'll find those.

You should also be able to find a half mask respirator for fumes at the big boxes if you want. I don't think you need one though. The epoxy resin does not give off much in fumes. Just make sure you have good ventilation. Add a fan if you wish. Don't use polyester resin that stuff requires a respirator and will eat up foam. If you decide to use a respirator make sure it is fitted with a cartridge designed to work with epoxy. An organic vapor cartridge should work but I am NOT positive. Check the material safety data sheet from the manufacturer of your resin for the information. You can find the data sheet on line.

If you have any respiratory issues be careful using any mask. The increased respiratory effort required to breathe through one may set off your medical issues.

3M has good respirator info on their web sites. Sorry to bombard you with that much info but I do this stuff for aliving. I mentioned that I did not use a respirator for the fumes but I do recommend using an N95 mask if you sand your fiberglass. Hope that helps
Mel

"Believe in your abilities... Remember amateurs built the ark, professionals built the Titanic"

"Indecision may or may not be my problem" Jimmy Buffet

Image

The Road Foamie Build Thread: viewtopic.php?t=45698
User avatar
atahoekid
Platinum Donating Member
 
Posts: 1773
Images: 158
Joined: Sat Jul 24, 2010 2:49 am
Location: Incline Village, NV
Top

PreviousNext

Return to Foamies

Who is online

Users browsing this forum: No registered users and 12 guests