Army Goose - First Trip Report

Canvas covered foamies (Thrifty Alternatives...)

Moderator: eaglesdare

Army Goose - First Trip Report

Postby Aligator944 » Tue Apr 10, 2012 3:32 pm

OK, so I have mentioned that I have been working on a trailer in several posts, but have not got around to starting a thread until now. Before I start I want to thank many of you for the development work you have done in regards to the “foamie” concept. I have learned a great deal and soaked up the knowledge of your experiences. Unfortunately I have not taken many photos of the work till this point.

BACKGROUND:
Our tow car is a 2007 Hyundai Santa Fe with tow package. About 3 years ago we bought an Aristocrat LoLiner for camping to replace our old tent trailer. I completely redid the interior in it and repaired the rotted out front corner. We really like the trailers vintage looks, but even though it weighs about 2000lbs, and the Santa Fe is rated to tow 3500 lbs, the Santa Fe has real difficulty towing the trailer over Snoqualmie Pass to some of our favorite spots. After two summers I finally decided we needed a lighter trailer, and I really needed a new project…….because I don’t already have enough……unfinished projects……..really, ask my wife…….or not.

DESIGN:
The trailer design was inspired by the Kampmaster/Campmaster/Wild Goose type design where a large portion of the roof opens up to create a standing height interior. The design was drawn up in Autocad and revised several times to say the least. The trailer dimensions are 6’-3” wide by about 11 feet long. The trailer will hold me, my wife and our two dogs, a 105lb golden retriever and miniature schnauzer. Our 11 year old son usually shares a tent with our other camping friends. For those times they are not with us he may just squeeze in with us until he feels comfortable staying in a tent alone. The trailer will contain a near king size bed/dinette in the front of the trailer and a pair of 3’ wide cabinets flanking the drop floor area. Additional storage will be provided under the bed/dinette area. The main hatch will use a living hinge and several piano hinges will be used for the door and upper portion of the rear wall-hatch connection. Canvas or heavy vinyl will be used for the hatch side walls connected to the lower walls and back with Velcro. The windows were removed from a truck canopy by someone else (I did not need to dispose of the canopy!) and were picked up for $20 from craigslist. Canvas is from Harbor Freight.

Image
Image

POWER:
12 volt power will be provided by batteries to be located in the center front, below the bed initially, and then moved to a battery box on the trailer tongue. I picked up two automotive cigarette lighter /USB sockets and two USB goose neck reading lights that will be installed in storage cubbies in the cabinets at the head of each side of the bed. I plan to get a small power inverter as well. The trailer light wiring will be replaced and new LED tail lights will be mounted.


ImageImage

THE BUILD:
The trailer is based on our old tent trailer frame. It began last fall with the demo of the tent trailer down to the decking. Since the actual deck was in good condition, I decided to leave it in place. The galvanized steel wheel wells were also sound, so I left them in place. To give some more interior height I decided to install a drop floor. After looking at the frame I decided to cut out a portion of one steel cross member to install the dropped floor, bolting the pressure treated 2x6s to the frame at several places, including the remaining portion of the cut cross member. I was able to remove some additional steel support that was to distribute the forces of the tent trailer lifting mechanism, weight savings! Then it got cold and things sat in the garage until last month when I started again. Since the trailer is a rear entry design I also cut and reshaped the rear bumper to allow easier access. Eventually I will put some plywood on the remaining bumper areas and either build some storage boxes to site there or coolers and the like will be strapped there. The bottom was then sprayed with several cans of undercoating.
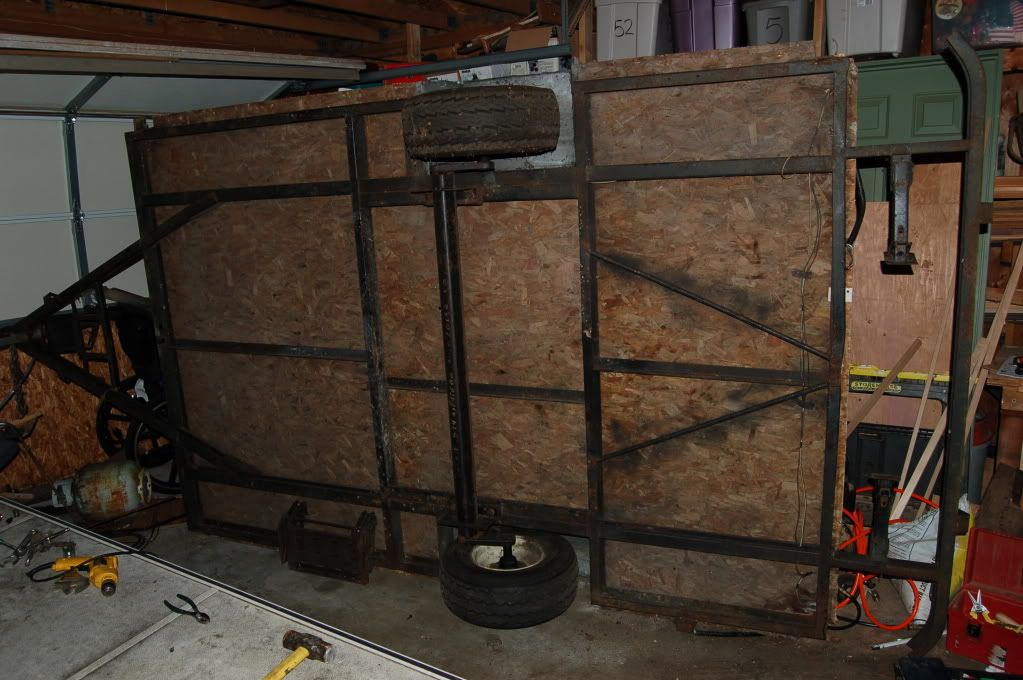
Image
Frame pre-modifications picture

The walls are 2” foam built up from 2’x8’ sheets of the Home Depot pink foam. I then glued a 2x3 glued to the bottom to anchor the wall to the trailer frame and a 1x “L” shaped piece glued to the top, along where the top will sit when down. These were not only glued, but also “nailed” into the foam with 5-6” lengths of glued in ½” dowel nails. There is also some 1x and ½” plywood glued on the end of the trailer to receive the rear walls which will be ½” plywood covered in canvas. The hope is that the wood provides a stronger glue joint along much of the perimeter of the wall. The windows were framed with 2x material. The interior of the walls has been canvassed with exterior paint “glue”, a mix of old paint and the $5 a gallon custom mixed, but not picked up, discounted paint from Lowes and Home Depot. Besides the “glue” coat, there are two top coats. The decking overhung the frame by about 3”, so I decided to trim off 2” of it along the sides of the trailer. I then screwed a 5/4” trim board just below decking. This hides the steel frame and also gives me the better canvas/wood bonding surface along the bottom of the trailer. The walls were then Gorilla Glued to the deck. By cutting back the overhang I could also bolt through the 2x at the bottom of the walls and through the actual steel frame rather than just through the OSB decking. (Almost all the gluing has been done with Gorrilla glue, except for some wood to wood joints were I used Titebond II.)

On the curved nose several 1x’s were notched and wood nailed into the foam to provide support for the masonite interior sheeting. I chose the masonite for cost, bendability and because I like the nondescript patterning. I also wanted some different textures and warmer colors in the interior. There are other benefits to this construction method, like not needing to fill the kerfs in the foam or trying to glue canvas to an inverted surface. The masonite was glued to the edges of the foam and the 1x and held in place with straps until dry. I did get some unwanted Gorilla glue oozing that I will need to scraped off the masonite. Then I sealed the back side and edges of the masonite with a generous coat of exterior paint. The front window was framed with 2x’s and two 2x’s and a 5/4” oak strip were laminated together to form the beam for the hinge. These were Gorilla glued and wood nailed onto the masonite/foam. I added another 2x to the top curved portion for additional strength. I roughed in the wiring for the ceiling lights and then came foam kerfing day, and the majority of the front was covered with Gorilla glued 2” foam, while I was only covered in pink foam dust.

Image
Image
Image
Image

That brings the build current. I have about 2 months until our first trip of the year, so there is no time to waste. Any suggestions on names for the trailer or paint schemes are welcome.
Last edited by Aligator944 on Thu Jun 21, 2012 10:31 am, edited 8 times in total.
User avatar
Aligator944
Teardrop Builder
 
Posts: 41
Joined: Thu Aug 11, 2011 6:03 pm
Location: Kirkland, WA

Re: New Build - Wild Gooseish - Awaiting real name

Postby pete42 » Tue Apr 10, 2012 3:38 pm

Nice build as you stated lots of good advice on this site.
love the pictures I'll keep an eye out for any more you might post.

pete
User avatar
pete42
Super Lifetime Member
 
Posts: 2203
Images: 13
Joined: Sat Nov 07, 2009 11:52 am
Location: SouthWest Ohio

Re: New Build - Wild Gooseish - Awaiting real name

Postby eaglesdare » Wed Apr 11, 2012 9:57 am

love your shape! and love that another foamie is being built. glad that info from these threads has helped you out. thanks so much for the pics also. looking forward to more from this build. :wine:
Louella
May the foam be with you.
User avatar
eaglesdare
Donating Member
 
Posts: 3168
Images: 13
Joined: Tue Aug 26, 2008 7:06 pm
Top

Re: New Build - Wild Gooseish - Awaiting real name

Postby GPW » Wed Apr 11, 2012 7:15 pm

Gator, Dude, what a Great job !!! Well thought out , Strong design , Cool looking and Big too ... And done in the Thrifty Foamie manner ... :thumbsup: :applause: 8) 8) 8)

Please send more :pictures: as the WildMaster progresses... ;)
There’s no place like Foam !
User avatar
GPW
Gold Donating Member
 
Posts: 14912
Images: 546
Joined: Thu Feb 09, 2006 7:58 pm
Location: New Orleans
Top

Re: New Build - Wild Gooseish - Awaiting real name

Postby atahoekid » Thu Apr 12, 2012 8:57 pm

I like it!! :beer: :beer: Great Job. Keep on going, sounds like you've got things well thought out... As far as not having enough unfinished projects sitting about, your wife can talk to my wife. :oops: :oops: Those aren't necessarily pretty stories. :lol: :lol:
Mel

"Believe in your abilities... Remember amateurs built the ark, professionals built the Titanic"

"Indecision may or may not be my problem" Jimmy Buffet

Image

The Road Foamie Build Thread: viewtopic.php?t=45698
User avatar
atahoekid
Platinum Donating Member
 
Posts: 1773
Images: 158
Joined: Sat Jul 24, 2010 2:49 am
Location: Incline Village, NV
Top

Re: New Build - Wild Gooseish - Awaiting real name

Postby pat g » Sun Apr 15, 2012 4:22 pm

Nice design!

Pat G :beer:
pat g
Teardrop Master
 
Posts: 155
Images: 122
Joined: Thu Feb 17, 2011 8:28 pm
Location: Medina, Oh
Top

Re: New Build - Wild Gooseish - Awaiting real name

Postby Aligator944 » Mon Apr 16, 2012 12:38 pm

Thanks for the complements,

This past weekend work progressed mainly on the top which is now mostly finished except for trim and the exterior canvas/paint skin. Decided to add a 24" x 48" skylight in the top for star viewing at night. The one thing I forgot, or rather did not fully think through was the wiring to the two lights in the hatch roof. I was going to run the wires between the masonite and the foam, but it is kind or hard to do until the hatch is attached. I figure that I will just have to add some dado's in the back of some of the trim pieces to hide the wires in. Some pics
Image
Image
Image
Image

I probably should have installed the new vinyl flooring this past weekend since that is really the next thing to do. Other thank the vinyl, the main steps left are:
1. Rear walls and door.
2. Cabinets and under-bed storage, along with dinette table.
3. Outer canvas and paint.
4. Install hatch.
5. Stain and poly on the interior.
6. Install windows.
7. Misc finishing touches, wiring connections, etc
User avatar
Aligator944
Teardrop Builder
 
Posts: 41
Joined: Thu Aug 11, 2011 6:03 pm
Location: Kirkland, WA
Top

Re: New Build - Wild Gooseish - Awaiting real name

Postby eaglesdare » Mon Apr 16, 2012 2:33 pm

:thumbsup: i like this alot! love your front window, i have been debating putting one on my new one.
Louella
May the foam be with you.
User avatar
eaglesdare
Donating Member
 
Posts: 3168
Images: 13
Joined: Tue Aug 26, 2008 7:06 pm
Top

Re: Wild Goose .... for now

Postby Aligator944 » Mon Apr 23, 2012 12:30 pm

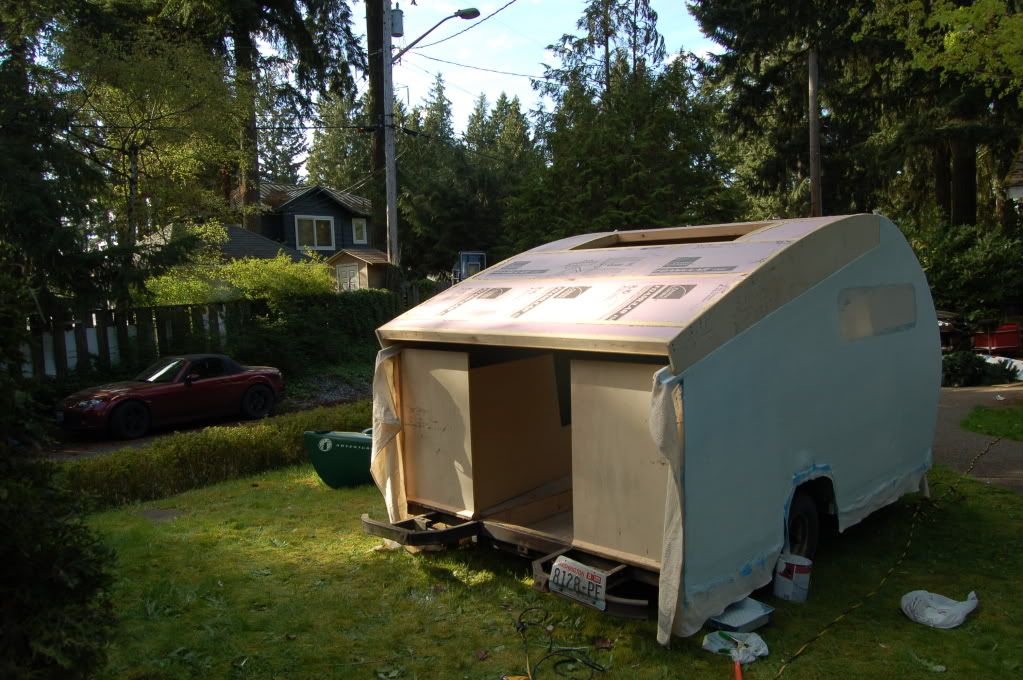
The weather was outstanding this weekend so I decided to move the trailer out of the driveway/garage and onto the front lawn. Work this passed weekend included filling and sanding the exterior for canvas, canvasing the sides and part of the front and began the back wall.
I used the great stuff spray foam for any larger gaps and light weight vinyl spackle for the smaller ones. I probably wasted 90% or more of the great stuff trimming it off.
Sanded and ready for canvasing
Image

First piece of exterior canvas goes on. The benefit to doing this in the front yard is that all the drips and spills will eventually get mown up.
Image

End of the day on Saturday, both sides canvased with 2 top coats of paint - not the final color yet
Image

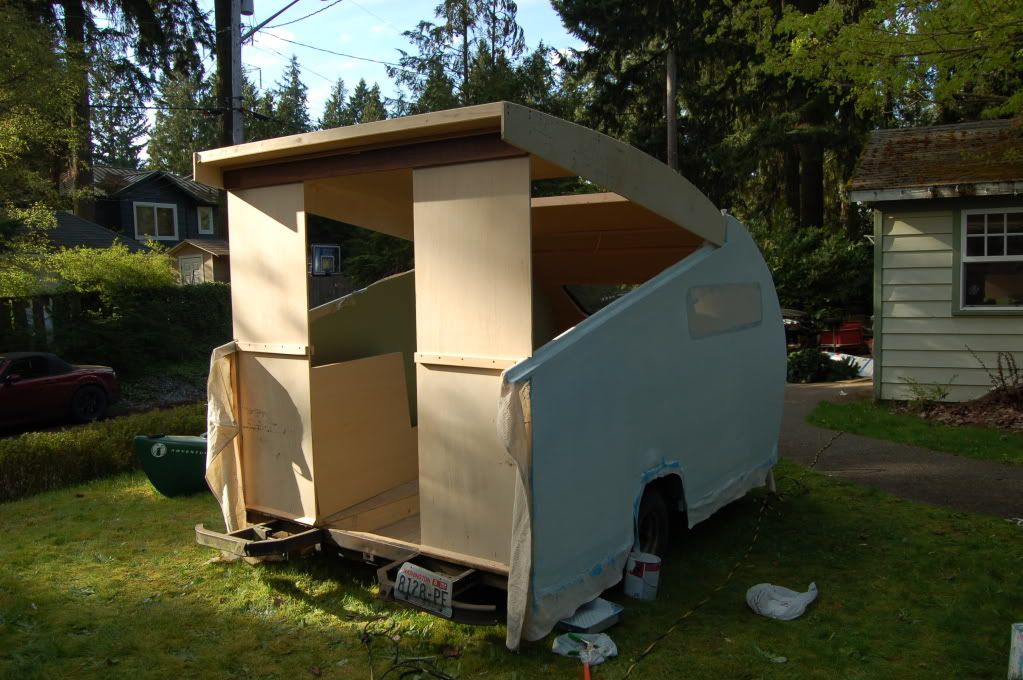
The rear wall sections made from 1/2" plywood. They are slipped into 3/4" deep groves I made from 3/4" wood and 1/2 plywood that are part of the ends of the side walls.
Image

The top comes up
Image

The top all the way up. The outside of the back walls will be canvassed to match the rest of the exterior. The inside will be stained.
Image

Near the end of Sunday I decided to use the last piece of canvas on the front of the trailer. Notice the variation in colors as I use up left over paint from the past 15 years since we moved into our house. I need to check in with Lowes and Home Depot for more cheap rejected custom mixed exterior paint before I can do any more canvasing. I have used atleast 4 gallons, maybe 5, of paint thus far.
Image

I found that drywall nails work well to hold the canvas in place, especially when "stretching" it out. I still need to attach the canvas at the bottom of the trailer and cut out for the windows. I will use Titebond II for the final gluing to the wood at these points for strength.
Tonight I hope to get the new vinyl floor glued down while the weather holds. There are somewhat cooler temps and rain coming by Wednesday. Then the back walls can be glued in place.

If anyone has a desire to see pictures of any of the specific construction details, let me know.
User avatar
Aligator944
Teardrop Builder
 
Posts: 41
Joined: Thu Aug 11, 2011 6:03 pm
Location: Kirkland, WA
Top

Re: Wild Goose .... for now 4/23

Postby GPW » Mon Apr 23, 2012 1:40 pm

WOW!!! That’s Very COOL !!!! 8) 8) 8) :thumbsup: :applause: Getting Close now !!! :D
There’s no place like Foam !
User avatar
GPW
Gold Donating Member
 
Posts: 14912
Images: 546
Joined: Thu Feb 09, 2006 7:58 pm
Location: New Orleans
Top

Re: Wild Goose .... for now 4/23

Postby eaglesdare » Mon Apr 23, 2012 1:42 pm

i hope you had help with that canvas!
it is looking real good. :applause:
Louella
May the foam be with you.
User avatar
eaglesdare
Donating Member
 
Posts: 3168
Images: 13
Joined: Tue Aug 26, 2008 7:06 pm
Top

Re: Wild Goose .... for now 4/23

Postby Aligator944 » Mon Apr 23, 2012 1:58 pm

My wife helped with the side canvas. I did the front by myself.
User avatar
Aligator944
Teardrop Builder
 
Posts: 41
Joined: Thu Aug 11, 2011 6:03 pm
Location: Kirkland, WA
Top

Re: Wild Goose .... for now 4/23

Postby aggie79 » Mon Apr 23, 2012 2:49 pm

GPW wrote:WOW!!! That’s Very COOL !!!! 8) 8) 8) :thumbsup: :applause: Getting Close now !!! :D


+1 on GPW said. That is a really cool design!
Tom (& Linda)
For build info on our former Silver Beatle teardrop:
Build Thread

93503
User avatar
aggie79
Super Duper Lifetime Member
 
Posts: 5405
Images: 686
Joined: Tue Aug 07, 2007 5:42 pm
Location: Watauga, Texas
Top

Re: Wild Goose .... for now 4/23

Postby S. Heisley » Mon Apr 23, 2012 7:42 pm

aggie79 wrote:
GPW wrote:WOW!!! That’s Very COOL !!!! 8) 8) 8) :thumbsup: :applause: Getting Close now !!! :D


+1 on GPW said. That is a really cool design!


Make that:

+2!

I can hardly wait to see more!
User avatar
S. Heisley
Super Lifetime Member
 
Posts: 8774
Images: 495
Joined: Mon Sep 17, 2007 10:02 am
Location: No. California
Top

Re: Wild Goose .... for now 4/23

Postby mezmo » Tue Apr 24, 2012 12:25 am

Hi Aligator944,

Great design and great progress! The profile is quite "fetching"
as the old-timers used to say.

I was wondering how you were attaching the windows and the hatch.

Will the windows be clamp ringed on or screwed on? If exterior located
screws are used as the attaching method, I'd suggest -as some have
mentioned in different builds here- to either drill out the screw-hole
oversize and then fill with epoxy and then drill out the hardened epoxy
the correct size to receive the screws -or- at least back out the screws
and squirt some silicone caulk into the screw holes and then reinstall the
screws This is to prevent wood rot in the perimeter window frames due
to moisture working it's way into the wood via the screws and screw holes
and eventually causing rot there.

And since the hatch will direct a lot of water at the hinge in the open
position, what are your plans for preventing the hinge area from leaking
or overflowing into the cabin? You may need some kind of diverter
where the hinge [hinge overhang] meets the sidewalls. Is that 'living
hinge' one of those continuous plastic types?

'Hope the weather and your 'free time' cooperates for ya!

Cheers,
Norm/mezmo
If you have a house - you have a hobby.
User avatar
mezmo
1000 Club
1000 Club
 
Posts: 1817
Images: 194
Joined: Fri Jan 01, 2010 4:11 am
Location: Columbia, SC
Top

Next

Return to Foamies

Who is online

Users browsing this forum: No registered users and 28 guests