The Poet Creek Express - Foamie Hybrid

Canvas covered foamies (Thrifty Alternatives...)

Moderator: eaglesdare

Re: The Poet Creek Express - Foamie Hybrid

Postby OP827 » Fri Nov 06, 2015 3:30 pm

^^+1.

KC, I have learnt to use some packing tape wrapped and smooth strips of wood be clamped around such corners to eliminate the blisters, creates nice and crisp results and no need for sanding where the the stips were clamped. Sometimes I use drywall screws to hold the wood strips down to wood(if there is some wood under the FG cloth layup), especially when clamps are not going to work. Combination of these tricks allowed me to make laminations of most of tricky spaces so far. Another bonus is elimination of potential amine blush where is no air contact, ie under the strip. Sometimes I just lay polyethilene or vinyl film over the layup, instead of packing tape, whatever works. But I learnt not to wrap the wet epoxy with packing tape facing epoxy, I once tried it and it created a difficult to remove goo layer on the epoxy, I removed it, but it takes more time.
Just my 0.02.
User avatar
OP827
Donating Member
 
Posts: 1558
Images: 405
Joined: Fri Apr 25, 2014 7:27 pm
Location: Bruce County Ontario

Re: The Poet Creek Express - Foamie Hybrid

Postby KCStudly » Sun Nov 08, 2015 2:56 am

Thanks for that tip, OP. I could see that working, but also adding another layer of prep and complication.

Definitely easier to get it right the first time than it is to undo the bad and have to redo, so I guess a little extra prep work and complication would be worth it.

I've decided to go with the bias strips on the rim and will probably also increase the round overs to at least 3/16 inch.
KC
My Build: The Poet Creek Express Hybrid Foamie

Poet Creek Or Bust
Engineering the TLAR way - "That Looks About Right"
TnTTT ORIGINAL 200A LANTERN CLUB = "The 200A Gang"
Green Lantern Corpsmen
User avatar
KCStudly
Donating Member
 
Posts: 9616
Images: 8169
Joined: Mon Feb 06, 2012 10:18 pm
Location: Southeastern CT, USA

Re: The Poet Creek Express - Foamie Hybrid

Postby KCStudly » Sun Nov 08, 2015 3:09 am

To update on Frankie, apparently she (?) wandered off after I left, then came back the next day for a while and wandered off again.

On the build, as mentioned previously, I bought a bunch of the 60 inch wide 6oz glass cloth, enough for 2 plies all over the cabin, hatch and to do the doors separately and then some; but have been trying to get the TB out of the 38 wide that Karl donated, and the smaller piece of 60 wide that I bought for reinforcing the ceiling front radius. Those smaller stocks are running out so I am trying to maximize the yield by doing careful layouts.

I could break into the bigger stash, but I would have to figure out a way to roll out enough of it to prioritize the larger sections before taking smaller bits here and there. I may even buy some more of the narrow stuff to complete the TB and do the first ply on the hatch on the bias, since I think there would be less waste using the narrower stuff this way.

Anyway, I had one piece big enough to do the underside of the TB, which I decided could get away with one ply (since it is over plywood… with 2 separate bias plies over the stiffening rib). I decided to use the PMPP technique on the underside because the slot for the stiffening rib would destabilize the cloth running lengthwise, so I cut that piece to length, prepared the plastic, traced out the template and rolled it up for safe keeping until I get to the layup (no pics).

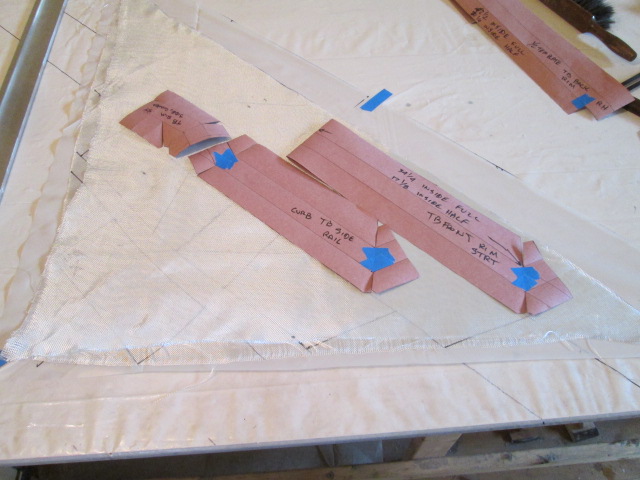
I had hoped to get all of the bias strips for the TB rim out of the other 38 x 36 inch piece, but couldn’t quite stretch it (not literally) that far. At first I figured all I would have to do would be to lay out 5 inch wide bands on the plastic, I even made some marks directly on the cloth; but those will likely just confuse me and I wished I hadn’t done it. In the end, with the templates I realized that all of the little tucks and darts on the smallish pieces were going to make them pretty fragile in the layup stage, so decided that wetting them all out as one using the PMPP process (again) would be the most efficient, meaning that there would be less waste by having common cut edges and that the plastic would hold the parts stable while applying.

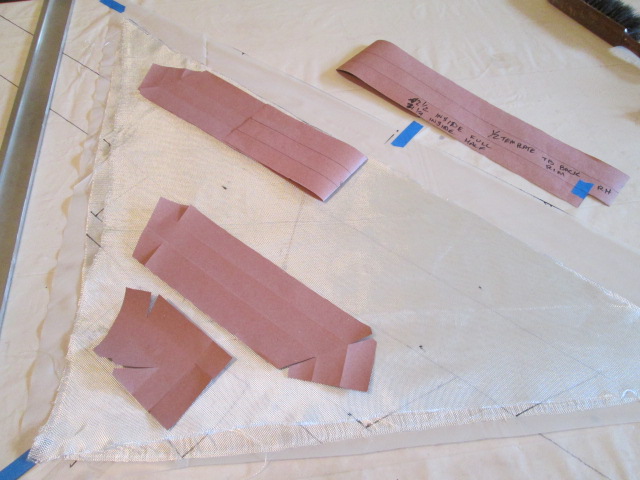
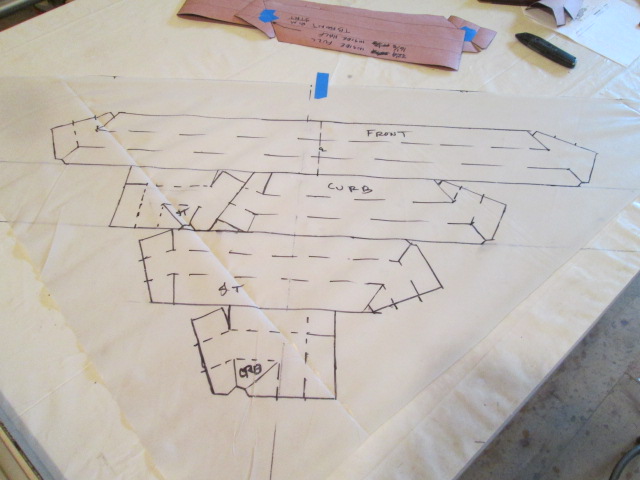
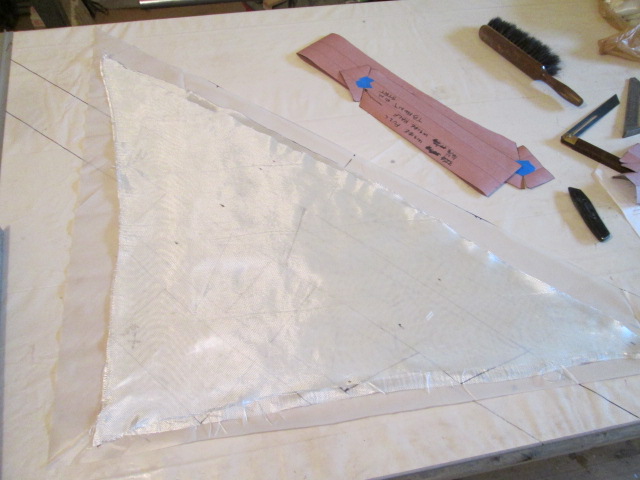
So I cut the cloth along the diagonal and flipped one piece back on the other. I wasn’t able to get the long back rim piece to fit comfortably, so that will have to come from somewhere else, but I did fit all of the other pieces. Since there is symmetry from right to left I only had to flip the templates over to get right and left. (Even though I could have just peeled the top or bottom plastic off to get the same thing, I decided it would fit the cloth better and avoid confusion to do it this way.) Also, I didn’t bother cutting longer strips of the rosin paper for the front and rear rim pieces; I just templated one end to the centerline, then flipped this pattern over to get the other end, making sure to double check overall dimensions before marking the patterns on the plastic. Here is the bottom plastic with two triangles of cloth and the templates, just checking to see if it would all fit. Note the 45 deg lines drawn on the big plastic sheet covering the worktable below. The template on the right is the half pattern of the front rim; the one in the middle is the longer curb side; and the one on the upper left is the small rear side and corner.
Image

Now they are flipped and repositioned to see that I could get the other half.
Image

With that settled, and after finding that I had screwed up on the length of the front piece… fortunately leaving it too long, not too short… I started tracing templates onto the bottom sheet of plastic.
Image
Image

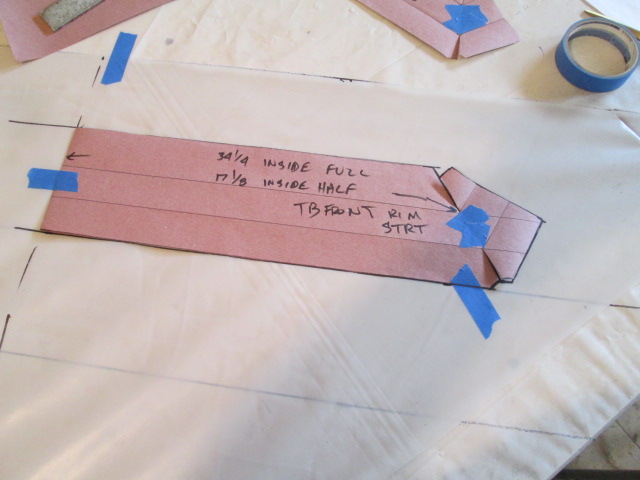
Now you can see how this should save both cloth and epoxy by having common cut lines and doing the wet out as one operation; less extra border will be wasted. Note the centerline shift on the larger top pattern, and the dashed lines that will help me line the pieces up with the edges of the rim when I go to lay them on.
Image

I also put sharpie lines on the front and rear rims of the box to mark the center lines, thinking that this will also help get the wet pieces in their proper locations.
Image

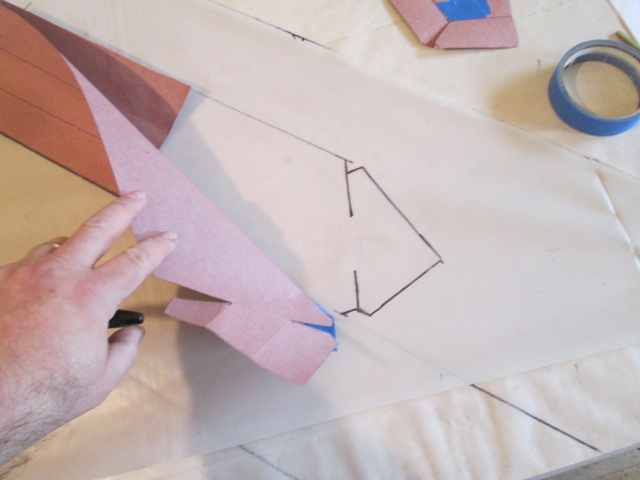
Double checking to see that everything fit under the glass before topping with the other sheet of plastic and rolling it up for safe keeping.
Image

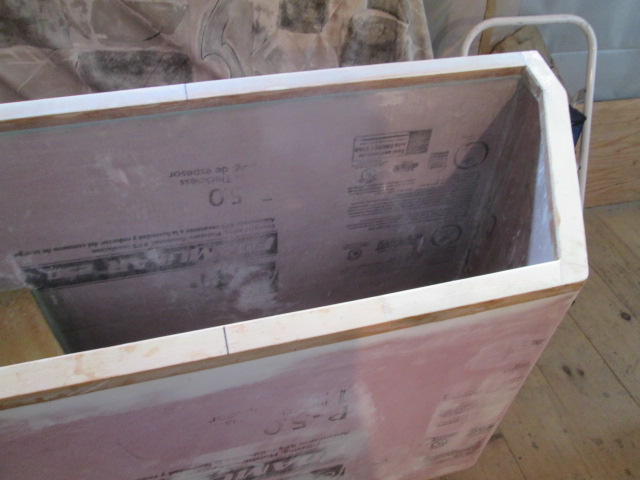
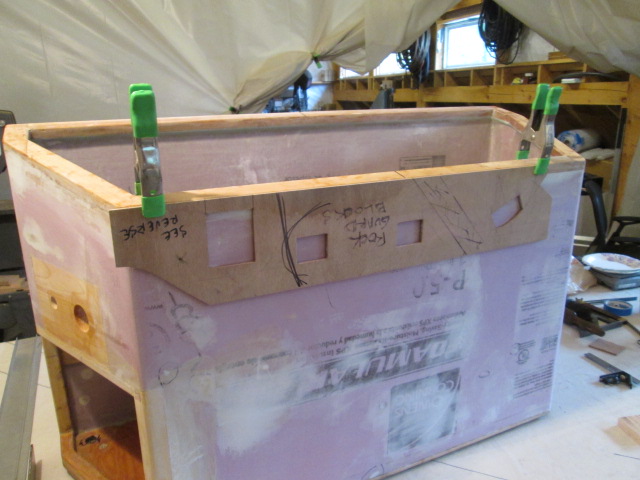
Shifting gears a little, I used the router template for the rock guard blocking and added a square cut for the TB latch blocking. By positioning the cut at the correct distance from the long edge it was a simple thing to align the edge of the template with the top of the rim and clamp it to the lip. I ended up using a few more clamps than shown here (to make sure the template wouldn’t slip) and moving the near side clamp down to make sure there was enough room for the router base.
Image

After extending the template lines up and matching them to marks I had measured on the top surface of the rim, I eyeballed things again with the block to be sure I was happy with the location.
Image

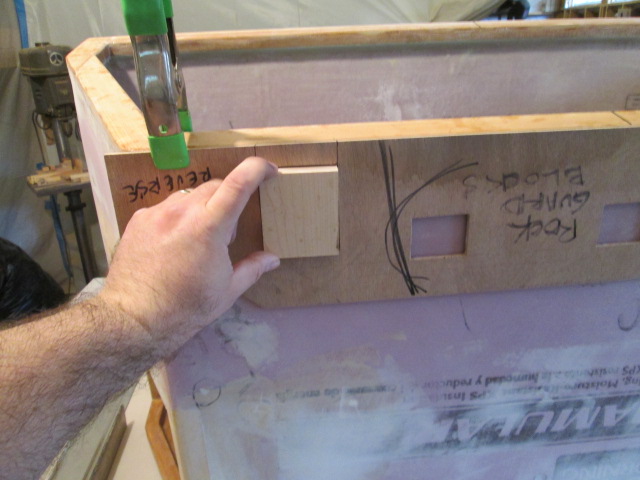
Then I made a shallow test cut to check that the template was a good fit for the blocks. Satisfied with that, I readjusted the router to full depth, made the cuts, and squared up the corners with the steak knife.
Image

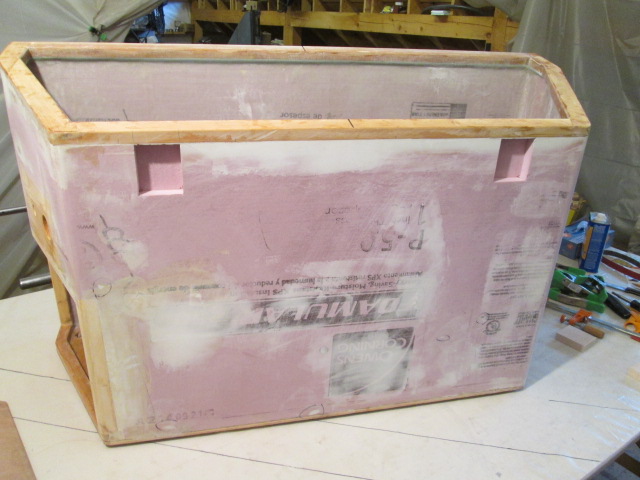
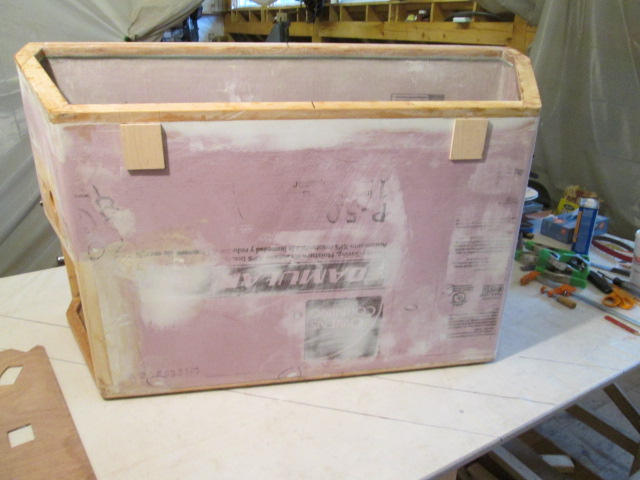
Then a dry fit. Shown here with the blocks just partially inserted to make getting them back out easier. I did check the depth on one by pushing it all the way in, but I had to gently pry it back out with the knife.
Image

I had completely forgotten to bring my glues and epoxies today (overnight lows have been dipping into the low 40’s), so that is where I left off.

Still, doing this all, plus cleaning out the shop vac and fiddling with the stupid push button retainer cap for the vac filter and finally modifying it to accept the older style plastic nut, took about 4 hrs.

This evening (Saturday) Yvette and I went out for Mexican food and then to the Garde Theater to see Buddy Guy fronted by Quinn Sullivan. Excellent!
KC
My Build: The Poet Creek Express Hybrid Foamie

Poet Creek Or Bust
Engineering the TLAR way - "That Looks About Right"
TnTTT ORIGINAL 200A LANTERN CLUB = "The 200A Gang"
Green Lantern Corpsmen
User avatar
KCStudly
Donating Member
 
Posts: 9616
Images: 8169
Joined: Mon Feb 06, 2012 10:18 pm
Location: Southeastern CT, USA
Top

Re: The Poet Creek Express - Foamie Hybrid

Postby Atomic77 » Sun Nov 08, 2015 7:53 am

Looks like it's been an interesting few days for you... Wild animals coming to visit, Buddy Guy... Engineering the heck outta that fiberglass layup! ;) As always, great work KC on what is no longer a camper but now simply a work of art!
Michael

"The Strength is in the Sum of the Parts..."

The Astroliner

Follow The Astroliner Blog Here!

Check out our YouTube video
User avatar
Atomic77
1000 Club
1000 Club
 
Posts: 1463
Images: 309
Joined: Tue Oct 08, 2013 5:29 pm
Location: Fort Wayne Indiana
Top

Re: The Poet Creek Express - Foamie Hybrid

Postby KCStudly » Sun Nov 08, 2015 11:33 am

Atomic77 wrote:Looks like it's been an interesting few days for you... Wild animals coming to visit, Buddy Guy... Engineering the heck outta that fiberglass layup! ;) As always, great work KC on what is no longer a camper but now simply a work of art!


:D I guess that's just how I roll. Hard to change a leopard's spots. 8) Thanks for the generous complement! Anxiously awaiting the reveal of your paint scheme. :thumbsup:
KC
My Build: The Poet Creek Express Hybrid Foamie

Poet Creek Or Bust
Engineering the TLAR way - "That Looks About Right"
TnTTT ORIGINAL 200A LANTERN CLUB = "The 200A Gang"
Green Lantern Corpsmen
User avatar
KCStudly
Donating Member
 
Posts: 9616
Images: 8169
Joined: Mon Feb 06, 2012 10:18 pm
Location: Southeastern CT, USA
Top

Re: The Poet Creek Express - Foamie Hybrid

Postby KCStudly » Sun Nov 08, 2015 6:14 pm

Plugging away at my over engineered TB, I wanted to scuff the maple blocks for the lid latches up well with 36 grit, as recommended by West System for hardwoods. However, in scuffing those blisters on the inside of the box I had stolen the belt off of my medium sanding block and torn a piece out of it. When I went to get another belt I found I only had the shorter ones that wouldn’t fit my home made block. That was okay; that block was slightly narrower than the standard 3 inch wide belt and I didn’t like how the tension spacer block was less than the width of the board (my grip tended to tear the belts on the top side). So I decided to take a few minutes to make a new coarse block. Simple scrape of 1/2 inch ply cut to the correct size, corners knocked off with the small hand block, and a piece of 1 inch foam with beveled corners as a tensioner/handle. Works great!
Image

Before mixing any epoxy, siding with Sheddie's advice, I cut a few small patches of glass (from scraps) to cover those blister repair areas on the inside of the box. I mocked those up and made a couple of sharpie marks around the patches to help guide me wetting the areas and placing the glass.

Then I mixed up some wet epoxy and painted it on the latch blocks; then added a little filler to make a wet slurry and spread that in the holes using the stir stick; then put the blocks in; wiped excess; and clamped with backer blocks on both sides, the top ones wrapped with stretch wrap to avoid sticking.
Image

I took the remainder of the slurry, added more filler to form a thick paste and spread that into the blister craters on the inside of the box, using a credit card squeegee to fair. What was left over I used up on the fillet for the stiffener rib under the bottom of the box.

Then I mixed up another small batch of wet, painted that around the filled blister craters using the sharpie marks as a guide; wet the larger patches on a small side piece of plastic sheet; lifted the edges with the spreader; and transferred them on to the wet patch areas. On one of the smaller patch pieces I just wet it out in place. It’s hard to tell from the pictures, but I am very happy with the repairs.

Here you can see a patched area along the right hand side and another close to the acute angle of the electronics ledge (look for the sharpie tic marks locating the corners of the patches). Compare that to the rough looking light colored area that was from a previous filler repair without the cloth cap (between the two newer patches to the right of the pink panther’s fingers).
Image

I guess there isn’t much to see here, but it is the small square patch that I wet in place.
Image
(Not being able to see the repair is a good thing!)

On this larger patch I didn’t cut and dig all of the blisters out. I did the biggest one and just sanded the small ones flat. The patch was sized to cover all of them, but the thing to note is that this was done on the slightly inverted surface (the inside street side of the angled side with the box lying on its back). With a thin painted on coat and the patch not excessively wet (or heavy, due to its small size) it seemed to stick just fine, despite warping the weave some getting it into place.
Image

I had quite a bit of wet left and it was starting to warm up in the cup, so I mixed in filler to a stiff paste and put it toward the stiffener rib…
Image
Image

…filling the backs of the T-nuts for the battery mount, and filleting around the raised block for the main wiring harness pull box.
Image

Only about 3 hrs in today, but I got done what I had my mind set on and once the epoxy starts the loft is not a pleasant place to be w/o the charcoal respirator in place (I get a headache quickly w/o it). Another thing I have noticed is that my mask tends to collect a lot more aspirated moisture with the vapor filters as opposed to the std dust filters. I know this doesn’t make sense since the exhaust port is the same regardless of filter type, it must just be that I am wearing the respirator for longer periods of time while glassing. Still, I have taken to removing the cartridges and storing them in a zip bag by themselves, and hanging the mask to dry, then using sanitizing respirator wipes to clean the mask prior to the next use.

Plugging away at it, one bite at a time. :D
KC
My Build: The Poet Creek Express Hybrid Foamie

Poet Creek Or Bust
Engineering the TLAR way - "That Looks About Right"
TnTTT ORIGINAL 200A LANTERN CLUB = "The 200A Gang"
Green Lantern Corpsmen
User avatar
KCStudly
Donating Member
 
Posts: 9616
Images: 8169
Joined: Mon Feb 06, 2012 10:18 pm
Location: Southeastern CT, USA
Top

Re: The Poet Creek Express - Foamie Hybrid

Postby Atomic77 » Sun Nov 08, 2015 8:15 pm

You're becoming a pro at that fiberglass stuff! Nice work. When you find a blister, do you fill it with thick before you patch? I appreciate the over-engineering KC... Keep on rolling!
Michael

"The Strength is in the Sum of the Parts..."

The Astroliner

Follow The Astroliner Blog Here!

Check out our YouTube video
User avatar
Atomic77
1000 Club
1000 Club
 
Posts: 1463
Images: 309
Joined: Tue Oct 08, 2013 5:29 pm
Location: Fort Wayne Indiana
Top

Re: The Poet Creek Express - Foamie Hybrid

Postby KCStudly » Sun Nov 08, 2015 8:57 pm

Mostly.

For the bigger blisters here's what I did. I sanded the raised material flat. This would generally weaken the remaining skin making it easy to slice thru the middle, getting the razor knife in to trim around the unbonded area. Then sand the edge of the plies some with sandpaper under my thumb. This was only effective sometimes; usually it removed more foam than glass and had a tendency to push the foam down away from the glass (again, not building an airplane, so not too concerned about structural strength on the inside of the TB).

I have a sneaking concern that some of this blistering may have something to do with the spackle filler, as there has been powdery white residue under some of the blisters. Maybe I should do a larger test before I go much further to make sure that the blisters weren't caused by some weird outgassing of the spackle (too early to speculate on this, but I am keeping my eyes open to the possibility).

For the first couple of repairs I just mixed up some thickened epoxy and squeegeed it into the lows with no cloth patch, then scuffed it some after cure (although it ended up hard as a rock with a little rough texture and slightly higher than the surrounding cloth).

Some of the smaller blisters I just sanded flat and did not bother cutting open or getting back to the foam. They'll still have a delam spot, but they are small. The added ply should stiffen them back up to eliminate the soft spot caused by sanding away the raised stuff.

I decided not to drill holes and try to inject wet under the skin because it just seemed like it didn't matter here. The key was to get rid of the high spots w/o leaving a crater or flimsy areas.
Last edited by KCStudly on Sun Nov 08, 2015 9:13 pm, edited 1 time in total.
KC
My Build: The Poet Creek Express Hybrid Foamie

Poet Creek Or Bust
Engineering the TLAR way - "That Looks About Right"
TnTTT ORIGINAL 200A LANTERN CLUB = "The 200A Gang"
Green Lantern Corpsmen
User avatar
KCStudly
Donating Member
 
Posts: 9616
Images: 8169
Joined: Mon Feb 06, 2012 10:18 pm
Location: Southeastern CT, USA
Top

Re: The Poet Creek Express - Foamie Hybrid

Postby Atomic77 » Sun Nov 08, 2015 9:08 pm

I think any more would just be overkill. On the inside thick without a patch should be plenty adequate. My concern about the spackle isn't out gassing, but more of a concern of the two just not playing well together. Not a huge concern inside. But looking ahead to the exterior...
Michael

"The Strength is in the Sum of the Parts..."

The Astroliner

Follow The Astroliner Blog Here!

Check out our YouTube video
User avatar
Atomic77
1000 Club
1000 Club
 
Posts: 1463
Images: 309
Joined: Tue Oct 08, 2013 5:29 pm
Location: Fort Wayne Indiana
Top

The Poet Creek Express - Foamie Hybrid

Postby Ned B » Mon Nov 09, 2015 12:18 am

KC, thanks for proving to me that I'm in the PMF camp for certain. that being said , as always, I'm enjoying the ride as you learn. I look at the TB as your journeyman's project en route to your masterpiece; TPCE.
User avatar
Ned B
1000 Club
1000 Club
 
Posts: 1036
Joined: Sat Apr 16, 2011 10:25 am
Location: Syracuse NY (ish)
Top

Re: The Poet Creek Express - Foamie Hybrid

Postby KCStudly » Mon Nov 09, 2015 7:34 am

Michael, yeah we're on the same page, but the cloth patch wasn't a big deal to add and did give a better finish, so I will tuck that in my little book of knowledge (...to be forgotten soon enough :lol: ).

Ned, yeah, the decision between epoxy/glass and PMF was a struggle for me, and I am still mildly second guessing that decision at times; but then I think that I would probably be fighting the little details with the canvas, too, so that puts it back into perspective.

The TB is definitely a learning curve for me, my "confidence piece". Despite the fact that I already have a ton of hours into it (maybe comparable to the side doors), and would really hate it if I screw something up big time; it is coming out the way I want it (more or less) and will be a better fit for the trailer than anything I could have bought ready made. I guess I am confident enough in the glass work now to realize that even if I screw up, I can still fix it. Maybe it won't come out as pristine as I would like it to, but it will get done and it will fit in. Warts are relative; you just have to drive them back until they are small enough that they don't bother you enough to fix them any further.
KC
My Build: The Poet Creek Express Hybrid Foamie

Poet Creek Or Bust
Engineering the TLAR way - "That Looks About Right"
TnTTT ORIGINAL 200A LANTERN CLUB = "The 200A Gang"
Green Lantern Corpsmen
User avatar
KCStudly
Donating Member
 
Posts: 9616
Images: 8169
Joined: Mon Feb 06, 2012 10:18 pm
Location: Southeastern CT, USA
Top

Re: The Poet Creek Express - Foamie Hybrid

Postby OP827 » Mon Nov 09, 2015 11:31 am

Nice work KC. It just takes time like any other good work and I like your attention to detail with doing the precut shapes. I had my share with blisters. Little holes that were left unfilled in foam before lamination do produce hundreds of tiny or not so tiny blisters, had that experience and they were a pain to address. Do not know about "vinyl" spackle that you have used. "Vinyl" by itself is not a good companion to epoxy, it won't stick to it. "Polyester" filler (bondo, 3m etc.) seems to be ok with epoxy, but it eats XPS foam like nobody's business. You did make a lamination sample with epoxy FG over this "vinyl" spackle patch as well and had no concerns, and did you tear it apart to check to your satisfaction, right?
User avatar
OP827
Donating Member
 
Posts: 1558
Images: 405
Joined: Fri Apr 25, 2014 7:27 pm
Location: Bruce County Ontario
Top

Re: The Poet Creek Express - Foamie Hybrid

Postby KCStudly » Mon Nov 09, 2015 12:35 pm

I didn't do a destructive test, and it was a relatively small area compared to the big area on my hatch. On the test piece It did seem to have a slight depression where the spackle had been fair (or at least I thought it had been fair) before glassing.

You make a good point, tho. Maybe I should cut the sample open and see what I can see.

I wonder if there is something I can use as a sealer/primer coat between spackle and/or TB2 and epoxy; something that is also compatible with the foam?
KC
My Build: The Poet Creek Express Hybrid Foamie

Poet Creek Or Bust
Engineering the TLAR way - "That Looks About Right"
TnTTT ORIGINAL 200A LANTERN CLUB = "The 200A Gang"
Green Lantern Corpsmen
User avatar
KCStudly
Donating Member
 
Posts: 9616
Images: 8169
Joined: Mon Feb 06, 2012 10:18 pm
Location: Southeastern CT, USA
Top

Re: The Poet Creek Express - Foamie Hybrid

Postby GPW » Mon Nov 09, 2015 12:49 pm

We tried to warn you... :roll: Micro Balloons , a phenolic plastic mixed with epoxy makes a great foam filler, and can be sanded ... but wear a mask as the baboons are almost lighter than air and will float and become trapped in the lungs .. http://www.aeromarineproducts.com/pheno ... fgodJ1MCpQ
There’s no place like Foam !
User avatar
GPW
Gold Donating Member
 
Posts: 14912
Images: 546
Joined: Thu Feb 09, 2006 7:58 pm
Location: New Orleans
Top

Re: The Poet Creek Express - Foamie Hybrid

Postby GPW » Mon Nov 09, 2015 12:53 pm

Ps. It’s probably not a good thing to have lighter than air Baboons in your lungs eh ....???? :lol: :lol: :lol:
There’s no place like Foam !
User avatar
GPW
Gold Donating Member
 
Posts: 14912
Images: 546
Joined: Thu Feb 09, 2006 7:58 pm
Location: New Orleans
Top

PreviousNext

Return to Foamies

Who is online

Users browsing this forum: No registered users and 12 guests