CapeBuild Build Journal

...ask your questions in the appropriate forums BUT document your build here...preferably in a single thread...dates for updates, are appreciated....

Re: CapeBuild Build Journal

Postby swoody126 » Sat Jul 17, 2021 6:10 am

"I can see it would be great to build 2 teardrops. You make all your errors on your first build and use that as a learning experience to make your second build PERFECT. ;)"

it'z that way whether it be boats or tears or ...

and that 2nd one is usually just one small step in a builder's life of building ...

the monday morning quarterback has great hindsight

how many mondays are there in a man's/woman's life !!!

IIRC one respondent to this forum has already indicated intended editing of his book after SEVERAL BUILDS

some of those edits are a result of ideas/processes/puzzlements/ponderments of a beginner

there is always room for improvement

sw
"we are the people our parents warned us about" jb
swoody126
500 Club
 
Posts: 769
Joined: Mon Feb 22, 2016 6:11 pm
Location: north of Ft Worth

Re: CapeBuild Build Journal

Postby TimC » Sat Jul 17, 2021 7:17 am

Capebuild wrote: ...I can see it would be great to build 2 teardrops. You make all your errors on your first build and use that as a learning experience to make your second build PERFECT. ;)


True to life. The planning and research you have made prior to picking up a tool is an approach we should all take and has resulted in your build being close to perfect. Don't fret over little fixes. My Brother-in-law told me something many years ago that has stuck with me in everything I build. Cy was a home siding contractor when I was growing up. He said that his job isn't to just throw on the siding, his job was covering up mistakes the carpenters made so that no one would ever know they were there. That's your task John. Continue to put your expertise in planning to work and cover up those mistakes and you will soon forget they are there. Your work is very impressive for a "rookie"!

And you said "...and just pocket holed them in place". They're my preferred method for cabinet frames though I am impressed with the tab and slot methods.

Tim
Last edited by TimC on Sat Jul 17, 2021 11:52 am, edited 1 time in total.
Tim
Niagara, WI
My First Benroy Teardrop Build Thread - A 5x8 Woodie - http://www.tnttt.com/viewtopic.php?f=50&t=63575
My Second Teardrop (partial) Build Thread - Started August '16 - http://www.tnttt.com/viewtopic.php?f=50&t=66939
#3 My son's Benroy Foamie team build - Started July '20 - http://www.tnttt.com/viewtopic.php?f=50&t=72877

Image
User avatar
TimC
Gold Donating Member
 
Posts: 1421
Images: 747
Joined: Sat May 23, 2015 4:15 am
Location: WI/MI border

Re: CapeBuild Build Journal

Postby Tom&Shelly » Sat Jul 17, 2021 7:35 am

swoody126 wrote:"I can see it would be great to build 2 teardrops. You make all your errors on your first build and use that as a learning experience to make your second build PERFECT. ;)"

it'z that way whether it be boats or tears or ...

and that 2nd one is usually just one small step in a builder's life of building ...

the monday morning quarterback has great hindsight

how many mondays are there in a man's/woman's life !!!

IIRC one respondent to this forum has already indicated intended editing of his book after SEVERAL BUILDS

some of those edits are a result of ideas/processes/puzzlementse/ponderments of a beginner

there is always room for improvement

sw


And then, once the build is perfect for one climate....I'm noticing the humidity of the Northeast is affecting our hatch fit. Might have gone a lifetime in the Southwest and not even know it's an issue. :thinking:

Tom
174145 170466 173366
Tom&Shelly
Palladium Donating Member
 
Posts: 2349
Images: 2170
Joined: Tue Sep 05, 2017 3:27 pm
Location: New Mexico
Top

Re: CapeBuild Build Journal

Postby eLink » Sat Jul 17, 2021 11:21 am

Capebuild wrote:July 16, 2021
If I had my druthers and a chance to do it all over again I would have skipped the dados in the side walls that match up with the cabinetry and just pocket holed them in place.
Turns out the CNC'd dados on the side walls are a bit off from my cabinetry geometry so need to make some adjustments. Workin' on it.
John


Been there! Had to do a lot of sanding and re-routing in some places. I had to do some rocking and jiggling to get my headboard to pop into place. I think moisture swelling and an uneven frame were to blame.
I had never heard the term "druthers" before except in this forum, so I finally looked it up. (thought is was some sort of magical tool!) If I had mine, I would give my dados a higher tolerance.
User avatar
eLink
Teardrop Master
 
Posts: 191
Images: 142
Joined: Mon Nov 12, 2018 3:34 pm
Location: Los Angeles
Top

Re: CapeBuild Build Journal

Postby Tom&Shelly » Sat Jul 17, 2021 1:56 pm

eLink wrote:
Capebuild wrote:July 16, 2021
If I had my druthers and a chance to do it all over again I would have skipped the dados in the side walls that match up with the cabinetry and just pocket holed them in place.
Turns out the CNC'd dados on the side walls are a bit off from my cabinetry geometry so need to make some adjustments. Workin' on it.
John


Been there! Had to do a lot of sanding and re-routing in some places. I had to do some rocking and jiggling to get my headboard to pop into place. I think moisture swelling and an uneven frame were to blame.
I had never heard the term "druthers" before except in this forum, so I finally looked it up. (thought is was some sort of magical tool!) If I had mine, I would give my dados a higher tolerance.


Since we are visiting my Mom: Any way my mother druther have it, that is the way I druther have it. And my brother druther have it dat way too. Now, if my uncles have their druthers, my brother's druthers, my mother's druthers, her brother's druthers and my druthers all druther be the same. But if you druther not, I have other druthers too.

Tom
174145 170466 173366
Tom&Shelly
Palladium Donating Member
 
Posts: 2349
Images: 2170
Joined: Tue Sep 05, 2017 3:27 pm
Location: New Mexico
Top

Re: CapeBuild Build Journal

Postby Capebuild » Sun Jul 18, 2021 4:21 am

July 18, 2021

Thank you all for the encouraging comments. Perfection is something to strive for, but from my experience (and many others, I'm sure) there always seems to be something that's "not perfect" and you wind up focusing on that hiccup.
Us humans.

At any rate, fiddled with the other side and got that fit in place. That side was actually pretty close to just fitting on without much adjustment.... which is a good and a bad thing. Meaning I'll have to further adjust one side or the other so both sides line up symmetrically. But for now I'll leave the fits as is and make further adjustments after I get the 3 layered side panels all glued up and ready to be permanently installed in place.

John
Attachments
2 sides.jpg
2 sides.jpg (300.74 KiB) Viewed 1100 times
"Success can be defined as moving from failure to failure without loss of enthusiasm".... Churchill

Visit my Teardrop build here: viewtopic.php?f=50&t=73779
User avatar
Capebuild
Donating Member
 
Posts: 760
Images: 129
Joined: Sun Jan 31, 2021 6:50 am
Location: Massachusetts
Top

Re: CapeBuild Build Journal

Postby Capebuild » Fri Jul 30, 2021 4:50 am

July 30, 2021

I've been working on the bed platform which will support the mattress and also fold up to a couch position.
Shown here just on the worktable (bed position and couch position).... won't install it into the trailer until I get the wall assembly attached as there are
Delrin slider tracks that will be installed under the platform and they get placed up against the inner wall sections.

John
Attachments
bed.jpg
bed.jpg (328.91 KiB) Viewed 1036 times
couch.jpg
couch.jpg (297.32 KiB) Viewed 1036 times
"Success can be defined as moving from failure to failure without loss of enthusiasm".... Churchill

Visit my Teardrop build here: viewtopic.php?f=50&t=73779
User avatar
Capebuild
Donating Member
 
Posts: 760
Images: 129
Joined: Sun Jan 31, 2021 6:50 am
Location: Massachusetts
Top

Re: CapeBuild Build Journal

Postby rjgimp » Fri Jul 30, 2021 2:54 pm

:shock: :thumbsup:
-Rob


I hope to make it to a Procrastinators Anonymous meeting someday...
just as soon as the steering committee gets around to scheduling one!
User avatar
rjgimp
500 Club
 
Posts: 827
Images: 7
Joined: Fri Feb 22, 2019 3:59 am
Location: Saint Paul MN
Top

Re: CapeBuild Build Journal

Postby Capebuild » Sat Jul 31, 2021 4:25 pm

July 31, 2021

glued up the exterior panel to middle skeletonized panel. Good thing I had my wife to help... had to move fast spreading out all that adhesive and stapling all down with crown stapler. You read about others doing this and kind of remember their comments about "moving fast" during this operation, but when you get to actually doing it, you see what is meant by "move fast"........I think it went okay. Probably used too many crown staples and went through that single tube of 939 in no time. luckily had some PL3X to complete the job. Will order more 939. Also got the tracks finished which will house the springs for the bed / couch platform.
Attachments
panel glue up.jpg
panel glue up.jpg (277.14 KiB) Viewed 974 times
track.jpg
track.jpg (164.51 KiB) Viewed 974 times
spring.jpg
spring.jpg (155.62 KiB) Viewed 974 times
"Success can be defined as moving from failure to failure without loss of enthusiasm".... Churchill

Visit my Teardrop build here: viewtopic.php?f=50&t=73779
User avatar
Capebuild
Donating Member
 
Posts: 760
Images: 129
Joined: Sun Jan 31, 2021 6:50 am
Location: Massachusetts
Top

Re: CapeBuild Build Journal

Postby swoody126 » Sat Jul 31, 2021 4:40 pm

yes ...

this is the main reason i like TROPICAL SLOW epoxy hardener

even in the heat down here it sometimes takes 48± hours to cure

butt that'z OK w/ this solo builder of toys

sw
"we are the people our parents warned us about" jb
swoody126
500 Club
 
Posts: 769
Joined: Mon Feb 22, 2016 6:11 pm
Location: north of Ft Worth
Top

Re: CapeBuild Build Journal

Postby Capebuild » Sun Aug 01, 2021 5:39 pm

Aug 1, 2021

Today removed the clamps and cinder block weights on the first side panel glue up, filled the staple indents with Bondo type filler, and orbital sanded. Also fit in place the 3/4 inch insulation panels (friction fit).
Next up is to glue up the interior panel to the assembly. (third panel making up the left side).

Looking at this now I might have been able to cut a bit more wood out of the middle skeletonized ply to reduce weight... but all in all not sure it would have saved all that much (weight). Once I get the interior side glued in place I'll weigh it.. .just curious.

John
Attachments
bondoed side.jpg
bondoed side.jpg (233.13 KiB) Viewed 936 times
other side.jpg
other side.jpg (220.66 KiB) Viewed 936 times
"Success can be defined as moving from failure to failure without loss of enthusiasm".... Churchill

Visit my Teardrop build here: viewtopic.php?f=50&t=73779
User avatar
Capebuild
Donating Member
 
Posts: 760
Images: 129
Joined: Sun Jan 31, 2021 6:50 am
Location: Massachusetts
Top

Re: CapeBuild Build Journal

Postby noseoil » Mon Aug 02, 2021 9:15 am

John, if I remember correctly, the side panel with one skin in place on our trailer weighed in at 34#. This was with the 3/4" skeleton wall & one layer of 1/8" Baltic birch glued in place & trimmed, no insulation either. I believe it did have the ceiling rabbet cut into the perimeter as well for this weight.
Build log: viewtopic.php?f=50&t=60248
The time you spend planning is more important than the time you spend building.........

137905
User avatar
noseoil
1000 Club
1000 Club
 
Posts: 1821
Images: 669
Joined: Sun Apr 27, 2014 8:46 am
Location: Raton, New Mexico, living the good life!
Top

Re: CapeBuild Build Journal

Postby Capebuild » Mon Aug 02, 2021 11:18 am

Thanks for that poundage info Tim. Spurred me on to put my panel on the scale. Very heavy, compared to yours at 34#s. My 3/4” middle panel and outer .238 okoume panel with insulation weighs in at 59#s. I also weighed what will be the inner panel, .157” okoume, that alone weighs 10.6#s. So seems if I don’t make any revisions the entire 3 section side wall assembly would wind up at about 70#s.

The 3/4” MDO panel alone weighs 39#s.

Looking at where I can remove some material from the middle MDO panel and try to reduce the weight.
Thanks again.

John
"Success can be defined as moving from failure to failure without loss of enthusiasm".... Churchill

Visit my Teardrop build here: viewtopic.php?f=50&t=73779
User avatar
Capebuild
Donating Member
 
Posts: 760
Images: 129
Joined: Sun Jan 31, 2021 6:50 am
Location: Massachusetts
Top

Re: CapeBuild Build Journal

Postby Capebuild » Sat Aug 07, 2021 3:51 pm

August 7, 2021

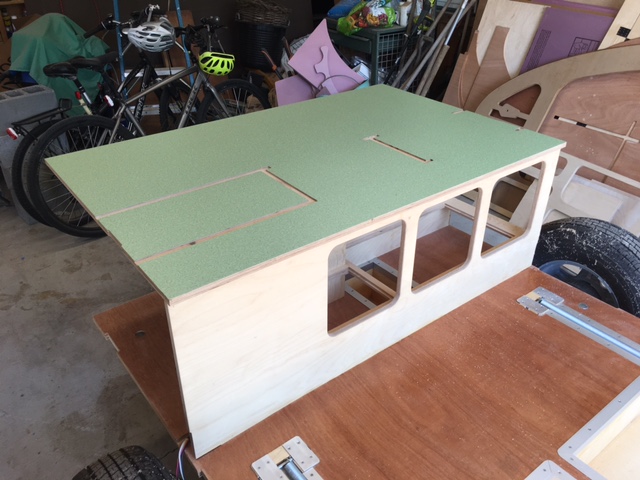
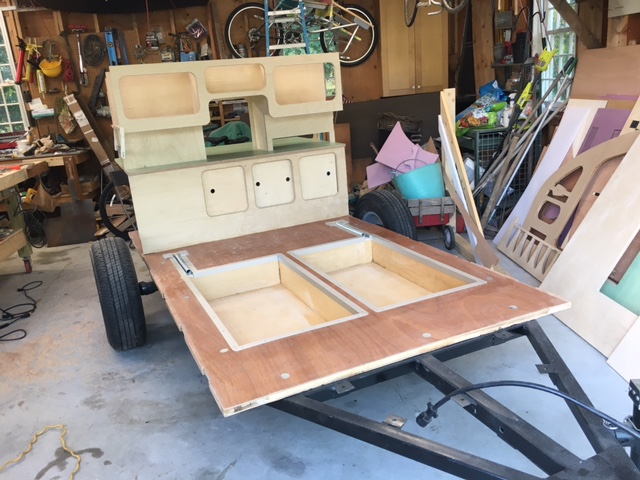
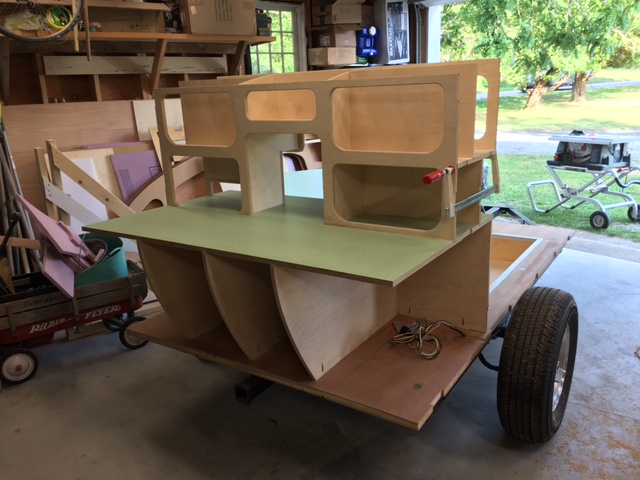
Installed laminate which covers kitchen/galley area and extends into cabin area. We ordered this laminate (kind of a retro boomerang design) 3 weeks ago. The local supplier said it would take 3-4 weeks, so very happy with the timing in which it arrived. If I had to do it again, I would have applied to laminate to the ply substrate and then had it CNC'd with the dados cut into it. Had to cut in the dados for the cabinetry after the CNCing. A bit of a challenge but came out.

Today, dry fitting the cabinetry. Now that we see it in "real life" making a few changes before finalizing it and gluing up. Had planned on having the monitors, readouts and switches in the lower left galley side, but now moving them to the upper center opening, galley side, to allow for more "kitchen" space. Also the opening on the right, inside cabin area was going to be a drawer and that will now be just a solid piece of wood, no drawer. The middle pass through from galley into cabin will be fitted with a 2 piece screen opening vertically with the bottom section sliding up. Installed the sliding doors in the cabin. Will be making some adjustments to those to tighten up some of the spacing between the panels.

Also, not shown, glued up the 3 piece (with insulation) right wall assembly. I'll step out on a limb and say gluing up the wall assemblies will probably be my least favorite activity of building a teardrop. Not a lot of time to get everything clamped down and not have the pieces kind of slide around out of sync. I had some alignment pins in the outer ply to the middle section which worked well in keeping the layers aligned .... but not for the inner wall to the middle wall. That was a bit of challenge. But persevered.

John
Attachments
IMG_5547.JPG
IMG_5547.JPG (117.24 KiB) Viewed 867 times
IMG_5553.JPG
IMG_5553.JPG (134.75 KiB) Viewed 867 times
IMG_5555.JPG
IMG_5555.JPG (114.3 KiB) Viewed 867 times
"Success can be defined as moving from failure to failure without loss of enthusiasm".... Churchill

Visit my Teardrop build here: viewtopic.php?f=50&t=73779
User avatar
Capebuild
Donating Member
 
Posts: 760
Images: 129
Joined: Sun Jan 31, 2021 6:50 am
Location: Massachusetts
Top

Re: CapeBuild Build Journal

Postby Capebuild » Sun Aug 22, 2021 3:07 pm

It's been a while since I've posted any updated shots...so checking in and sharing some progress and progress shots.

Got the 2 sidewall assemblies all glued up. Installed one wall today. The tab and slot configuration on the bottom of wall where it mates with floor worked out well. I got some flat headed ledger lock screws which really pulled the wall against the floor nicely (round shapes running along bottom of wall). On the other hand, the cut in dados (into the side wall) that were to match up with the cabinetry did not work out so well. I guess in the end it wasn't "so bad as I thought" but getting all those sections to line up was a real pita. Had to go back into the dados in the sidewalls and tweak them to get every thing to fit. If I had to do it all over again, I would have made all the cabinetry walls fit flush against the sidewalls. So be it.

I had ran all the tow vehicle wiring from the 7 pin connector back to the rear of the chassis. When I created the side wall for that side I made a channel in the MDO middle wall skeletonized section where all the wire would run up through the wall. So that worked out well. Fed it all through the opening and pulled it all up into the junction box I made (3-D printed)... shown with the cover made also. All the house battery wiring will run up the other sidewall in a similar channel.

Going to start install the elex components tomorrow. Got everything collected (minus the battery charger which should be here this week). Should be easier to place and screw down all the components with the other wall not installed yet. From the manual I see it's clear the solar controller needs to be mounted vertical (not horizontal as I had originally planned) due to heat up and air flow considerations. Also suggested to mount controller on flame proof board. Probably a "lawyer" thing, but I'll do it. Seems to make sense.

Thanks for looking.
John
Attachments
w 1st wall instll 2.jpg
w 1st wall instll 2.jpg (273.12 KiB) Viewed 755 times
with 1st wall install 1.jpg
with 1st wall install 1.jpg (289.09 KiB) Viewed 755 times
junction box.jpg
junction box.jpg (239.57 KiB) Viewed 755 times
"Success can be defined as moving from failure to failure without loss of enthusiasm".... Churchill

Visit my Teardrop build here: viewtopic.php?f=50&t=73779
User avatar
Capebuild
Donating Member
 
Posts: 760
Images: 129
Joined: Sun Jan 31, 2021 6:50 am
Location: Massachusetts
Top

PreviousNext

Return to Build Journals

Who is online

Users browsing this forum: No registered users and 6 guests