Aluminum corner trim?

Anything to do with mechanical, construction etc

Aluminum corner trim?

Postby cappy208 » Fri Oct 16, 2009 6:53 pm

Hello all you professional teardroppers.
I have a question I have not seen answered anywhere else.
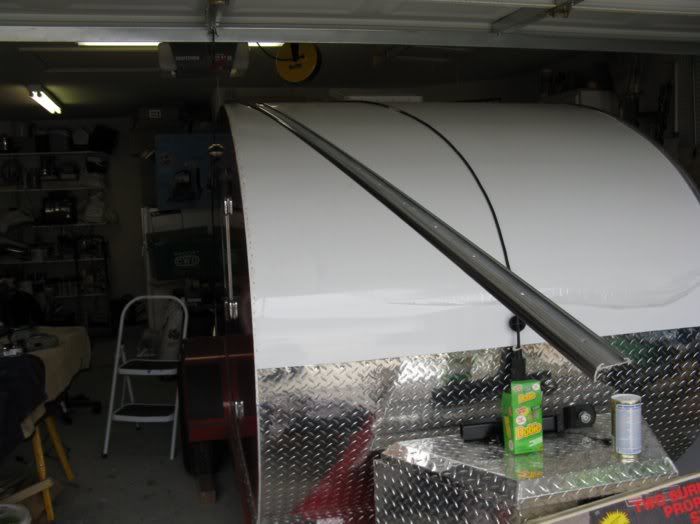
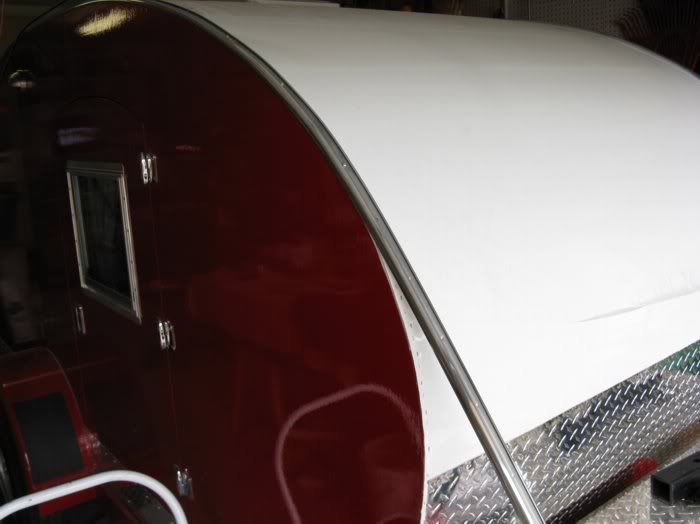
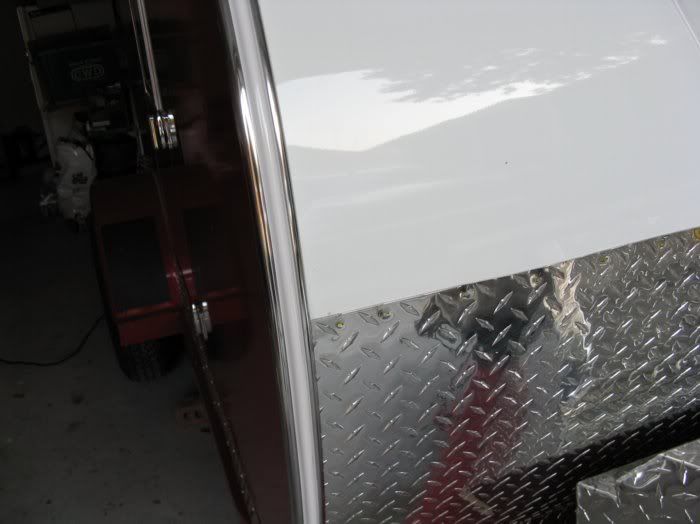
The aluminum trim covering the roof/wall joint.
Is there a special name for the flexible type, which can be easily bent to the curve of the 'ham'?
All I have seen is pretty stiff stuff which would (to my mind) crinkle on the radius.
Or is there a technique I have not heard about to successfully bend the stuff?
Are the HF sheet metal stretcher/shrinker the tool?

Of all the details I am working out in my mind, this seems to be the most perplexing one... to ensure the roof wall joints watertight integrity and keep it looking good!
Thanks

John
User avatar
cappy208
Teardrop Builder
 
Posts: 36
Images: 1
Joined: Sun Sep 20, 2009 6:16 pm
Location: Cape Cod Ma.

Postby planovet » Fri Oct 16, 2009 7:04 pm

One type (that I used) is called insert trim and most RV stores will stock it. Usually comes in white or mill finish. It seems stiff but it bends on a radius pretty easily, just take your time. It has a place for an insert to be installed to cover the screw holes. You can find the inserts in several colors. I used white.

Image

Image

Image
ImageMark (& Cindi)
Visit our website: Little Swiss Teardrop

I was wondering why the water balloon was getting bigger... and then it hit me.

ImageImageImageImage
User avatar
planovet
The Cat Man
 
Posts: 5583
Images: 3
Joined: Tue Nov 27, 2007 4:48 pm
Location: Plano, Texas

Postby mikeschn » Fri Oct 16, 2009 7:15 pm

What Mark said... I have the same stuff in white, just haven't had a chance to use it yet.

Also Grant sells some deadsoft aluminum which is supposed to bend fairly easy.

Mike...
The quality is remembered long after the price is forgotten, so build your teardrop with the best materials...
User avatar
mikeschn
Site Admin
 
Posts: 19202
Images: 475
Joined: Tue Apr 13, 2004 11:01 am
Location: MI
Top

Postby cappy208 » Fri Oct 16, 2009 10:59 pm

Thanks for the awesome photos.

But I still cant get over the intentional drilling of MORE holes in the roof to have to seal.... in addition to the original holes from the roof panel!

I would think a more secure way would be to screw from the sidewall, and have the bent piece on the roof with the mastic, or rubber gooey stuff. what is that stuff named anyway? I saw ir on another post, but lost it.

John
User avatar
cappy208
Teardrop Builder
 
Posts: 36
Images: 1
Joined: Sun Sep 20, 2009 6:16 pm
Location: Cape Cod Ma.
Top

Postby Gage » Sat Oct 17, 2009 12:01 am

cappy208 wrote:But I still cant get over the intentional drilling of MORE holes in the roof to have to seal.... in addition to the original holes from the roof panel!
John

What are you talking about? Sounds to me that your trying to make a mountain out of a mole hill. If your doing a restore and you use the correct edge molding, the holes should just about match up. Have you got any pictures?

Image
Image Image Image
Remember 'Teardrop Time'.......Take your time, you don't have to have it finished NOW.
User avatar
Gage
8000 Club
8000 Club
 
Posts: 8321
Images: 28
Joined: Sat Apr 17, 2004 9:14 pm
Location: Palmdale, CA
Top

Postby Classic Finn » Sat Oct 17, 2009 4:39 am

Gage wrote:
cappy208 wrote:But I still cant get over the intentional drilling of MORE holes in the roof to have to seal.... in addition to the original holes from the roof panel!
John

What are you talking about? Sounds to me that your trying to make a mountain out of a mole hill. If your doing a restore and you use the correct edge molding, the holes should just about match up. Have you got any pictures?

Image


Gage are them screws or nails you used on the edge trim? If I remember correctly you mentioned someplace that you have or will use rounded top nails or am I wrong. :thinking: Your work is so Finntastic as always. :thumbsup:

Classic Finn ;)
Royal Teardrop Society Scandinavian Bureau Chief of Staff

Image
User avatar
Classic Finn
Midnight Sun Voyager
 
Posts: 17488
Images: 146
Joined: Fri Apr 29, 2005 4:29 am
Location: Country of Finland
Top

Postby Carter » Sat Oct 17, 2009 5:55 am

The RV edge trim is pretty soft. I used it all the way around the sides and bottom of mine, even the wheel wells. Just take your time and fasten it as you go along. The reason it's not fastened to the side wall is the flange would have to be wider and thicker making it more difficult to form.

Put it on with all the fasteners then take it off again, add a bead of good quality butyl caulk when reinstalling

Jim

Image
I need a new Avatar. I'd put my dog up there but she doesn't look much like me. She's the skinny one.
User avatar
Carter
Gold Donating Member
 
Posts: 319
Images: 32
Joined: Sun Aug 10, 2008 6:45 am
Location: Rochester Hills, MI
Top

Postby planovet » Sat Oct 17, 2009 8:44 am

Carter wrote:Put it on with all the fasteners then take it off again, add a bead of good quality butyl caulk when reinstalling


Yep, that's what I did (almost). Yes it's more holes in the roof but they will be sealed. I predrilled each hole and used SS screws. I went one screw at a time. Drill & screw, drill & screw. On the straight parts you can probably drill a few holes at a time but on the curves I would do it one at a time. Ease the trim over, drill and screw. Ease the trim some more, drill and screw. Once you have it all installed, take it all off, put down some butyl tape and re-install with NEW screws.You have less chance of stripping the heads of the screws if you use new ones on the re-install. It's a lot of work but it will be worth it. I'm not a professional but it worked for me.

cappy208 wrote:But I still cant get over the intentional drilling of MORE holes in the roof to have to seal.... in addition to the original holes from the roof panel!
John


What does it matter whether the holes are in the roof or in the sidewall? Water will get in either way if you don't seal it well enough. Insert trim has been put on roofs of professionally made RVs for years, there must be a reason why they do it that way...
ImageMark (& Cindi)
Visit our website: Little Swiss Teardrop

I was wondering why the water balloon was getting bigger... and then it hit me.

ImageImageImageImage
User avatar
planovet
The Cat Man
 
Posts: 5583
Images: 3
Joined: Tue Nov 27, 2007 4:48 pm
Location: Plano, Texas
Top

Postby Gage » Sat Oct 17, 2009 3:59 pm

Classic Finn wrote: Gage are them screws or nails you used on the edge trim? If I remember correctly you mentioned someplace that you have or will use rounded top nails or am I wrong. :thinking: Your work is so Finntastic as always. :thumbsup:
Classic Finn ;)
I used alum twist nails. I pre formed my molding because I was using nails. I then applied sealant and did as Mark did. Clamp and pre drilled and installed nails (or screws) one at a time.

Image
I'm not really that tall. I'm standing on a stole.
Image Image Image
Remember 'Teardrop Time'.......Take your time, you don't have to have it finished NOW.
User avatar
Gage
8000 Club
8000 Club
 
Posts: 8321
Images: 28
Joined: Sat Apr 17, 2004 9:14 pm
Location: Palmdale, CA
Top

Postby 48Rob » Sat Oct 17, 2009 4:42 pm

But I still cant get over the intentional drilling of MORE holes in the roof to have to seal.... in addition to the original holes from the roof panel!
John


John,

Instead of worrying about more holes, or any holes, consider that a properly constructed trailer will not leak.

If you'll take the time to learn and understand what causes leaks, and how to prevent them, you can put a thousand holes in your roof, and not have a single leak. :thumbsup:

Rob
Waiting for "someday" will leave you on your deathbed wondering why you didn't just rearrange your priorities and enjoy the time you had, instead of waiting for a "better" time to come along...
User avatar
48Rob
Super Lifetime Member
 
Posts: 3882
Images: 4
Joined: Thu Nov 17, 2005 6:47 pm
Location: Central Illinois
Top

Postby bfitz » Mon Oct 19, 2009 12:24 am

Okay Rob....ya got a willing learner here. Any references you can point to?

Gratzi
bfitz
Teardrop Master
 
Posts: 149
Images: 22
Joined: Mon Dec 29, 2008 11:07 am
Location: Battle Creek, MI
Top

Postby steve smoot » Mon Oct 19, 2009 6:49 am

I have been thinking alot about this same issue, and these posts have really helped me. Thanks for all the detailed pictures. Great info. :applause:

Boy, Gage has more clamps than that fellow, Norm... ;)

Steve
I am not a complete idiot, some parts are missing...
User avatar
steve smoot
Lifetime member
 
Posts: 1355
Images: 62
Joined: Thu Sep 17, 2009 5:42 pm
Location: Boone NC
Top

Postby planovet » Mon Oct 19, 2009 8:18 am

steve smoot wrote:Boy, Gage has more clamps than that fellow, Norm...


Building a teardrop somehow causes you to acquire many clamps :lol:

Image
ImageMark (& Cindi)
Visit our website: Little Swiss Teardrop

I was wondering why the water balloon was getting bigger... and then it hit me.

ImageImageImageImage
User avatar
planovet
The Cat Man
 
Posts: 5583
Images: 3
Joined: Tue Nov 27, 2007 4:48 pm
Location: Plano, Texas
Top

Postby 48Rob » Mon Oct 19, 2009 12:29 pm

Gratzi,

There are many references on the Web... but in general, research why a roof leaks, then how to repair it.
Once you know those two things, you'll be able to prevent leaks.

Here is a page that covers all the basics,
http://repairingyesterdaystrailers.yuku.com/topic/26

Rob
Waiting for "someday" will leave you on your deathbed wondering why you didn't just rearrange your priorities and enjoy the time you had, instead of waiting for a "better" time to come along...
User avatar
48Rob
Super Lifetime Member
 
Posts: 3882
Images: 4
Joined: Thu Nov 17, 2005 6:47 pm
Location: Central Illinois
Top

Great!!

Postby John Samarin » Thu Dec 31, 2009 10:18 pm

I posted a question somewhere, about bending the molding, :thinking:
never mind!!
User avatar
John Samarin
Teardrop Inspector
 
Posts: 24
Images: 12
Joined: Sun May 17, 2009 6:36 pm
Location: Vista CA
Top

Next

Return to Teardrop Construction Tips & Techniques

Who is online

Users browsing this forum: Jimbodub and 2 guests