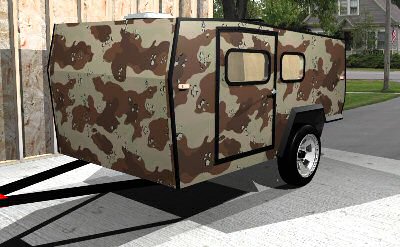
My offroad Camper

Did you just design your very own teardrop or tiny trailer? Want to discuss it? Here's the place to post your design for discussion!

Postby Wright » Mon Dec 17, 2007 7:06 pm

:thumbsup: Looking real good there Steve, I'm very impatient, As you are I'm sure, to see your finished Trailer... it's like the start of summer there right?? keep up the good work and I'll keep watching with interest... Enjoy... :applause: :applause: :applause:
:BE Wright

SEMPER FI
User avatar
Wright
*teardrop schemer
 
Posts: 298
Images: 15
Joined: Mon Sep 19, 2005 2:33 pm
Location: Albion NY

Postby bve » Tue Dec 18, 2007 1:14 am

Looking great, I too can't wait to see it completed.

I'm seriously thinking I want to 'steal' your excellent design for my build.


Burke
Burke

KISS > COMPLEX
Image
Image

Build threads converted to PDFs.
As of 2008-08-08 I have added more build threads to the pdf collection
User avatar
bve
500 Club
 
Posts: 694
Images: 98
Joined: Sat Aug 25, 2007 1:44 am
Location: Edmonton, Alberta, Canada

Postby Steve F » Wed Dec 19, 2007 1:51 am

I really don't like making doors, the shape to match the trailer was a nice idea but it's taken a lot longer to make a door than a rectangular one would.

Anyway, almost finished door number one, just need to put the insulation in and glue on that outer skin and then trim around the inner cutout. I couldn't be bothered moving the ply for the pics so a little imagination may be needed :)

Image

Image

And I just like this pic.

Image

I was also going to do some of the galley but only got as far as the two upper cupboards front frame and then called it quits for the day :)

You can see the framing for the bench and how short the lower cupbards will be, this is due to the height of the chassis etc, any taller and the bench would be too high.

Image

Also ordered some LED lights for the interior, just two for now as for some reason 2 orders of 2 is cheaper to ship than 1 order of 4 so thought I may as well go for just the 2 and make sure they'll do the job.

Image

Cheers
Steve
User avatar
Steve F
The 300 Club
 
Posts: 489
Images: 25
Joined: Fri Feb 02, 2007 8:12 am
Location: Sydney, Australia
Top

Postby Miriam C. » Wed Dec 19, 2007 6:27 am

8) I think the door is gonna work. I see you have some extra plywood for the next td too. ;) :thumbsup: Have fun with the cabinets. I found mine are a bit high but since I will not be cooking on them it is OK.

Doing great :thumbsup:
“Forgiveness means giving up all hope for a better past.â€
User avatar
Miriam C.
our Aunti M
 
Posts: 19675
Images: 148
Joined: Wed Feb 15, 2006 3:14 pm
Location: Southwest MO
Top

Postby Steve F » Fri Dec 21, 2007 1:26 am

I like skinning it, looks like there has been a lot of progress as the skin goes on :)

Framed the front and put the outer skin on, need to trim it with the router but it's close. I had to use a lot of screws though as the bottom goes over the floor etc to help keep it water proof and it's quite a tight bend. The ply was cracking as I screwed it down but I'll epoxy it on the inside where it joins the floor etc so it'll be fine.

Image

I guess I should clean out the inside now and get rid of the coke cans and beer bottles ;) As an aside it's very roomy in there, I was quite surprised. I think I can get a nice thick mattress in there :)

Image

Image

And to get an idea of the height, I'm 182cm, no idea what that is in feet and inches. Also it's very hot and humid here at the moment hence the shirt that is wet to the waist :)

Image

Cheers
Steve
User avatar
Steve F
The 300 Club
 
Posts: 489
Images: 25
Joined: Fri Feb 02, 2007 8:12 am
Location: Sydney, Australia
Top

Postby Wolffarmer » Fri Dec 21, 2007 9:05 am

Thanks for the pictures. That is a nice looking trailer you got going there.
:thumbsup: :thumbsup: :thumbsup:
"these guys must be afraid of the dark"
User avatar
Wolffarmer
Donating Member
 
Posts: 4612
Images: 309
Joined: Wed May 02, 2007 1:32 pm
Location: Idaho Rupert
Top

Postby bobhenry » Fri Dec 21, 2007 10:04 am

It's humid here in Indiana too. With 8-10 inches of wet sloppy snow and 38 degrees. Supposed to be 56 tomorrow we may drowned.
Growing older but not up !
User avatar
bobhenry
Ten Grand Club
Ten Grand Club
 
Posts: 10368
Images: 2623
Joined: Fri Feb 09, 2007 7:49 am
Location: INDIANA, LINDEN
Top

Postby schaney » Fri Dec 21, 2007 11:20 am

Steve, very nice trailer and great build write up. When I finally build one that isn't tent topped, it will be some form of a Grasshopper maybe with a popup roof.

Can't wait to see it finished.
Scott
Camping the "Compact Way"
Image
User avatar
schaney
500 Club
 
Posts: 804
Images: 262
Joined: Tue May 02, 2006 9:27 pm
Location: Salem, OR
Top

Postby Steve F » Sat Dec 22, 2007 4:26 am

Another hour or two and some more to show for it, trimmed the front panel I fitted yesterday and added the panel for the window section. I wont be attaching it until after the interior paneling is done as I'll be sliding the ceiling section in through here as it wont fit through the door :D

Image

Image

Cheers
Steve
User avatar
Steve F
The 300 Club
 
Posts: 489
Images: 25
Joined: Fri Feb 02, 2007 8:12 am
Location: Sydney, Australia
Top

Postby mikeschn » Sat Dec 22, 2007 4:57 am

Steve,

That's really nice! I like it. Now you need a paint job like this...


Image

Mike...
The quality is remembered long after the price is forgotten, so build your teardrop with the best materials...
User avatar
mikeschn
Site Admin
 
Posts: 19202
Images: 475
Joined: Tue Apr 13, 2004 11:01 am
Location: MI
Top

Postby bve » Sat Dec 22, 2007 2:41 pm

Great progress I sure do like the design. That big opening window is going to provide some serious ventilation.
Burke

KISS > COMPLEX
Image
Image

Build threads converted to PDFs.
As of 2008-08-08 I have added more build threads to the pdf collection
User avatar
bve
500 Club
 
Posts: 694
Images: 98
Joined: Sat Aug 25, 2007 1:44 am
Location: Edmonton, Alberta, Canada
Top

Postby Steve F » Sun Dec 23, 2007 8:16 pm

bve wrote:Great progress I sure do like the design. That big opening window is going to provide some serious ventilation.


I'm also thinking of making some roll down flyscreens that velcro to the door frame as well or possibly an internal zipped screen door like a tent that can be rolled to the sides most of the time or zipped at night and leave the doors open. Time to talk to my Mum as she's the one handy with the needle and thread ;)

Cheers
Steve
User avatar
Steve F
The 300 Club
 
Posts: 489
Images: 25
Joined: Fri Feb 02, 2007 8:12 am
Location: Sydney, Australia
Top

wow

Postby Jeeper92 » Mon Dec 24, 2007 5:40 am

wow
Jeeper92
500 Club
 
Posts: 529
Joined: Thu May 17, 2007 8:03 pm
Top

Postby ARKPAT » Mon Dec 24, 2007 5:57 am

Good Job!


:thumbsup:

Pat
Life is to short always eat dessert first.
User avatar
ARKPAT
1000 Club
1000 Club
 
Posts: 1549
Images: 77
Joined: Tue Dec 13, 2005 4:45 am
Location: Arkansas
Top

Postby Steve F » Tue Jan 01, 2008 3:27 am

The ceiling is now skinned and insulated, I just need to cut the hole for the roof vent in the inner skin. I decided not to glue it but rather use small brads, the trim around the vent and trim along the edges will also help hold it nice and firm but right now it all seems good anyway :)

The section hanging down here is a larger roof spare and is also the upper part for the rear cabinets, this really helped tie the roof and cabinets together. The vent is right between the two lights.

Image

Had an old battery which would only hold 10v when I retired it, this was 4 years ago, hooked it up and the LED's lit up, not much but enough to check the wiring :)

Image

And the front section, you can see I had to use two pieces, I decided it was easier to have the join run across the interior and will use some highlight wood trim and run a few strips across to help hide it. The wire hanging down is the switch wire for the lights and will mount next to the window. It's 10AMP wire the lights draw 0.2AMPS each so I may also run the power from this same wire to some reading lights.

Image

I also permanently installed the outer skin around the window, it's not a perfect fit so some epoxy filler will fix it up, all edges will be taped anyway with fiberglass and epoxy so I'm not too worried

Image

Cheers
Steve
User avatar
Steve F
The 300 Club
 
Posts: 489
Images: 25
Joined: Fri Feb 02, 2007 8:12 am
Location: Sydney, Australia
Top

PreviousNext

Return to Member Designs

Who is online

Users browsing this forum: No registered users and 3 guests