This thread describes one way to build a DIY lithium iron phosphate (LiFePO4) battery out of raw cells. It’s how I built mine. I am attempting to distill out the most important details from what I learned to make the a complex process accessible, but I am still assuming you know basic electricity: volts x amps = watts. BUT: This thread is not meant to be a stand alone how-to, and you are responsible for your own build. I have no liability if you burn down your camper or your house, or if something else bad happens. Please respect the large amount of power in these batteries and know what you’re doing so you can do it safely. Never ever drop a wrench or screwdriver across your battery terminals! And wear safety goggles! That said, LiFePO4 batteries can be a tremendous upgrade that can make you even more self sufficient during your camping adventures, and they can last for more than 10 years.
1. Background:
Please do not rely solely on this thread for info. There is a lot of good reading/YouTubing to do about this process and its considerations. Here is a small sampling:
- Dan Lin from Freely Roaming has a video series on making a LiFePO4 battery from prismatic cells for his family’s van. This is the one that originally inspired me. https://freelyroaming.com/lithium-iron-phosphate-batteries-are-finally-cheaper-than-agm-batteries/
- David Poz built a LiFePO4 battery out of cylindrical cells: https://youtu.be/6Ai5IRQbLcc This is an alternative to prismatic cells that can be adapted to different form factors if space is an issue.
- Will Prowse has many YouTube videos and a book on the subject but his website is a place to start: https://www.mobile-solarpower.com/design-your-own-12v-lifepo4-system.html
Some more technical but important series to read before building a battery:
- Marinehowto.com: https://marinehowto.com/lifepo4-batteries-on-boats/
- Nordkyndesign.com: http://nordkyndesign.com/category/marine-engineering/electrical/lithium-battery-systems/
- Saildivefish.ca: https://www.saildivefish.ca/category/projects/lifepo4-battery-install/
- The long version of my battery construction thread, written as I went along, that includes commentary from other folks: http://www.tnttt.com/viewtopic.php?f=30&t=73849
Educate yourself about the design, advantages, and limitations of a LiFePO4 system before deciding to make one and your expectations will be in line with what it can actually do. Some companies like BattleBorn (which is probably the most well known and reputable LiFePO4 battery company out there) already make commercially available LiFePO4 batteries that are available to buy (see Appendix 1 below). If you are not sure you want to go through the process of building one yourself from raw cells but still want the advantages of this kind of battery, this is a way to go. The trade off is cost, and of course less fun in building it!
2. Advantages and Limitations:
Advantages:
- LiFePO4 batteries can store a lot more energy than conventional lead acid batteries, at a fraction of the weight.
- They have a much better depth of discharge than lead acid, which can only be drawn down to 50% to save battery life. LiFePO4 can go down to like 10%, giving you almost the full amp hours the battery is rated for.
- They can last 2000 to 5000+ cycles, which translates to 5-10+ years at one cycle per day. For the weekend teardropper, they could last decades. This is one of the reasons they are so cost effective if you can swallow the initial investment.
- The voltage curve is flat and voltage doesn’t sag much under load (the Peukert Effect) like in lead acid cells. This means you can run your higher amp equipment longer and more reliably before your voltage drops off and the batteries reach empty.
- LiFePO4 is relatively safe compared to Lithium Ion batteries, which are the ones we hear about on the news that can sometimes catch on fire when they fail. Lithium Ion is a battery chemistry used in computer and tool batteries (eg., 18650 cells), which would not (in my opinion) be suitable for a camper because of the risk of thermal runaway. LiFePO4 batteries on the other hand tend to expand (poof up) when they fail due to overcharging but rarely catch on fire. The safety factor is one of the reasons I went with LiFePO4.
Disadvantages/Considerations:
- LiFePO4 has a higher initial cost than conventional lead acid or AGM (but last so much longer and have much more useable amp hours so they cost you less in the long run).
- LiFePO4 cells are easily and permanently damaged by overcharging them or drawing them down too far. They are also permanently damaged by charging in freezing temperatures (below 32°F or 0°C). Thus, a battery management system (BMS) is critical to make sure your battery is happy at all times. This BMS is extra expense but it guarantees a long battery life. (BattleBorn batteries have their own internal BMS with a cold temperature disconnect; not all off the shelf LiFePO4 batteries have a cold temperature disconnect though). If you read somewhere you don’t need a BMS, don’t believe it.
- A regular lead acid battery charger or solar charge controller will not work to charge a LiFePO4 battery, and can permanently damage it. You will need a solar charge controller and a battery charger compatible with LiFePO4 chemistry. This is an additional expense if your existing equipment needs to be upgraded.
- LiFePO4 cells don’t like sitting for long periods of time at 100% charge, so discharging them slightly (to 90% is fine) between camping trips will make them last longer.
3. LiFePO4 System Components:
The LiFePO4 battery is part of a system, and cannot just be dropped in to your existing battery box. Again, lead acid chargers will kill it, so get compatible equipment.
My battery system consists of the following (see Appendix 2 for links):
- LiFePO4 prismatic cells, 3.2 volts nominal. You need a minimum of 4 cells. I have 8, with 4 sets of 2 run in series (2 parallel, 4 series or 2p4s). The outcome is a 12.8 volt nominal battery. There are many sizes (amp hour ratings) of battery cells available on the web, but many are used or repackaged factory seconds labeled as new. Beware and do your research before purchasing. I got mine from http://www.BatteryHookup.com, a company located in Bensalem, PA that tests them first. They have a discount code available in David Poz’s video above that will take 5% off the price.
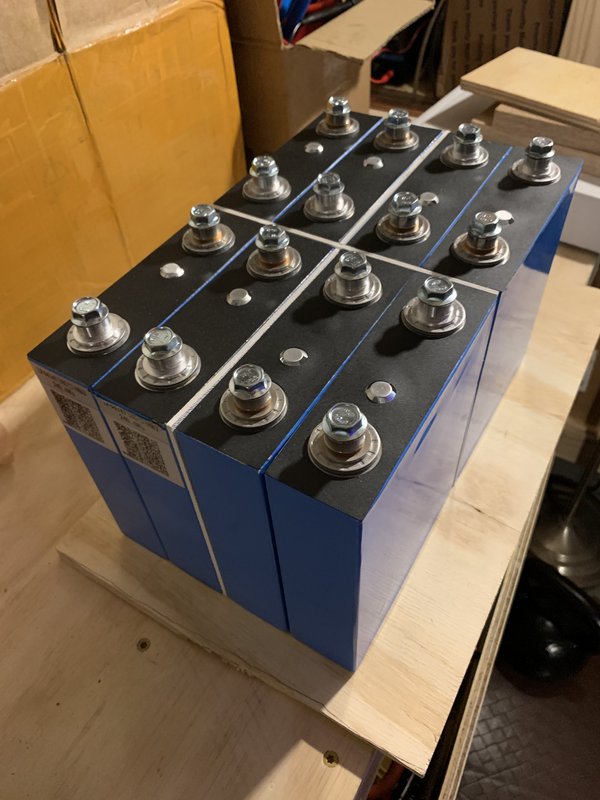
- Bus Bars to connect the cells together. If your batteries don’t come with them, you’ll need to make your own. You can flatten copper pipe as Dan Lin did, or get copper bars, as I did. I got 1/8” thick 3/4” wide copper stock from http://www.onlinemetals.com and built my own.

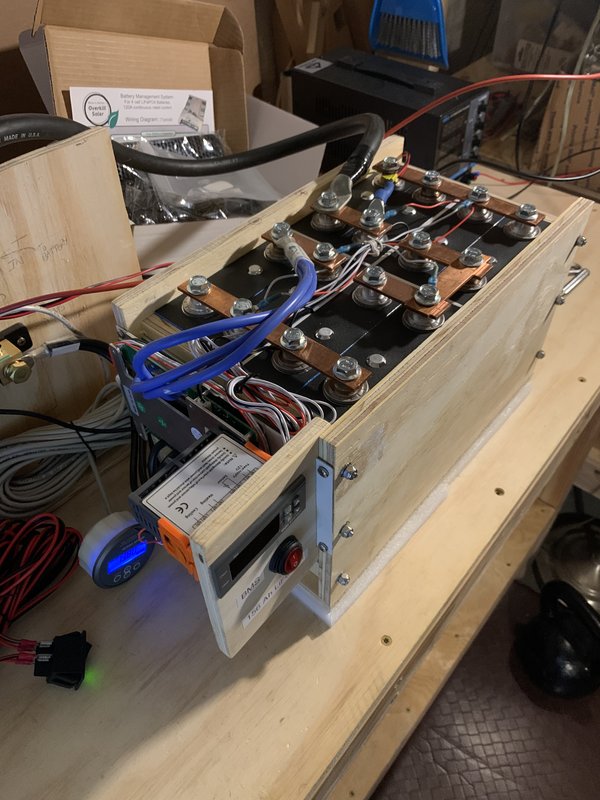
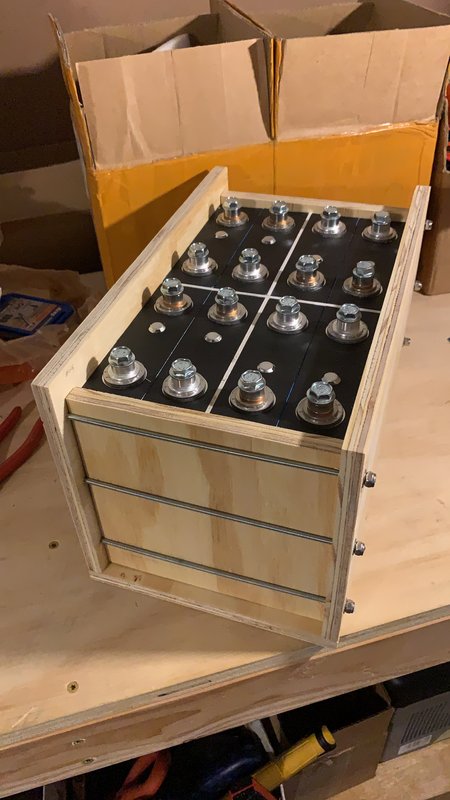
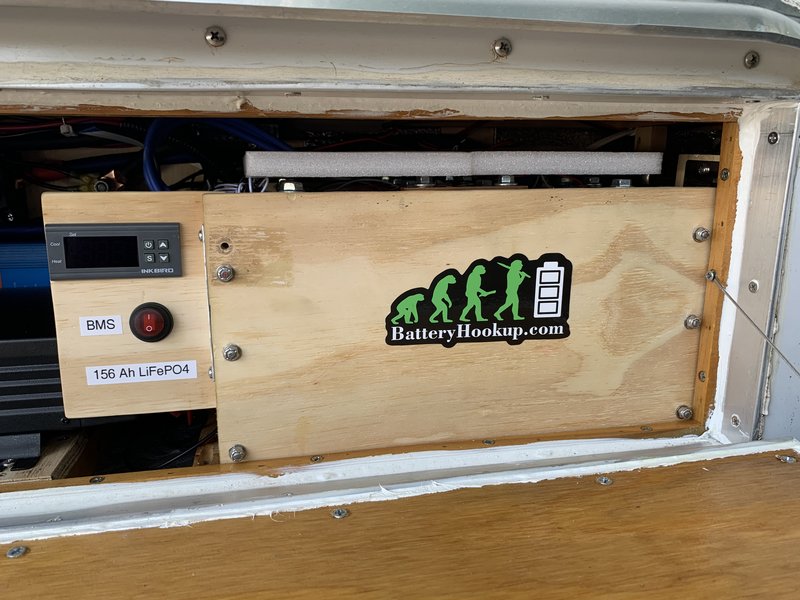
- Prismatic LiFePO4 cells last longer when compressed (not allowed to expand) so I built a tight fitting battery box using 1/2” plywood and threaded metal rods sourced from the local home goods store. I also got hardware for attaching the bus bars to the battery terminals from there.
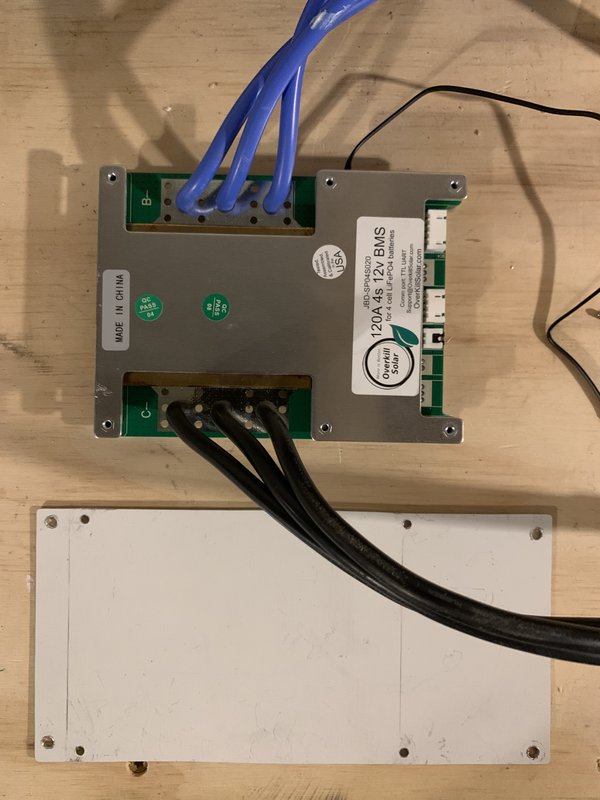
- BMS or battery management system. This little computer prevents charging at low temperatures or too high a voltage, and prevents over discharging. It also keeps your cells in balance over time. There are cheap BMS’s out there that do the job, but most do not last long term or they lack a cold temperature disconnect to keep your battery from charging below 0°C and destroying itself. One high quality BMS that does have the low temperature disconnect, and the one I got, comes from http://www.OverkillSolar.com.
- Bench top variable power supply. In order to balance the cells at the beginning, you’ll need a power supply that can go as low as 3 volts, and be capable of continuous voltage and continuous current. It should be able to charge at least at 5 amps of current, but 10 amps is better (faster). The one I got:

- Multimeter. You’ll need to be able to precisely measure voltage on your batteries while balancing them on your workbench. Two decimal places on the voltage meter works ok but a resolution of 3 decimal places is better.
- Victron BMV712 battery monitor and temperature sensor. I wanted to be able to keep track of how much energy was in the battery while camping, and also do a capacity test at the beginning. There are cheaper battery monitors out there (Google the AiLi battery monitor), but Victron is the best. It has Bluetooth functionality and keeps track of trends in my power usage over time. It can estimate how much time is left before the battery is empty, which is a feature my wife loves. We never used to know when power would run out with our old system and it was a source of stress. Victron equipment is available lots of places online, but I got mine from http://www.ContinuousResources.com using the 5% off discount code available on their Facebook forum.
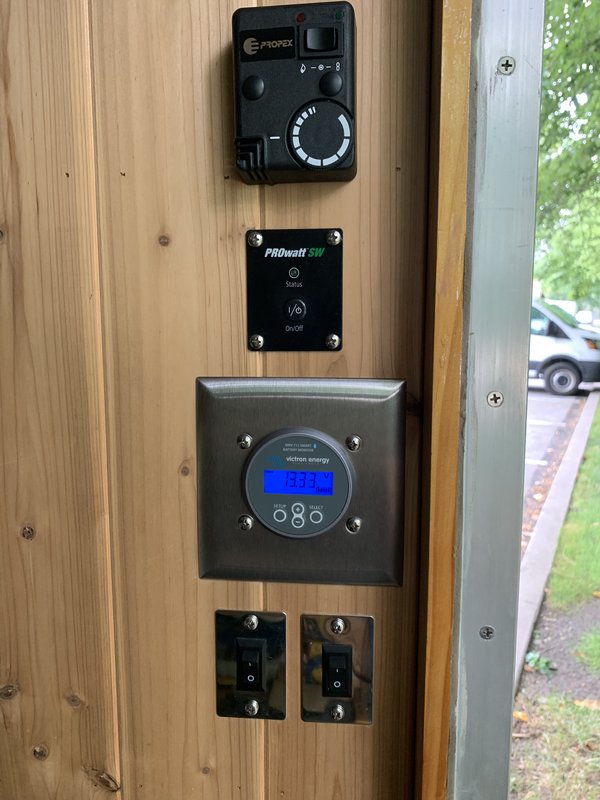
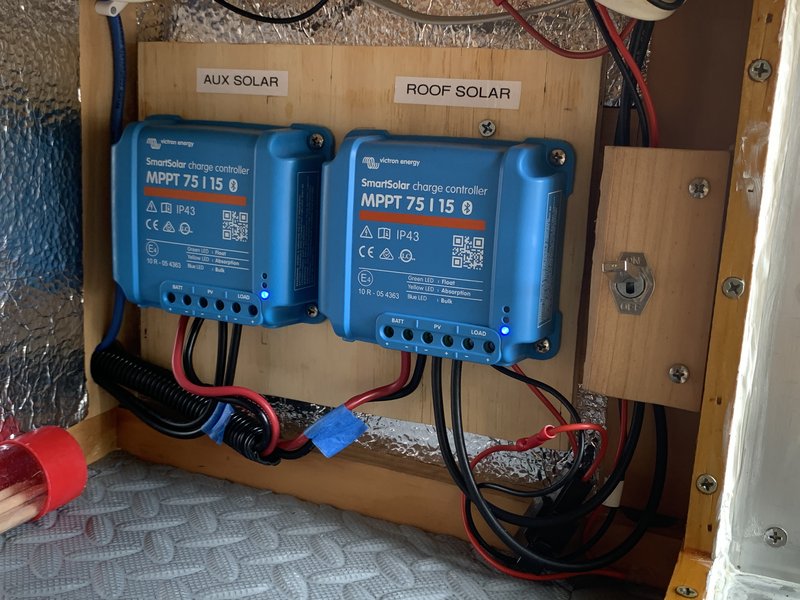
- Victron SmartSolar 75/15 MPPT charge controller. My old MPPT charge controller couldn’t charge LiFePO4 chemistry. The new one has Bluetooth and networks with the BMV to know the battery temperature and charge (or stop charging) based on the conditions. One of the nice features of the Victron is that you can set all the parameters manually if you want. Most Lithium compatible charge controllers don’t allow you to do this. I am able to charge to 90% instead of 100% this way and extend my battery life.
- Victron BlueSmart battery charger. Again, my old charger was not LiFePO4 compatible. I still wanted to be able to charge from the power grid when parked under trees. Other LiFePO4 chargers like the NoCo Genius are out there as well if you didn’t want to get Victron.
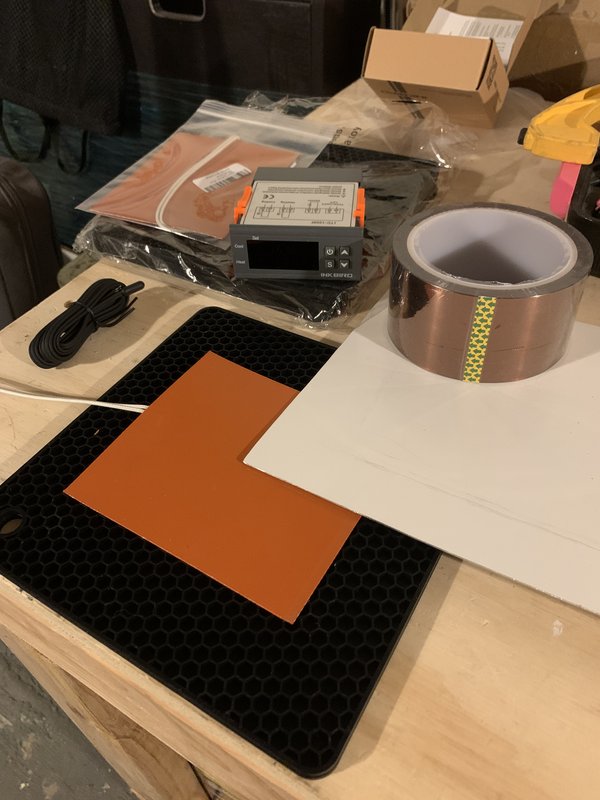
- Because I want to use my battery in winter, I made a battery warming system composed of a thermostat and beehive heaters. The heating pads, similar to mini seat heaters in your car, were placed under the battery and below an aluminum plate that helps distribute the heat. I followed Dan Lin’s design for the battery heater. This system will keep the battery above freezing so it can be charged during winter camping trips. The heating system is optional, especially if you rarely camp in freezing temperatures. (You can buy off the shelf LiFePO4 batteries with built in heaters by companies such as BattleBorn and ReLiOn if you wanted an all season battery but didn’t want to make one.) Parts for my DIY battery heating system are listed in Appendix 2 below.
4. Assembly and Top Balancing
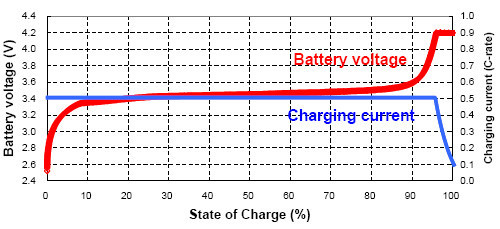
Before your battery can be usable at 12 volts in the real world, the individual cells should be top balanced. The cells may all test a similar voltage out of the box (mine shipped at 3.28 volts each) but remember the voltage curve on LiFePO4 is flat. Anywhere along that center part of the curve, a 25% charged cell might have nearly the same voltage as a 75% charged cell. Thus, all the cells need to be slowly and carefully raised up to the right hand side of the voltage curve so they all measure 100% charge at the same time. The reason this step is important is that if one of your cells has a higher level of charge compared to the others, it can be pushed into overcharge territory by a 12 volt charger even as the average voltage of the battery bank is not that high. And overcharging = permanent cell damage. Top balancing also insures that you get the most amp hours from the whole battery if all the cells are working in unison. While some people may argue top balancing isn’t necessary with a good BMS, it is good practice and ensures proper functionality. If your battery cells get out of balance over time, you can periodically top balance them (like every few years) to get them back in sync.
How to top balance:
- Read read read before starting this step. Be sure you understand what you’re doing and have the time to devote to paying attention to your battery. The BMS is not involved in top balancing. You have to be the BMS yourself and make sure you don’t overcharge and puff your cells.
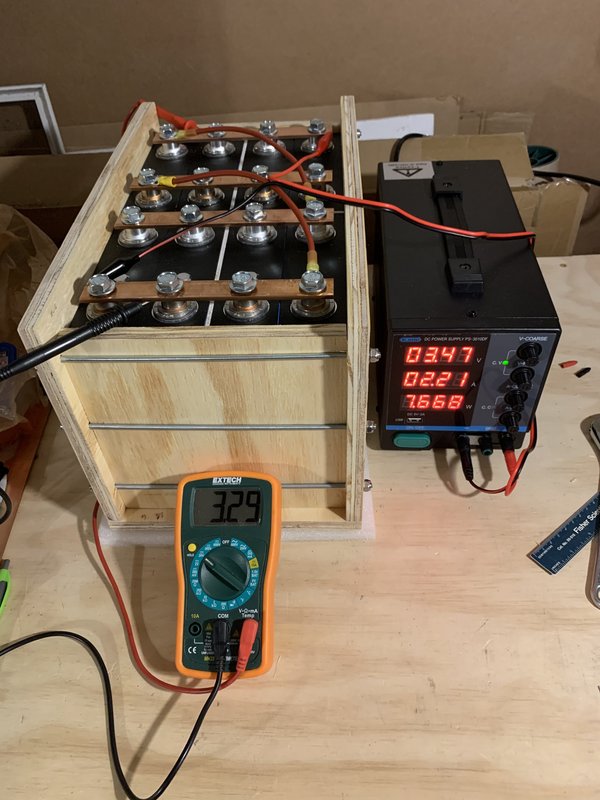
- Arrange your cells in parallel to make a large 3.2 volt battery. Connect all the positives together and all the negatives together. Check the voltage with your multimeter. It should be somewhere around 3.28 volts, same as an individual cell.
- Set the voltage on your power supply to 3.45 volts continuous voltage. Then after setting, attach the leads to the battery. (Never change voltage on the machine with the battery connected.) The leads can be at either end of the pack or central depending on how many cells you have. The idea is to provide the same voltage to all the cells simultaneously. If you have a 10 amp charger, dial back the current to 8 amps if it reads over 8. If a 5 amp charger, make it 4 amps. Keeping the current at 80% of max keeps the power supply from wearing out. If amps seem low, use thicker gauge wires and ring terminals instead of the supplied alligator clips. It makes a big difference in how much the charger can put out to the battery.
- Wait. For. Days. The power supply will be charging at 4-8 amps, but if you have 8, 78 Ah cells like me, that means to go from 0-100% you need to fill up 624 amp hours (Ah). 624 Ah / 4 A = 156 hours (6.5 days)! It won’t take you quite that long because your batteries don’t start at 0% but they could be as low as 10-20% to start. You can set the charging voltage level and then check on it a few times a day at this stage.
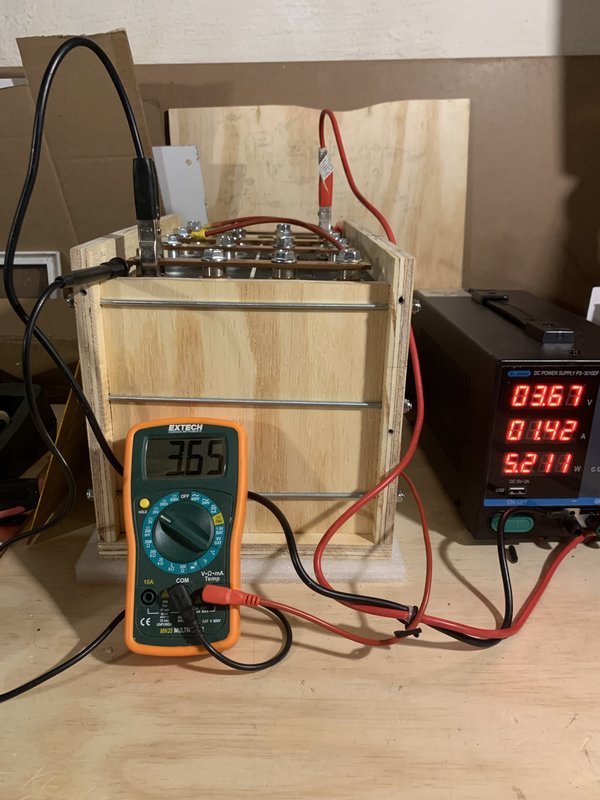
- When the voltage of the pack approaches the target voltage of 3.45 volts, the amps will decline to zero and charging will automatically stop. Once it reaches zero amps and 3.45 volts, you are ready to continue to the part of top balancing where you need to pay very close attention. You want to be in the same room and checking every few minutes because voltage will skyrocket exponentially at the right side of the charging curve and overcharging = cell damage. Disconnect the power supply and set it to 3.65 volts as the target voltage and then reconnect it to the pack. It should take less than an hour (varies depending on the size of the battery and charger) to reach 3.65 volts. At the end, voltage will climb quickly and you have to be ready to disconnect the charger immediately at 3.65 voltage and not let it get higher. Measure the voltage on the battery itself using your multimeter to determine if it’s at 3.65, and don’t rely on the power supply’s readout. There may be voltage drop between the battery and power supply especially if using thin wires, which can throw off the reading. Measure voltage at the battery using your multimeter for this step.
- Next, after the batteries reach 3.65 volts, wait 30-60 minutes. If the battery pack drops back below 3.5 volts, charge it back up to 3.65 volts again and repeat. If it stays above 3.5 volts, you can consider the pack successfully top balanced.
5. Capacity Testing
LiFePO4 batteries do not like to stay at 100% charge, meaning cell degradation can occur if left at full capacity over long time periods. It is a good idea to do a capacity test immediately after top balancing to bring the charge down, or at least put a load on the battery to get the voltage down around 13.5 volts if you’re going to store it for any length of time.
How to run a capacity test:
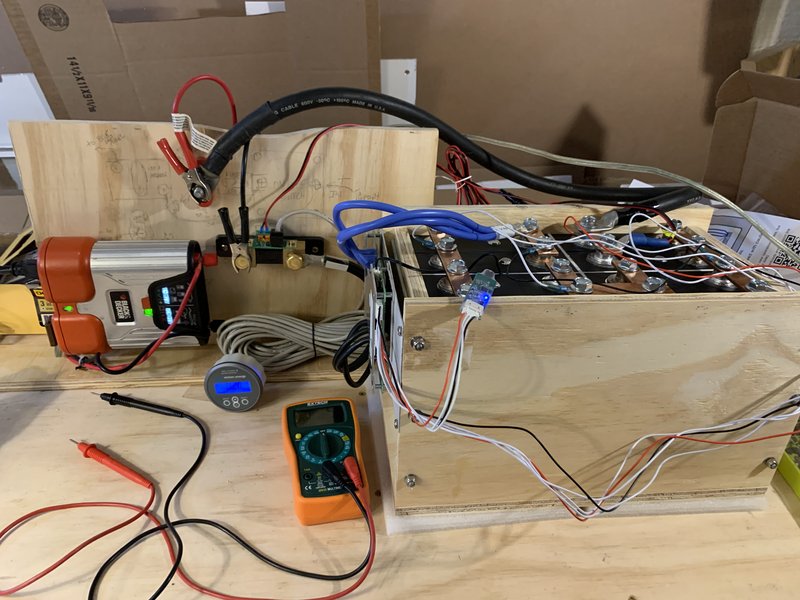
- You need to disconnect your bus bars on your top balanced pack and rearrange the cells in a 4s or 2p4s configuration to make the pack into 12.8 volt nominal. (At 3.5 volts per cell it will read 14 volts on your meter). Put plastic dividers between your 4 units to keep them from shorting out if vibration eventually wears through the blue vinyl coatings around the cells. (The aluminum housings are all continuous with the + terminals if I remember correctly.)
- You’ll need to hook up your BMS. The BMS connects to the negative terminal of the battery on one side and to the chargers and loads on the other. It has a series of small wires called balance leads that tell it the individual voltages of each cell. Follow the directions of your BMS to hook these up carefully because doing it wrong can burn out your BMS. Tape the BMS’s temperature sensor to the battery cells so it has good contact. Once the BMS is working and on, you should register 14 volts between the positive battery terminal (+) of the battery pack and the load side of the BMS (-).
- You’ll need a battery monitor with a shunt (Victron BMV712 for me but check out the AiLi battery monitor for a cheaper alternative). The shunt goes on the (-) of the BMS so that every device and charger must go through it to get to the battery. The shunt can measure the amount of current (Amp hours) that passes through so you can see how many Ah your battery has when you fully discharge it. You can also measure the consumption of specific devices in your system if you want.
- Attach multiple loads to the other end of the shunt and watch the current on the battery monitor. For LiFePO4 cells, the optimal discharge rate for a capacity test is 0.2 x the number of amp hours in the battery (0.2 C). For example, you can draw continuous 20 amps from a 100 Ah battery, or 30 amps from a 150 Ah battery at 0.2 C.
- For a long time the voltage of the battery will seem to remain the same. As the energy of the battery gets low the voltage will drop fairly suddenly. When the first cell in the battery reaches 2.5 volts the BMS should shut down the discharge to protect the battery. At that point see how many amp hours have gone through the shunt. It should be close to or a small amount better than what the battery was advertised for. If the battery had significantly less amp hours in it than advertised, you can try to get your money back or exchange it.
- Now that the capacity test is over, hook up your 12 volt charger and don’t leave the battery in a severely discharged state.
6. Regular use & settings
At this point you can install the battery and lithium compatible chargers in your trailer.

Tips:
- My understanding is you should not discharge the battery below 10% on a regular basis for maximum battery life. You should also not charge it to 100% and leave it there, like you would a lead acid battery. 90% charge is a good benchmark for a “full” charge in order to maximize battery life. On the other hand, the 2000 or 5000 cycles the battery is rated for assumes a 100% discharge rate per cycle. So even if you don’t limit your use to 80% of your battery on a regular basis, it will still last a very long time. Check out Victron’s LiFePO4 settings on their website if you want to set these parameters manually.
- Depending on what your battery is rated for, it can be discharged at up to 2 C (2x the amp hour rating) and charged at 1 C. Some batteries can even do better than this. See the literature that comes with your cells to know how fast you can safely discharge and charge them.
- Extreme heat is bad for LiFePO4 batteries. Wherever you ultimately put them in your trailer, try to avoid direct sun or proximity to heat generating devices without good ventilation.
- If you are planning to store the trailer over a long period of time, discharging the battery first to about 50% charge (about 13.3-13.4 volts) will stabilize it for long term storage. But also, don’t store it with very little power left in it, as the millivolts of power the BMS needs every day could drop the cell voltages below 2.5 volts (10 volts for the whole pack) over an extended period of time resulting in permanent battery damage.
I’m in the process of installing the new battery and charge controllers in my trailer. If you’re interested in that project, it can be found here: http://www.tnttt.com/viewtopic.php?f=50&t=62581&start=750#p1279497
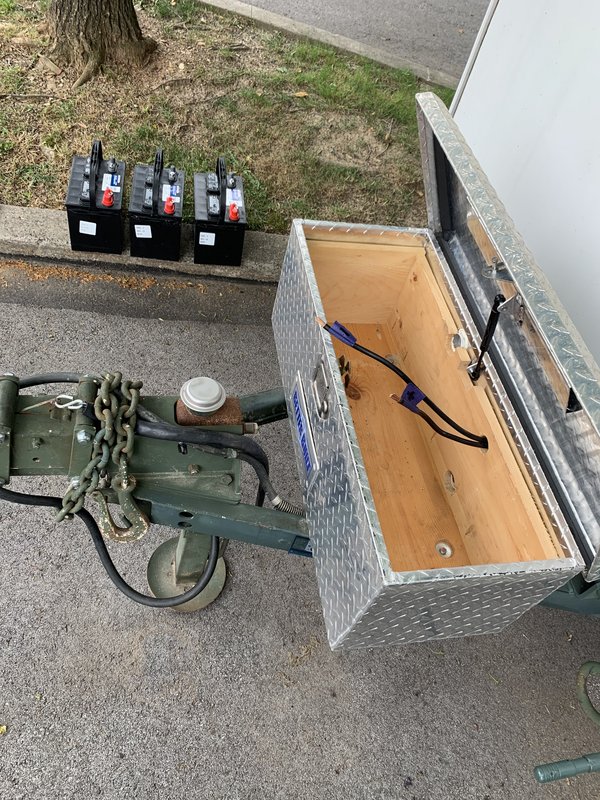
My LiFePO4 battery is about 1/3 the volume and 1/3 the weight of the three lead acid deep cycle batteries I had previously, but provides 50% more usable amp hours! This change allows me to put the new battery in a different compartment, freeing up the tongue box where the old batteries were. I now can put 1 lb propane bottles, tent poles, tools, and other things in there that took up room inside of the trailer. It also reduces excessive tongue weight by more than 100 lbs, and although my Jeep could handle it, I hope it drives much better now. (Tongue weight is still fine at least 10% of total trailer weight—I still can’t lift it without the jack.)
Bye, lead acid deep cycles! Sold on Craigslist.
If people have questions, please post them below. Also, as the technology evolves going forward, this thread is not intended to be static and should evolve with it. Please comment on relevant new advances and technologies, and post photos of your own LiFePO4 batteries!
Cheers,
Lauren
Appendix 1: Drop-In LiFePO4 options:
The advantage to drop-in units is that they have their own BMS, are roughly the same size as a regular battery, and are readily available on the internet. The main disadvantage is up front cost ($750+ for 100 Ah), and some built-in BMS’s don’t have a low temperature cutoff. Some folks think drop-in literally means they can replace their old flooded or AGM battery with lithium and that’s it… but NO. A lead acid battery charger will kill the LiFePO4 battery and you’ll be out a lot of money. Changing to LiFePO4 means making sure your charge controllers and battery chargers are all compatible, and that may incur extra cost. However, with how long lithium lasts (10+ years), it will probably be cost effective in the long term. http://www.ContinuousResources.com carries many of these. Reputable ones include (not a comprehensive list):
Battle Born - the best known, high quality LiFePO4 drop-in battery company IMO. Used by a lot of Vanlife & Overlanding folks.
ReLiOn - developed a self-heating battery that can be charged below freezing temperatures
Lion Energy
SOK
Renogy - can be networked with Renogy charge controllers
Victron - can be networked with Victron charge controllers & other equipment
Lynx Battery - a Seattle company that will make a battery from raw cells and a Daly BMS for you: https://lynxbattery.com
Other Ebay and Amazon options from China are less expensive than these. Will Prowse tests & reviews them from time to time, so check out his recommendations on: https://www.mobile-solarpower.com/lithium-batteries.html
Appendix 2: Where to get parts to build your own LiFePO4 battery (not a comprehensive list):
Raw LiFePO4 cells can be found on Amazon, Ali Express, Alibaba, Ebay, and other shadowy places on the internet. The key is not to be ripped off by paying a lot of money for used or B grade cells. Will Prowse keeps tabs on where to find good cells for the cheapest price on his webpage: https://www.mobile-solarpower.com/raw-lifepo4-deals-page.html
I chose to buy cells from Battery Hookup, a US company in Bensalem, PA, that tests and resells battery cells of all kinds. Their inventory constantly changes, so check back often. https://batteryhookup.com
The advantage to ordering on Ali Express or Alibaba is the lowest price (but keep an eye on the shipping cost as it can be free to astronomical). The disadvantage is not knowing for sure what you’re getting and having to wait several months for your batteries to cross the ocean in a shipping container. Battery Hookup is in the US, they test their stuff, and your purchases will ship right away. As you can imagine, Battery Hookup provides customer service that a company halfway across the world cannot.
Copper bars for bus bars can be ordered from any number of places, but I used https://www.onlinemetals.com/en/buy/copper-rectangle-bar. The key is to get pure copper (not aluminum) and have it be of a thickness that is sufficient to carry the amps you need from cell to cell. Here is the ampacity table I used: https://www.copper.org/applications/electrical/busbar/bus_table3.html. My 1/8” thick, 3/4” wide bus bars should be good for 200 amps at less than a 30 degree C temperature rise (you don’t want them to get hot). My electrical system has a 150 amp fuse coming from the battery so overloading should never be a problem at the bus bars.
If you’re building a battery out of raw cells, be sure to get a BMS that has a low temperature cutoff for charging. Good BMS options include:
Overkill BMS (warranteed by a US company) https://overkillsolar.com/product/bms-120a-4s-lifepo4/
Daly BMS (no low temperature cutoff as of this writing but very popular)
See Will Prowse’s page https://www.mobile-solarpower.com/raw-lifepo4-deals-page-676969.html for more info on BMS’s.
The bench top power supply I used: https://www.amazon.com/dp/B082HXVRNF/ref=cm_sw_em_r_mt_dp_B4F3XYFNKM29GXRC5RK7?_encoding=UTF8&psc=1
You’ll want to make some leads using 10 gauge (or similar) wire and some ring terminals. The thin wires with alligator clips that come with the unit charge the battery much more slowly than thicker wires with good solid connections.
Beehive heater components I used:
Inkbird thermostat: https://www.amazon.com/gp/product/B019I3YCFS/ref=ppx_yo_dt_b_asin_title_o06_s00?ie=UTF8&psc=1
Silicone trivet (got 2): https://www.amazon.com/gp/product/B08HJRFJLF/ref=ppx_yo_dt_b_asin_title_o06_s00?ie=UTF8&psc=1
Beehive heater (got 2): https://www.amazon.com/gp/product/B0794V5J5H/ref=ppx_yo_dt_b_asin_title_o06_s00?ie=UTF8&psc=1
Kapton tape for wrapping the aluminum base plate: https://www.amazon.com/gp/product/B07HB9M3ZP/ref=ppx_yo_dt_b_asin_title_o06_s00?ie=UTF8&psc=1

