New guy looking for more detailed weekender plans

This is the place where you can introduce yourself, and include a photo if so desired.

New guy looking for more detailed weekender plans

Postby tstroud » Mon Apr 06, 2009 8:25 pm

Hello,
I am really likeing the simple aproach of the weekender plans. Does anyone have more detailed plans? I understand how to build the exterior shell, but sam s little unclear how it all goes together.

Thanks
Tim
tstroud
Teardrop Inspector
 
Posts: 8
Joined: Mon Apr 06, 2009 8:19 pm
Location: Terre Haute, Indiana

Postby Miriam C. » Mon Apr 06, 2009 10:23 pm

Image 
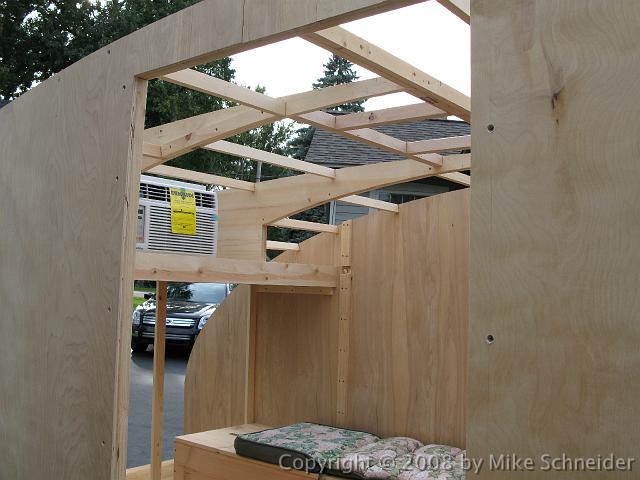
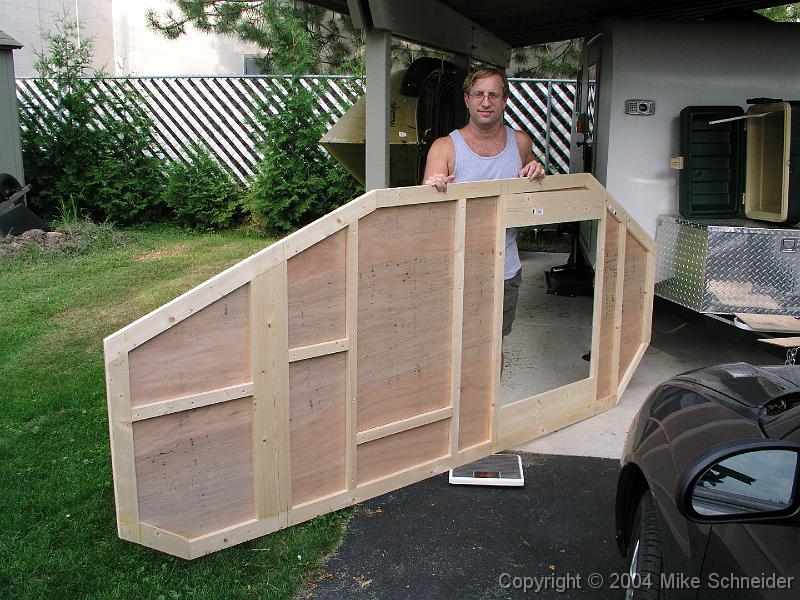
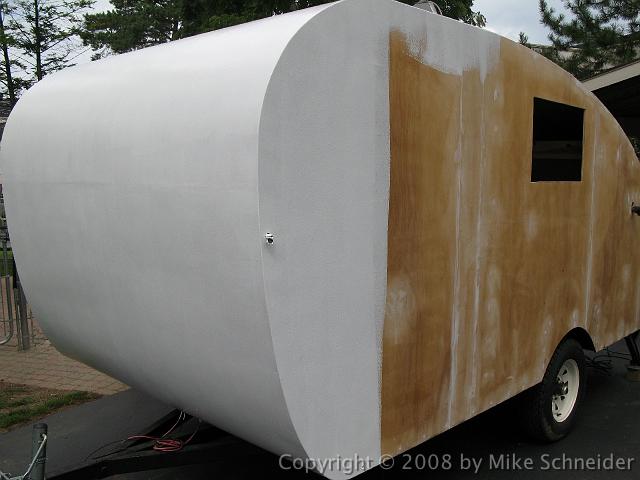
to the playground Tim. Which weekender are you looking to build? There are a couple. Mike, the owner of T/TTT has a very detailed plan for his
http://tnttt.com/viewtopic.php?t=683

And there is Starleens
http://tnttt.com/viewtopic.php?t=25226

And Bristol Del.
http://tnttt.com/viewtopic.php?t=23923

Each in their own way are fantastic and worthy of reproducing.

Enjoy the site and please remember :pictures: :pictures: :pictures: To keep the bubble in the center and the oil half full. ;)
“Forgiveness means giving up all hope for a better past.â€
User avatar
Miriam C.
our Aunti M
 
Posts: 19675
Images: 148
Joined: Wed Feb 15, 2006 3:14 pm
Location: Southwest MO

Postby tstroud » Mon Apr 06, 2009 11:05 pm

I was refering to Mike's design. I found all of the demensions for the shell, but was looking for more detail on how its all put together. Is it just glues and screwed? I will look at the other links you sent. Thanks for your help.

Tim
tstroud
Teardrop Inspector
 
Posts: 8
Joined: Mon Apr 06, 2009 8:19 pm
Location: Terre Haute, Indiana
Top

Postby rbeemer » Tue Apr 07, 2009 10:52 am

Do a internet search for "Desert Dawg" This is Joanne's build of a weekender that she has detailed real well and should be able to answer alot of build questions of a weekender
Rick

If ducks had scales, would fish quack?
rbeemer
500 Club
 
Posts: 997
Images: 13
Joined: Sun Apr 03, 2005 11:35 pm
Location: Oregon, Tigard
Top

Postby mikeschn » Tue Apr 07, 2009 4:11 pm

Some of these photos might help...

http://www.mikenchell.com/Weekender_Photo_Album/

Mike...
The quality is remembered long after the price is forgotten, so build your teardrop with the best materials...
User avatar
mikeschn
Site Admin
 
Posts: 19202
Images: 475
Joined: Tue Apr 13, 2004 11:01 am
Location: MI
Top

Postby tstroud » Tue Apr 07, 2009 9:44 pm

That's exactly what I was looking for. What kind of weight did you end up with? Im looking for a build that is light enough to pull with a mid sized car.

Thanks for your help. You guys are great.

Tim
tstroud
Teardrop Inspector
 
Posts: 8
Joined: Mon Apr 06, 2009 8:19 pm
Location: Terre Haute, Indiana
Top

Postby mikeschn » Wed Apr 08, 2009 3:59 pm

I never did take it to the scales... but at the point where I was at it was probably around 600 pounds. I imagine finished it would have been closer to 700.

Mike...
The quality is remembered long after the price is forgotten, so build your teardrop with the best materials...
User avatar
mikeschn
Site Admin
 
Posts: 19202
Images: 475
Joined: Tue Apr 13, 2004 11:01 am
Location: MI
Top

Postby tstroud » Thu Apr 09, 2009 7:27 pm

I was looking at some old posts. Did you ever play around with the idea of cooling this thing with the old camper fridge?
tstroud
Teardrop Inspector
 
Posts: 8
Joined: Mon Apr 06, 2009 8:19 pm
Location: Terre Haute, Indiana
Top

Postby mikeschn » Thu Apr 09, 2009 7:52 pm

tstroud wrote:I was looking at some old posts. Did you ever play around with the idea of cooling this thing with the old camper fridge?


Nope... the most cost effective way to cool a TD is with an el cheapo window air conditioner. hence my roof mount el cheapo!!!!!

Image

Of course if you are roughing it, without ac, you probably only have two options...

1) a roof vent that runs off the 12v battery

2) a cheap window air conditioner that runs off a 2000 watt generator.

There are other options, but they can get pretty expensive...

Mike...
The quality is remembered long after the price is forgotten, so build your teardrop with the best materials...
User avatar
mikeschn
Site Admin
 
Posts: 19202
Images: 475
Joined: Tue Apr 13, 2004 11:01 am
Location: MI
Top

Postby tstroud » Fri Apr 10, 2009 6:39 pm

In that last set of pictures you added, is that 1/4 luan you lined the outside with?
tstroud
Teardrop Inspector
 
Posts: 8
Joined: Mon Apr 06, 2009 8:19 pm
Location: Terre Haute, Indiana
Top

Postby mikeschn » Fri Apr 10, 2009 10:59 pm

tstroud wrote:In that last set of pictures you added, is that 1/4 luan you lined the outside with?


Yep, those walls are built up with sticks, and 1/4" luan. Well, actually it's 5mm luan. Pretty cheap stuff from the box store. Since then I've been using birch plywood to build up walls.

Mike...
The quality is remembered long after the price is forgotten, so build your teardrop with the best materials...
User avatar
mikeschn
Site Admin
 
Posts: 19202
Images: 475
Joined: Tue Apr 13, 2004 11:01 am
Location: MI
Top

Postby tstroud » Sat Apr 11, 2009 11:15 am

Are you using 1x2's or 1x3's for sticks to frame it out. Ill bet the birch gives you a much smoother finish.

Thanks
Tim
tstroud
Teardrop Inspector
 
Posts: 8
Joined: Mon Apr 06, 2009 8:19 pm
Location: Terre Haute, Indiana
Top

Postby mikeschn » Sat Apr 11, 2009 1:42 pm

tstroud wrote:Are you using 1x2's or 1x3's for sticks to frame it out. Ill bet the birch gives you a much smoother finish.

Thanks
Tim


I typically rip my sticks from a 1x8. So I'll rip them to whatever width makes sense. Typically that's 1 1/2" wide. But you can see the areas where the sticks had to be wider, and sometimes much wider!

Image

Mike...
The quality is remembered long after the price is forgotten, so build your teardrop with the best materials...
User avatar
mikeschn
Site Admin
 
Posts: 19202
Images: 475
Joined: Tue Apr 13, 2004 11:01 am
Location: MI
Top

Postby tstroud » Sun Apr 12, 2009 5:56 pm

I hope you dont mind me asking all these questions, and I appreciate your help. In your original plans where you used 1/2" plywood, you used a biscuit joiner the join the plywood peices for the sides which were longer than 8'. How did you do that using the 1/4 birch? Did you just make sure there was a board behind the seam to screw the plywood down at the seams? If so did you fill the seam with something similar to how you would with drywall? Was the seam noticable after paint? Do you have any pictures of your completed build after paint?

Thanks
Tim
tstroud
Teardrop Inspector
 
Posts: 8
Joined: Mon Apr 06, 2009 8:19 pm
Location: Terre Haute, Indiana
Top

Postby mikeschn » Sun Apr 12, 2009 6:13 pm

tstroud wrote:I hope you dont mind me asking all these questions, and I appreciate your help. In your original plans where you used 1/2" plywood, you used a biscuit joiner the join the plywood peices for the sides which were longer than 8'. How did you do that using the 1/4 birch? Did you just make sure there was a board behind the seam to screw the plywood down at the seams? If so did you fill the seam with something similar to how you would with drywall? Was the seam noticable after paint? Do you have any pictures of your completed build after paint?

Thanks
Tim


Now there's a bunch of questions for you...

1) I didn't use a biscuit jointer for the 1/4" birch. I just made sure I had a wide stick that I could screw into...

2) On similar builds, like my generic ET, I used the rot doctor's epoxy filler. If you do a good job you won't see the seam. If you are sloppy, you will.
Image

3) I didn't finish the weekender, Frank did. And you can see his pics here. But he used fiberglass resin over the entire body, so you won't see any seams... http://www.mikenchell.com/Weekender_Photo_Album_2/

Mike...
The quality is remembered long after the price is forgotten, so build your teardrop with the best materials...
User avatar
mikeschn
Site Admin
 
Posts: 19202
Images: 475
Joined: Tue Apr 13, 2004 11:01 am
Location: MI
Top

Next

Return to Newbies, Introduce yourselves

Who is online

Users browsing this forum: No registered users and 1 guest