New-ish member from Upstate NY

This is the place where you can introduce yourself, and include a photo if so desired.

Postby SubaruDave » Sun Dec 11, 2011 11:16 pm

I guess I'm a little too ambitious with my ideas...

I've been watching DIY network and HGTV for ideas and tips how to build different things for the home that I'm sure can be modified for a trailer.
SubaruDave
Teardrop Advisor
 
Posts: 69
Joined: Wed Aug 17, 2011 5:26 pm
Location: Upstate NY

Postby SubaruDave » Tue Dec 13, 2011 1:19 pm

Found some nice 12V lighting fixtures which are decently priced.

http://superlumination.com/fixtures.htm

What other stores/websites does everyone else use for their 12v lighting?
SubaruDave
Teardrop Advisor
 
Posts: 69
Joined: Wed Aug 17, 2011 5:26 pm
Location: Upstate NY

Postby hoytedow » Tue Dec 13, 2011 1:56 pm

That's a pretty nice link, actually.

There are others.
http://tweetys.com/rv-lighting.aspx?gcl ... 4AodIVF54g
Happy trails,
Hoyt
User avatar
hoytedow
Teardrop Master
 
Posts: 181
Images: 19
Joined: Thu Oct 13, 2011 4:33 pm
Location: Central Florida
Top

Postby SubaruDave » Tue Dec 13, 2011 2:06 pm

hoytedow wrote:That's a pretty nice link, actually.

There are others.
http://tweetys.com/rv-lighting.aspx?gcl ... 4AodIVF54g


yeah, they pretty much have everything you'll need for lighting. I order everything from them. but was just wondering what everyone else uses.
SubaruDave
Teardrop Advisor
 
Posts: 69
Joined: Wed Aug 17, 2011 5:26 pm
Location: Upstate NY
Top

Postby absolutsnwbrdr » Tue Dec 13, 2011 2:17 pm

Picked up most of my LED's here... http://www.superbrightleds.com/
Zach
Coming Soon...
Image Image
User avatar
absolutsnwbrdr
Donating Member
 
Posts: 2657
Images: 412
Joined: Mon Jan 25, 2010 6:10 pm
Location: Hanover, PA
Top

Postby bobhenry » Tue Dec 13, 2011 2:31 pm

SubaruDave wrote:Found some nice 12V lighting fixtures which are decently priced.

http://superlumination.com/fixtures.htm

What other stores/websites does everyone else use for their 12v lighting?


Autozone : buy a replacement socket and the appropriate bulb and work it into a fixture of choice.
Growing older but not up !
User avatar
bobhenry
Ten Grand Club
Ten Grand Club
 
Posts: 10368
Images: 2623
Joined: Fri Feb 09, 2007 7:49 am
Location: INDIANA, LINDEN
Top

lights, shell, time

Postby PcHistorian » Tue Dec 13, 2011 9:33 pm

cool tips on the lights everyone. thanks. I was only going to use led's for automatic inside with the doors opening. I can scrap out the led's from stuff and do my own wiring. probably a 100k ohm resistor per led on a 12v system, and get my bulbs 5/per $1 from a flashlight at the dollar store. For brighter, I am using van "air line" type swivel lights I stripped from my old van. (gone). The 12v sockets (lighter) I got from van shop/off road vehicle accessories. (be sure to use heavy 14 gauge stranded wire if you are going to plug in a lighter.) to fuse that I am using a self resetting breaker that goes in the old style fuse socket, I got from radio shack.

I empathize with you in that I want to use my trailer to also haul tools for handyman work when I don't camp. So the 12v battery to 110 volt outlet inverter is a big plus (and tax deductible as a tool expense.) I think your hardest decision will be between a tiny ultra light fiber glass pre-made or get a work trailer and revamp it with windows and screens with slide out / interchangeable interior even, work to play. It is going to depend on if you want to put huge loads of time into remodeling the interior. I'm overhauling one, but my decision is based on, I want off the ground (no tent), like to haul a little extra for camping and work (tiny trailer for 4 cyl ranger), I love to work with my hands and the wood, metal, electrical. No wife and/or kids so plenty of time to invest on hobby to build. Little money so I wanted to start raw and build custom for me.

Good luck, hope to see you on the open road. Check out my profile for what I am doing. I'll look around for some links, too. You might want something you make yourself to show off what you can do, to build your business. (as with my interior wiring, wood work, electrical, plumbing, paneling, painting...) :thumbsup:
Elf Cottage
Image

Build Documentary
https://sites.google.com/site/pchistorian/home/hobby/camping/elf-build
Build Forum
http://www.tnttt.com/viewtopic.php?t=48462
Build Album
http://www.tnttt.com/gallery/album.php?album_id=42

progress is progress. (don't look a gift "progress" in the mouth.)
User avatar
PcHistorian
The 300 Club
 
Posts: 354
Images: 198
Joined: Fri Dec 09, 2011 1:06 pm
Location: S.E. Michigan
Top

Postby SubaruDave » Wed Dec 14, 2011 7:44 am

I love building things and using my hands to put things together, that's probably why I'd rather build a trailer to convert instead of buy a camper.
I'm pretty good with wiring things but not so much with making things from scratch. I've done numerous wire harnesses and car and home stereo installs. I've also made wire harnesses for cars.
I went to college for autobody repair and I'm pretty good with painting things too.

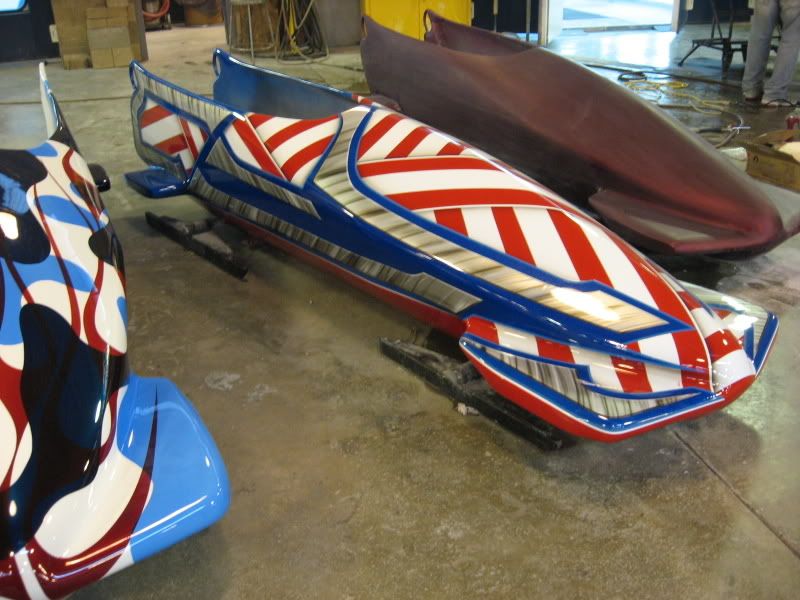
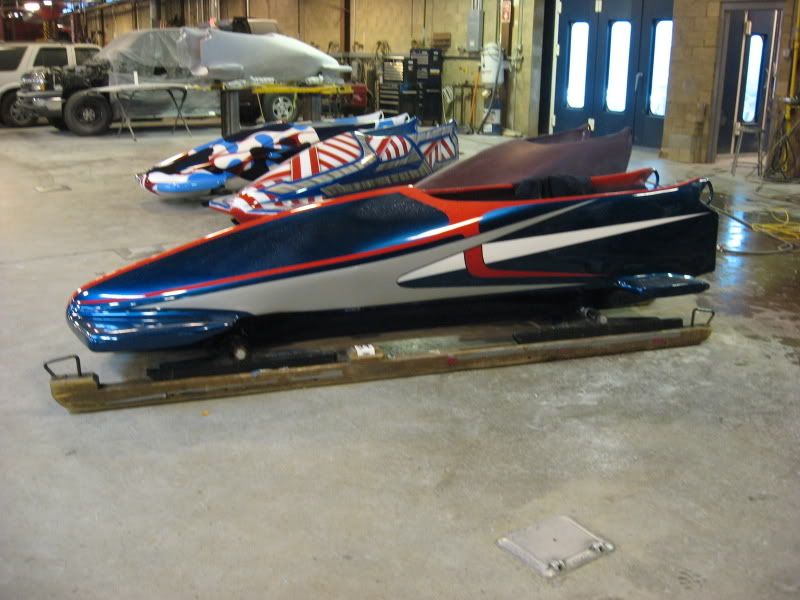
Heres a couple pics of things I did back in college.


Some of them are Bobsleds used [in practice] in the 1980 Winter Olympics (Lake Placid). We got to repair and refinish them in whichever way we wanted as long as they incorporated Red, White and Blue. PPG Automotive Refinish donated the paint and materials.

Heres a link about the event, which was back in early 2007. http://www.race2win.net/wc/06/12/bbcda.html

Image

Image
SubaruDave
Teardrop Advisor
 
Posts: 69
Joined: Wed Aug 17, 2011 5:26 pm
Location: Upstate NY
Top

Postby SubaruDave » Thu Dec 29, 2011 8:39 pm

SubaruDave wrote:Did some more thinking today and searching and searching for something to suit my needs, or to see if its even been done... I've seen RVs with slide out sections and I would like to do the same with a cargo trailer. I could try to make it from light materials, like foam or something similar. I can make it weatherproof by covering the entire thing in FRP or another lightweight material.

Since I was thinking about going with a 6x12 or even 6x10, what if I built the slide out section to come out 3 or 4 feet of the rear of the trailer when the doors are open, that will keep me from having to make it weatherproof when closed (because the doors will cover it), also it will allow me to have more windows if I would like. and it would also keep the weight over or close to the trailer axle when in transit, and not add anything to my tongue weight.

The only issue is where can I get the hardware to do so?


Anyone have any ideas? Most likely it would be on the upper half of the trailer for a sleeping area, leaving the lower portion for storage.
SubaruDave
Teardrop Advisor
 
Posts: 69
Joined: Wed Aug 17, 2011 5:26 pm
Location: Upstate NY
Top

RE: Do A Roll-Out

Postby mezmo » Sat Dec 31, 2011 1:11 am

Hi SubaruDave,

If you wanted to do a very simple one, you could just build a plywood [or
even foam w/ 1/4in interior paneling and the fabric and glue a/o paint
exterior coating] box to roll out the rear CT opening [it'd still need to be
weatherproof enough when it is expanded out for camping] that would run
on runners you'd place and brace in position and level. Put fixed wheels
[very reasonably priced - just get ones that can carry the structure and
storage contents and bedding total or estimated weight.] on each of the
four corners of the 'box' structure that would follow along runners/guides
in the CT in the travel position, and then roll on out on the exterior
mounted extension runners when set up in camp. [Made out of wood or
metal 'U' channels sized to the corner wheels.]This is a low-tech solution.
They do have large heavy duty full extension "drawer" slides that can be
used but they are very very expensive!

Don't forget some way to keep the roll-out box in position - a stop or pin
set up - while traveling and when opened. Also you'd need a perimeter
flange-like frame at the CT rear opening that you would have a
corresponding matching flange-like frame around the interior opening of
the roll-out box, between which you could mount the seal - a dense foam
or garage door like seal comes to mind.

Since you want the bottom for storage, I'd suggest doing plywood or thin
hardboard drawers under a platform for the bed/bunks. you could split
them so half open out to the rear outside and the other half open into the
interior. Drawers are just more useful/accessible. If you need a storage
cupboard under the bed for bulky items like aluminum lawn chairs, you
could do half [one side] a cup board and half the double opening drawers
- the main thing is to tailor it to your storage needs.

'Hope the description makes sense!

Happy New Year! Have fun planning!

Cheers,
Norm/mezmo
If you have a house - you have a hobby.
User avatar
mezmo
1000 Club
1000 Club
 
Posts: 1817
Images: 194
Joined: Fri Jan 01, 2010 4:11 am
Location: Columbia, SC
Top

Postby SubaruDave » Sat Dec 31, 2011 10:26 pm

That was actually VERY helpful. I was thinking about rollers inside a channel but wasn't sure if it would work in the real world. I have a few different ideas for a latching system to keep it locked in place while extended. I can just out a stopper on the inside because the rear doors should hold it inside when closed.

Theoretically, how much of the slide out do I need inside the trailer in the tracks so it stays level, or would it be fine if I have 4 heavy duty latches (2 on each side) and have it slid out all the way?
SubaruDave
Teardrop Advisor
 
Posts: 69
Joined: Wed Aug 17, 2011 5:26 pm
Location: Upstate NY
Top

Postby mezmo » Sun Jan 01, 2012 1:59 am

Hi SubaruDave,

Happy New Year!

Since the rollout would be essentially a box on corner wheels, the goal is
to keep it located where you want it and kept in position. Inside the CT all
you'd need would be side guides tall enough to guide the rollout sides as
you push it out and some kind if pinning set up to keep it from moving
[especially to-and-fro] while being towed.

To avoid frictional binding when extending the rollout box, you could
mount side quide wheels along it [3-4 per side] or on floor or side
mounted guides to locate the box internally. One possibility would be
to make a couple side guides in an "L" shape out of 1x3 for the base and a
1x4 for the vertical member with the base mounted to the floor, and then
mount the guide wheels on top of the vertical leg so that they are parallel
with the floor surface so they can roll against the box sides as it passes.
Alternatively, you could mount a couple of 2x4-2x6s, vertically at the floor
level against each wall, and mount the side guide wheels for the rollout
box on their top so they roll along the rollout box's sides as it is extended
out/in.

Without runners you have no way to easily get the rollout box extended
out of the CT easily. Manhandling out would get very old after the first
try. It'll be way to heavy to handle alone, let alone awkward. Make it easy
on yourself and use exterior runners to guide and support the corner
wheels, and thus the rollout box.

As you need a way to extend the rollout box, the simplest way to
do it [in my view], without resorting to the prior mentioned very expensive
drawer type slides, is to have the "U" channel type runner for the corner
wheels to travel along outside the rear of the CT. This could be a metal
"U" channel of some sort or a wooden one - all it needs is enough of a
channel in it to keep the wheels contained. That could be achieved by
a 1/2in deep ,routed groove in the wood, just a bit wider than the wheel
width [Of course the runner needs to be thick/sturdy enough to carry the
weight of the rollout box- probably use a couple 2x4s for the runners.] or
by adding a couple of small 1x wood pieces along each top side or by
attaching some 3/4-1 in aluminum angle on top of each side of the wooden
runner, the verticals being mounted inboard to act as the corner wheel
guides. [Note: don't forget to consider any clearances needed for all this -
it's not complicated but you just need to remember them so you don't get
binding.] Alternately, you could get a couple of the small aluminum ramps
they sell for loading ATVs and such and use them horizontally and level
with the CT floor, for runners.

These exterior runners could either be hinged to the CT rear floor edge
and fold up for travel behind the rollout box or be demountable and use
whatever attachment hardware there is available for ramps. It's very
important for the runners to be in the same horizontal plane as the CT
floor for the rollout box to smoothly transition in and out. The ends of the
runners could be supported by many set ups, an easy one would be to
just use simple jacks/jackstands. I think it'd be easy to just hinge an
appropriate length of 2x4 on the underneath of the 2x4 runner and
fashion your own adjustable bottom to it. With the runners, you should
also have some kind of cross piece also between the two runners to keep
them located and parallel too. Some triangulation in all this wouldn't hurt
either - only common sense and safety for that.

Also, to keep it secure when opened, I'd fix a pin or latch setup inside on
the two opening perimeter frames mentioned earlier to function for the
weather sealing matters.

The rollout box would just roll on the CT floor internally and on the
exterior runners when extended - the CT floor and runner groove flat
surfaces would be a continuous level rolling surface for the rollout box.

'Hope this helps some.

Cheers,
Norm/mezmo
If you have a house - you have a hobby.
User avatar
mezmo
1000 Club
1000 Club
 
Posts: 1817
Images: 194
Joined: Fri Jan 01, 2010 4:11 am
Location: Columbia, SC
Top

Postby SubaruDave » Fri Jan 06, 2012 8:29 am

I was looking thru the picture gallery and came across this...

Image


Where can I find those???
SubaruDave
Teardrop Advisor
 
Posts: 69
Joined: Wed Aug 17, 2011 5:26 pm
Location: Upstate NY
Top

Postby Gaelen » Fri Jan 06, 2012 7:02 pm

Dave, try the you-build-it custom closet shop at Home Depot or Loews. Those look like the same wire shelving baskets and frames they sell in that section.
Gaelen
2006-2011: '79 SunLine Sun Spot
now: '05 Finntec homebuilt teardrop
My blogs: Life Out Loud, Kitchen Jam and Dog Trainer's Log.
Syracuse Dog Training and @gaelen2 on Twitter
User avatar
Gaelen
500 Club
 
Posts: 595
Images: 38
Joined: Sun Oct 08, 2006 3:09 pm
Location: Central NY
Top

Re: New-ish member from Upstate NY

Postby SubaruDave » Sun Mar 25, 2012 12:22 pm

I'm starting to buy all the things I feel necessary to be inside the camper and now I've came to my water source/supply.

On one of the survivalist (prepper) forums I'm on, many people have a ceramic water filter system set up. Most filters cost between $15 and $25 a piece. Since every where I go has some sort or water supply I was thinking about using these instead of hauling my water to where I'm going. I believe if I have a few filters set up I can have drinkable water from whatever source I come across. I've seen someone filter nasty pond water and it came out crystal clear and he said there were no I'll effects from drinking it.

Some filters have a (pressure) rate of 60-70 gallons a day. I'm sure if I have than one it should be more than sufficient even if only gravity fed. Where can I find a big enough water tank to hold an ample supply of water for beneath the trailer that is also easy to empty in a hurry if I need to?
SubaruDave
Teardrop Advisor
 
Posts: 69
Joined: Wed Aug 17, 2011 5:26 pm
Location: Upstate NY
Top

PreviousNext

Return to Newbies, Introduce yourselves

Who is online

Users browsing this forum: No registered users and 1 guest