Silver Beatle - She's now with an old friend!

...ask your questions in the appropriate forums BUT document your build here...preferably in a single thread...dates for updates, are appreciated....

Postby 2bits » Wed Sep 02, 2009 11:49 pm

Man that is looking good! I love how cool it is in the evenings lately! Hot as Texas in the day, but desert cool at night. I hope you can squeeze a couple of week nights in doing one small thing. That is what I try to do. "one" thing each night, and it really adds up. Let me know if you would like any help on the rolling over days (ahem the teardrop ;) )
Thomas

Image
User avatar
2bits
2bit Member
 
Posts: 5130
Images: 8
Joined: Thu Dec 27, 2007 6:04 pm
Location: Lake Tawakoni, TX

Postby kennyrayandersen » Thu Sep 03, 2009 3:41 am

What, no popcorn on the ceiling?

Just kiddin’ – looks better than downtown!
:thumbsup: :applause:
User avatar
kennyrayandersen
1000 Club
1000 Club
 
Posts: 1750
Images: 38
Joined: Sun Apr 29, 2007 10:27 pm
Location: TX

Looks good, Tom!

Postby Alfred » Thu Sep 03, 2009 9:38 am

Looks good, Tom! Keep gittin' R' done!

AL in Asheville :thumbsup:
4 minute video of our build - A 5x8 Camper for a family of 5 - http://youtu.be/CYGTlkfpIhY
How we built a 5x8 camper for a family of 5, using a utility trailer with an incorporated bunk bed for the kids.
From plain trailer to campground!

ImageImageImage
Also - More pictures here: http://flic.kr/ps/225piC
User avatar
Alfred
Silver Donating Member
 
Posts: 1633
Images: 368
Joined: Sun Jun 03, 2007 9:18 pm
Location: NC, Asheville
Top

Postby aggie79 » Mon Sep 14, 2009 12:23 pm

Thanks all for your nice comments.


:thinking: Progress has been slow. Before the monsoon hit this weekend, my wife helped me pull the teardrop off the trailer to flip it over. I had some work to do on the belly side and thought it would be easier to do the work "bottoms up."
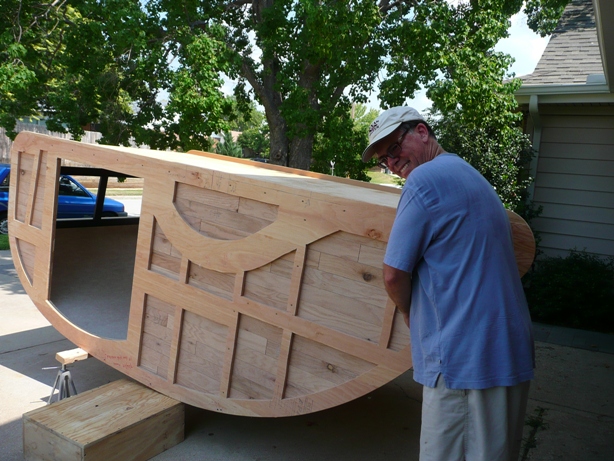
Image

First, I needed to work on the front and rear roll pans. I had thought about making them from plywood and foam, but the trailer sides only extend 2" below the floor. So I added wood filler strips and planed and sanded them to match the front and rear radius.
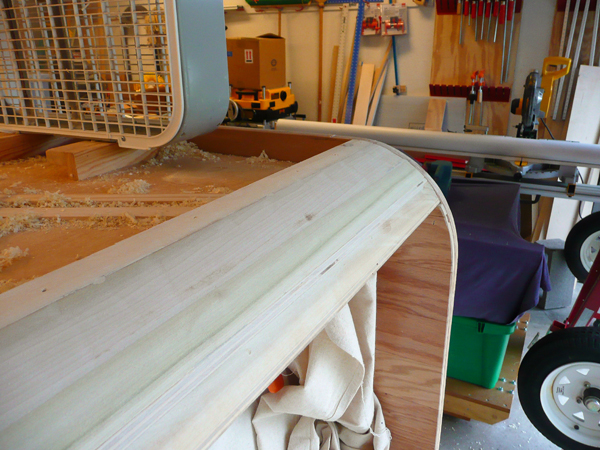
Image

Next the sidewalls were notched to provide extra clearance for the axle's torsion arms. (From the way I ordered my axle, I only had about 1/4" clearance from torsion arm to the sidewall and didn't think that would be enough.) So I cut out that portion of the sidewall below the floor and rabbeted 1/2" into the 3/4" plywood "framing." The picture shows the template I cut for using my router with a pattern bit.
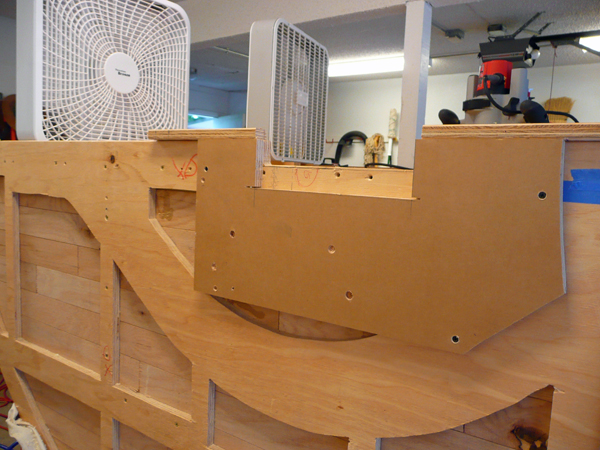
Image

I plan to epoxy the sidewall extensions and edges of the plywood framing. (My floor already has 3 coats of CPES on it.) After the epoxy is cured, I'll add a coat or two of rubberized undercoating. That will finish the street side of the floor, and I can flip the teardrop right side up and put it back on the frame.

:worship: Things hopefully will then pick up. The hurricane hinge and my trim arrived from Grant (except for the roof edge trim. I still can't decide what style to use.) Most of my electrical components are purchased and ready to install. Wiring and the dreaded hatch construction are the next two dragons to slay.

:thumbsup: Gig'em, Tom
Tom (& Linda)
For build info on our former Silver Beatle teardrop:
Build Thread

93503
User avatar
aggie79
Super Duper Lifetime Member
 
Posts: 5405
Images: 686
Joined: Tue Aug 07, 2007 5:42 pm
Location: Watauga, Texas
Top

Postby 2bits » Mon Sep 14, 2009 8:38 pm

Good job Tom! !! I think being able to roll it over like that is a huge testament to the strength of the structure you've created! ! ! I dunno about a quarter inch that might have been ok, Looks like your tire to side wall distance is plenty though, so that's good. Those were my two big concerns.

Your roll pan looks super nice too! You are becoming an arteeest!
:thumbsup:
Thomas

Image
User avatar
2bits
2bit Member
 
Posts: 5130
Images: 8
Joined: Thu Dec 27, 2007 6:04 pm
Location: Lake Tawakoni, TX
Top

Postby aggie79 » Mon Sep 14, 2009 10:18 pm

2bits wrote:I think being able to roll it over like that is testament to the strength of the structure you've created!


Thanks Thomas.

I think in general that we all overbuild our teardrops. Here's another picture of it before I turned it over. The teardrop is sitting on three points - two at the back and one in the front midspan on the floor. Being curious, I put my 200# arse inside the teardrop and it didn't flex at all!

Image

Tom
Tom (& Linda)
For build info on our former Silver Beatle teardrop:
Build Thread

93503
User avatar
aggie79
Super Duper Lifetime Member
 
Posts: 5405
Images: 686
Joined: Tue Aug 07, 2007 5:42 pm
Location: Watauga, Texas
Top

Postby 2bits » Mon Sep 14, 2009 10:29 pm

That is a great pic! Just what I was wanting! that is sturdy with no frame underneath! Dang!
Thomas

Image
User avatar
2bits
2bit Member
 
Posts: 5130
Images: 8
Joined: Thu Dec 27, 2007 6:04 pm
Location: Lake Tawakoni, TX
Top

Postby S. Heisley » Fri Sep 18, 2009 12:13 am

2bits wrote:
I think being able to roll it over like that is a huge testament to the strength of the structure you've created! ! !


:shock: I think it's a testament to Tom's strength that he can lift and flip something like that! It must weigh a few hundred pounds.

(But then, teardrop builders seem to be able to do just about anything!)
User avatar
S. Heisley
Super Lifetime Member
 
Posts: 8774
Images: 495
Joined: Mon Sep 17, 2007 10:02 am
Location: No. California
Top

Postby WayneFromMo » Sat Sep 19, 2009 8:23 am

Look at what you can do! You should be glad that you listened to your mom, when she told you to take your vitamins.

Want to come over and help me flip mine? That dude is light. Sturdy also, nice work.
Last edited by WayneFromMo on Sat Sep 19, 2009 5:23 pm, edited 1 time in total.
The only thing keeping anyone from being a genius is motivation- Albert Einstein
My build
http://www.tnttt.com/viewtopic.php?t=31105
User avatar
WayneFromMo
Teardrop Master
 
Posts: 134
Images: 92
Joined: Thu Jun 11, 2009 7:22 pm
Location: Poplar Bluff Missouri
Top

Postby Mike_La » Sat Sep 19, 2009 5:11 pm

:thumbsup:


Very nice, Tom.
I like the profile.

:applause:
Mike


"Believe you can and you're halfway there."
Theodore Roosevelt
Mike_La
Silver Donating Member
 
Posts: 600
Images: 71
Joined: Thu Jun 01, 2006 7:31 pm
Location: Louisiana
Top

Postby SIXTOTWO » Thu Sep 24, 2009 7:27 am

Very nice Tom!! I've read thru your entire build. I love your "ebonized" headboard! What kind of doors will you be putting on there?
Also, What are you skinning it with?

Lookin' great! :applause: :thumbsup:
Terry and Sue Landis
BUILD THREAD
Image Image
******Embarassing our kids, just another quality service that we offer!******
User avatar
SIXTOTWO
Donating Member
 
Posts: 323
Images: 216
Joined: Sat Aug 09, 2008 1:26 pm
Location: Green Lane, PA
Top

Postby aggie79 » Thu Sep 24, 2009 8:16 am

Sue and Wayne,
I'm not Hercules, but I did start out trying to flip it over myself. When my wife came back from the store and saw my redneck hall-of-fame setup being used to stand the teardrop on end, she intervened and we used good ole muscle power to flip the teardrop belly side up. (By the way, I'm finished epoxying the bottom and it will be time this weekend to turn it back over again.)

Mike,
I'm happy with the profile, too but it is not original. It is "borrowed" from a few others I've seen, primarily Gern's Amarillo teardrop.

Terry,
The interior cabinets and probably the galley cabinets will be ebonized - face frames and doors. I think it provides a good contrast to the white oak walls. As far as the exterior, I will be using that mirror clear anodized aluminum. Hopefully that stuff will not be too much work to keep it shiny. Here's a picture of it waiting to be installed (still with the protective film on.)

Image

:thumbsup: Thanks, Tom
Tom (& Linda)
For build info on our former Silver Beatle teardrop:
Build Thread

93503
User avatar
aggie79
Super Duper Lifetime Member
 
Posts: 5405
Images: 686
Joined: Tue Aug 07, 2007 5:42 pm
Location: Watauga, Texas
Top

Postby Jst83 » Thu Sep 24, 2009 9:38 am

Very nice looking tear :applause:

Love the wood on the inside walls, What is it?
Image
User avatar
Jst83
3000 Club
3000 Club
 
Posts: 3606
Images: 215
Joined: Thu Jul 20, 2006 7:33 pm
Location: Indiana, Greenfield
Top

Postby planovet » Thu Sep 24, 2009 10:19 am

Where did you get your aluminum Tom?
ImageMark (& Cindi)
Visit our website: Little Swiss Teardrop

I was wondering why the water balloon was getting bigger... and then it hit me.

ImageImageImageImage
User avatar
planovet
The Cat Man
 
Posts: 5583
Images: 3
Joined: Tue Nov 27, 2007 4:48 pm
Location: Plano, Texas
Top

Postby aggie79 » Thu Sep 24, 2009 12:05 pm

Jst83 wrote:Very nice looking tear :applause:

Love the wood on the inside walls, What is it?


Thanks Scott.

The wood on the inside is engineered wood flooring. The big blue box had it on sale for around $3.00 per foot, and with a 10% off coupon and a few gift certificates I had it was less than the coast of unfinished oak plywood, and I didn't have to finish it myself (which I'm not too fond of.)

planovet wrote:Where did you get your aluminum Tom?


Hi Mark,

I purchased the aluminum from Regal Plastics, a sign materials supplier, in Fort Worth. The sheets are 4' x 10' so I won't have seams on the sides. I will have to seam the roof, and intend to use some of that 3m VHB tape.

BTW, Somehow Linda and I didn't meet Cindy at the Loyd Park last weekend. We look forward to our paths crossing in the future.

Gig'em, Tom :thumbsup:
Tom (& Linda)
For build info on our former Silver Beatle teardrop:
Build Thread

93503
User avatar
aggie79
Super Duper Lifetime Member
 
Posts: 5405
Images: 686
Joined: Tue Aug 07, 2007 5:42 pm
Location: Watauga, Texas
Top

PreviousNext

Return to Build Journals

Who is online

Users browsing this forum: No registered users and 13 guests