Wolfgang's 2&2 built updated December 25, 2010

...ask your questions in the appropriate forums BUT document your build here...preferably in a single thread...dates for updates, are appreciated....

Postby Wolfgang92025 » Mon May 31, 2010 9:44 pm

Here is an update for the weekend.
It was pretty productive.

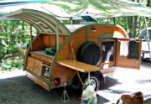
Made a drawer for the inside tall cabinet.
Also gave the weight set a work out.

Image

Drawer installed

Image

View from driver side with the drawer open

Image


Cabinet above opens to from a platform for small electric heater for those chilly nights.

Image

Also bought the aluminum for the trailer skin.

Image

Cut the first piece to skin the hatch.

Image

Yup, it will take some polishing to get the water stains out...:thumbdown:

That's about it............
Wolfgang

Only 44 days till IRG III :thumbsup:
Wolfgang

Image
User avatar
Wolfgang92025
Lifetime member
 
Posts: 1098
Images: 660
Joined: Fri Apr 18, 2008 10:16 pm
Location: Salt Lake City area, Utah

Postby parnold » Mon May 31, 2010 9:51 pm

Very nice! :thumbsup: :applause:
User avatar
parnold
Donating Member
 
Posts: 2344
Images: 302
Joined: Mon Feb 08, 2010 4:49 pm
Location: Northwest New Jersey

Postby S. Heisley » Tue Jun 01, 2010 6:35 pm

Beautiul cabinet work. :thumbsup:
User avatar
S. Heisley
Super Lifetime Member
 
Posts: 8866
Images: 495
Joined: Mon Sep 17, 2007 10:02 am
Location: No. California
Top

Postby Wolfgang92025 » Wed Jun 16, 2010 11:20 pm

Well, another two weeks are gone.
Ended up spending 4 days last week working in Milwaukee. Needless to say, that means I could not work on the trailer.

Worked some more on the skin, and got the rock guard mounted.

Image

Also got the Fantastic Fan mounted in place and sealed up.
Outside view

Image

Inside view

Image

Worked on the electrical. Wiring harness is inside the bottom of closet. None of the wires are marked. Better not loose the paper with all the wiring data.

Image
Need to vacuum out the mess in the bottom.

Got the charger, converter installed and wired. Tried out the fan and everything works.

Image

Also made one of the eyebrows (rain guard) for the door. Still need to make the other one and seal and install them.

Image

Well, that's it for today. Unfortunately I will be in Milwaukee for 3 days again next week, so work is really cramping my time to "get R done"

Wolfgang

Only 28 days till IRG III :)
Last edited by Wolfgang92025 on Thu Jun 17, 2010 6:15 pm, edited 1 time in total.
Wolfgang

Image
User avatar
Wolfgang92025
Lifetime member
 
Posts: 1098
Images: 660
Joined: Fri Apr 18, 2008 10:16 pm
Location: Salt Lake City area, Utah
Top

Postby grizz » Thu Jun 17, 2010 1:36 am

Great progress, and still love what you are doing.

Hope the time away allows you to create more in your head.
Greetings from England.

Rian.


Hoping to get it all done in time.
User avatar
grizz
1000 Club
1000 Club
 
Posts: 1210
Images: 29
Joined: Mon Sep 21, 2009 2:37 pm
Location: Rochester, Kent, UK
Top

Postby Vindi_andy » Thu Jun 17, 2010 4:06 am

Loooking Fan- F*****G tastic there.

If mine turns out half as good Ill be proud. Ive decided to go fairly minmalistic inside however the wife may have other plans.

A true Artist and carftsman at work there
Boys never grow in to men the toys just get more expensive and more dangerous

How true :)
User avatar
Vindi_andy
Teardrop Master
 
Posts: 176
Images: 49
Joined: Tue May 25, 2010 10:13 am
Location: Leicestershire, UK
Top

Postby bve » Thu Jun 17, 2010 8:32 am

Looking fantastic Wolfgang.

So is that a light above the window?
Image

Very nice detail.


Burke
Burke

KISS > COMPLEX
Image
Image

Build threads converted to PDFs.
As of 2008-08-08 I have added more build threads to the pdf collection
User avatar
bve
500 Club
 
Posts: 694
Images: 98
Joined: Sat Aug 25, 2007 1:44 am
Location: Edmonton, Alberta, Canada
Top

Postby S. Heisley » Thu Jun 17, 2010 8:37 am

Wow! You've gotten a lot done! It is looking great. I never thought of attaching wiring connections on the inside top of the cabinet that way. ...Clever. :thumbsup:
User avatar
S. Heisley
Super Lifetime Member
 
Posts: 8866
Images: 495
Joined: Mon Sep 17, 2007 10:02 am
Location: No. California
Top

Postby Wolfgang92025 » Thu Jun 17, 2010 6:09 pm

bve wrote:Looking fantastic Wolfgang.

So is that a light above the window?
Image

Very nice detail.


Burke


Thanks Burke, Yes there are two LED light strips (high/low) hidden behind the walnut fascia. Still need to glue the other ones on.

Wolfgang
Wolfgang

Image
User avatar
Wolfgang92025
Lifetime member
 
Posts: 1098
Images: 660
Joined: Fri Apr 18, 2008 10:16 pm
Location: Salt Lake City area, Utah
Top

Postby Wolfgang92025 » Thu Jun 17, 2010 6:22 pm

Thanks for all the kind comments.

Some parts look really good, others I'm not real happy with, but I guess that's true for just about very built. I'm not sure if it will be done for IRG III, but it will be done enough to go............. I hope :worship:

Wolfgang
Wolfgang

Image
User avatar
Wolfgang92025
Lifetime member
 
Posts: 1098
Images: 660
Joined: Fri Apr 18, 2008 10:16 pm
Location: Salt Lake City area, Utah
Top

Postby jackdaw » Fri Jun 18, 2010 4:19 pm

I've only kust caught this thread....
Blinking marvelous Wolfgang :applause: :applause: :applause:
Loving the two tone wood. 8) 8) Fantastic finish.

What are your walls made up of ?
User avatar
jackdaw
500 Club
 
Posts: 598
Images: 124
Joined: Fri Feb 22, 2008 2:31 pm
Location: Wltshire, UK
Top

Postby Wolfgang92025 » Fri Jun 18, 2010 11:24 pm

jackdaw wrote:What are your walls made up of ?


Thanks Jackdaw,
It's a sandwich construction. 1/4" on the exterior, 3/4" center with insulation and wooden support structure and 1/8" inside wall.
Inside is plain maple with 3 or 4 coats of varnish. Exterior bottom is walnut, top half is maple with red oak trim all with 3 or 4 coats of varnish.

Wolfgang
Wolfgang

Image
User avatar
Wolfgang92025
Lifetime member
 
Posts: 1098
Images: 660
Joined: Fri Apr 18, 2008 10:16 pm
Location: Salt Lake City area, Utah
Top

Postby BC Dave » Sat Jun 19, 2010 12:14 am

:o

waow ...!

Just chatching up on your build thread youve gone a long way with the details in your design and construction ... superb!

Your wood detailing is amazing!
User avatar
BC Dave
Teardrop Master
 
Posts: 247
Images: 13
Joined: Sat Oct 31, 2009 12:32 am
Location: BC, Canada
Top

Postby doug hodder » Sat Jun 19, 2010 12:41 am

Beautiful project!!! I've always liked the 2+2 and you are doing it justice...looking forward to seeing it at the IRG, don't sweat the AC...you won't be needing it there....only like 26 days now...Doug
doug hodder
*Snoop Dougie Doug
 
Posts: 12625
Images: 562
Joined: Tue Dec 14, 2004 11:20 pm
Top

Postby BillZ » Sat Jun 19, 2010 8:27 pm

Definitely one of my favorite builds! I can only hope that mine will look half as good.
User avatar
BillZ
The 300 Club
 
Posts: 308
Images: 0
Joined: Tue Feb 16, 2010 7:39 pm
Location: College Park, Maryland
Top

PreviousNext

Return to Build Journals

Who is online

Users browsing this forum: No registered users and 14 guests