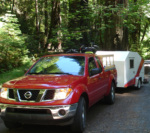
Well it's official. ZooZooBee build. 4/27/11: Done !

...ask your questions in the appropriate forums BUT document your build here...preferably in a single thread...dates for updates, are appreciated....

Postby Cliffmeister2000 » Fri Aug 06, 2010 3:41 pm

Looks like you are off to a good start! What shape are you planning?
God Bless

Cliff

♥God. ♥People.
1 John 4:9-11

My Teardrop build pictures
User avatar
Cliffmeister2000
Titanium Donating Member
 
Posts: 3622
Images: 157
Joined: Thu Jul 26, 2007 10:18 pm
Location: Phoenix, AZ

Postby tcolar » Fri Aug 06, 2010 3:57 pm

Something like this:

Image

Sorry that drawing is not too good ... got more accurate 2D CAD drawings.
User avatar
tcolar
Teardrop Master
 
Posts: 216
Images: 15
Joined: Fri Jul 16, 2010 12:50 am
Location: Kent, WA

Postby Cliffmeister2000 » Fri Aug 06, 2010 4:36 pm

Looks good and practical!

If you are going to put a shower in there, make good and sure you seal the floor and an inch or so up the interior walls!
God Bless

Cliff

♥God. ♥People.
1 John 4:9-11

My Teardrop build pictures
User avatar
Cliffmeister2000
Titanium Donating Member
 
Posts: 3622
Images: 157
Joined: Thu Jul 26, 2007 10:18 pm
Location: Phoenix, AZ
Top

Postby tcolar » Fri Aug 06, 2010 11:10 pm

ignore
Last edited by tcolar on Fri Aug 06, 2010 11:16 pm, edited 1 time in total.
User avatar
tcolar
Teardrop Master
 
Posts: 216
Images: 15
Joined: Fri Jul 16, 2010 12:50 am
Location: Kent, WA
Top

Postby tcolar » Fri Aug 06, 2010 11:10 pm

8/6/10:
Today i cut the floor of the drop floor and covered it in henry 204
I wired the Subaru with the trailer harness.

Image

I painted(brush) another coat on the trailer with red Rostuleum paint.

Image

Removed the wheels, so tomorrow I can flip the floor on the trailer and mount it, then the plan is to use the floor as my workbench to build the walls (since i don't have anything else flat and 10'x5').

Probably go look for some 1/8 Luan ply tomorrow.
User avatar
tcolar
Teardrop Master
 
Posts: 216
Images: 15
Joined: Fri Jul 16, 2010 12:50 am
Location: Kent, WA
Top

Postby john » Sat Aug 07, 2010 10:06 am

I like the bunk setup. Most of them I have seen fold up and against the wall rather than down. Nifty idea.

One of the problems with almost all camper seating is the vertical backrest that most are hampered with. I find them uncomfortable.

Your top bunk can be built to not fold flat against the wall. Some stops could be fashioned that make the bottom (while in backrest mode) sit away from the wall.

Voila! Comfort.
Build I -- Scenic ---
http://www.flickr.com/photos/8121727@N04/
Goto the Tear Build file

Build II -- Scenic II ---
viewtopic.php?t=29603

Build III -- Scenic Solo---
viewtopic.php?f=50&t=50324

Travel Blog----Now without Political Commentary
http://polifrogblog.blogspot.com/2009/0 ... -2009.html

The Constitution was ratified, not an interpretation thereof...

Penomeli ikibobo
john
User avatar
john
500 Club
 
Posts: 663
Images: 261
Joined: Tue Oct 05, 2004 6:26 pm
Location: eden nc
Top

Postby tcolar » Sat Aug 07, 2010 10:15 am

Yeyp that is exactly the idea !

I've tried those square seats before ... Not good !
User avatar
tcolar
Teardrop Master
 
Posts: 216
Images: 15
Joined: Fri Jul 16, 2010 12:50 am
Location: Kent, WA
Top

Postby tcolar » Sun Aug 08, 2010 1:25 am

Kinda painful today.
Spent half the day finding materials to build the walls.
The other half was spent putting the floor on the frame.

The Henry stuff still being completely sticky/gooye made it a nightmare to position the floor on the frame and I apparently had a couple recess holes a bit off (wasn't perfectly simetrical)

Anyway the goo got everywhere on me and on the floor (incl top surface) ... not too happy.

Eventually managed to clean it up and sand it some.

The can say to use denatured alcohol for cleanup but that did not help a bit, but paint thinner / mineral spirit worked pretty good.

Anyway, late in the day the floor is finally fully setup and bolted to the frame (16 bolts).

also added some crews from the top side and filled with titebond the cracks/gaps of the floor (top side).

Next is walls, finally, though I need to think carefully on those (height and studs locations)
User avatar
tcolar
Teardrop Master
 
Posts: 216
Images: 15
Joined: Fri Jul 16, 2010 12:50 am
Location: Kent, WA
Top

Postby xddorox » Sun Aug 08, 2010 8:48 am

Nice going, it seems to be getting along real good. :)
User avatar
xddorox
Teardrop Advisor
 
Posts: 82
Joined: Tue Jul 06, 2010 10:19 pm
Location: Montreal, Canada
Top

Postby tcolar » Sun Aug 08, 2010 1:19 pm

Hum ... those bunks won't fit.

Figured out that with the trailer floor height, the fan sticking out a bit, that only gives me 5' height if i want to fit in the garage (< 7').

It's OK, but that makes my bunk bed not work ... i need the first bunk at least 18'' of the ground so the adult sleeping "bellow" got some leg room, so that would leave only 42'' for the bunks which divided by 2 minus some mattress height would make for some very narrow height bunks/coffins.

My original plan had the bunks against the back wall, at 0(floor) and ~ 2.5' ... that would work fine but i like that layout less, i really prefer the potty in the corner and also that looses quite a bit of storage, also i'm more worried about weight distribution ... might make the back too light.

I'm thinking maybe I'll just do away with the bunk and just have L shape seating around back-left corner that just also are the kids beds, that would allow for more seating and storage and could load the one against the back wall if more tail weight needed.

Gotta play with the CAD a bit :)
User avatar
tcolar
Teardrop Master
 
Posts: 216
Images: 15
Joined: Fri Jul 16, 2010 12:50 am
Location: Kent, WA
Top

Postby tcolar » Sun Aug 08, 2010 9:34 pm

8/8/2011:

Finished bolting the floor to the frame and cleaned up some of the goo mess ... the floor will be covered later anyhow.

Image

Went to the store to buy the 1 1/2 foam ... can only put 2 of those in the subaru per trip ... luckily not too far.

Started cutting the 5mm ply walls.
Cutting both sides of the sandwich at a time, so they are even.

Only have a jigsaw, so had to be a bit creative with cutting straight shapes.
Image

built a "compass" to make the 2' radius:
Image
Image
Image

Here are the cuts for one wall sandwich:
Image

Still have to cut the door and wheel well, then will start building that wall, need to get some CPES first.
User avatar
tcolar
Teardrop Master
 
Posts: 216
Images: 15
Joined: Fri Jul 16, 2010 12:50 am
Location: Kent, WA
Top

Postby tcolar » Sat Aug 14, 2010 11:53 pm

8/9/2010 - 8/14/210

During the week I've worked on the floor, inside the house (needed a flat surface)
Image

Including kerfing first the first time (worked good)
Image

I also cut all the skins for the walls.

Today, did a lot, depsite a record hot day for Seattle (95), moved the wall outside to finish the framing and also added CPES to the perimeter, it is ready for foam and outer skin tomorrow.
Image
Image

I also put the wheels back on the frame and primed the floor, which will got a polyurethan paint tomorrow (garage floor paint)
Image
Image
Image
User avatar
tcolar
Teardrop Master
 
Posts: 216
Images: 15
Joined: Fri Jul 16, 2010 12:50 am
Location: Kent, WA
Top

Postby Cliffmeister2000 » Sun Aug 15, 2010 6:17 am

Great progress! :thumbsup:
God Bless

Cliff

♥God. ♥People.
1 John 4:9-11

My Teardrop build pictures
User avatar
Cliffmeister2000
Titanium Donating Member
 
Posts: 3622
Images: 157
Joined: Thu Jul 26, 2007 10:18 pm
Location: Phoenix, AZ
Top

Postby tcolar » Mon Aug 16, 2010 12:28 am

8/15/10

Cut out the door opening and the wheel well openings
Added a total of 3 coats of garage polyurethane paint to the trailer outside .. in the shade but with temps around 95 it dried quick.

Image

Added the insulation / foam to the wall:
Image

The grinder works very well to make groves (for the electric wires PVC pipe)
Image
Image

Applied some more CPS around the whole perimeter and exposed framing
Note: CPS loves eating foam !
Image

The finished, shiny floor and the insulated wall
Image

First layer of paint (light blue) on the inside of the wall (interior of cabin)
Image
User avatar
tcolar
Teardrop Master
 
Posts: 216
Images: 15
Joined: Fri Jul 16, 2010 12:50 am
Location: Kent, WA
Top

Postby Cliffmeister2000 » Mon Aug 16, 2010 7:46 am

Looks good so far!

Uh, why is the wall shorter than the floor? :thinking:
God Bless

Cliff

♥God. ♥People.
1 John 4:9-11

My Teardrop build pictures
User avatar
Cliffmeister2000
Titanium Donating Member
 
Posts: 3622
Images: 157
Joined: Thu Jul 26, 2007 10:18 pm
Location: Phoenix, AZ
Top

PreviousNext

Return to Build Journals

Who is online

Users browsing this forum: No registered users and 6 guests