Father-Daughter Build 2013-14

...ask your questions in the appropriate forums BUT document your build here...preferably in a single thread...dates for updates, are appreciated....

Re: Father-Daughter Build 2013-14

Postby lfrazer98 » Sun Dec 01, 2013 7:57 pm

The Teardrop Nanny wrote:8) Welcome to Lauren & Jim !

I have a woody and just love it! If you are thinking of putting in an outlet or 2, I would really recommend it. Never hurts to have that option......as my husband found out when he wanted to grind his coffee beans one morning and remembered we don't have a plug in. :lol:

:lol: And he needs his coffee in the morning. I just sent him off to the bathrooms where there was an outlet but not every place we camp has that option. So, if my husband ever appears at YOUR camp with an empty cup, could ya be a good sport and fill it up for him??


Thanks for the welcome! We are both coffee drinkers so should your husband come across either one of us, we would be happy to share! :) I will have to take a look at your woody if you have it posted online. Haven't had a chance yet to look! Just got back into town a few hours ago. Hope you had a great holiday!
User avatar
lfrazer98
Teardrop Master
 
Posts: 204
Images: 217
Joined: Tue Sep 17, 2013 6:25 pm
Location: New York

Re: Father-Daughter Build 2013-14

Postby lfrazer98 » Sun Dec 01, 2013 8:16 pm

KennethW wrote:If you go woody. I found wood conditioner really brings the wood grain to life and makes the stain a lot easier to apply. Be warned a woody will be noticed at all times. So cool!
It may be the bar in the back! Have fun with your build Then use at the time. it's fun!


Thanks for the advice! I bet the bar was secondary to the beautiful wood exterior, but the bar can't hurt! :beer:
User avatar
lfrazer98
Teardrop Master
 
Posts: 204
Images: 217
Joined: Tue Sep 17, 2013 6:25 pm
Location: New York

Re: Father-Daughter Build 2013-14

Postby KCStudly » Sun Dec 01, 2013 8:58 pm

re: your profile sketch.
Did you measure where your fender is on the trailer and compare that to where your door is in the sketch? It looks like you are probably ok, but just to be sure it is a good idea to include the fender in the beginning (in its scale size and location) so you can factor in clearance for the door and any trim.

I have tried to build as much as I can on the bench, including wood finishing, before enclosing the cabin in. Although my build seems like an endless marathon at times (will it ever be done?) I am convinced that it is easier and quicker to do a higher quality of work doing it this way. Building the box first and then trying to build everything inside of the box, and then applying finishes seems to me more like building a ship in a bottle; too much climbing in and out, working in awkward positions, drips, etc. A lot of people have used Steve Fredrick's manual, but it's not that hard to work out a sequence for yourself using similar principals.

The real advantage that I saw in Fredrick's method is the fact that the ceiling panel and roof goes on from the top, rather than trying to fit the panels to the underside of the spars from the inside after the fact.

Just keep this in mind during your planning stage. Think about your cabinetry and joints and build provisions for these in from the beginning. Do as much work as you can on the bench. If you have a detailed plan you can build to it and everything should snap together pretty easily in the end.

Another thing you may want to consider is trying out your mattress first. Your door sill looks a little high to me. If you are sitting on the mattress in the doorway, the mattress will compress and you don't want the door sill to be digging into the backs of your legs.

Keep plugging away at your plan. You are doing great so far, but do make time to look at other peoples builds. I can't tell you how many mistakes I have avoided by learning from other people making them before me!
KC
My Build: The Poet Creek Express Hybrid Foamie

Poet Creek Or Bust
Engineering the TLAR way - "That Looks About Right"
TnTTT ORIGINAL 200A LANTERN CLUB = "The 200A Gang"
Green Lantern Corpsmen
User avatar
KCStudly
Donating Member
 
Posts: 9617
Images: 8169
Joined: Mon Feb 06, 2012 10:18 pm
Location: Southeastern CT, USA
Top

Re: Father-Daughter Build 2013-14

Postby Esteban » Sun Dec 01, 2013 9:00 pm

:thinking: Do you and your dad have good backs? With your galley design you will have to bend over to reach the counter top and cabinets. To avoid that I prefer the rear end of a Benroy or a Grumman II which can begin the galley counter top closer to the end than you have drawn.

:thinking: :thumbsup: You can design the bottom of your door to begin above the floor about half the height of your proposed mattress. The bottom lip helps keep the mattress inside. Without causing a pressure point when you sit in the door opening, compressing the mattress, to get in and out.

:thumbsup: Steve Fredericks' "inside out" building method has an upper inside lip on each side wall. The lip equals the combined height of your ceiling plywood and the rafter. For instance a 1/8" plywood ceiling plus 1-1/2" rafters equals an inside lip height of 1-5/8". The outside (1/4") plywood in this instance would be 1-5/8" higher than the lip. You completely build your walls on a bench with his method. Then you attach them (the walls) to the floor. With the walls attached you can install the bulkhead and cabinets without a ceiling/roof on so its easier to work standing up "inside" the cabin area.

:thumbsup: The cabin ceiling is attached later (glued and nailed/stapled/screwed/your choice) to the lip. Then you install the rafters/spars, electrical wiring and insulation. Following that you skin the roof with plywood. I've gotten wordy. Best to investigate his building manual.

:thumbsup: He build components on a work bench as much as possible which is more efficient and less uncomfortable. He prefinishes (varnish, paint, and/or fiberglass) components as much as possible before assembly too.

edit: Looks like KC and I see complementary things.

:thinking: You may also consider using manufactured doors instead of making your own. It is a big time and fiddly/frustrating details saver. May not cost you much/any more. Weather tightness is more easily achieved with them. Frank Bear has several styles and sizes that are well regarded. One is the window as the door style and the other one is a window in the door style.
Steve - SLO, CA
Esteban
Donating Member
 
Posts: 1684
Images: 15
Joined: Fri Jul 28, 2006 4:39 pm
Location: California, San Luis Obispo
Top

Re: Father-Daughter Build 2013-14

Postby lfrazer98 » Sun Dec 01, 2013 10:16 pm

Esteban wrote::thinking: Do you and your dad have good backs? With your galley design you will have to bend over to reach the counter top and cabinets. To avoid that I prefer the rear end of a Benroy or a Grumman II which can begin the galley counter top closer to the end than you have drawn.

Just have a few minutes so I will reply to what I can :) We measured counter height at my sisters house and estimated between 36 and 39in for the build. With the frame height of 15.5 and 2-3" floor, we estimated that the counter would be ~20" high from the floor. That would take us just 4-6 inches in from the floor of the hatch. We didn't see this as a tremendous reach. We also thought that our counter wouldn't be too deep either... about 15".. then we could start the cabinets. We are both long armed and legged, 5'8" for me and 5'11" for him, but we will look again at our measurements. :thumbsup:
I will have to look into what you both said about having the top put on as mentioned in Steve Frederick's builds. I am not sure I quite understand, but I also haven't purchased his plans. We might just have to figure it out ourselves. :? I do have a picture in my head based on what Esteban wrote though!
:thumbsup: Agreed about the door height. After drawing it, we were concerned that we would be resting the backs of our legs on the frame when entering and exiting. I am hoping to get a 6" thick mattress, so I guess the door should only cover the bottom half. I had only the top 2" exposed. I guessed :oops:
Thanks KC and Esteban! Much appreciated! :thumbsup:
User avatar
lfrazer98
Teardrop Master
 
Posts: 204
Images: 217
Joined: Tue Sep 17, 2013 6:25 pm
Location: New York
Top

Re: Father-Daughter Build 2013-14

Postby KCStudly » Sun Dec 01, 2013 10:42 pm

Aggie79 (Tom) did his roof one step further. He built the frame work as a unit, removed it, covered it, and reinstalled it.
The Silver Beatle

Not exactly the Fredrick's method, nor is what I am doing, but the ideas are all predicated on the same thing, maintaining easy access to what you are working on and not boxing yourself in too early.
KC
My Build: The Poet Creek Express Hybrid Foamie

Poet Creek Or Bust
Engineering the TLAR way - "That Looks About Right"
TnTTT ORIGINAL 200A LANTERN CLUB = "The 200A Gang"
Green Lantern Corpsmen
User avatar
KCStudly
Donating Member
 
Posts: 9617
Images: 8169
Joined: Mon Feb 06, 2012 10:18 pm
Location: Southeastern CT, USA
Top

Re: Father-Daughter Build 2013-14

Postby bc toys » Mon Dec 02, 2013 10:42 am

I was looking at your design pic and noticed that you are only going 3ft high what is the reason for this why not go 4ft with that long of a trailer think you might like the high ceiling. this is my 2 cents
bc toys
2000 Club
2000 Club
 
Posts: 2217
Images: 42
Joined: Sun Jun 28, 2009 2:45 pm
Location: LAS VEGAS NV
Top

Re: Father-Daughter Build 2013-14

Postby Esteban » Mon Dec 02, 2013 10:49 am

bc toys wrote:I was looking at your design pic and noticed that you are only going 3ft high what is the reason for this why not go 4ft with that long of a trailer think you might like the high ceiling. this is my 2 cents

when you expand the drawing it scales up to a 4 ft. tall design. :D

some suppliers for your consideration:
Frank Bear has many essential parts for building teardrops teardroptrailerparts.com
Grant Whipp does too teardrops.net
need bolts and fasteners? boltdepot.com has a great selection.
epoxy and fiberglass to protect the woodie side walls raka.com
aluminum sheets saf.com has them as large as 5' x 10' or 4' x 12'
big selection of trailer parts etrailer.com
electrical supplies delcity.net
Steve - SLO, CA
Esteban
Donating Member
 
Posts: 1684
Images: 15
Joined: Fri Jul 28, 2006 4:39 pm
Location: California, San Luis Obispo
Top

Re: Father-Daughter Build 2013-14

Postby lfrazer98 » Mon Dec 02, 2013 5:59 pm

KCStudly wrote:Aggie79 (Tom) did his roof one step further. He built the frame work as a unit, removed it, covered it, and reinstalled it.
The Silver Beatle

Not exactly the Fredrick's method, nor is what I am doing, but the ideas are all predicated on the same thing, maintaining easy access to what you are working on and not boxing yourself in too early.


I saw this build thread somewhere already (probably from one of you guys) and bookmarked it so we could look at it next when we get together for planning. I agree. We want to make this build as easy as possible on our backs and will try to do most of our work "at the bench" as opposed to cramped inside the tear. :thumbsup:
Last edited by lfrazer98 on Mon Dec 02, 2013 6:22 pm, edited 1 time in total.
User avatar
lfrazer98
Teardrop Master
 
Posts: 204
Images: 217
Joined: Tue Sep 17, 2013 6:25 pm
Location: New York
Top

Re: Father-Daughter Build 2013-14

Postby lfrazer98 » Mon Dec 02, 2013 6:03 pm

I need to work on posting the pictures the right size so that they don't need scroll bars to view them. I downsized that sketch to 100kb, but I guess that is still too big? Any suggestions for sizing, or am I doing something wrong when I attach the photos?
But, yes, it is 4ft tall. Thanks, Esteban, for pointing that out.
User avatar
lfrazer98
Teardrop Master
 
Posts: 204
Images: 217
Joined: Tue Sep 17, 2013 6:25 pm
Location: New York
Top

Re: Father-Daughter Build 2013-14

Postby KCStudly » Mon Dec 02, 2013 6:39 pm

I set my camera for something in the neighborhood of 600x800 pixels and they fill the screen nicely w/o the need to scroll (even on my netpad. I find it easiest to set my camera for this size and avoid having to resize the files after downloading. I do, however, us the gallery provided here (as opposed to linking to an outside file server/photo bucket), so your mileage may vary.
KC
My Build: The Poet Creek Express Hybrid Foamie

Poet Creek Or Bust
Engineering the TLAR way - "That Looks About Right"
TnTTT ORIGINAL 200A LANTERN CLUB = "The 200A Gang"
Green Lantern Corpsmen
User avatar
KCStudly
Donating Member
 
Posts: 9617
Images: 8169
Joined: Mon Feb 06, 2012 10:18 pm
Location: Southeastern CT, USA
Top

Re: Father-Daughter Build 2013-14

Postby kayakdlk » Mon Dec 02, 2013 9:09 pm

Welcome to the site. I just recently "almost" finished my build and used lots of great ideas from this web site and the many build journals

Your design is looking good. I Like the shape.

A few suggestions/comments:

The door bottom edge should be about 1/2 the height of your mattress. This allows one to sit and not feel the bottom lip on your legs. You may want to move the door forward a little. I would draw the layout on the wall with tape next to your bed , or mock up in cardboard, or paper. sit down in the opening space and swing you legs in. You should then be able to lay down without any other movement and your head should hit where the pillow should be. If you have to scoot around then change the door location. I did both the tape on wall and cardboard and it helped visualize the door location and I moved mine before I built.

I never used any plans with dimensions, all trial and error during planning stage (paper and card board) and some suggestions of how to get the front and rear arcs using a flexible stick and eyeing it from Steve Fredericks builders manual which I highly recommend. Especially if you want a woody. His build technique saved me lots of time and back aches.

Also look at your window location on the front. it is in the curve and you will usually find flat windows. I extend and sharpened the curve on my front for nice flat surface to mount a windows so we could see the stars at night and to allow some room up front for storage.

I suggest looking at the simple AC plan http://www.tnttt.com/viewtopic.php?f=30&t=37732&start=15

As for a woody I highly recommend using epoxy (Raka) and cloth. I used 1/8 Baltic Birch for the inside and outside. On the outside I applied 7 oz fiberglass cloth and 3 coats epoxy. It looked good (woody) before I painted it. I wanted bedliner paint for durability and to match my Jeep.

Another great build that puts the roof on after they built the sides is http://littleswissteardrop.com/. This build has painted side but the concept is the same for woody sides and an aluminum roof.

As far as scaling picture I use PIXresizer (free) and set the size to 600 and do batch print resizing and then upload to my galley

Enjoy building
Dan
User avatar
kayakdlk
Platinum Donating Member
 
Posts: 310
Images: 392
Joined: Wed Jun 27, 2012 9:02 pm
Location: Foothills of Colorado
Top

Re: Father-Daughter Build 2013-14

Postby working on it » Tue Dec 03, 2013 9:31 pm

KCStudly wrote:I set my camera for something in the neighborhood of 600x800 pixels and they fill the screen nicely w/o the need to scroll (even on my netpad. I find it easiest to set my camera for this size and avoid having to resize the files after downloading. I do, however, us the gallery provided here (as opposed to linking to an outside file server/photo bucket), so your mileage may vary.

I use several photo sources, including Internet photos. If they are originally too big for posting here, I open them in Microsoft Paint (too cheap to get Photoshop!),since it came on my computer, re-size or crop, etc, then save.... Then, I try posting them, and preview my post to see if it was what I wanted. Or, just post the pictures to your gallery, and then insert into your posts from there. Getting better at it now; I was a total failure at posting pictures and attachments here on TnTTT two years ago. Also, about the door height. kayakdlk suggested the standard way that most builders use to set the door bottom edge height; I (and my wife, didn't want to have to lift up and over the ledge to enter the cabin. I first thought of a swing-out ledge beneath the door, but that would necessitate more seals and hinges and latches (in effect, a "dutch-door" arrangement, though mis-proportioned). Instead, I just decided to make the door come all the way down to the floor, with a friction-fit threshold below (attached to the floor) just like on a house. 105587 The rest of the door is sealed against an inner frame with an automotive door seal.86962 
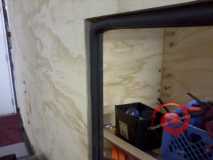
To further weather proof the door bottom, sans seal, I used a flexible door sweep,102813 to hang below the door/threshold interface (directs wind and water down and away from that area). My trailer floor sits on top of the trailer chassis, so re-directed water won't pool or seep in.
2013 HHRv "squareback/squaredrop", rugged, 4x8 TTT, 2225 lbs
  • *3500 lb Dexter EZ-Lube braked axle, 3000 lb.springs, active-progressive bumpstop suspension
  • *27 x 8.5-14LT AT tires (x 3) *Weight Distribution system for single-beam tongue
  • *100% LED's & GFCI outlets, 3x fans, AM/FM/CD/Aux. *A/C & heat, Optima AGM, inverter & charger(s)
  • *extended-run, on-board, 2500w generator *Coleman dual-fuel stove & lantern, Ikea grill, vintage skillet
  • *zinc/stainless front & side racks *98"L x 6" diameter rod & reel carrier tube on roof
173193172890148599
User avatar
working on it
2000 Club
2000 Club
 
Posts: 2179
Images: 457
Joined: Tue Oct 04, 2011 9:05 pm
Location: DFW Texas
Top

Re: Father-Daughter Build 2013-14

Postby lfrazer98 » Thu Dec 05, 2013 7:45 pm

Esteban wrote:Do you and your dad have good backs? With your galley design you will have to bend over to reach the counter top and cabinets. To avoid that I prefer the rear end of a Benroy or a Grumman II which can begin the galley counter top closer to the end than you have drawn.


I took another look at the distances in the gallery area. I see what you mean. I did another drawing and think everything is going to be a little bit low, but reachable. We may end up making a steeper slope in the hatch to compensate. I free handed the curve in the rear and like the look of it, but we may end up using the dimensions of the kenskill profile to get the cabinets higher and closer.
Thanks for making me take another look, Esteban! :thumbsup:
User avatar
lfrazer98
Teardrop Master
 
Posts: 204
Images: 217
Joined: Tue Sep 17, 2013 6:25 pm
Location: New York
Top

Re: Father-Daughter Build 2013-14

Postby lfrazer98 » Thu Dec 05, 2013 8:03 pm

I will plan on uploading my pictures to my gallery first. How do you attach the photo from the gallery into a reply? Do I need to open it (my gallery) in another window, copy the URL and then paste it in my message?

I have a modified sketch with the door lowered and shifted to the right. I also added in a "skirt" and sketch of a possible fender. Looks balanced. I will have to take another look at the window. I added in a profile of the galley and have lots of ideas for that. Next step is to design the interior cabinets, etc.

Dad got the wood off, got an angle grinder and we are tearing it apart Saturday. Going to upload a picture or 2 now and see if I can post it!

Dan- is the epoxy and cloth like fiberglass and cloth? Same thing, different name? I will have to look that up. :)
Last edited by lfrazer98 on Thu Dec 05, 2013 8:30 pm, edited 1 time in total.
User avatar
lfrazer98
Teardrop Master
 
Posts: 204
Images: 217
Joined: Tue Sep 17, 2013 6:25 pm
Location: New York
Top

PreviousNext

Return to Build Journals

Who is online

Users browsing this forum: Google [Bot] and 10 guests