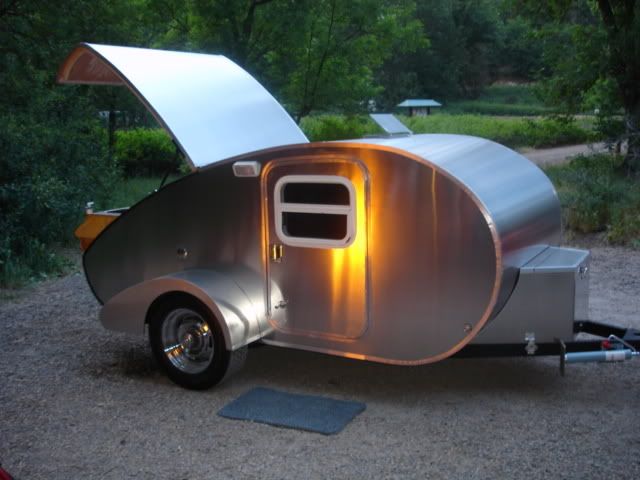
Where or When Jr. --Paint & New Tow Vehicle--update 5/17/15

...ask your questions in the appropriate forums BUT document your build here...preferably in a single thread...dates for updates, are appreciated....

Postby myoung » Sat Mar 12, 2011 9:27 pm

Cliffmeister2000 wrote:Very nice, Mike! I hope to see lots of detail on how you weatherproof the door. :thumbsup:


Cliff,

I'm not planning anything elaborate. There is a threshold and an aluminum trim strip with drip edge and pliable rubber gasket at the bottom. Along the sides, I'll put a compressive rubber gasket inside an overlapping and perhaps rabbeted trim strip around the other three sides.

If it ever becomes necessary, I could put a drip gutter over the door and edge the outside of the door with flat stock overlapping the sides and top.

Might I need to do more?
Mike Young
build thread: viewtopic.php?t=40459
User avatar
myoung
500 Club
 
Posts: 644
Images: 250
Joined: Sat Aug 07, 2010 11:21 am
Location: Nipomo, CA

Postby Cliffmeister2000 » Sat Mar 12, 2011 11:06 pm

myoung wrote:
Cliffmeister2000 wrote:Very nice, Mike! I hope to see lots of detail on how you weatherproof the door. :thumbsup:


Cliff,

I'm not planning anything elaborate. There is a threshold and an aluminum trim strip with drip edge and pliable rubber gasket at the bottom. Along the sides, I'll put a compressive rubber gasket inside an overlapping and perhaps rabbeted trim strip around the other three sides.

If it ever becomes necessary, I could put a drip gutter over the door and edge the outside of the door with flat stock overlapping the sides and top.

Might I need to do more?


Probably not, as you plan to garage it. I'm not that happy with my weatherstripping. As soon as I find a better solution, I will change it. As meticulous as you have been, I'm sure what you do will be perfect. :thumbsup:
God Bless

Cliff

♥God. ♥People.
1 John 4:9-11

My Teardrop build pictures
User avatar
Cliffmeister2000
Titanium Donating Member
 
Posts: 3622
Images: 157
Joined: Thu Jul 26, 2007 10:18 pm
Location: Phoenix, AZ

Postby myoung » Thu Mar 17, 2011 8:22 pm

Today it was time to box in the deflector in front of the pop-up top.
Image

By placing one 3/4-inch strip horizontally on the roof top, I have the added advantage of a support under the pop-up when it is in the down position. I'll put 5mm Luan along the top and the backside of the deflector to allow only a small gap between the deflector and the pop-up, which should be easy to seal with a strip of rubber.
Image
Image

The deflector allows me to frame the opening for the linear actuator and to create an effective seal along the front edge of the pop-up.
Image

Happy St. Patrick's Day. I'm 1/8 Irish by virtue of my great grandmother, Anastasia Murphy.
Mike Young
build thread: viewtopic.php?t=40459
User avatar
myoung
500 Club
 
Posts: 644
Images: 250
Joined: Sat Aug 07, 2010 11:21 am
Location: Nipomo, CA
Top

Postby emiller » Thu Mar 17, 2011 8:58 pm

:thinking: oh :thumbsup: aw
User avatar
emiller
Donating Member
 
Posts: 3421
Images: 157
Joined: Sun Jun 13, 2004 11:00 pm
Location: Arizona, Phoenix
Top

Postby 2bits » Thu Mar 17, 2011 9:08 pm

I'm not Irish, but that is some sweet work!!!
Thomas

Image
User avatar
2bits
2bit Member
 
Posts: 5132
Images: 8
Joined: Thu Dec 27, 2007 6:04 pm
Location: Lake Tawakoni, TX
Top

Postby myoung » Fri Mar 18, 2011 11:19 pm

Time to install some plumbing. Here is a photo of the underside of the trailer showing the discharge pipe from the 17-gallon grey water tank thru a ball valve and out a hose bib fitting. There is about 7 inches of clearance above the ground.
Image

The grey water tank is suspended on four 8-inch carriage bolts fastened to angles. The fit couldn't have worked out better.
Image

Now that the deflector detail has been worked out, I was able to locate the lower attachment point for the linear actuator. Here is the actuator in the fully-extended (18-inch throw) position.
Image

Here's the actuator seen from the inside. The rocker switch to move it up and down is shown on the electrical panel on the far right. It's kind of a touchy little switch that will take some getting used to.
Image

Here is the slot in which the actuator travels fore and aft. With two hinges at the back of the pop-up and this narrow slot at the front, there is little or no side to side movement. I think this will work out well when finished.
Image
Mike Young
build thread: viewtopic.php?t=40459
User avatar
myoung
500 Club
 
Posts: 644
Images: 250
Joined: Sat Aug 07, 2010 11:21 am
Location: Nipomo, CA
Top

Postby emiller » Sat Mar 19, 2011 9:00 am

Boy Mike you sure have a sharp mind and are doing fantastic work. Is the Airstream feeling neglected.
User avatar
emiller
Donating Member
 
Posts: 3421
Images: 157
Joined: Sun Jun 13, 2004 11:00 pm
Location: Arizona, Phoenix
Top

Postby myoung » Sat Mar 19, 2011 9:35 am

emiller wrote: Is the Airstream feeling neglected.


Not really. Airstreams know that they are around for forever. May take it out to a rally at Lake Pleasant in mid-April.
Mike Young
build thread: viewtopic.php?t=40459
User avatar
myoung
500 Club
 
Posts: 644
Images: 250
Joined: Sat Aug 07, 2010 11:21 am
Location: Nipomo, CA
Top

Postby starleen2 » Sat Mar 19, 2011 12:49 pm

you just raised the "coolness" factor with the linear actuator (pun intended) :thumbsup:
User avatar
starleen2
5th Teardrop Club
 
Posts: 16272
Images: 224
Joined: Sat May 12, 2007 8:26 pm
Location: Pea Ridge ,AR
Top

Postby bve » Sat Mar 19, 2011 1:19 pm

The trailer is coming along nicely, great pictures and detail.

I'm wondering what your plan is for sealing the opening for the actuator?

Image
Burke

KISS > COMPLEX
Image
Image

Build threads converted to PDFs.
As of 2008-08-08 I have added more build threads to the pdf collection
User avatar
bve
500 Club
 
Posts: 694
Images: 98
Joined: Sat Aug 25, 2007 1:44 am
Location: Edmonton, Alberta, Canada
Top

Postby myoung » Sat Mar 19, 2011 2:00 pm

bve wrote:I'm wondering what your plan is for sealing the opening for the actuator?

Image


Me too. Stay tuned. I'm certain that the solution will reveal itself.
:)
Mike Young
build thread: viewtopic.php?t=40459
User avatar
myoung
500 Club
 
Posts: 644
Images: 250
Joined: Sat Aug 07, 2010 11:21 am
Location: Nipomo, CA
Top

Postby Cliffmeister2000 » Sat Mar 19, 2011 5:52 pm

myoung wrote:
bve wrote:I'm wondering what your plan is for sealing the opening for the actuator?

Image


Me too. Stay tuned. I'm certain that the solution will reveal itself.
:)


It will be under the canvas, won't it?
God Bless

Cliff

♥God. ♥People.
1 John 4:9-11

My Teardrop build pictures
User avatar
Cliffmeister2000
Titanium Donating Member
 
Posts: 3622
Images: 157
Joined: Thu Jul 26, 2007 10:18 pm
Location: Phoenix, AZ
Top

Postby S. Heisley » Sat Mar 19, 2011 7:53 pm

:thinking: Very Interesting. I'm looking forward to seeing more!
User avatar
S. Heisley
Super Lifetime Member
 
Posts: 8866
Images: 495
Joined: Mon Sep 17, 2007 10:02 am
Location: No. California
Top

Postby myoung » Sat Mar 19, 2011 10:54 pm

More framing of the deflector. Lots of wood for such a small item but it had to be done for support and stability.
Image

Notice that the slotted opening for the deflector unit is actually quite small. The length of travel is only about 3 1/2 inches and the hinges together with the linear actuator are sufficient to restrain the potential side-to-side motion. This photo shows the fully extended position.
Image

Here are two images of the small slotted opening. This shouldn't be too hard to cover with a piece of rubber or a moveable flap. This is the completely down position.
Image

This is the opening in the fully-retracted position.
Image
Last edited by myoung on Sat Mar 19, 2011 11:02 pm, edited 1 time in total.
Mike Young
build thread: viewtopic.php?t=40459
User avatar
myoung
500 Club
 
Posts: 644
Images: 250
Joined: Sat Aug 07, 2010 11:21 am
Location: Nipomo, CA
Top

Postby myoung » Sat Mar 19, 2011 11:01 pm

Cliffmeister2000 wrote:It will be under the canvas, won't it?


Yes, Cliff, the canvas (or rip stop nylon) would be attached to the inside lip of the pop-up and the outside lip of the actual roof opening.
Mike Young
build thread: viewtopic.php?t=40459
User avatar
myoung
500 Club
 
Posts: 644
Images: 250
Joined: Sat Aug 07, 2010 11:21 am
Location: Nipomo, CA
Top

PreviousNext

Return to Build Journals

Who is online

Users browsing this forum: No registered users and 18 guests