Camp Critter update 11/6/2013

...ask your questions in the appropriate forums BUT document your build here...preferably in a single thread...dates for updates, are appreciated....

Postby LDK » Tue Sep 13, 2011 5:53 pm

campmasterk wrote:Today your build was #30 down on the list. Just checking on ya Larry.


Whats up captain Kirk! :lol:

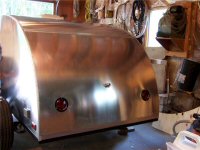
I tell you what, all the little things take time. I trimmed out the door jamb, the door, hatch offset, installed both windows. I still need to put the hatch lid overhang trim on. When I'm done with that I'll have to take everything back off and apply the sealant. :CC :lol: I'll post some pictures soon.
LDK
Gold Donating Member
 
Posts: 1419
Images: 1
Joined: Fri Jan 22, 2010 8:29 pm

Postby campmaster-k » Tue Sep 13, 2011 6:52 pm

Right on. I havent been hitting the tear as hard as I should. Its deer season here. I'm not a huge deer hunter but my son is and he makes me go.
-Kirk

>TnTTT ORIGINAL 200A LANTERN CLUB

>CEO Coleman Recovery Inc.

>Nor Cal Camping Pinewood Racing Team


Build thread -

viewtopic.php?t=45307&postdays=0&postorder=asc&start=180

Check out my Pictures -

http://s1199.photobucket.com/albums/aa4 ... 0QQtppZZ24
User avatar
campmaster-k
Lifetime member
 
Posts: 3030
Images: 17
Joined: Fri Jun 17, 2011 5:02 pm
Location: Colusa, California

Postby LDK » Sat Sep 17, 2011 1:48 pm

Well so much for going camping this weekend. The camp critter is all most done except for alittle more trim work. All the little things are taking alot longer than I thought. I guess because there are so many little things. :lol:
Here are a few progress pics. Hopefully tomorrow I'll at least be maybe 95% done. :lol:
Image
The door and trim are done. The only thing I need to do now is put a rain diverter above the door and next to the hinge knuckle.

I had to notch out the trim that goes on the bottom of the hatch. I did that so it would fit around the hasp. The hatch is so heavy I figured the hasp with a handle would be good enough.
Image
Image
Image
Gettin DONE is definitely gonna be soon. I hope. :lol:
Last edited by LDK on Sat Sep 17, 2011 7:56 pm, edited 1 time in total.
LDK
Gold Donating Member
 
Posts: 1419
Images: 1
Joined: Fri Jan 22, 2010 8:29 pm
Top

Postby Loader » Sat Sep 17, 2011 6:08 pm

Looks nice Larry! :applause: :applause: Nice job trimming up the trim for the hasp. :D

Did you put in gas struts for your hatch? Also what is the black trim on the door?

Camping is getting closer!
Earl & Kerry

"Loader"

Blue Yonder Build Thread - viewtopic.php?f=50&t=42611

ImageImage
User avatar
Loader
Platinum Donating Member
 
Posts: 1584
Images: 245
Joined: Tue Apr 26, 2005 2:33 pm
Location: Fort Worth, Texas
Top

Postby LDK » Sat Sep 17, 2011 7:11 pm

Loader wrote:Looks nice Larry! :applause: :applause: Nice job trimming up the trim for the hasp. :D

Did you put in gas struts for your hatch? Also what is the black trim on the door?

Camping is getting closer!


Hey Earl

The black thing is the seal thats on the t-molding. I'm not sure how I'll do my hatch props. It's heavy (30lbs), would that be too heavy for gas struts?? I was thinking wooden props but I haven't really decided yet.
LDK
Gold Donating Member
 
Posts: 1419
Images: 1
Joined: Fri Jan 22, 2010 8:29 pm
Top

Postby CliffinGA » Sat Sep 17, 2011 7:12 pm

Great job Larry!! Your almost to that point that you can take a break and just enjoy it.

Cliff (& Sheri) :thumbsup:
In God we trust, shoot the rest and he will sort out!

My Build:

viewtopic.php?f=50&t=42628
User avatar
CliffinGA
1000 Club
1000 Club
 
Posts: 1499
Images: 207
Joined: Sat Nov 14, 2009 1:29 pm
Location: Jefferson, GA
Top

Postby LDK » Sat Sep 17, 2011 7:26 pm

Here are a few more pics. I am finally done with the hatch trim!! The only thing I need to do now is install the trim on each side at the bottom, the rain diverters around the door and on the hatch hinge, fashion some kinda hatch props or struts, and apply the decals. :D

Image
Image
Image

On this last pic I got that idea from Johnny (down under tech) on how to trim out the corners.
Last edited by LDK on Sat Sep 17, 2011 8:37 pm, edited 2 times in total.
LDK
Gold Donating Member
 
Posts: 1419
Images: 1
Joined: Fri Jan 22, 2010 8:29 pm
Top

Postby LDK » Sat Sep 17, 2011 7:32 pm

CliffinGA wrote:Great job Larry!! Your almost to that point that you can take a break and just enjoy it.

Cliff (& Sheri) :thumbsup:


Thanks Cliff

Tomorrow I'll install the lower side trim and then I might just hook it up and pull it for the first time. :thumbsup:
LDK
Gold Donating Member
 
Posts: 1419
Images: 1
Joined: Fri Jan 22, 2010 8:29 pm
Top

Postby mike93lx » Sat Sep 17, 2011 8:17 pm

LDK wrote:Hey Earl

The black thing is the seal thats on the t-molding. I'm not sure how I'll do my hatch props. It's heavy (30lbs), would that be too heavy for gas struts?? I was thinking wooden props but I haven't really decided yet.


Larry, it is definitely not too heavy for gas struts. I've found McMaster-Carr to be a great resource for Gas Strut (or gas spring, as they call them) sizing.

http://www.mcmaster.com/#gas-springs/=e3wly1

They have every style that you can imagine (including some that lock, which could be nice when you are standing under the hatch).
mike93lx
Teardrop Inspector
 
Posts: 18
Joined: Thu Aug 13, 2009 7:51 pm
Top

Postby Billy K » Sat Sep 17, 2011 9:20 pm

Nice work, Larry!

Now that you have gotten yours done....I have the full interior left to do...

You should take yours out and camp. Those of us that still working at ours, can dream and hope ours are as nice, as yours.

You earned it; go enjoy it!!
"...influence is no government." - George Washington
Billy K
Teardrop Master
 
Posts: 276
Joined: Sun Dec 06, 2009 8:03 pm
Location: Kokomo,IN
Top

Postby LDK » Sat Sep 17, 2011 9:54 pm

Hey Mike

Thanks for the link. I might go with the gas struts. I just need to think on it alittle longer.

Hey Billy

Thank you for the complement. You'll get yours done soon. :thumbsup:
LDK
Gold Donating Member
 
Posts: 1419
Images: 1
Joined: Fri Jan 22, 2010 8:29 pm
Top

Postby LDK » Sun Sep 18, 2011 8:20 pm

Here is a side pic of the critter with the lower trim and the fender attached. I guess I'm about 95% done now. Just alittle more trim work and installing either hatch props or struts. Still scratching my head on that one. :thinking:
Image
LDK
Gold Donating Member
 
Posts: 1419
Images: 1
Joined: Fri Jan 22, 2010 8:29 pm
Top

Postby CliffinGA » Sun Sep 18, 2011 8:47 pm

Hey Larry looks great man :thumbsup: , just one question though, why is your electrical plug on the wrong side of the tear? They're usually on the driver side so when you bvack in its on the side the electrical box is usually on.

Cliff (& Sheri) :thumbsup:
In God we trust, shoot the rest and he will sort out!

My Build:

viewtopic.php?f=50&t=42628
User avatar
CliffinGA
1000 Club
1000 Club
 
Posts: 1499
Images: 207
Joined: Sat Nov 14, 2009 1:29 pm
Location: Jefferson, GA
Top

Postby LDK » Sun Sep 18, 2011 8:58 pm

CliffinGA wrote:Hey Larry looks great man :thumbsup: , just one question though, why is your electrical plug on the wrong side of the tear? They're usually on the driver side so when you bvack in its on the side the electrical box is usually on.

Cliff (& Sheri) :thumbsup:


Hey Cliff

I've never owned a trailer before so I didn't know which side to use. I guess it really depends on which way you approach the power pole. :thinking: Doesn't matter, I have a 25 foot 12 gage cord I can easily slide under the camper. :lol:
LDK
Gold Donating Member
 
Posts: 1419
Images: 1
Joined: Fri Jan 22, 2010 8:29 pm
Top

Postby WhitneyK » Sun Sep 18, 2011 9:11 pm

Looks great Larry!!! :applause: :thumbsup:

Can't wait to see it in person.
Whitney & Tracie
Crothersville, IN

We never really grow up, we only learn how to act in public.

Do not confuse what you hear with what I mean.

My build: http://www.tnttt.com/viewtopic.php?t=41955

160061-------------------------------101114
States we've drug our
li'l camper through. (44 States + Vancouver Island and over 45,000 miles so far)
User avatar
WhitneyK
Gold Donating Member
 
Posts: 559
Images: 412
Joined: Sun Dec 12, 2010 10:28 pm
Location: IN, Crothersville (36mi N or Louisville)
Top

PreviousNext

Return to Build Journals

Who is online

Users browsing this forum: No registered users and 14 guests