Started construction today!

...ask your questions in the appropriate forums BUT document your build here...preferably in a single thread...dates for updates, are appreciated....

Re: Started construction today!

Postby stanimal » Sun Apr 28, 2013 5:57 pm

Got (what felt) like a lot done this weekend.

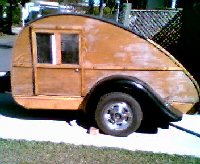
I got the hatch skinned. I'm glad I used 1/4 inch wood for this. I had briefly debated using 1/2 inch, and I can flat out say that it would not have worked. 1/4 inch was enough of a chore for one person. It took most eery clamp I own, a good dose of construction adhesive, and lots and lots of screws.

These three pictures show the hatch through about 3/4 of being skinned.
Attachments
ImageUploadedByTapatalk HD1367189702.928486.jpg
ImageUploadedByTapatalk HD1367189702.928486.jpg (26.3 KiB) Viewed 1775 times
ImageUploadedByTapatalk HD1367189685.636041.jpg
ImageUploadedByTapatalk HD1367189685.636041.jpg (49.05 KiB) Viewed 1775 times
ImageUploadedByTapatalk HD1367189671.168687.jpg
ImageUploadedByTapatalk HD1367189671.168687.jpg (26.97 KiB) Viewed 1775 times
stanimal
Teardrop Builder
 
Posts: 38
Joined: Tue Jan 22, 2013 5:19 pm

Re: Started construction today!

Postby stanimal » Sun Apr 28, 2013 6:11 pm

These photos show the hatch fully skinned.

I also began really working on the electrical system this weekend. I am going to have a fully 12 volt system. I bought a 6 circuit, bladed fuse block with a negative bus from West Marine. I figured that was probably the easiest way to go about things.

At the last minute, I made a design change that will house the battery in the hatch area, rather than in a tongue box. The battery will sit on the lower shelf, with the main cables running up to the fuse block, and the power being distributed from there.

I made a "breaker box" that will house the fuse block. The last picture is a mock up of what it will look like once everything is ready to be closed up (minus the hinges that I haven't installed). There is a small raceway that you can see that will hide the main cable from the battery.

I'm running 12-gauge wire to all the lights, power ports, and the vent fan. That should be more than adequate for the power draw on any individual circuit. I have a spare pair of old jumper cables that I am going to cut down and use for my main supply from the battery to the fuse block.

Next weekend will be final electrical connections, and putting the skin on the outside of the main compartment. After that, it's really more about the finish work
Attachments
ImageUploadedByTapatalk HD1367189923.843749.jpg
ImageUploadedByTapatalk HD1367189923.843749.jpg (27.18 KiB) Viewed 1770 times
ImageUploadedByTapatalk HD1367189907.398199.jpg
ImageUploadedByTapatalk HD1367189907.398199.jpg (29.97 KiB) Viewed 1770 times
ImageUploadedByTapatalk HD1367189893.270986.jpg
ImageUploadedByTapatalk HD1367189893.270986.jpg (36.58 KiB) Viewed 1770 times
stanimal
Teardrop Builder
 
Posts: 38
Joined: Tue Jan 22, 2013 5:19 pm

Re: Started construction today!

Postby stanimal » Sun Apr 28, 2013 6:13 pm

Just realized that I didn't post additional pictures of the cabinets. Doors will come later.
Attachments
ImageUploadedByTapatalk HD1367190786.807257.jpg
ImageUploadedByTapatalk HD1367190786.807257.jpg (31.26 KiB) Viewed 1768 times
ImageUploadedByTapatalk HD1367190767.944211.jpg
ImageUploadedByTapatalk HD1367190767.944211.jpg (27.42 KiB) Viewed 1768 times
stanimal
Teardrop Builder
 
Posts: 38
Joined: Tue Jan 22, 2013 5:19 pm
Top

Re: Started construction today!

Postby rmef27 » Sun Apr 28, 2013 7:21 pm

nice progress looking good
rmef27
Teardrop Builder
 
Posts: 38
Joined: Sun Mar 24, 2013 6:10 pm
Top

Re: Started construction today!

Postby Oldragbaggers » Sun Apr 28, 2013 7:37 pm

Very nice. Good for you getting that 1/4" ply to conform to your will. I had such a hard time with the 1/8", I can't even imagine wrestling that bear.
Life is sooooo good.........
Sail...camp....bike...repeat
Becky

Build Journal http://www.tnttt.com/viewtopic.php?f=50&t=45917
Visit our blog at http://www.oldragbaggers.com
Image Image
User avatar
Oldragbaggers
Gold Donating Member
 
Posts: 1842
Images: 331
Joined: Mon Aug 01, 2011 9:22 pm
Location: Essex, MD
Top

Re: Started construction today!

Postby stanimal » Mon May 06, 2013 6:38 pm

so this weekend it was time to shore up the electrical work, install a porch nightlight, and put the outer shell on the roof.

The electrical has been much easier than I thought it would be. I highly recommend using the bladed fuse block from Blue Sea. It has a negative bus on it, and makes the whole process very easy. It gets a strong endorsement from this guy.

Bending the wood was a beast. I was even more glad I went with 1/4 inch stuff this time. My radius on the leading curve is 19 inches. I cracked one sheet because I tried going too fast.

I got success by screwing the sheet of wood to the walls up to the point that the curve began. Then I ran ratchet straps from the front of the trailer, over the wood, and attached them to the back of the trailer. I pulled a slight bend into the wood, until I felt it "catch" and then just let the straps hold it there.

Then I stole my dogs drool towel from in front of his bowl, soaked it in hot water, and draped it over the wood. I also appropriated by wife's clothes steamer and steamed the front and backside of the wood. It was tedious work, and slow and steady definitely wins the race. I developed a rhythm where I would ratchet each strap 2 clicks, wait 5 minutes for the wood to relax and adjust to the tension, and then went back and ratcheted them another two clicks. As the board bent, I screwed it into bracing to take up some of the tension. All in all, it took probably close to 2 hours to make the bend.
Attachments
ImageUploadedByTapatalk HD1367883467.225119.jpg
ImageUploadedByTapatalk HD1367883467.225119.jpg (51.99 KiB) Viewed 1713 times
ImageUploadedByTapatalk HD1367883455.115994.jpg
ImageUploadedByTapatalk HD1367883455.115994.jpg (36.8 KiB) Viewed 1713 times
ImageUploadedByTapatalk HD1367883443.286052.jpg
ImageUploadedByTapatalk HD1367883443.286052.jpg (30.78 KiB) Viewed 1713 times
stanimal
Teardrop Builder
 
Posts: 38
Joined: Tue Jan 22, 2013 5:19 pm
Top

Re: Started construction today!

Postby stanimal » Mon May 06, 2013 6:45 pm

Another few pictures of the "Big Bend"

It hit me when I got the roof all the way on, major construction is essentially over. There's a few more things to take care of, gotta order the roll of living hinge for the hatch and door sometime this week. Trim work, staining the hatch area, and putting the inside skin on the hatch, outer waterproofing and coating, and installing windows, but really, the major purchases, and major work are close to being done.


I figure another 3 to 4 weekends worth of work will see this project essentially done. I'm not sure if I will make Memorial Day weekend or not, but the weekend after is definitely doable for a quick weekend shakedown cruise.
Attachments
ImageUploadedByTapatalk HD1367883770.134245.jpg
ImageUploadedByTapatalk HD1367883770.134245.jpg (36.15 KiB) Viewed 1711 times
ImageUploadedByTapatalk HD1367883760.869621.jpg
ImageUploadedByTapatalk HD1367883760.869621.jpg (30.77 KiB) Viewed 1711 times
ImageUploadedByTapatalk HD1367883748.804811.jpg
ImageUploadedByTapatalk HD1367883748.804811.jpg (36.02 KiB) Viewed 1711 times
stanimal
Teardrop Builder
 
Posts: 38
Joined: Tue Jan 22, 2013 5:19 pm
Top

Re: Started construction today!

Postby George Taylor » Mon May 06, 2013 7:43 pm

Sucks about the tools, had that happen to me when I was building my house. Did you call you homeowners insurance company? They payed for some of my stuff. It all depends on who you talk to. Just a suggestion.
George Taylor
Teardrop Master
 
Posts: 214
Images: 12
Joined: Sat Mar 13, 2010 9:18 pm
Location: New Boston, NH
Top

Re: Started construction today!

Postby stanimal » Mon May 06, 2013 9:18 pm

Hi George,

No, I didn't bother to claim them on my insurance. In total I was out about $1,100. That didn't meet my deductible.

In the end of the day, I installed automatically locking keypad deadbolts on all of our doors into the house (we were real bad about not locking the door from the garage into the house), and also added a sensor to the garage door opener that is in the bedroom and has a bright red light when the garage door is up. we keep an extra clicker in there to be able to close it from the bedroom. And we've gotten better about setting the alarm when we go to sleep. Doors are always locked, and the garage is always closed.
stanimal
Teardrop Builder
 
Posts: 38
Joined: Tue Jan 22, 2013 5:19 pm
Top

Re: Started construction today!

Postby stanimal » Sun Jun 02, 2013 8:40 pm

After a few weeks of having to take care of other things, I got to work on the teardrop again this weekend. It got to be time to seal the wood. I had debated trying to skin it in sheet aluminum, but there are cost and skill considerations with that.

I had also thought of epoxy/fiberglass/paint, but again, some cost and skill considerations.

I had seen some folks talking about having Rhino lined their teardrops. When I took mine for a spin by the local Rhino place, they quoted me almost $900 to spray the whole thing.

I found a great product from Rustoleum canned Deck and Concrete Restore. I is an amazingly thick application. It will swell and contract with wood, and is totally and completely waterproof when it dries. It also apparently doesn't fade in sunlight. It doesn't dry smooth, and has a texture to it that is very similar to bed liner. The marketing says it is ten times thicker than paint, and I believe it. a 5 gallon bucket was a little over $70, and I applied two coats and have about a gallon or so to spare. It is about 1/8" thick after the two coats.

One of the nice things about it is that it will fill gaps and screw holes up to 1/4" without having to prep them. I chose the color "Linen." If I decide a couple of years down the road to go ahead with the aluminum, I can skin over this stuff and it'll all be good.


You can see the roll of living hinge in one of these pictures. Next weekend its attaching the hatch, the door, and installing windows. After that, it's just some detail work, and buying a deep cycle battery and installing that. I've tested the electric already by running jumper cables from my jeep to the fuse box onboard.


Can't wait to finish it up and take it out for a test run on a weekender.
Attachments
ImageUploadedByTapatalk HD1370222978.499171.jpg
ImageUploadedByTapatalk HD1370222978.499171.jpg (17.03 KiB) Viewed 1603 times
ImageUploadedByTapatalk HD1370222967.703269.jpg
ImageUploadedByTapatalk HD1370222967.703269.jpg (21.38 KiB) Viewed 1603 times
ImageUploadedByTapatalk HD1370222956.556112.jpg
ImageUploadedByTapatalk HD1370222956.556112.jpg (19.44 KiB) Viewed 1603 times
stanimal
Teardrop Builder
 
Posts: 38
Joined: Tue Jan 22, 2013 5:19 pm
Top

Re: Started construction today!

Postby Junkboy999 » Mon Jun 03, 2013 10:52 pm

Looking great so far. Your toe clearance is a little close for me. I roll over a lot and I broke my big toe toenail kicking the cabinets in my TD. :cry:

Keep at it and you’ll be camping in no time.
User avatar
Junkboy999
1000 Club
1000 Club
 
Posts: 1259
Images: 52
Joined: Fri Jul 06, 2012 9:18 pm
Location: Wichita, KS
Top

Re: Started construction today!

Postby stanimal » Sat Jun 08, 2013 8:06 pm

Wow, really got a lot done today. Trimmed out the hatch and the door with aluminum channel. Installed the living hinge, and got the hatch and door mounted.

I am really impressed with the living hinge. Much more durable than I thought it would be. The door doesn't sag at all when it is open.
Attachments
ImageUploadedByTapatalk HD1370739962.632243.jpg
ImageUploadedByTapatalk HD1370739962.632243.jpg (31.71 KiB) Viewed 1561 times
ImageUploadedByTapatalk HD1370739944.675708.jpg
ImageUploadedByTapatalk HD1370739944.675708.jpg (33.52 KiB) Viewed 1561 times
ImageUploadedByTapatalk HD1370739930.479977.jpg
ImageUploadedByTapatalk HD1370739930.479977.jpg (28.85 KiB) Viewed 1561 times
stanimal
Teardrop Builder
 
Posts: 38
Joined: Tue Jan 22, 2013 5:19 pm
Top

Re: Started construction today!

Postby stanimal » Sat Jun 08, 2013 8:07 pm

GOt the hatch installed, and also the driver's side window.
Attachments
ImageUploadedByTapatalk HD1370740039.925913.jpg
ImageUploadedByTapatalk HD1370740039.925913.jpg (27.98 KiB) Viewed 1560 times
ImageUploadedByTapatalk HD1370740022.995472.jpg
ImageUploadedByTapatalk HD1370740022.995472.jpg (36.53 KiB) Viewed 1560 times
ImageUploadedByTapatalk HD1370740003.808715.jpg
ImageUploadedByTapatalk HD1370740003.808715.jpg (22.04 KiB) Viewed 1560 times
stanimal
Teardrop Builder
 
Posts: 38
Joined: Tue Jan 22, 2013 5:19 pm
Top

Re: Started construction today!

Postby stanimal » Sat Jun 08, 2013 8:13 pm

OK, Last photos for the day. Just a few more.

I used a putty that is used in mobile home window installations to seal the roof vent and the windows. Ran a gasket around the inside of the door. Just a few things left. I have to install a door handle on the door, handle on the hatch, along with a lock, draw latches, and a piece of molding in the hatch. Also need to skin the inside, but really, for all intents and purposes, I've got a functional teardrop!!
Attachments
ImageUploadedByTapatalk HD1370740127.998917.jpg
ImageUploadedByTapatalk HD1370740127.998917.jpg (28.76 KiB) Viewed 1559 times
ImageUploadedByTapatalk HD1370740102.721596.jpg
ImageUploadedByTapatalk HD1370740102.721596.jpg (23.61 KiB) Viewed 1559 times
ImageUploadedByTapatalk HD1370740091.146618.jpg
ImageUploadedByTapatalk HD1370740091.146618.jpg (26.34 KiB) Viewed 1559 times
stanimal
Teardrop Builder
 
Posts: 38
Joined: Tue Jan 22, 2013 5:19 pm
Top

Re: Started construction today!

Postby Fyddler » Sun Jun 09, 2013 1:13 am

Looking good! Where did you get your living hinge?
To err is human, to really foul up requires a computer

Build Log: http://www.tnttt.com/viewtopic.php?f=50&t=55017
User avatar
Fyddler
The 300 Club
 
Posts: 349
Joined: Sat Sep 01, 2012 9:52 am
Location: Port Orchard, WA
Top

PreviousNext

Return to Build Journals

Who is online

Users browsing this forum: No registered users and 11 guests