Silver Beatle - She's now with an old friend!

...ask your questions in the appropriate forums BUT document your build here...preferably in a single thread...dates for updates, are appreciated....

Postby aggie79 » Thu Aug 25, 2011 8:58 am

atahoekid wrote:That tile job looks awesome and I am going to use the PL premium idea for my road foamie. What are you grouting with? Standard stuff?


Thanks Mel.

I plan on using an epoxy grout. Although I've never used the stuff before, and have heard it is a little tough for a novice, I think the epoxy grout will be better for all of the bouncing around and should help the white color I'm using to keep from getting stains.

Take care,
Tom
Tom (& Linda)
For build info on our former Silver Beatle teardrop:
Build Thread

93503
User avatar
aggie79
Super Duper Lifetime Member
 
Posts: 5405
Images: 686
Joined: Tue Aug 07, 2007 5:42 pm
Location: Watauga, Texas

Postby bobhenry » Thu Aug 25, 2011 9:38 am

I used the bathrom tub and tile caulk and it has held up for 3 years. No pops no cracks no seperations. Being "rubberized" it has some impact give. I have sat hot skillets on it and routinely have the propane cook top setting over it. I would suggest a halo of wood around the edge to minimize accidential damage. I laid mine out to work with full tiles and traced each one in the grid so the substrata looks like a checkerboard. I then placed a heavy bead forming a letter X corner to corner of each box to adhere each tile and then ran a heavy bead on each line. I started setting in the corner and squished each one into position. I grouted with the back of a small spoon so the "grout" was about an 1/8 " below the face of the tile. I then took a little soapy water to run the joints and clean the excess off of the face of the tiles. Still looks great after 30 - 40 outings.

Image
Last edited by bobhenry on Thu Aug 25, 2011 9:49 am, edited 1 time in total.
Growing older but not up !
User avatar
bobhenry
Ten Grand Club
Ten Grand Club
 
Posts: 10368
Images: 2623
Joined: Fri Feb 09, 2007 7:49 am
Location: INDIANA, LINDEN

Postby jss06 » Thu Aug 25, 2011 9:39 am

Great choice on the tile It really does pull the tear together.
User avatar
jss06
Palladium Donating Member
 
Posts: 663
Joined: Mon May 12, 2008 7:48 pm
Location: Carrollton, TX
Top

Postby aggie79 » Thu Aug 25, 2011 9:56 am

bobhenry wrote:I used the bathrom tub and tile caulk and it has held up for 3 years. No pops no cracks no seperations. Being "rubberized" it has some impact give. I have sat hot skillets on it and routinely have the propane cook top setting over it. I would suggest a halo of wood around the edge to minimize accidential damage. I laid mine out to work with full tiles and traced each one in the grid so the substrata looks like a checkerboard. I then placed a heavy bead forming a letter X corner to corner of each box to adhere each tile and then ran a heavy bead on each line. I started setting in the corner and squished each one into position. I grouted with the back of a small spoon so the "grout" was about an 1/8 " below the face of the tile. I then took a little soapy water to run the joints and clean the excess off of the face of the tiles. Still looks great after 30 - 40 outings.

Image


Bob,

Tub and tile caulk was my first preference, and I think it will work better than the epoxy grout. But...the tile I'm using is 1" square with 1/8" joints, and I don't have the patience to deal with the tub and tile caulk on all of those little grout joints. I have done grouting before - on 12" floor ceramic tile - and have a rubber float and margin trowel. I'm thinking - but could be wrong - that the epoxy grout on the mosaic tile may be less work.

Take care,
Tom
Tom (& Linda)
For build info on our former Silver Beatle teardrop:
Build Thread

93503
User avatar
aggie79
Super Duper Lifetime Member
 
Posts: 5405
Images: 686
Joined: Tue Aug 07, 2007 5:42 pm
Location: Watauga, Texas
Top

Postby bobhenry » Thu Aug 25, 2011 1:57 pm

and 4" tile is 16 times less work ! :lol: :lol: :lol:

Seriously the tub and tile stuff can become a pretty sticky mess if you can't get right at it , so maybe your path is the right one for the tiny tiles. I did our kitchen 12" tile floor with cementitious grout and clean up was ez but it doesn't take kindly to flex and I had a few loose tiles I have had to repair with adhesive type grouts. I hope your substrata is fairly substantial to eliminate the flex and absorb most of the road shock.

However you do it tile is a great choice ! :thumbsup:
Growing older but not up !
User avatar
bobhenry
Ten Grand Club
Ten Grand Club
 
Posts: 10368
Images: 2623
Joined: Fri Feb 09, 2007 7:49 am
Location: INDIANA, LINDEN
Top

Postby atahoekid » Fri Aug 26, 2011 1:14 am

aggie79 wrote:
atahoekid wrote:That tile job looks awesome and I am going to use the PL premium idea for my road foamie. What are you grouting with? Standard stuff?


Thanks Mel.

I plan on using an epoxy grout. Although I've never used the stuff before, and have heard it is a little tough for a novice, I think the epoxy grout will be better for all of the bouncing around and should help the white color I'm using to keep from getting stains.

Take care,
Tom


I think I will look into epoxy grout. I think as long as the "grout" gives a bit and as Bob Henry recommends I have a fairly stiff substrate I should be OK. I was a bit worried about using tiles on the counter but empirical evidence proves it can be done. :applause: :thumbsup: :applause:
Mel

"Believe in your abilities... Remember amateurs built the ark, professionals built the Titanic"

"Indecision may or may not be my problem" Jimmy Buffet

Image

The Road Foamie Build Thread: viewtopic.php?t=45698
User avatar
atahoekid
Platinum Donating Member
 
Posts: 1773
Images: 158
Joined: Sat Jul 24, 2010 2:49 am
Location: Incline Village, NV
Top

Postby aggie79 » Mon Aug 29, 2011 9:56 pm

I've been working on my interior cabinets on and off the past few days.

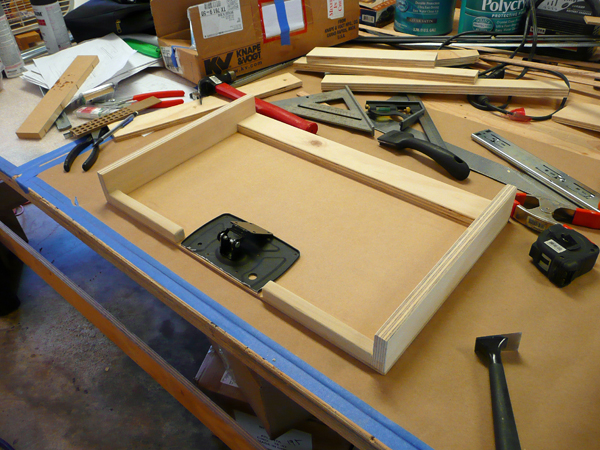
The plan was for the TV to "fold down" and fit into a drawer. After a lot of head scratching, I fabricated the drawer for the TV and cut down parts of the TV stand to use for the folding mechanism. Here's the finished TV drawer awaiting paint:

Image

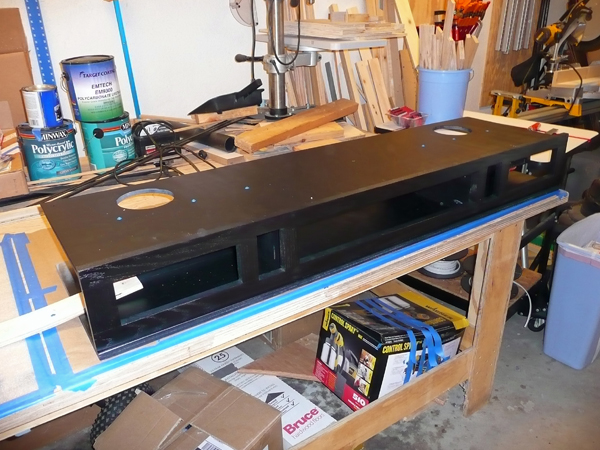
That was the last component of the footboard cabinet. Before I installed the cabinet in the teardrop I test fit everything on the bench. This is a picture of the bottom showing the speaker openings:

Image

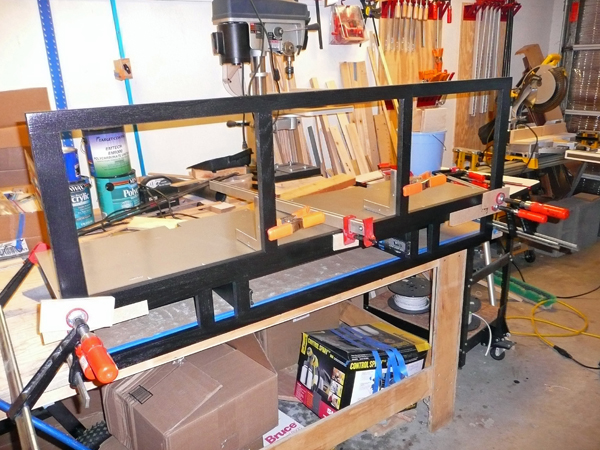
This is how it looks with the two face frames attached:

Image

After everything was fitted together, I took the pieces apart. The main shelf sits on a cleat that I had previously installed:

Image

Next I installed the shelf. (It had a slight bow, so I used the jack stand to take the bow out.)

Image

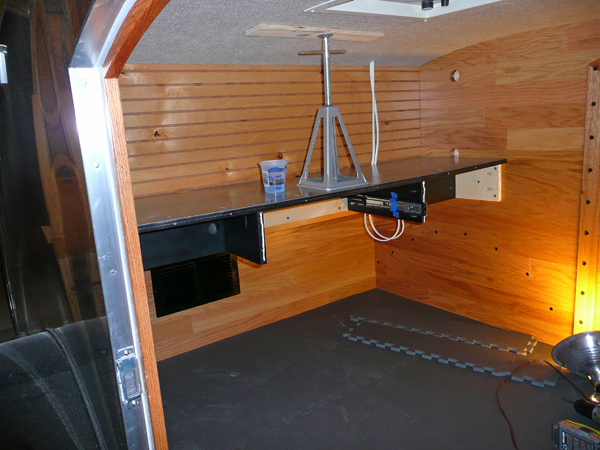
Then, I installed the center console (for car radio and DVD player) and the two face frames:

Image

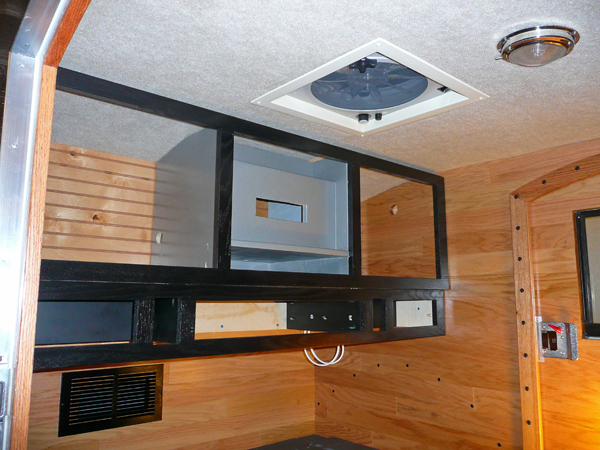
Next up is to paint the parts of the cleat that will be exposed and to pre-wire everything. Then I can install the cabinet bottom panel, and doors and drawer.

Thanks for looking,
Tom
Tom (& Linda)
For build info on our former Silver Beatle teardrop:
Build Thread

93503
User avatar
aggie79
Super Duper Lifetime Member
 
Posts: 5405
Images: 686
Joined: Tue Aug 07, 2007 5:42 pm
Location: Watauga, Texas
Top

Postby Breezy13 » Tue Aug 30, 2011 8:16 am

All I can say is wow, you've got a killer TD! After this is done you're going to have a lot of extra time on your hands.

Breezy
User avatar
Breezy13
Teardrop Builder
 
Posts: 47
Images: 11
Joined: Mon May 23, 2011 9:20 am
Location: Estes Park, CO
Top

Postby DMcCam » Tue Aug 30, 2011 9:34 am

Beautiful Tom!!! :thumbsup: It looks like your cabinets will give you plenty of valuable storage. I'm lovin' the contrast! It looks like your TV drawer pulls out then the TV swings up? Nice and neat design my friend. You're doing such a great job...hall of fame here we come!!!

All the best,

Dave
User avatar
DMcCam
Gold Donating Member
 
Posts: 883
Joined: Wed Jan 06, 2010 8:30 pm
Location: Reno, Nevada
Top

Postby campmaster-k » Tue Aug 30, 2011 11:00 am

Great job Tom I always look forward to your updates.
-Kirk

>TnTTT ORIGINAL 200A LANTERN CLUB

>CEO Coleman Recovery Inc.

>Nor Cal Camping Pinewood Racing Team


Build thread -

viewtopic.php?t=45307&postdays=0&postorder=asc&start=180

Check out my Pictures -

http://s1199.photobucket.com/albums/aa4 ... 0QQtppZZ24
User avatar
campmaster-k
Lifetime member
 
Posts: 3030
Images: 17
Joined: Fri Jun 17, 2011 5:02 pm
Location: Colusa, California
Top

Postby Fishingtomatoseed » Tue Aug 30, 2011 11:24 am

I like the detail. How does the foam square tiles for the floor feel. Lookin good. :thumbsup:
User avatar
Fishingtomatoseed
Donating Member
 
Posts: 261
Images: 9
Joined: Sun Aug 21, 2011 4:47 pm
Location: North Texas
Top

Postby kinto » Tue Aug 30, 2011 1:00 pm

looking great tom! :applause:

and that foam floor is a really nice idea... i might hafta return the vinyl flooring i bought and look into that...

kent
:)
Is a hippopotamus just a really cool opotamus?

imay ildbay urnaljay

Image
User avatar
kinto
Gold Donating Member
 
Posts: 228
Images: 465
Joined: Tue Jul 19, 2011 10:20 am
Location: STL
Top

Postby S. Heisley » Tue Aug 30, 2011 8:25 pm

:o ...Impressive. This is gonna be a WOWser of a teardrop! :applause:
User avatar
S. Heisley
Super Lifetime Member
 
Posts: 8866
Images: 495
Joined: Mon Sep 17, 2007 10:02 am
Location: No. California
Top

Postby Danny » Tue Aug 30, 2011 9:09 pm

Most impressive!!! Outstanding Tom.. :thumbsup: :applause:
User avatar
Danny
The 300 Club
 
Posts: 333
Images: 108
Joined: Sat Oct 07, 2006 11:22 pm
Location: Nebraska
Top

Postby Oldragbaggers » Thu Sep 01, 2011 9:44 pm

I just finished reading your entire build thread, and the word "impressive" doesn't begin to express it.
You are a true craftsman, and have great creativity. What a beautiful teardrop. I hope I get a chance to see it for real sometime.
Thanks for taking the time to do all this documentation so that we can all learn and be inspired by it.
Becky
Life is sooooo good.........
Sail...camp....bike...repeat
Becky

Build Journal http://www.tnttt.com/viewtopic.php?f=50&t=45917
Visit our blog at http://www.oldragbaggers.com
Image Image
User avatar
Oldragbaggers
Gold Donating Member
 
Posts: 1842
Images: 331
Joined: Mon Aug 01, 2011 9:22 pm
Location: Essex, MD
Top

PreviousNext

Return to Build Journals

Who is online

Users browsing this forum: featherliteCT1 and 14 guests