Weekender status - 1st camping (update 10-21-12)

...ask your questions in the appropriate forums BUT document your build here...preferably in a single thread...dates for updates, are appreciated....

Re: Weekender status - finally slinging paint (update 7-28-

Postby les45 » Sat Jul 28, 2012 12:42 pm

The day finally came to start painting. Got out ahead of the heat and put the first coat of Zinsser oil based primer on today. All the sanding and filling really paid off as I only had a couple of small spots that I have to go back and touch up with filler before the next coat of primer. After that it will get three coats of Rustoleum Sunburst Yellow. (Yes, we finally made a decision.) I was mildly surprised that it only took less than a quart of primer on the first coat.

Before:
Image

Two hours later:
Image
User avatar
les45
500 Club
 
Posts: 974
Images: 605
Joined: Sat Feb 25, 2012 8:57 am
Location: Aiken, South Carolina

Re: Weekender status - finally slinging paint (update 7-28-

Postby CliffinGA » Sat Jul 28, 2012 2:36 pm

Great job Les, we'll definatly see ya coming down the road! :R 
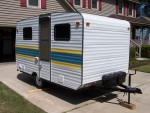
actually I like yellow but the better half said no :lol:. Looking good bud shpuld be ready to camp in when it cools off some.

Cliff :thumbsup:
In God we trust, shoot the rest and he will sort out!

My Build:

viewtopic.php?f=50&t=42628
User avatar
CliffinGA
1000 Club
1000 Club
 
Posts: 1499
Images: 207
Joined: Sat Nov 14, 2009 1:29 pm
Location: Jefferson, GA

Re: Weekender status - finally slinging paint (update 7-28-

Postby rbourne3 » Fri Aug 03, 2012 12:28 pm

Here is mine in Safety Yellow.

Image
User avatar
rbourne3
Teardrop Builder
 
Posts: 42
Joined: Sat Apr 10, 2010 7:37 pm
Location: Fernandina Beach, FL
Top

Re: Weekender status - stabilizer jacks (update 8-5-12)

Postby les45 » Sun Aug 05, 2012 10:46 am

After a lot of downtime this week due to family travel, I finally got the second coat of primer on today. While the paint was drying, I decided to go ahead and install the Atwood stabilizer jacks that I picked up on ebay recently. Really easy installation; just drill four holes and install four bolts. Keeping them straight was the hard part. I was able to use bolts and nylon lock nuts left over from the original trailer fabrication. I'm only installing two jacks on the rear and will use a Northern Tool swingaway tongue jack for the front with chocks on the trailer wheels. I figure that most of the time the tongue will stay hooked up to the receiver on the TV.

Image
User avatar
les45
500 Club
 
Posts: 974
Images: 605
Joined: Sat Feb 25, 2012 8:57 am
Location: Aiken, South Carolina
Top

Re: Weekender status - stabilizer jacks (update 8-5-12)

Postby WhitneyK » Sun Aug 05, 2012 10:57 am

les45 wrote:I'm only installing two jacks on the rear and will use a Northern Tool swingaway tongue jack for the front with chocks on the trailer wheels. I figure that most of the time the tongue will stay hooked up to the receiver on the TV.


That's what I did / do Les, once you have the wheels chocked and the 2 jacks down it is really solid even when not hooked to the TV. I didn't install the scissor type jacks (they were in my original plan), my neighbor gave me 4 Reese al trailer jacks. So, I saved that expence for later,..... maybe.
ImageImage

Lookin' good!!! :thumbsup:
Whitney & Tracie
Crothersville, IN

We never really grow up, we only learn how to act in public.

Do not confuse what you hear with what I mean.

My build: http://www.tnttt.com/viewtopic.php?t=41955

160061-------------------------------101114
States we've drug our
li'l camper through. (44 States + Vancouver Island and over 45,000 miles so far)
User avatar
WhitneyK
Gold Donating Member
 
Posts: 559
Images: 412
Joined: Sun Dec 12, 2010 10:28 pm
Location: IN, Crothersville (36mi N or Louisville)
Top

Re: Weekender status - heat+rain=humidity (update 8-7-12)

Postby les45 » Wed Aug 08, 2012 11:09 am

Well so far the last month has been a bust toward getting any painting done. First the heat in July and now the rain and humidity in August. The only good thing about it is that it gives me more time to keep filling those little cracks and dings that keep showing up every time you look at it in a different light. I've gotten two coats of Zinsser oil based primer on so far but have sanded half of it off to keep working the little blemishes. Today was another day of 100% humidity so no primer but another day of filler. Good thing I ordered "too much" of the Smith's Fill-it. Weatherman is calling for a dry spell next week so after some more filling and sanding this week, I'll be ready to start slinging paint again. Still gotta get two full coats of primer before the three coats of Rustoleum. It's gonna be a long month.

Primer, sand, fill, and sand some more. Primer, sand, fill, and sand some more, etc. etc.
Image

Good thing I bought too much of this stuff.
Image
User avatar
les45
500 Club
 
Posts: 974
Images: 605
Joined: Sat Feb 25, 2012 8:57 am
Location: Aiken, South Carolina
Top

Re: Weekender status - heat+rain=humidity (update 8-7-12)

Postby CliffinGA » Wed Aug 08, 2012 7:48 pm

Bud I feel your pain, we're getting it down here also and its a pain! I was going to try and start putting fiberglass tape on my hatch but its just too stinking humid to do it. Their saying may have good weather this weekend so may start then. Keep pluggin away at it bud and you'll be done in no time!

Cliff :thumbsup:
In God we trust, shoot the rest and he will sort out!

My Build:

viewtopic.php?f=50&t=42628
User avatar
CliffinGA
1000 Club
1000 Club
 
Posts: 1499
Images: 207
Joined: Sat Nov 14, 2009 1:29 pm
Location: Jefferson, GA
Top

Re: Weekender status - finally painting (update 8-14-12)

Postby les45 » Tue Aug 14, 2012 1:06 pm

After a summer full of heat and humidity, the weather finally cooperated this week. First coat of Rustoleum Sunburst Yellow went on today and looks good even if I do say so myself. All that filling and sanding and priming ad nauseum finally paid off. Learned a lot about how to get a really smooth finish with a 4" foam roller (I'll write something on that later.) Even in the middle of the day inside the garage I still had a couple of bugs do crash landings on the front bevel so I'll have to do a little sanding before the next coat. Kind of surprised that it only took a little less than one quart to do the whole thing. Two more coats and I'll start putting everything back together. Starting to see daylight at the end of the tunnel.

Image


Image
User avatar
les45
500 Club
 
Posts: 974
Images: 605
Joined: Sat Feb 25, 2012 8:57 am
Location: Aiken, South Carolina
Top

Re: Weekender status - finally painting (update 8-14-12)

Postby jbyrd » Wed Aug 15, 2012 5:38 am

looking good, I really like that color of yellow! wanted to use it on mine originally but the boss(aka wife) said NO WAY lol
Til later, See ya
Jeremy

My build journal #1 "SOLD" : viewtopic.php?t=45945
my build journal #2 "SOLD": viewtopic.php?f=50&t=59216
User avatar
jbyrd
Teardrop Master
 
Posts: 146
Images: 172
Joined: Sun Aug 28, 2011 8:24 pm
Location: marianna, Florida
Top

Re: Weekender status - finally painting (update 8-14-12)

Postby les45 » Wed Aug 15, 2012 7:35 am

jbyrd wrote:looking good, I really like that color of yellow! wanted to use it on mine originally but the boss(aka wife) said NO WAY lol


Actually my wife helped pick out this color. She even helped roll some of it on.
User avatar
les45
500 Club
 
Posts: 974
Images: 605
Joined: Sat Feb 25, 2012 8:57 am
Location: Aiken, South Carolina
Top

Re: Weekender status - finally painting (update 8-14-12)

Postby WhitneyK » Wed Aug 15, 2012 8:57 am

That "extra" time you got to spend doing "body work" will pay off in the end. Looks good, can't wait to see what a couple more coats are gonna do for it. :thumbsup:
Whitney & Tracie
Crothersville, IN

We never really grow up, we only learn how to act in public.

Do not confuse what you hear with what I mean.

My build: http://www.tnttt.com/viewtopic.php?t=41955

160061-------------------------------101114
States we've drug our
li'l camper through. (44 States + Vancouver Island and over 45,000 miles so far)
User avatar
WhitneyK
Gold Donating Member
 
Posts: 559
Images: 412
Joined: Sun Dec 12, 2010 10:28 pm
Location: IN, Crothersville (36mi N or Louisville)
Top

Re: Weekender status - fourth & final coat (update 8-24-12)

Postby les45 » Fri Aug 24, 2012 11:28 am

No new pics. Just look at my last post and imagine the yellow with a nice uniform shine throughout. After three coats of Rustoleum Sunburst Yellow straight out of the can with a 4" foam roller, I still wasn't satisfied with the dull streaks left by the roller. There seemed to be a fine line between getting enough paint on the roller and working it out too much to the point that it wouldn't settle out to a shine. I posted my problem under Teardrop Construction Tips and Techniques but I didn't really get a definitive answer. I even considered rubbing the paint with a car type rubbing compound but that didn't work on a test piece. I remembered that adding water to latex paint helped get a better shine on the last coat so I decided to try thinning my Rustoleum with mineral spirits and try a thinner mix. I thinned a partial remaining can by 25% with pure mineral spirits and did a test piece to see how it would look. The results looked really good. Finally, after several more days of rain and humidity, I was able to get the fourth (and final) coat on today. The results were a nice uniform shine throughout with absolutely no roller marks. It almost looks like it was sprayed on. The secret to getting it uniform is to actually keep working it with increasingly lighter strokes with the last pass just using the weight of the roller. It will have bubbles when first applied, but they go away on their own without need of blowing air or tipping. This method is also very forgiving as I found you can go back over a spot several minutes later and it will still settle to a uniform shine (had to go back and remove a couple of gnats that had flown off course). Ready to start putting everything back together and finish this sucker so I can go camping.
User avatar
les45
500 Club
 
Posts: 974
Images: 605
Joined: Sat Feb 25, 2012 8:57 am
Location: Aiken, South Carolina
Top

Re: Weekender status - fourth & final coat (update 8-24-12)

Postby jbyrd » Fri Aug 24, 2012 2:52 pm

Yeah actually you can paint a car with rustoleum enamel and get a great paint job. google "50 dollar paint job" lots of info on it.
Basically It's two coats thinned, wet sand 3-500 grit, two coats thinned, wet sand 500-1000, two coats thinned, wet sand 1000-1500 two coats thinned and Optional buffing.
I tested it one time on an old hood I had and It turned out beautifully. Didnt get any pics though :x ( I say that way too much lol)
Til later, See ya
Jeremy

My build journal #1 "SOLD" : viewtopic.php?t=45945
my build journal #2 "SOLD": viewtopic.php?f=50&t=59216
User avatar
jbyrd
Teardrop Master
 
Posts: 146
Images: 172
Joined: Sun Aug 28, 2011 8:24 pm
Location: marianna, Florida
Top

Re: Weekender status - fourth & final coat (update 8-24-12)

Postby CliffinGA » Fri Aug 24, 2012 4:24 pm

Looks great Les and glad you found a remedy to the issue you had, my spot I'm not worrying about because next weeked it will be covered with diamond pate as a rock shield :lol:. I'm down to 3 weeks til mine has to be campable for a GA tearjerkers gathering up @ Cloudland Canyon State Park up in NW GA by TN/GA/AL lines. Good group of folks should be there!

Cliff :thumbsup:
In God we trust, shoot the rest and he will sort out!

My Build:

viewtopic.php?f=50&t=42628
User avatar
CliffinGA
1000 Club
1000 Club
 
Posts: 1499
Images: 207
Joined: Sat Nov 14, 2009 1:29 pm
Location: Jefferson, GA
Top

Re: Weekender status - fourth & final coat (update 8-24-12)

Postby les45 » Fri Aug 24, 2012 4:47 pm

jbyrd wrote:Yeah actually you can paint a car with rustoleum enamel and get a great paint job. google "50 dollar paint job" lots of info on it.
Basically It's two coats thinned, wet sand 3-500 grit, two coats thinned, wet sand 500-1000, two coats thinned, wet sand 1000-1500 two coats thinned and Optional buffing.
I tested it one time on an old hood I had and It turned out beautifully. Didnt get any pics though :x ( I say that way too much lol)


I saw that video. That is what turned me on to the idea of thinning the paint. Didn't want a car like finish and all that extra work, but my glossy wood skins will do just fine. Another nice thing is that you can do a quick repair and re-coat easily and cheaply if you ever get some minor damage.
User avatar
les45
500 Club
 
Posts: 974
Images: 605
Joined: Sat Feb 25, 2012 8:57 am
Location: Aiken, South Carolina
Top

PreviousNext

Return to Build Journals

Who is online

Users browsing this forum: No registered users and 13 guests