building Plan B....

...ask your questions in the appropriate forums BUT document your build here...preferably in a single thread...dates for updates, are appreciated....

'night Mary Beth....

Postby mike_c » Sat Jul 06, 2013 2:00 am

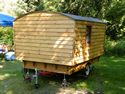
First night in the cabin. Still moored in the backyard, so it's like camping when we were kids, but still. We're in the cabin, settling in for bed. It's really comfy. The lighting is great. 'Night.
If it isn't broke, perhaps a more expensive tool is required to break it....
User avatar
mike_c
Teardrop Master
 
Posts: 124
Joined: Sun Jul 10, 2011 1:40 pm
Location: Blue Lake, California

six days left....

Postby mike_c » Sun Jul 14, 2013 11:53 pm

Well, we're making progress. Since the last update I've had a bunch of meetings, which kind of destroy your daily productivity even when they don't take but an hour or two. We're back on track, but there have been some frustrating days, too. This chunk o' Doug fir will be part of the bumper:

Image

Work continues on the galley hatch. Adding trim to the inner side:

Image

Reinforcing the outer edges:

Image

Sealed all over with CPES:

Image

We used Epifanes varnish-- a coat of matte over three coats of gloss. I found the gloss Epifanes difficult to work with. I thinned it about 2/3 varnish and 1/3 solvent for brush-ability, and even though I watched it for nearly an hour there were still some runs every coat. The matte finish went on beautifully, though:

Image

Our spray booth is top notch:

Image

The trailer has fenders. I was afraid they might be flimsily attached, but they seem pretty stable.

Image

We've slept in it this weekend and last. It's comfy, although if I could do it again I think I'd move the cabinet fronts back six inches and raise the bottom two. They're cavernous, and although the cabin isn't claustrophobic, it's small, especially for such a large profile. We use that middle lower cabinet front as a tray, when it's lowered.

Image

Image

Image

The sad state of the tongue:

Image

We laminated the outer side of the galley hatch with 0.040 aluminum, then trimmed it:

Image

Image

I also insulated under the floor, including the galley, and installed LED porch lights. No, I'm not happy with the placement, but unfortunately I committed myself to that wire exit long ago, in the distant early days of the build:

Image

Kathy has begun provisioning the galley. I really really am going to get a hatch on that soon.

Image

Varnishing the last two pieces of cabin trim:

Image

It's been a long day-- installing the passenger side porch light set off a wild goose chase for an electrical problem that was probably just me getting the polarity reversed in the first place. I'm still convinced that we'll have the trailer ready by next weekend!

--Mike C.
If it isn't broke, perhaps a more expensive tool is required to break it....
User avatar
mike_c
Teardrop Master
 
Posts: 124
Joined: Sun Jul 10, 2011 1:40 pm
Location: Blue Lake, California

Re: building Plan B....

Postby KCStudly » Mon Jul 15, 2013 12:02 am

Train kept a rollin'.

Looking good! :thumbsup:
KC
My Build: The Poet Creek Express Hybrid Foamie

Poet Creek Or Bust
Engineering the TLAR way - "That Looks About Right"
TnTTT ORIGINAL 200A LANTERN CLUB = "The 200A Gang"
Green Lantern Corpsmen
User avatar
KCStudly
Donating Member
 
Posts: 9640
Images: 8169
Joined: Mon Feb 06, 2012 10:18 pm
Location: Southeastern CT, USA
Top

Re: building Plan B....

Postby Shadow Catcher » Mon Jul 15, 2013 5:48 am

Looks very good, hope to see :pictures: soon of you camping in it.
User avatar
Shadow Catcher
Donating Member
 
Posts: 6008
Images: 234
Joined: Sat Apr 11, 2009 8:26 pm
Location: Metamora, OH
Top

Re: building Plan B....

Postby WhitneyK » Mon Jul 15, 2013 8:10 am

Go Mike Go! :applause:

Hopefully the light at the end of the tunnel isn't a train..... ;) :lol: :?
Lookin' good, and I agree with moving the cabinets back, does look a bit "tight". Although, you won't have to reach too far when your laying down to access them. Would probably work well for me and my back. :frightened: :D

You can do it :thumbsup:
Whitney & Tracie
Crothersville, IN

We never really grow up, we only learn how to act in public.

Do not confuse what you hear with what I mean.

My build: http://www.tnttt.com/viewtopic.php?t=41955

160061-------------------------------101114
States we've drug our
li'l camper through. (44 States + Vancouver Island and over 45,000 miles so far)
User avatar
WhitneyK
Gold Donating Member
 
Posts: 559
Images: 412
Joined: Sun Dec 12, 2010 10:28 pm
Location: IN, Crothersville (36mi N or Louisville)
Top

Re: building Plan B....

Postby Ron Dickey » Mon Jul 15, 2013 1:48 pm

nice tutorial you are doing a great job and I like coming back to see what you have done. I am only 1/3 done on mine. If you look at the bottom of this thread you will see a photo of how far I have come I update that photo every time I down load new pictures.

:thumbsup: :thumbsup: :applause:
Ron Dickey
Los Osos, CA
173882......173887
Inside almost done--Trolly top has opening windows & roof.doors need assembling--pictured above waley windows..galley 1/3 done
Cross Bow in Build Journals....http://www.tnttt.com/viewtopic.php?f=50&t=54108
User avatar
Ron Dickey
Silver Donating Member
 
Posts: 3109
Images: 787
Joined: Tue Apr 20, 2004 5:56 pm
Location: Central Coast, CA
Top

Re: building Plan B....

Postby Bobcape » Tue Jul 16, 2013 10:17 am

Nice build! I need to add some LED porch lights. I like the look of yours. Where did you buy them? Thanks.

Bob
User avatar
Bobcape
Teardrop Builder
 
Posts: 49
Images: 41
Joined: Sun Aug 26, 2012 1:19 am
Location: Black Hills, SD
Top

Re: building Plan B....

Postby mike_c » Tue Jul 16, 2013 11:02 am

Bobcape wrote:Nice build! I need to add some LED porch lights. I like the look of yours. Where did you buy them? Thanks.

Bob


Thanks! The porch lights most likely came from Amazon.com. We're in a pretty rural area so I've relied heavily on Amazon mail order for parts and supplies. Unfortunately, I saw the porch lights and bought them nearly two years ago, so I don't remember exactly where I got them. The summer I began construction I still thought I might finish the trailer within a couple of months, so I bought a flurry of stuff that then sat in a workbench drawer for two years, LOL.

--Mike C.
If it isn't broke, perhaps a more expensive tool is required to break it....
User avatar
mike_c
Teardrop Master
 
Posts: 124
Joined: Sun Jul 10, 2011 1:40 pm
Location: Blue Lake, California
Top

One day left-- it's on the road.

Postby mike_c » Fri Jul 19, 2013 11:42 pm

Whew. I am filthy from crawling around under the trailer, tired, and have a busted up knuckle. That one bled a shocking lot. It's getting dark, so I've stopped working on the last, finishing touches, which I'll do tomorrow. We've pushed back the departure until Sunday-- not because the trailer isn't ready, although I do appreciate the extra day to wind up some final pieces of trim and a few other chores that my tired brain is forgetting right now.

The teardrop trailer is on the road, ready (just about) to depart. Say YEAH!

I've been so relentlessly busy these last few days that I didn't take many pictures, but here's the few I took.

This is five feet of one inch aluminum angle awaiting annealing. I used a MAPP-Pro torch to heat it, but I was too conservative-- it softened, but not enough to make for a pleasant afternoon.

Image

I wrasseled that piece of angle around a bending form for two hours, advancing centimeter by centimeter in order to get a fair bend on both legs. Many, many clamps were required. I still had to live with some annoying waviness, but it's not too bad.

Image

I annealed the other side until it was so soft that it sagged under it's own weight. I am now a convert to the soot burn-off method. Since I work mainly outside I've never been able to apply a proper coat of soot to aluminum angle before annealing it, so it's always be a bit of a guess whether a piece is properly annealed until I wrap it around something. Candles just don't deposit soot in a breeze, and there's always a breeze when I want to anneal something. So on this-- the last piece of curved aluminum trim on the entire trailer-- I took it inside where the wind was blocked and laid a proper sooting of carbon black on the aluminum. I heated it in small segments until the soot burned off. That produced soft aluminum, but it was a hair's breath away from being too hot. I melted through one piece by having a tiny lapse of attention, and was constantly on the edge of raising blisters on the second. But it was dead soft and bent much easier than the other side.

Image

Image

This picture was taken right after we attached the galley hatch hurricane hinge. After it was done, we went out for dinner, because we were both too giddy to cook. Thanks again to Grant Whipp for the advice about slotting and pinning the hinge!

Image

When we came back, we lifted the hatch for the first time. I didn't take a picture, but we left the hatch propped open so we could look at it again first thing in the morning, and that's when I took this picture.

Image

We bought this kitchen thing to hold the stove and such, like a galley outrigger. It's tubular steel, and feels solid, not at all flimsy, which I worried about. It folds up and stows into a remarkably small package, and comes with a canvas carry sack. I was going to build a chuck box. Problem solved!

Oh, and the cross bar is two low in this pic. It didn't come with instructions, and it fits in several configurations, but it makes much more sense to hang pots or utensils up higher.

Image

I don't have any photos from yesterday, but I took this one this morning, after the bumpers and the hatch latches and handle had been attached. The partial weather strip at the bottom, held on by blue tape, is just to simulate the right resting point for the hatch-- putting the full length strip on the bottom edge of the hatch itself is one of my chores for tomorrow. The bumpers and hatch props are CPES sealed, but not yet varnished. I'll varnish them when the season is over, dammit. And that big drawer front on the left side is still missing. Winter project!

Image

I didn't take any pictures of the drama involved in getting the trailer out of the back yard, but it was a tight, tight fit. A bit of paint was lost from the front panel of my truck, but the teardrop was unscathed. I've towed it 20 miles or so round trip this afternoon. It tows well-- tracks precisely and doesn't bounce or anything-- but I can definitely feel the extra weight on my Ford Ranger. Here it is at the curb, taken about an hour ago. I'll connect the galley lights tomorrow morning. The aluminum siding is still a mess, and needs cleaning and buffing, but not until we get back. And I suspect it will never be truly finished. 'Ya know what I mean?

Image

Image

I'm going to take a shower now. :D

--Mike C.
If it isn't broke, perhaps a more expensive tool is required to break it....
User avatar
mike_c
Teardrop Master
 
Posts: 124
Joined: Sun Jul 10, 2011 1:40 pm
Location: Blue Lake, California
Top

Re: building Plan B....

Postby S. Heisley » Sat Jul 20, 2013 12:27 am

:applause: Good job! :applause: You got 'er ready to go!
The Galley and Interior look nice, too. :thumbsup:
User avatar
S. Heisley
Super Lifetime Member
 
Posts: 8867
Images: 495
Joined: Mon Sep 17, 2007 10:02 am
Location: No. California
Top

Re: building Plan B....

Postby KCStudly » Sat Jul 20, 2013 6:12 am

She's a true beauty! :thumbsup:
KC
My Build: The Poet Creek Express Hybrid Foamie

Poet Creek Or Bust
Engineering the TLAR way - "That Looks About Right"
TnTTT ORIGINAL 200A LANTERN CLUB = "The 200A Gang"
Green Lantern Corpsmen
User avatar
KCStudly
Donating Member
 
Posts: 9640
Images: 8169
Joined: Mon Feb 06, 2012 10:18 pm
Location: Southeastern CT, USA
Top

Re: building Plan B....

Postby stonykill » Sat Jul 20, 2013 6:50 am

really loving your build. Nice work!
User avatar
stonykill
Teardrop Master
 
Posts: 173
Joined: Mon Sep 05, 2011 12:28 pm
Location: Canaan NY
Top

Previous

Return to Build Journals

Who is online

Users browsing this forum: No registered users and 14 guests