G&M's 'Drop

...ask your questions in the appropriate forums BUT document your build here...preferably in a single thread...dates for updates, are appreciated....

Re: G&M's 'Drop

Postby GarthB » Wed Jun 30, 2021 4:26 pm

Proof of concept is there, however, proof of structural integrity is not. Drilling through a rivet isn't the wisest of ideas and I'm not about to load up two 90 pound cannons inside our beloved galley just to have them blow through the hatch wall as we're driving down a bumpy road. I may try making a thicker plate and use the threaded ball studs that came attached to the struts to begin with.

Image
Image
GarthB
Teardrop Master
 
Posts: 141
Images: 212
Joined: Wed Mar 31, 2021 4:28 am
Location: Northern Michigan

Re: G&M's 'Drop

Postby OP827 » Wed Jun 30, 2021 8:53 pm

Is this lower bracket orientation would be optimal to avoid the buckling mentioned above?
I must mention that I like Tony Latham's design of the hatch and weather seal.

Image
Last edited by OP827 on Wed Jun 30, 2021 9:29 pm, edited 1 time in total.
User avatar
OP827
Donating Member
 
Posts: 1561
Images: 405
Joined: Fri Apr 25, 2014 7:27 pm
Location: Bruce County Ontario

Re: G&M's 'Drop

Postby tony.latham » Wed Jun 30, 2021 9:18 pm

The ones from McMaster, like I ordered have a plate thickness of 0.08"


I just measured mine. .08"-ish. (from McMaster) I just ordered the ones from Amazon just to try and trouble shoot this issue.

Tony
User avatar
tony.latham
Gold Donating Member
 
Posts: 6914
Images: 17
Joined: Mon Jul 08, 2013 4:03 pm
Location: Middle of Idaho on the edge of nowhere
Top

Re: G&M's 'Drop

Postby Tom&Shelly » Thu Jul 01, 2021 6:31 am

tony.latham wrote:
The ones from McMaster, like I ordered have a plate thickness of 0.08"


I just measured mine. .08"-ish. (from McMaster) I just ordered the ones from Amazon just to try and trouble shoot this issue.

Tony


If it's not force from the struts while the hatch is closed (perhaps not bottoming out, but closer to it than the struts are designed for), I wonder if it could be wind loading on the hatch? That would be, wind blowing the hatch down against the force of the struts while the hatch is open. :thinking:

That may seem strange, but, after many years, I have a problem with our cabin wherein the roof has actually pulled up away from the porch beams across the front. Our builder (and still friend) brought out the former owner of a lumberyard who postulated wind getting under and lifting the porch. He has lots of experience (which is why the builder brought him here) so I'm inclined to think it can happen.

More to the point, those are the only two forces I can imagine strong enough to do that to the mounting plates.

Tom
172912 170466 173366
Tom&Shelly
Palladium Donating Member
 
Posts: 2236
Images: 2023
Joined: Tue Sep 05, 2017 3:27 pm
Location: Upstate New York/New Mexico
Top

Re: G&M's 'Drop

Postby tony.latham » Thu Jul 01, 2021 11:18 am

I wonder if it could be wind loading on the hatch?


I don't think this hatch has been outside yet. Ours has seen nearly a hundred camp days and plenty of wind. Especially this last spring trip.

I'm going to do an edit in the book over this issue when I take a look-see at the new brackets I ordered last night and figure out a proper method. I think the thicker brackets would solve the problem but--ultimately--they should be reversed so the pressure can't pull the ball away from the bracket.

Tony
User avatar
tony.latham
Gold Donating Member
 
Posts: 6914
Images: 17
Joined: Mon Jul 08, 2013 4:03 pm
Location: Middle of Idaho on the edge of nowhere
Top

Re: G&M's 'Drop

Postby GarthB » Thu Jul 01, 2021 4:40 pm

No wind loads yet for this hatch. However, having a few tie down points mounted to the hatch is something I'm considering adding for when it is open in windy conditions.

I ordered the brackets from the source on Amazon and plan to use them if their strength is sufficient. If not, I'll make some out of plate steel and plug weld a ball stud to them.

Today I got the interior skin added to the hatch. Rather than staples, I went with screws like I used in the cabin. Using screws allowed me to dry fit the birch and then screw it down at the bottom end of the hatch with a few screws. Then, I propped the rest of the sheet up with some scrap foam board and squeezed PL premium onto the top four spars of the frame.

Image

Once the beads of glue were laid, I removed the foam board, allowing the birch to lay on the frame. From there, I pressed it down and screwed it into each spar. Once the top half was finished, I removed the screws that I initially set in the bottom spar and repeated the process.

Image

Once the skin was in place, I test fit the hatch before the glue had time to set so that I could address any fitment surprises. Thankfully, it still fit well. I did notice that it seemed to have "sprung back" slightly. However, the draw latches should suck the hatch in tight once they are mounted.

Image

For the remainder of the time that the hatch is off of the trailer, I am going to try to store it in the position shown below to try to avoid any spring back.

Image
GarthB
Teardrop Master
 
Posts: 141
Images: 212
Joined: Wed Mar 31, 2021 4:28 am
Location: Northern Michigan
Top

Re: G&M's 'Drop

Postby GarthB » Mon Jul 05, 2021 7:52 pm

Spent most of the holiday weekend "living a little" rather than working on the teardrop. However, my wife and I still managed to get a few things completed during the mornings before any of the days' activities started up.

We got the hatch insulated, wired, and the blocking installed for the galley light and license plate bracket. Honestly, I had been planning on not installing a license plate light. At the last minute prior to being ready for the exterior skin, I looked up Michigan's trailer laws and realized a license plate light was required for all trailers. I'm glad I took the time to check, since going back and wiring it later wouldn't have been possible.

Image

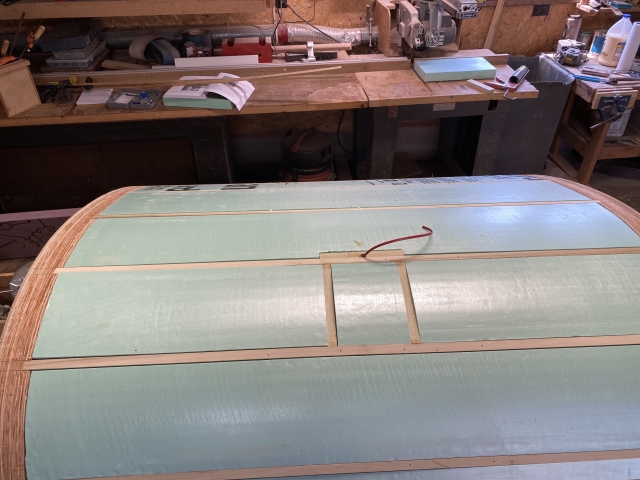
Next, we got the exterior skin installed on the hatch. It was a good feeling to know that we were done constructing the "shell" of the teardrop at this point. We followed the same method I used for the interior side of the hatch to install it, however, I used crown staples instead.

Image

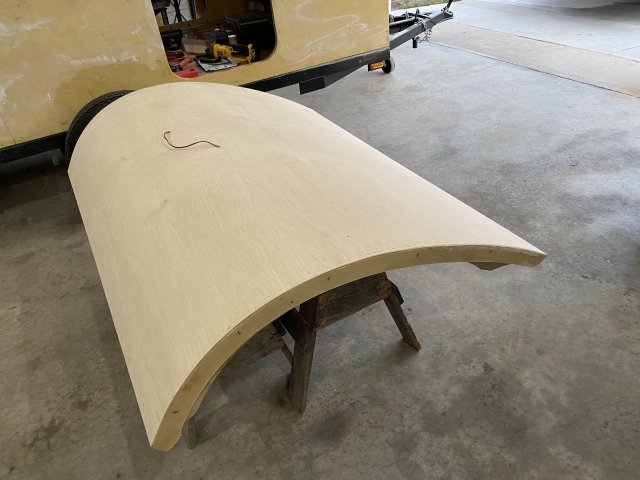
After the hatch was completed, I sanded it and rounded over the outside edges to match the rest of the roof line. Both the hatch and the roof of the teardrop will be getting fiberglassed later this week, once I've gotten everything sanded.

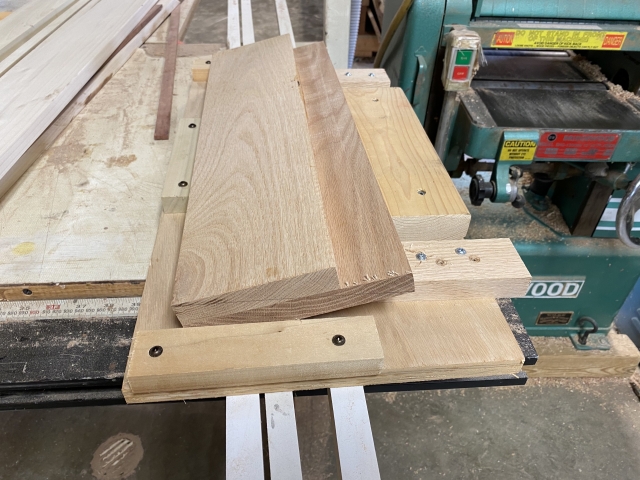
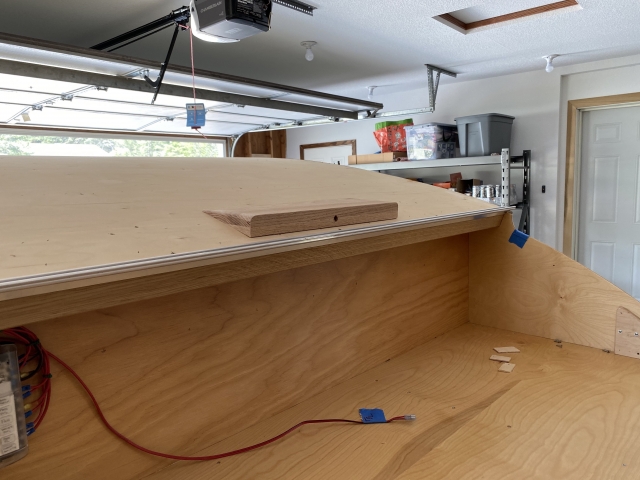
I was also able to crank out the third brake light mounting block. We glued two scrap pieces of oak together for this. I was somewhat curious as to how others have made the angled cut once it's glued since its a fairly wide piece. After giving it some thought, I remembered a youtube video I'd seen a while back where a planer sled was made. I decided this would be a good time to try making one myself. I screwed in blocks surrounding the light block and used additional blocks to prop one side of it up at an angle so that it would plane the block at an angle. It worked well and I'm happy to have one more woodworking trick in the toolbox.

Image
Image

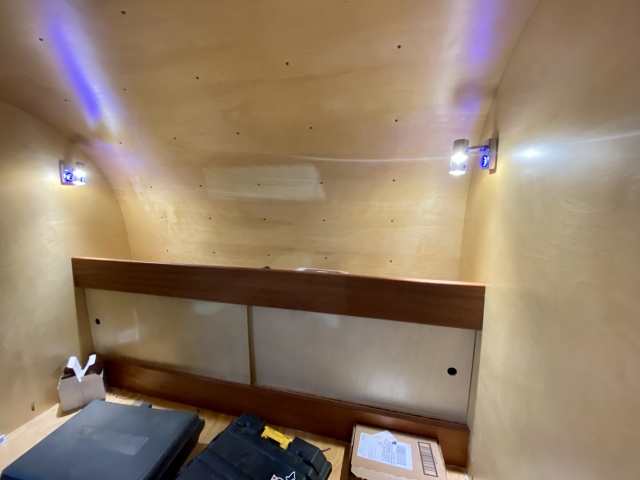
Last, we got the interior reading lights installed. There wasn't much room to stuff the wires behind these, so I opted to solder them. It was my first time, and it definitely showed. I may be going back to fix those connections one day... Thankfully they're easy to access.

Image

We're excited to prime and paint this thing soon. Choosing a color wasn't easy for us since we ordered all 63 of Monstaliner's color samples and were overwhelmed with options that we liked. The Monstaliner has been sitting in the corner since we got it on a Memorial Day sale and I've been anxious to use it. Just a whole lot of sanding to do before and after fiberglass before we can crack it open. :thumbsup:
GarthB
Teardrop Master
 
Posts: 141
Images: 212
Joined: Wed Mar 31, 2021 4:28 am
Location: Northern Michigan
Top

Re: G&M's 'Drop

Postby tony.latham » Tue Jul 06, 2021 2:02 pm

Garth:

I just got these from the Amazon link you provided.

Image

They are much stouter than those from McMaster and the hole locations are the same. I'll go ahead and change mine out. (And change my book's manuscript and upload it to the Amazon Jungle.)

Tony
User avatar
tony.latham
Gold Donating Member
 
Posts: 6914
Images: 17
Joined: Mon Jul 08, 2013 4:03 pm
Location: Middle of Idaho on the edge of nowhere
Top

Re: G&M's 'Drop

Postby GarthB » Tue Jul 06, 2021 8:21 pm

tony.latham wrote:I just got these from the Amazon link you provided.


I got ours in the mail today as well! I was relieved to see that the holes lined up.
GarthB
Teardrop Master
 
Posts: 141
Images: 212
Joined: Wed Mar 31, 2021 4:28 am
Location: Northern Michigan
Top

Re: G&M's 'Drop

Postby GarthB » Thu Jul 08, 2021 5:03 am

Got the roof and hatch fiberglassed last night. It went alright, with a few minor hiccups. We used 6oz cloth, Raka Non-blush hardener, and medium resin. Once we got the cloth laid out over all of the dry surfaces, we wetted it all out. After that, we took an hour or so break, came back, and applied a second coat since the first coat had tacked up. I'd planned to use a foam roller to apply the second coat a little more evenly than a squeegee would be able to.

We quickly noticed a lot of, what we thought were, bubbles all over the place. We paused from laying down anymore resin and I tried using a blow torch to get rid of the bubbles. No such luck. Perplexed, we tried my wife's hair dryer so that we could go slower without needing to worry about burning anything. Still no luck. Upon closer inspection, these "bubbles" appeared to be small particulates. We aren't entirely sure where they came from. We continued to lay down the second coat since there was no stopping halfway and they continued to appear even without the foam roller and just the squeegee application. My second assumption was that the surface under the cloth wasn't cleaned well enough and that these particles were showing up through the cloth and first coat. However, I don't think that my surface was that dirty underneath for the number of particles we were observing.

My final hypothesis that I'm running with is that the "particulates" we were seeing were fibers from the cloth itself and sticking up like whiskers. They're completely resin coated and tiny in size, so we'll see how it all sands out in a few days. I'm not super worried about it. The cloth bonded well to the plywood underneath and we didn't have any uplift.

Image
Image
Image

A question for the folks that know more about fiberglass than I do: Once I've completed my fill work and have sanded, is an additional epoxy flood coat necessary? I will be applying two coats of Magnapoxy epoxy primer over top of the glass prior to the Monstaliner. If it is necessary, I think I'm going to order a thinner resin. The Medium viscosity seems too thick to roll out well.

I'll post this question over in the "Skinning Secrets" if necessary.

Thanks for the help!
GarthB
Teardrop Master
 
Posts: 141
Images: 212
Joined: Wed Mar 31, 2021 4:28 am
Location: Northern Michigan
Top

Re: G&M's 'Drop

Postby swoody126 » Thu Jul 08, 2021 7:39 am

IMHO yes

once your filling is to your level of satisfaction a top coat is advised w/ a sanding to the point where you eliminate the shine prior to priming

when filling weave i try to use the HOT COAT method as much as possible

hot coating is when you apply the next coat just before the previous coat has fully cured thus eliminating the need for sanding between coats and layering your pox

hot coating generates a single chemically bonded layer which more sound than layering w/ sanding between

for this opperation the strength isn't the issue the elimination of a bunch of sanding is

for folks in the work-a-day world i suggest using SLOW hardener doing a coat just before quitting for the evening and another before going to work the next morning(the process only lasts a few days)

primer will not aid in the filling of the weave so that needs to be finalized(to your level of satisfaction) 1st

any weave not filled will print thru the primer AND finish coat as well

BON CHANCE

sw
"we are the people our parents warned us about" jb
swoody126
500 Club
 
Posts: 769
Joined: Mon Feb 22, 2016 6:11 pm
Location: north of Ft Worth
Top

Re: G&M's 'Drop

Postby tony.latham » Thu Jul 08, 2021 8:15 am

Once I've completed my fill work and have sanded, is an additional epoxy flood coat necessary?


No --but only you can make the call after sanding. I didn't do it and can't see any weave.

Image

Tony
User avatar
tony.latham
Gold Donating Member
 
Posts: 6914
Images: 17
Joined: Mon Jul 08, 2013 4:03 pm
Location: Middle of Idaho on the edge of nowhere
Top

Re: G&M's 'Drop

Postby GarthB » Thu Jul 08, 2021 11:14 am

Thanks a lot for all the info Swoody and Tony. I guess we'll see how it fairs out and go from there. Either way, I was starting to get low on epoxy and decided to order more. Hard to believe we've blown through 75% of Raka's 2 gallon kit on just the walls, roof, and hatch. I still need to get the galley floor, hatch edges, door edges, and fan opening covered.
GarthB
Teardrop Master
 
Posts: 141
Images: 212
Joined: Wed Mar 31, 2021 4:28 am
Location: Northern Michigan
Top

Re: G&M's 'Drop

Postby GarthB » Thu Jul 08, 2021 8:57 pm

If you can make one heap of all your winnings
And risk it on one turn of pitch-and-toss,
And lose, and start again at your beginnings
And never breathe a word about your loss...
-Rudyard Kipling


Image

Its days like today where I take a step back, turn to my all time favorite poem, If, by Rudyard Kipling, sigh, and move on.

We appear to have had an improperly mixed cup of epoxy on our base coat of the roof last night. As I was trimming excess fiberglass this evening, I noticed a gooey spot inside the fan vent opening. I then found another one, directly across from it, that had dripped down the outside wall. The surface of the glass was hard, but as soon as I gave the cloth a pull, it started peeling up. The first coat must've been the issue and the second coat must've had a proper mix. Everything underneath was still wet.

I peeled all of the glass off that I could and cut a clean perimeter around the whole blob with a box cutter to get a clean edge. Having seen Randall White's epoxy mishap, I grabbed a paint scraper and began scraping. A lot of the goo is removed now. The surface is still sticky, so I'm going to give it 12-24 hours and check to see if what's left has cured up at all. If it has, I'll sand it down to bare wood. If it hasn't, I'll keep scraping with the assistance of paint thinner or acetone.

My main concern is that I'll miss a spot of bad epoxy underneath what appears to be good glass. I'm going to make sure there are no remaining areas that I can peel back tomorrow.

Once its all cleaned up, I'll cut a piece of cloth to fit and re-glass the area. There is one other, unrelated area of the roof along the hatch edge that is still a bit tacky after 24 hours of curing. I'm hoping it isn't the same issue.

If anyone sees any concerns with my proposed solution or has any tips, feel free to let me know.

Things could be a lot worse. I'm thankful that I discovered it.
GarthB
Teardrop Master
 
Posts: 141
Images: 212
Joined: Wed Mar 31, 2021 4:28 am
Location: Northern Michigan
Top

Re: G&M's 'Drop

Postby swoody126 » Fri Jul 09, 2021 6:06 am

the ole infamous acetone party is on your horizon

i would love to be able to say i'd never been to one :-O

paint scraper 1st followed by acetone on a rag everywhere anysticky pox is found

breathing protection and nitrile gloves are minimum protection

FANS bowing the fumes away n out the door

once you are satisfied everything left has cured take the bade from a SureForm file and feather the edges of the glass

cut the replacement cloth oversized so it will rise up n over the cured glass

once the patch has cured block sand the perimiter to level creating a scarf of your cloth layers

RESUME your project

CARRY ON ...

SW
"we are the people our parents warned us about" jb
swoody126
500 Club
 
Posts: 769
Joined: Mon Feb 22, 2016 6:11 pm
Location: north of Ft Worth
Top

PreviousNext

Return to Build Journals

Who is online

Users browsing this forum: No registered users and 5 guests