My Simple Benroy

...ask your questions in the appropriate forums BUT document your build here...preferably in a single thread...dates for updates, are appreciated....

My Simple Benroy

Postby johnthom81 » Mon May 10, 2010 10:55 am

I started this build at the end of March 2010 with the hopes of being able to have a useable, but maybe not finished, 5x10 Benroy by Memorial Weekend. My build is being done without a garage, so on weather days the work gets done inside our living room (wife is skeptical, but going along with it). The trailer was a 5x7 Yamaha motorcycle trailer that I had stretched to 10'.The outer walls are 3/4 birch plywood, cabinets are 1/2" arroco plywood. the countertop was bought premade from a big box lumber store. As of May 9, it looks like we may not have to sleep in a tent for Memorial weekend, but still have a long way to go.
I'll be right back, you be left front.
User avatar
johnthom81
Teardrop Builder
 
Posts: 29
Images: 31
Joined: Fri Mar 12, 2010 2:25 pm
Location: Taos, NM

Postby johnthom81 » Mon May 10, 2010 10:59 am

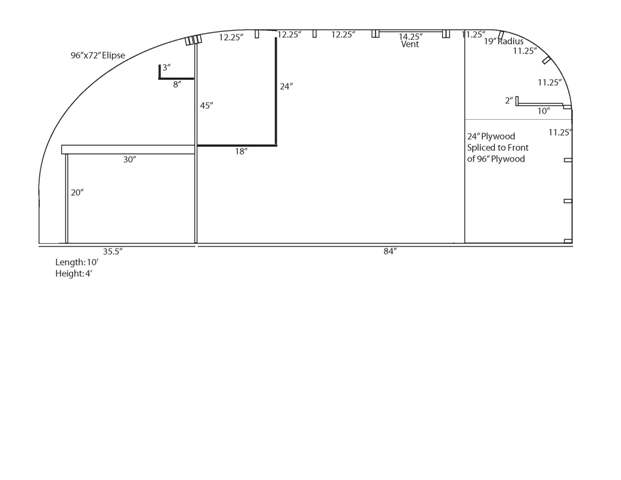
I drew up this profile using Adobe Illustrator and of course made modifications as needed throughout the build.
Image
I'll be right back, you be left front.
User avatar
johnthom81
Teardrop Builder
 
Posts: 29
Images: 31
Joined: Fri Mar 12, 2010 2:25 pm
Location: Taos, NM

Postby johnthom81 » Mon May 10, 2010 11:02 am

Tried to lay out the plywood so there would be a minimum of waste and still have some extra in case of mistakes. It has worked out very well so far.
Image
I'll be right back, you be left front.
User avatar
johnthom81
Teardrop Builder
 
Posts: 29
Images: 31
Joined: Fri Mar 12, 2010 2:25 pm
Location: Taos, NM
Top

Postby johnthom81 » Mon May 10, 2010 11:04 am

Here she is, folks. This will be my Benroy (I hope).
Image
I'll be right back, you be left front.
User avatar
johnthom81
Teardrop Builder
 
Posts: 29
Images: 31
Joined: Fri Mar 12, 2010 2:25 pm
Location: Taos, NM
Top

Postby johnthom81 » Mon May 10, 2010 11:06 am

Grind, sand, prime. Ready for wood.
Image
I'll be right back, you be left front.
User avatar
johnthom81
Teardrop Builder
 
Posts: 29
Images: 31
Joined: Fri Mar 12, 2010 2:25 pm
Location: Taos, NM
Top

Postby johnthom81 » Mon May 10, 2010 11:09 am

Good karma: recycle some windows from a "Hippie Preacher" bus. $25 each, and one of them is an emergency exit window.
Image
I'll be right back, you be left front.
User avatar
johnthom81
Teardrop Builder
 
Posts: 29
Images: 31
Joined: Fri Mar 12, 2010 2:25 pm
Location: Taos, NM
Top

Postby johnthom81 » Mon May 10, 2010 11:11 am

The windows after cleanup.
Image
I'll be right back, you be left front.
User avatar
johnthom81
Teardrop Builder
 
Posts: 29
Images: 31
Joined: Fri Mar 12, 2010 2:25 pm
Location: Taos, NM
Top

Postby johnthom81 » Mon May 10, 2010 11:14 am

Here is the wall profile after stretching the plywood to 10'. Thanks so much for the tip on how to do this. And yes, that is my living room.
Image
I'll be right back, you be left front.
User avatar
johnthom81
Teardrop Builder
 
Posts: 29
Images: 31
Joined: Fri Mar 12, 2010 2:25 pm
Location: Taos, NM
Top

Postby starleen2 » Mon May 10, 2010 11:19 am

Looks good so far - I hope you aren't building it in your living room? Could prove difficult getting it out the front door! :D
User avatar
starleen2
5th Teardrop Club
 
Posts: 16272
Images: 224
Joined: Sat May 12, 2007 8:26 pm
Location: Pea Ridge ,AR
Top

Postby johnthom81 » Mon May 10, 2010 11:19 am

Test-fitted the walls and found that my trailer sagged 3/4" in the middle. Great! Now what do I do? I ran a string from front to back along the trailer, measured the sag at each cross bar, then installed a shim between the trailer frame and subfloor. Came out perfect. You never know what challenges a build will throw at you, huh?
Image
I'll be right back, you be left front.
User avatar
johnthom81
Teardrop Builder
 
Posts: 29
Images: 31
Joined: Fri Mar 12, 2010 2:25 pm
Location: Taos, NM
Top

Postby johnthom81 » Mon May 10, 2010 11:21 am

Built my galley lower cabinet (in the living room) and installed 3 drawers that I traded for at the Habitat for Humanity ReStore.
Image
I'll be right back, you be left front.
User avatar
johnthom81
Teardrop Builder
 
Posts: 29
Images: 31
Joined: Fri Mar 12, 2010 2:25 pm
Location: Taos, NM
Top

Postby johnthom81 » Mon May 10, 2010 11:26 am

Test fitted the galley lower cabinet and bulkhead. Looks pretty ok.
Image
I'll be right back, you be left front.
User avatar
johnthom81
Teardrop Builder
 
Posts: 29
Images: 31
Joined: Fri Mar 12, 2010 2:25 pm
Location: Taos, NM
Top

Postby johnthom81 » Mon May 10, 2010 11:30 am

Polyurethaned the walls and finished the bulkhead/galley structure installation. I'll add an 8" deep shelf with a 2" front at the top of the galley to complete this part of the structure.
Image
I'll be right back, you be left front.
User avatar
johnthom81
Teardrop Builder
 
Posts: 29
Images: 31
Joined: Fri Mar 12, 2010 2:25 pm
Location: Taos, NM
Top

Postby johnthom81 » Mon May 10, 2010 11:35 am

Here is the interior with the storage cabinet installed. Amazing how solid the structure becomes when you secure the inner structure to the outer walls. I have enough 3/4" Birch plywood left to make the cabinet doors to match the walls.
Image
I'll be right back, you be left front.
User avatar
johnthom81
Teardrop Builder
 
Posts: 29
Images: 31
Joined: Fri Mar 12, 2010 2:25 pm
Location: Taos, NM
Top

Postby grizz » Mon May 10, 2010 4:09 pm

Not just a quick build, but a very neat one too.

I like your wife, my Nicola would tollerate most of that too, I think, anyway, she once goaded me into putting a motorbike in the kitchen.
Your galley looks lovely too.

Keep us updated.
Greetings from England.

Rian.


Hoping to get it all done in time.
User avatar
grizz
1000 Club
1000 Club
 
Posts: 1210
Images: 29
Joined: Mon Sep 21, 2009 2:37 pm
Location: Rochester, Kent, UK
Top

Next

Return to Build Journals

Who is online

Users browsing this forum: Google [Bot] and 19 guests