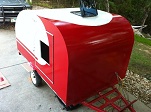
"Red Woof Inn" 10-16 update Hubcaps!

...ask your questions in the appropriate forums BUT document your build here...preferably in a single thread...dates for updates, are appreciated....

Re: "The Black Hole" build 4-14 sanding

Postby Loader » Sun Apr 15, 2012 5:55 am

Clif, we all had do-overs of some sort. The tear is looking great, and I look forward to seeing it with color!

Hang in there, you are going to have a really nice TD when complete!

Enjoy the fishing/boating party.
Earl & Kerry

"Loader"

Blue Yonder Build Thread - viewtopic.php?f=50&t=42611

ImageImage
User avatar
Loader
Platinum Donating Member
 
Posts: 1584
Images: 245
Joined: Tue Apr 26, 2005 2:33 pm
Location: Fort Worth, Texas

Re: "The Black Hole" build 3-10-12 Epoxied

Postby LDK » Sun Apr 15, 2012 7:30 am

CliffinGA wrote:Great day today.......for do overs! Didn't apply epoxy correctly first time, had to sand half the tape off and re-tape mostly done over the last month when I had a free moment to work on the tear. Today was the first full day I was able to get out in the sun andpull it out of the garage and do major work on it. Completely sanded the thing down with 80grit to get all of the epoxy runs out,Yes it was that bad! Then had to sand a 2 ft section of tape of the front drivers side curve and the front passenger edge 16" because of overzealousness (my word) sanding on the head DA in charge (me). I used body filler in the places around the door openings and the cut out for electricals in sides where the plywood tore and more sanding. Took a tip from Forrester on my other thread and soaked the tape first and then squeezed excess out in the container before applying to the 2 places. Then while I was working it anyway made another 3oz batch and applied over the rest of the tear. Been using the 6" foam rollers from HD and it works great. Doesn't sound like alot but while doing this I would take a break from sanding and go edge part of the sidewalks. My arm and hand would start hurting from the vibration of the edger and so I woud take a break and go sand. 30 mins later my other arm would start hurting so I would go edge again. Once all the edging was done I moved on to weed eating the backyard, blowing the back yard, cleaning off the front porch and blowing it, and washing the front chairs and my truck. By doing that you get a crap load done and then when you passout in the front yard because your sugar was too low you can feel you got some stuff accomplished :lol:. Tomorrow will just be a quick coat on the tape and rest of the tear and its off to the lake for a bachelor fishing/boating party. Have a great rest of the weekend and week! If I'm lucky I can get the thing sanded and start prinering it next weekend!

Cliff :thumbsup:


Cliff

It's good to see you back at it but it looks like you might of over did it on that day with the other work you did
and with the blood sugar issue. Remember the tear is more important, you can always hire the neighborhood kid
to do your yard work. :thumbsup: Have fun at that party!!!
LDK
Gold Donating Member
 
Posts: 1419
Images: 1
Joined: Fri Jan 22, 2010 8:29 pm

Re: "The Black Hole" build 4-14 sanding

Postby CliffinGA » Sat Apr 21, 2012 9:56 pm

Well had a great week where I sanded it down got 2 coats more of epoxy on it and sanded it lightly with 22o grit. Then yesterday I was able to get first coat of primer down and today sanded it lightly with 220 and cleaned it and tacked and got coat #2 on it.
http://www.tnttt.com/gallery/image_page.php?album_id=579&image_id=91172

Since I had already been primering the doors went ahead and put a coat of color on yesterday to see how we liked it and:

http://www.tnttt.com/gallery/image_page.php?album_id=579&image_id=91173

Yeppers uh Red!!! Very shiny RED!! several colors and she picked Red!


Well I do like it :lol:. Tomorrow I'm reworking the hatch and hoping to get it skinned and looking for coat#3 on the primer! Things work out by next weekend we will have 1st and maybe 2nd coat of red on it! I may make it by June or atleast will becamping in it anyway :lol:. Not sure why pics won'show so just posted URl's instead.

Cliff :thumbsup:
In God we trust, shoot the rest and he will sort out!

My Build:

viewtopic.php?f=50&t=42628
User avatar
CliffinGA
1000 Club
1000 Club
 
Posts: 1499
Images: 207
Joined: Sat Nov 14, 2009 1:29 pm
Location: Jefferson, GA
Top

Re: "The Black Hole" build 4-21 primer and color

Postby parnold » Sat Apr 21, 2012 10:01 pm

I like the red!

Image

:thumbsup: :thumbsup:
User avatar
parnold
Donating Member
 
Posts: 2344
Images: 302
Joined: Mon Feb 08, 2010 4:49 pm
Location: Northwest New Jersey
Top

Re: "The Black Hole" build 4-21 primer and color

Postby CliffinGA » Sat Apr 21, 2012 10:12 pm

Thanks Paul it works since my team and the wifes both are Red & Black, Texas Tech University where I graduated and the University of Georgia. So will do the whole tear in red and tape 3" from the topon sides and roof and do that band in black to look like trim. Then I plan on doing a 6" wood trim to cover the frame on the sides and the front in black. Should look geat when done!

Cliff :thumbsup:
In God we trust, shoot the rest and he will sort out!

My Build:

viewtopic.php?f=50&t=42628
User avatar
CliffinGA
1000 Club
1000 Club
 
Posts: 1499
Images: 207
Joined: Sat Nov 14, 2009 1:29 pm
Location: Jefferson, GA
Top

Re: "The Black Hole" build 4-21 primer and color

Postby Forrest747 » Sat Apr 21, 2012 10:22 pm

What manufacture of paint did you use. And for the record I planned on the same paint scheme so you can't go west of the Mississippi and ill stay on my side of the country.
"All the success on the trail can not compensate for having square headlights"

"I've got a fever and the only prescription is more cowbell!"
http://www.tnttt.com/viewtopic.php?f=50&t=37701 Build Journal
User avatar
Forrest747
Cowbell Donating Member
 
Posts: 1327
Images: 447
Joined: Mon Apr 06, 2009 3:40 am
Location: West Valley Utah, Utah
Top

Re: "The Black Hole" build 4-21 primer and color

Postby CliffinGA » Sun Apr 22, 2012 11:04 am

Lol Forrest its ok, I'm using Valspar tractor and implement oil based metal primer and one of their red enamels.

Cliff
In God we trust, shoot the rest and he will sort out!

My Build:

viewtopic.php?f=50&t=42628
User avatar
CliffinGA
1000 Club
1000 Club
 
Posts: 1499
Images: 207
Joined: Sat Nov 14, 2009 1:29 pm
Location: Jefferson, GA
Top

Re: "The Black Hole" build 4-21 primer and color

Postby Loader » Sun Apr 22, 2012 12:36 pm

Looking good Cliff!
Earl & Kerry

"Loader"

Blue Yonder Build Thread - viewtopic.php?f=50&t=42611

ImageImage
User avatar
Loader
Platinum Donating Member
 
Posts: 1584
Images: 245
Joined: Tue Apr 26, 2005 2:33 pm
Location: Fort Worth, Texas
Top

"The Black Hole" build 4-21 primer and color

Postby aggie79 » Sun Apr 22, 2012 1:14 pm

Very nice Cliff! Love the color. (That's hard for an Aggie to say, BTW.)
Tom (& Linda)
For build info on our former Silver Beatle teardrop:
Build Thread

93503
User avatar
aggie79
Super Duper Lifetime Member
 
Posts: 5405
Images: 686
Joined: Tue Aug 07, 2007 5:42 pm
Location: Watauga, Texas
Top

Re: "The Black Hole" build 4-21 primer and color

Postby CliffinGA » Sun Apr 22, 2012 2:17 pm

Thanks guys and not to worry Tom, I understand. Just for you I will put the A&M cup in the tear for when we come to Tx next time. I was disappointed that ya'll didn't have any gatherings going on during the time we were there. I have a cup due to inheriting a complete set of the Old SWC conference teams from my grandmother. Well today got a 3rd coat on and tomorrow will have to do some body filler work in a few areas and do more on the hatch which i'm glad I decided to redo as today is so windy that it got knocked over in a gust that sent alot of stuff including the ladder flying and its in 3 pieces now! Well thats it for this weekend, hope ya'll have a great week.

Cliff :thumbsup:
In God we trust, shoot the rest and he will sort out!

My Build:

viewtopic.php?f=50&t=42628
User avatar
CliffinGA
1000 Club
1000 Club
 
Posts: 1499
Images: 207
Joined: Sat Nov 14, 2009 1:29 pm
Location: Jefferson, GA
Top

Re: "The Black Hole" build 4-21 primer and color

Postby CliffinGA » Mon Apr 23, 2012 8:45 pm

[img]91264[/img]

[img]91265[/img]

[img]91266[/img]

[img]91267[/img]

Andme as I'm painting, in the wind

[img]91268[/img]

Well first coat is on, its red and finish is ok a lil bumpy but not bad.

Cliff :thumbsup:
In God we trust, shoot the rest and he will sort out!

My Build:

viewtopic.php?f=50&t=42628
User avatar
CliffinGA
1000 Club
1000 Club
 
Posts: 1499
Images: 207
Joined: Sat Nov 14, 2009 1:29 pm
Location: Jefferson, GA
Top

Re: "The Black Hole" build 4-23 We got color!!!

Postby Martiangod » Mon Apr 23, 2012 9:17 pm

Well time to add some lettering


Teardrop Time


To the Tee Shirt of course :R


As for the orange peeling, don't use thinners, instead, drop by an auto supply place that sells paint and buy some slow reducer
It will give the paint more time to flow whle drying by not evaporating so quick.
I've seen cars you would swear where sprayed, but done with brush and foam roller

Looking good though, will be very stealth in the forest
If it ain't broke, fix it till it is

Chris

Deep in the Heart of Nowhere
The topper viewtopic.php?f=50&t=58140, gone to a new home to be converted
into an ice fishing shack...FREEBIE !!! for a nice young family
The trailer viewtopic.php?f=50&t=48156
User avatar
Martiangod
500 Club
 
Posts: 856
Images: 432
Joined: Mon Jan 09, 2012 10:39 pm
Location: Peace River, Alberta
Top

Re: "The Black Hole" build 4-23 We got color!!!

Postby LDK » Mon Apr 23, 2012 9:31 pm

Cliff

It's lookin good. I really like the red paint. :thumbsup: How many coats will you put on?

Won't be much longer and you'll be done.
LDK
Gold Donating Member
 
Posts: 1419
Images: 1
Joined: Fri Jan 22, 2010 8:29 pm
Top

Re: "The Black Hole" build 4-23 We got color!!!

Postby txcamper » Tue Apr 24, 2012 12:37 am

Wreck 'em!

I like the paint choice!
User avatar
txcamper
Teardrop Master
 
Posts: 120
Images: 129
Joined: Wed Mar 21, 2012 12:25 am
Top

Re: "The Black Hole" build 4-23 We got color!!!

Postby CliffinGA » Tue Apr 24, 2012 4:06 am

Thanks guys,

Chris not yet on the lettering several more coats to go, and less orange peal and more not ipping fast enough or I just didn't get the primers sanded enough. It was kind of interesting watching all the flying crap that landed in the paint after I put it on :lol:. I know thats what I get for painting in the outdoors in 20-25 moh winds.

Larry right now I'm planning on 3 coats total and those I'm adding the enamel hardner to to make it more bulletproof. I've got to remake the hatch but not too worried about that and I need to order my aluminum trim for the doors and the hatch. Haven't decided whether to build a box on the front yet or buy one, so still lots to do yet!

Txcamper thanks had too thats where I'm from and where I got my degree from, just works as the wife is a big GA fan and they have the same colors!

Cliff :thumbsup:
In God we trust, shoot the rest and he will sort out!

My Build:

viewtopic.php?f=50&t=42628
User avatar
CliffinGA
1000 Club
1000 Club
 
Posts: 1499
Images: 207
Joined: Sat Nov 14, 2009 1:29 pm
Location: Jefferson, GA
Top

PreviousNext

Return to Build Journals

Who is online

Users browsing this forum: No registered users and 15 guests