TTT # 1 - Quick and Cheap

...ask your questions in the appropriate forums BUT document your build here...preferably in a single thread...dates for updates, are appreciated....

TTT # 1 - Quick and Cheap

Postby M C Toyer » Tue Jun 05, 2012 5:05 am

Per my introductory post in the Newbie section http://www.tnttt.com/viewtopic.php?f=40&t=50713 here is a time line and some construction photos.

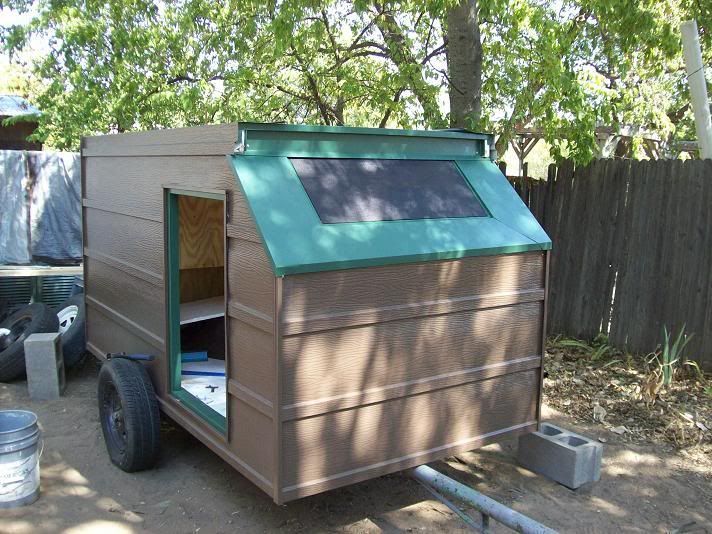
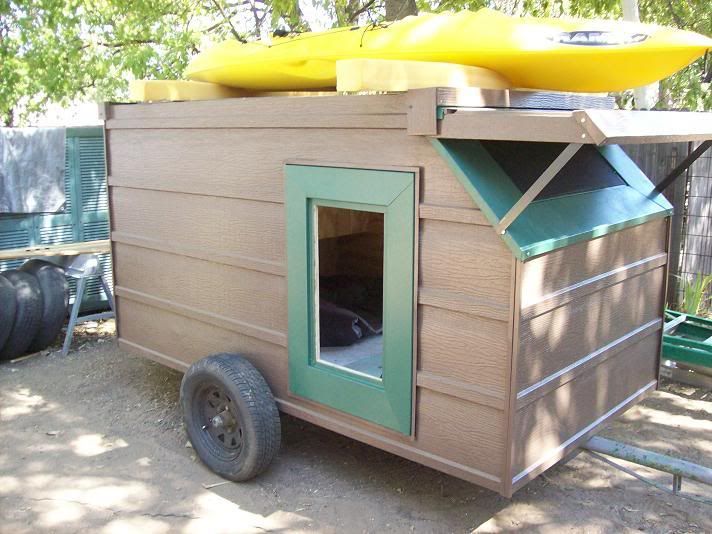
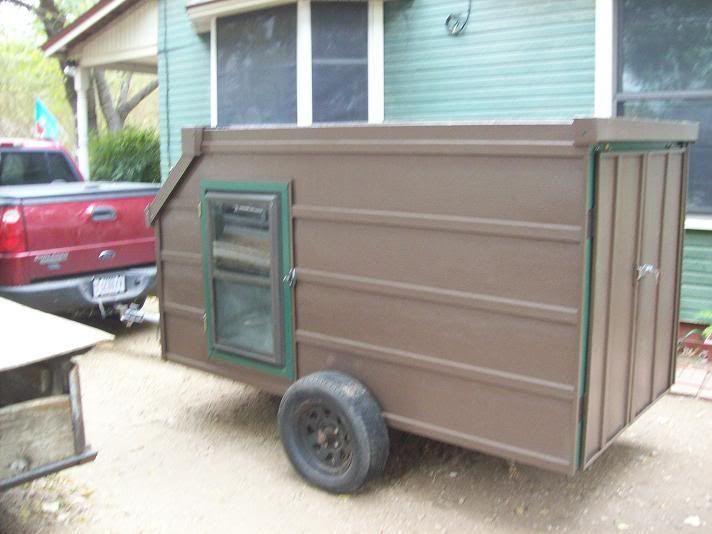
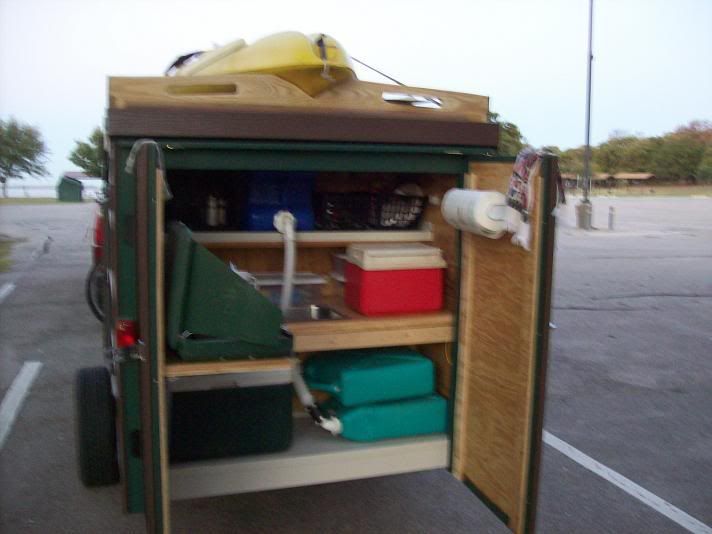
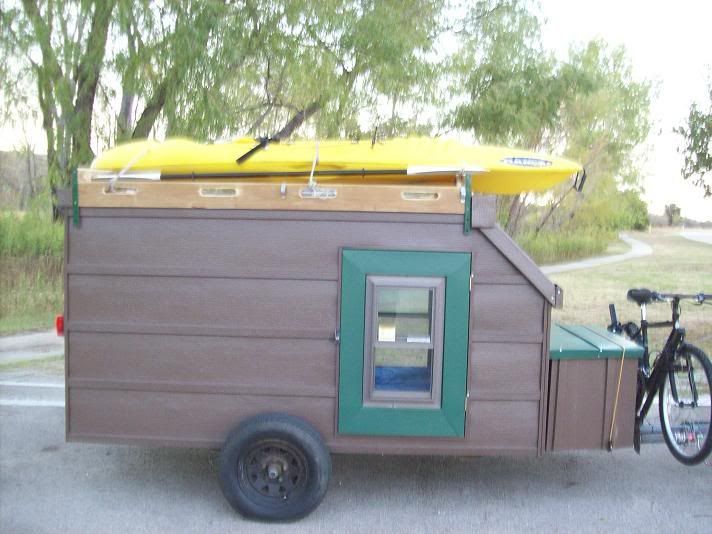
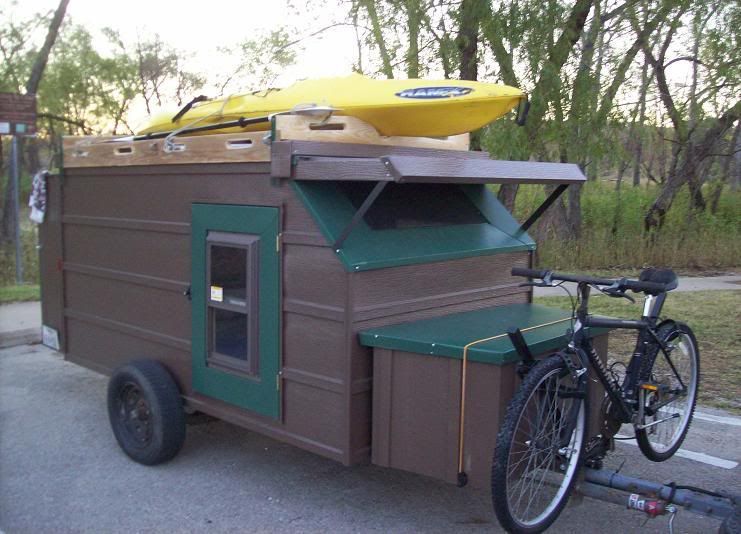
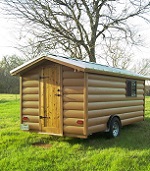
My goal was to build an enclosed trailer as quickly and cheaply as possible maximizing salvage and surplus materials I had accumulated over several years. Its purpose was to hold all my camping and outdoor equipment, be easily set up, and fully self contained suitable for year round use. It was built in 2 weeks in the fall of 2011 and my cash outlay was approximately $200 for hardware and accessories.

Trailer - I did not take any photos. The trailer was given to me. It had been home built using an old automobile drop axle with a tread width of approximately 56 inches riding on leaf springs. The steering arms of the spindles had been welded in place with good caster and camber. The hubs are 5 bolt 4.5 inch pattern with 14 x 6 inch rims. It pulls well and true. The frame consisted of a pair of 2 inch square tube rails and three 2x2 angle iron crossmembers forming a bed approximately 4 x 8 feet. The tongue was a 2.5 inch round tube extending from the center crossmember to about 4.5 feet forward of the bed. I moved the axle to 44 inches from the back of the bed and 52 inches from the front of the bed and added a fold-up jack. I also added two pieces of 1 x 1 inch angle iron from the front of the tongue to each side of the front crossmember for reinforcement and to support the tongue box to be added later.

Floor is 3/4 inch pressure treated plywood topped by 1/8 inch masonite. It is screwed and glued to pressure treated 2 x 4s around the perimeter underside which are bolted to the front and read crossmembers. The floor rests on the two rails which are approximately 36 inches apart and the three crossmembers which are 24 inches apart.

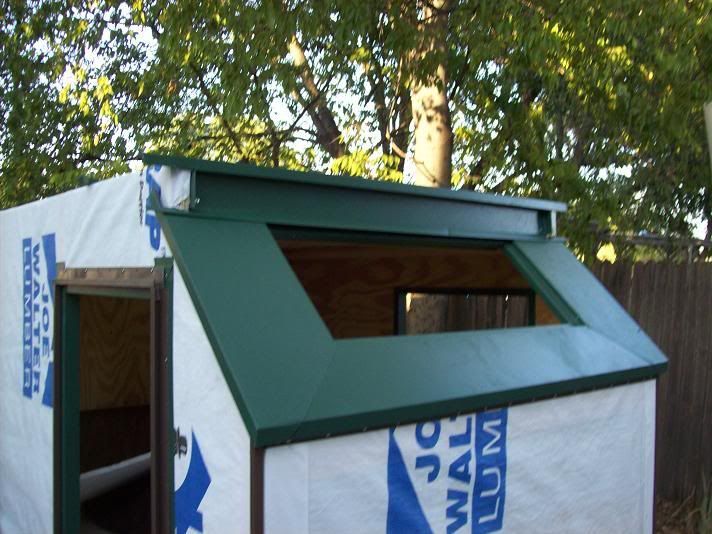
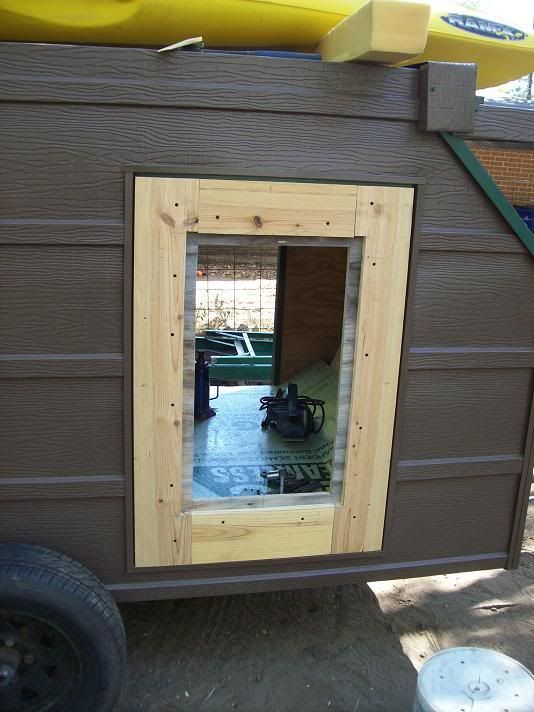
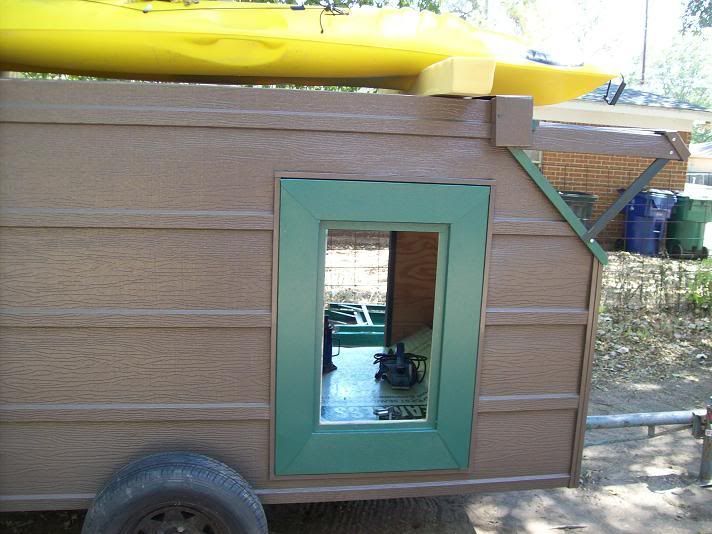
Side and front walls are 3/4 inch exterior grade plywood (CDX) screwed and glued to the outside of the perimeter 2 x 4 creating an interior 48 inches wide and 44 inches in height. The front wall was cut back at the top 45 degrees for about 12 inches.

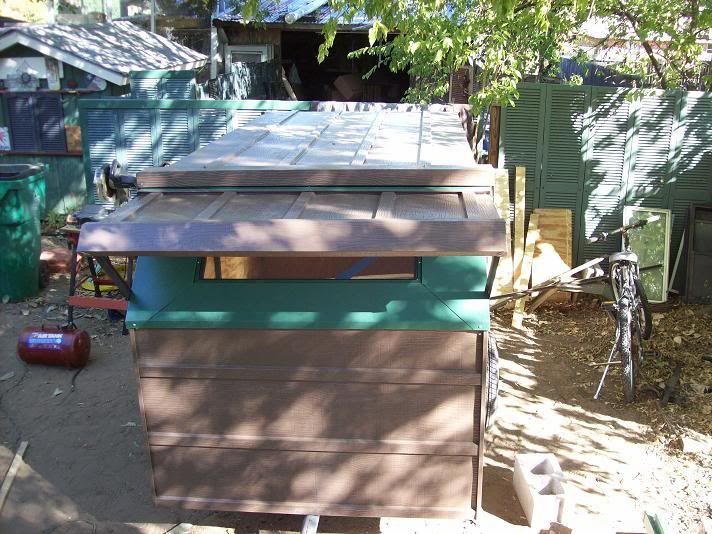
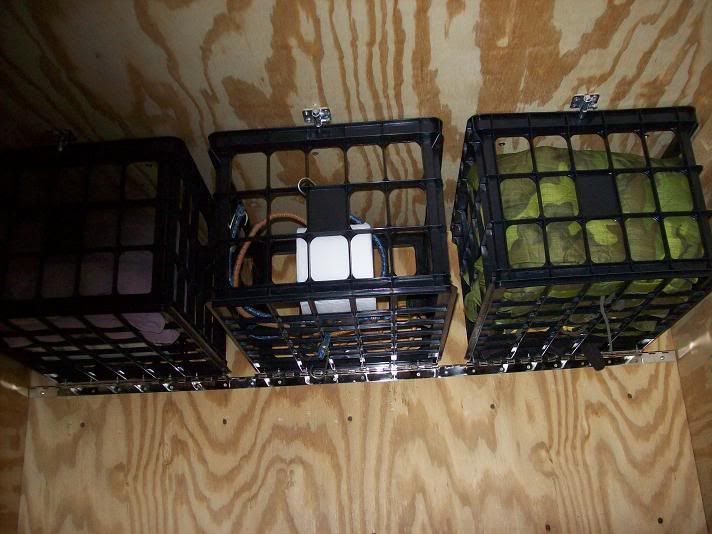
Roof spars are 2 x 3 on edge 16 inches on center resting on top of the side walls with a 1/4 inch plywood ceiling glued to the underside. The void was filled with solid urethane insulation and topped with 1/2 plywood to support the roof. The other half and cut off of the front wall was used for the rear bulkhead which is set 16 inches from the rear at floor level up 24 inches and 28 inches from the rear at the top creating a bed area of 48 x 80 inches.

Most of the plywood was weathered on the outside from sun and rain exposure but solid with no delamination, mold or rot. The inside was sanded and sealed with clear polyurethane.
Last edited by M C Toyer on Thu Jun 14, 2012 11:13 pm, edited 4 times in total.
User avatar
M C Toyer
The 300 Club
 
Posts: 363
Images: 11
Joined: Thu May 31, 2012 8:59 pm
Location: Pilot Point (Denton County) Texas

Re: TTT # 1 - Quick and Cheap

Postby M C Toyer » Tue Jun 05, 2012 5:29 am

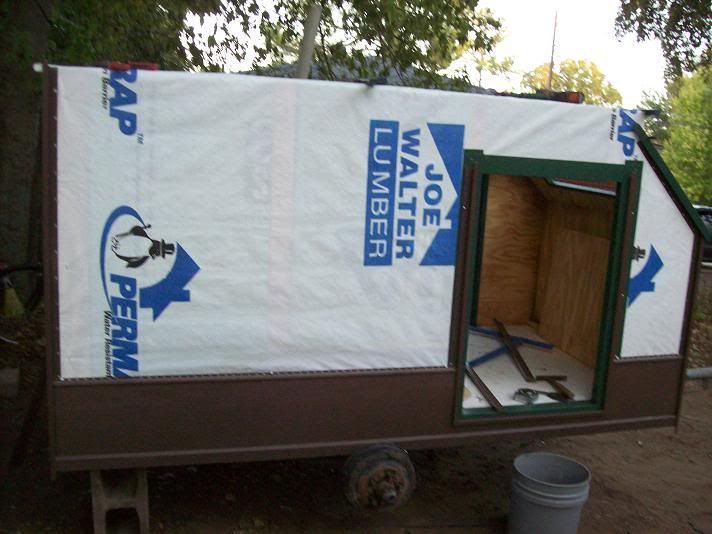
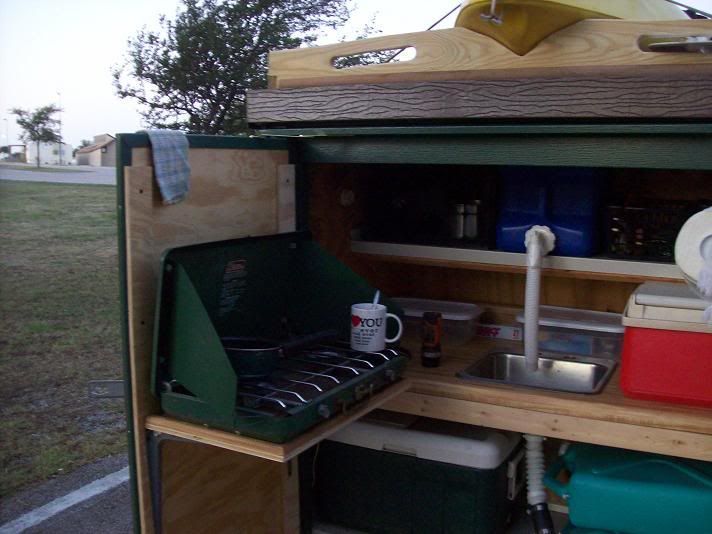
The side door openings were cut out and the outside walls were strapped with 3/4 inch plywood scraps glued and screwed at the corners, around the door openings, and in between on approximately 24 inch center:

Image

Image

Image

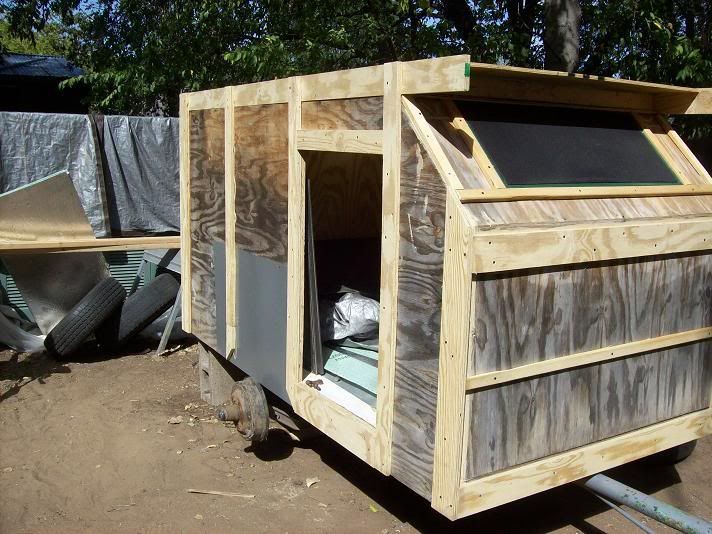
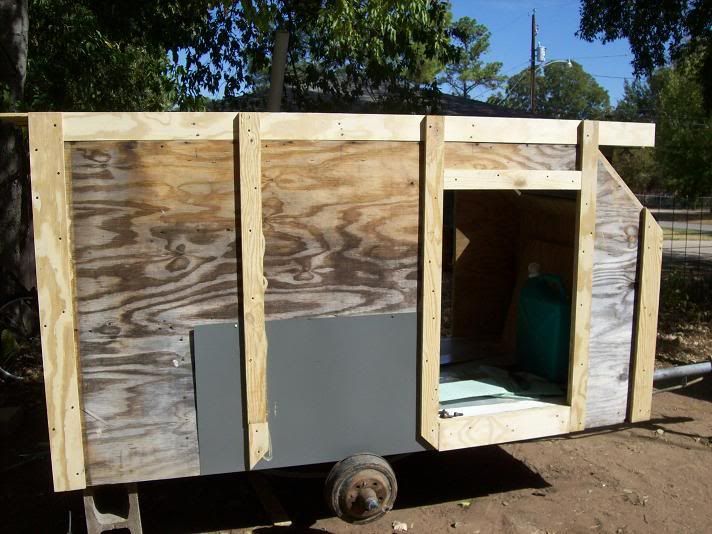
The voids were filled with a double layer of 3/8" foil faced urethane insulation with the foil in the center:

Image

Image

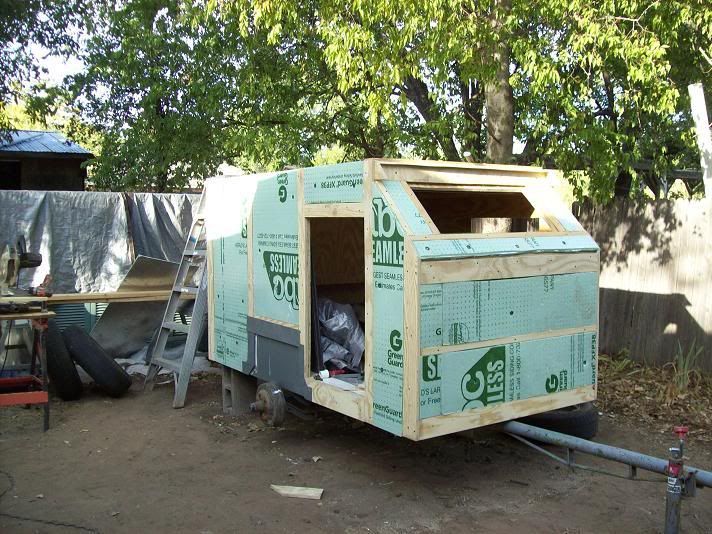
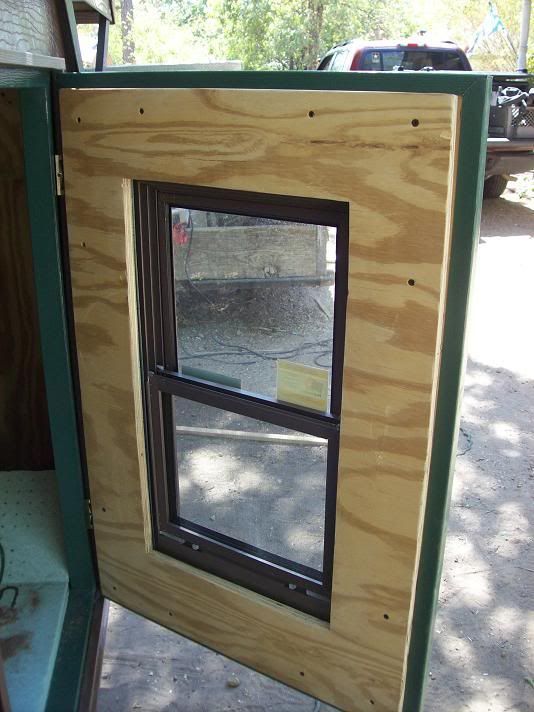
A window opening was cut in the angled section of the front wall:

Image

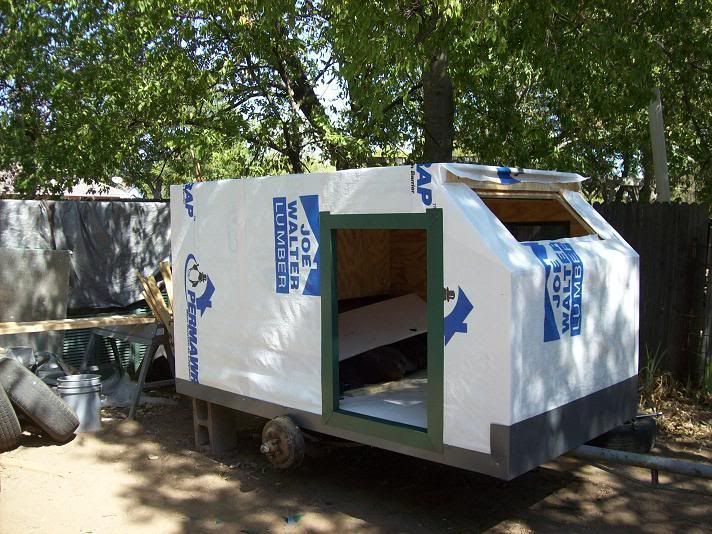
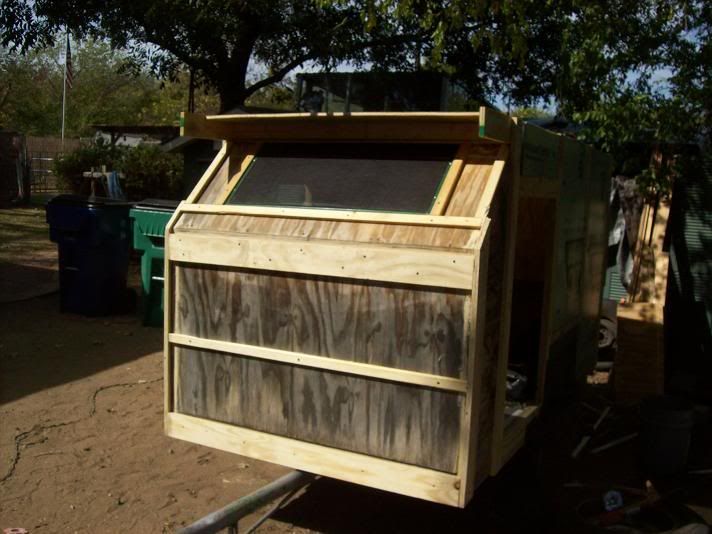
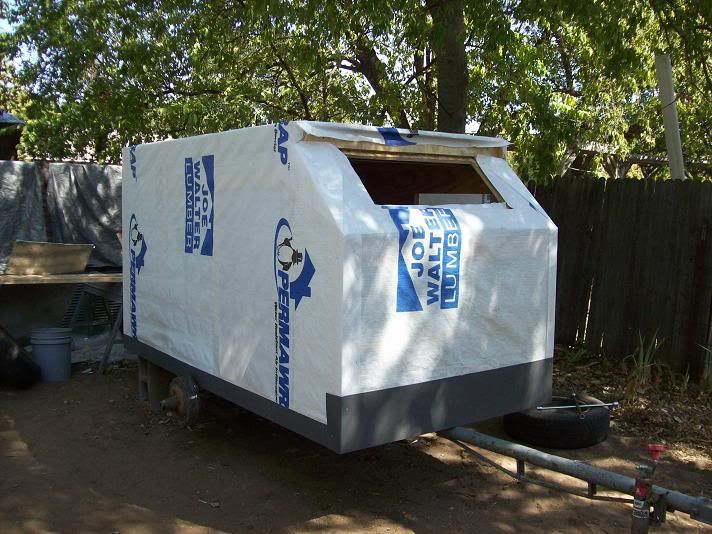
The entire exterior and roof was covered with house wrap:

Image

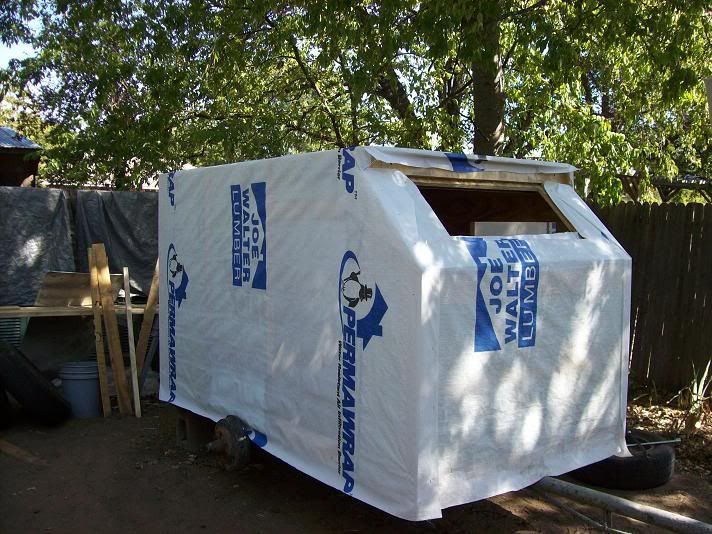
The base of the walls and bottom of the 2 x 4 perimeter of the floor were capped with 26 ga steel sheeting:

Image
User avatar
M C Toyer
The 300 Club
 
Posts: 363
Images: 11
Joined: Thu May 31, 2012 8:59 pm
Location: Pilot Point (Denton County) Texas

Re: TTT # 1 - Quick and Cheap

Postby M C Toyer » Tue Jun 05, 2012 5:45 am

The door and window openings were capped with vinyl clad 26 ga steel sheeting which extends around to the inside covering the plywood edge:

Image

Image

You can see part of the counter top and shelving for the galley. The blue fresh water tanks on top will be secured by a removable closet rod. The counter is stock formica covered rolled edge with backstop with a stainless steel bar size sink in the center. The floor is covered with the vinyl coated steel sheeting to protect from moisture from the ice chest, sink drain and gray water tanks:

Image
User avatar
M C Toyer
The 300 Club
 
Posts: 363
Images: 11
Joined: Thu May 31, 2012 8:59 pm
Location: Pilot Point (Denton County) Texas
Top

Re: TTT # 1 - Quick and Cheap

Postby M C Toyer » Tue Jun 05, 2012 5:59 am

The trailer exterior is covered with 26 ga vinyl clad steel siding. This panel is 12 inches wide in a board and batten pattern. It can be used veritically or horizontally. Each piece has a hook on the bottom and a lip at the top with prepunched fastener holes. In this application 1-1/2 inch stainless steel panhead screws are used through the strapping and into the walls. The screws are covered by the batten in each successive course.

Image

The siding panels continue up the side walls and over the roof. In this application the roof is essentially a standing seam configuration.

The door openings and corners are trimmed with J channel. The facings of the front window overlap the sidewalls.

Image

Image
User avatar
M C Toyer
The 300 Club
 
Posts: 363
Images: 11
Joined: Thu May 31, 2012 8:59 pm
Location: Pilot Point (Denton County) Texas
Top

Re: TTT # 1 - Quick and Cheap

Postby M C Toyer » Tue Jun 05, 2012 6:21 am

This view shows the roof and the hatch cover over the front window. It is in the open position but will be closed for travel and extremely cold weather. A screen covers the outside of the window opening. On the inside there is a solid glass window hinged at the top which swings upward to the ceiling for ventilation. The hatch completely shields it from rain.

Image

The side doors were built from the cutouts. An opening 3/4 inch smaller than the window to be installed is cut then the whole door is strapped with 3/4 inch wood the size of the window and overlapping the door cutout 3/4 inch. This provides three sealing surfaces for each of the sides, bottom and top of the door.

Image

Image

The outside and edges of the door plus the inside of the window opening are all covered with the steel sheeting.

Image

Image

The window is installed on the outside. In this case it is a triple track double hung storm window with the screen in the inside.

Image
Last edited by M C Toyer on Tue Jun 05, 2012 7:29 am, edited 1 time in total.
User avatar
M C Toyer
The 300 Club
 
Posts: 363
Images: 11
Joined: Thu May 31, 2012 8:59 pm
Location: Pilot Point (Denton County) Texas
Top

Re: TTT # 1 - Quick and Cheap

Postby M C Toyer » Tue Jun 05, 2012 6:23 am

In this view the exterior of the trailer is esssentially complete. The box on the front and rear edges of the roof covers the ends of the roof and has an internal rain gutter. This prevents rainwater from dripping down the galley in back and the hatch in front.
Fenders made from the metal sheeting will be added plus a wooden roof rack for the kayak.

Image

The two galley doors were made from 1/2 plywood and covered with the steel siding applied vertically. They open 90 degress outward from the center and are held open by shelf brackets. When closed one overlaps the other and both are secured with a gate bolt.

Image

The two burner Coleman stove sits on a shelf attached to the door. When the door is closed the shelf rides just over the counter top. Plastic baskets on simple drawer glides mount on the bottom of the top shelf (not shown yet) and other baskets on top of the shelf are held by the closet rod which secures the fresh water containers.

Image

Three milk crates are mounted on the upper bulkhead in the sleeping compartment on a hinge and are held closed with bolt latches on the ceiling.

Image
Last edited by M C Toyer on Tue Jun 05, 2012 7:32 am, edited 1 time in total.
User avatar
M C Toyer
The 300 Club
 
Posts: 363
Images: 11
Joined: Thu May 31, 2012 8:59 pm
Location: Pilot Point (Denton County) Texas
Top

Re: TTT # 1 - Quick and Cheap

Postby M C Toyer » Tue Jun 05, 2012 7:10 am

The tongue box was made from 1/2 inch plywood and the steel siding. The top is the steel sheeting and can serve as a table when closed.

The bike rack attaches to a receiver hitch on the trailer tongue under the box. The rack can be removed and used on the receiver hitch of the tow vehicle.

Image

This is the trailer road ready:

Image

This is the trailer set-up - Front hatch open if desired and galley doors open if needed. The trailer can be left on the hitch without interfence to the tow vehicle tailgate, tongue box or bike rack. If unhitched the tongue jack and two wheels provide balance with out any other support.

Image

The interior and galley lighting are by batttery powered LED closet lights. I also have a clip-on battery powered fan and a catalytic heater which fasten to the ceiling but have not had to use either on so far. I have a small inverter in the tow vehicle to recahrge the fan and light batteries plus my laptop, GPS and camera batteries.

The bed is two separate 3 inch thick foam pads which are 48 x 78 inches. There are two inside door covers made from 3/4 inch insulation covered with fabric and held in place with magnets if needed. I use sleeping bags if real cold and poncho liners in milder weather.

Not shown in these early phots is a small changing / porta potty room drape that attaches over one side door and a small awning over the galley. I aslo have a full 10 x 12 awning that covers the entire trailer plus 2-3 feet all around.

That's pretty much it.

M C
User avatar
M C Toyer
The 300 Club
 
Posts: 363
Images: 11
Joined: Thu May 31, 2012 8:59 pm
Location: Pilot Point (Denton County) Texas
Top

Re: TTT # 1 - Quick and Cheap

Postby Oldragbaggers » Tue Jun 05, 2012 7:54 am

Very interesting build. It's amazing you got all that done for $200. Congratulations on your inexpensive, functional and attractive fun machine.
Life is sooooo good.........
Sail...camp....bike...repeat
Becky

Build Journal http://www.tnttt.com/viewtopic.php?f=50&t=45917
Visit our blog at http://www.oldragbaggers.com
Image Image
User avatar
Oldragbaggers
Gold Donating Member
 
Posts: 1842
Images: 331
Joined: Mon Aug 01, 2011 9:22 pm
Location: Essex, MD
Top

Re: TTT # 1 - Quick and Cheap

Postby loaderman » Tue Jun 05, 2012 12:37 pm

Amazing for $200.00. How heavy is it?
loaderman
The 300 Club
 
Posts: 306
Joined: Fri Jan 27, 2012 12:03 am
Top

Re: TTT # 1 - Quick and Cheap

Postby M C Toyer » Tue Jun 05, 2012 6:14 pm

Loaderman and Ragbaggers (you don't look old to me) - Thanks for looking and the positive comments.

loaderman wrote: How heavy is it?


I haven't put it on a scale but would guess under 1200 lbs loaded. Tongue weight is around 100 lbs with 10 gal water in the tongue box and 5 gal in the galley.

To make a fair comparison I did get the trailer for free. All of the metal siding and metal trim and insulation was left over from jobs - you can't return partial rolls, boxes or bundles. Most of the wood was salvaged from building sites where I worked. Framers and roofers leave a lot of big scraps. The 3/4 ply was stacked to be picked by the lumber yard but the driver kicked off the top two pieces because they had already weathered. He also left the treated 3/4 at the bottom of the stack because it was sitting in the mud.

This is a rough estimate of what I did purchase:

for the trailer - tongue jack, two tail lights, and wiring - $ 45
1 sheet 1/4 ply and 1 sheet 1/8 masonite - $ 25
hinges - 4 brass butt hinges and two 48" piano hinges - $ 40
milk crates and plastic boxes - $ 15
4 LED closet lights - $ 20
battery powered clip on fan $ 6
Liquid Nails construction adhesive - $ 12
1 qt Min-Wax polyurethane - $ 10
3 bolt latches - $ 6
2 shelf brackets and 1 gate latch for galley doors - $ 16
bar sink (used) $ 5

Donated, salvaged and surplus materials estimated value:

Trailer - $ 300
It had servicable tires but I took two off a newer trailer so $ 120 to replace
4 sheets 3/4 plywood and 2 sheets 1/2 plywood or OSB - $120
40 foot 2 x 4 treated $ 24 for floor
32 foot 5/4 x 5 treated for roof rack $ 28
60 foot 2 x 3 - $ 36
4 foot formica countertop $ 24
2 square steel siding - $ 245
1 roll steel trim sheet - $ 100
2 used storm windows $ 50
2 square fan fold insukation $ 20
1 square styrofoam insulation for roof $ 12

With careful shopping it could have been built for under $ 1500.

I don't mean to dimiish those who build trailers with fine craftmanship, innovative details and long lasting results. Indeed I am in awe of what has and can be produced and marvel at their perserverance and skill.

I was looking for something I could use right away and reduce the mountain of materials stacked and scattered around my home. I also needed the hands on experience for my next build and a test bed for my own design and ideas.

M C
User avatar
M C Toyer
The 300 Club
 
Posts: 363
Images: 11
Joined: Thu May 31, 2012 8:59 pm
Location: Pilot Point (Denton County) Texas
Top

Re: TTT # 1 - Quick and Cheap

Postby 2bits » Tue Jun 05, 2012 7:31 pm

I like colors, it looks like my living room! It really works! What is the brown side sheeting? I don't believe I have ever seen that before.
Thomas

Image
User avatar
2bits
2bit Member
 
Posts: 5132
Images: 8
Joined: Thu Dec 27, 2007 6:04 pm
Location: Lake Tawakoni, TX
Top

Re: TTT # 1 - Quick and Cheap

Postby S. Heisley » Tue Jun 05, 2012 7:43 pm

I don't mean to dimiish those who build trailers with fine craftmanship, innovative details and long lasting results. Indeed I am in awe of what has and can be produced and marvel at their perserverance and skill.

I was looking for something I could use right away and reduce the mountain of materials stacked and scattered around my home. I also needed the hands on experience for my next build and a test bed for my own design and ideas.


M.C.:
You have a nice looking, durable trailer that should serve you well. Your build stands in its own right. Thanks for sharing your story and pictures. :thumbsup: :applause:
Your build doesn't diminish anybody's efforts or chosen style of building because building style is a preference and each build is what works for the builder, not for somebody else; so never worry about that. Just go enjoy what you've built and don't forget to post pictures of some of your fun trips! :pictures:
User avatar
S. Heisley
Super Lifetime Member
 
Posts: 8867
Images: 495
Joined: Mon Sep 17, 2007 10:02 am
Location: No. California
Top

Re: TTT # 1 - Quick and Cheap

Postby StandUpGuy » Tue Jun 05, 2012 8:06 pm

I like how utilitarian your trailer is. I like the rack on top for the kayak. It looks like it belongs in the north woods for adventure.
User avatar
StandUpGuy
1000 Club
1000 Club
 
Posts: 1090
Images: 52
Joined: Sun Mar 27, 2011 6:15 pm
Top

Re: TTT # 1 - Quick and Cheap

Postby High Desert » Tue Jun 05, 2012 8:45 pm

I like it! Purpose built, primarily from left over materials. It can do everything you want to to do and do it well. And it didn't even dent the bank, let alone break it. From where I stand that makes for an outstanding result.

You did great, thanks for sharing it! :applause:
Shaun

"it's not the years honey, it's the mileage"
High Desert
Platinum Donating Member
 
Posts: 8780
Images: 27
Joined: Wed Apr 08, 2009 1:46 pm
Location: SW Washington state
Top

Re: TTT # 1 - Quick and Cheap

Postby toypusher » Wed Jun 06, 2012 4:53 am

I may have missed it, but did you do anything to seal water from the J-channels? If you tow in the rain, I would be afraid of it driving the rain into the J-channels and soaking into your wood. I would put some silicon (or something like that) sealant in all of the J-channel sections.

Just my opinion.

Great build though! :thumbsup:
User avatar
toypusher
Site Admin
 
Posts: 43040
Images: 324
Joined: Fri Jan 28, 2005 12:21 pm
Location: York, PA Area
Top

Next

Return to Build Journals

Who is online

Users browsing this forum: No registered users and 20 guests