Wingloader's first build

...ask your questions in the appropriate forums BUT document your build here...preferably in a single thread...dates for updates, are appreciated....

Wingloader's first build

Postby wingloader » Tue May 21, 2013 10:26 am

I've been working on this since February, but I've been so busy I haven't taken the time to do much besides read the posts and mooch ideas from you all (mostly Zach). I probably spent 40 hours reading the forum and learning Sketchup before I even bought my HF trailer.

I am using _Ryan_ 's profile and Zach's 5x10 over a 4x8 trailer idea.

Joe
Last edited by wingloader on Tue May 21, 2013 12:55 pm, edited 1 time in total.
It takes a big man to cry, and an even bigger man to laugh at that man.
--jack handy
User avatar
wingloader
Donating Member
 
Posts: 81
Images: 84
Joined: Tue Feb 26, 2013 4:17 am
Location: Buffalo, NY

4-12-2013

Postby wingloader » Tue May 21, 2013 11:31 am

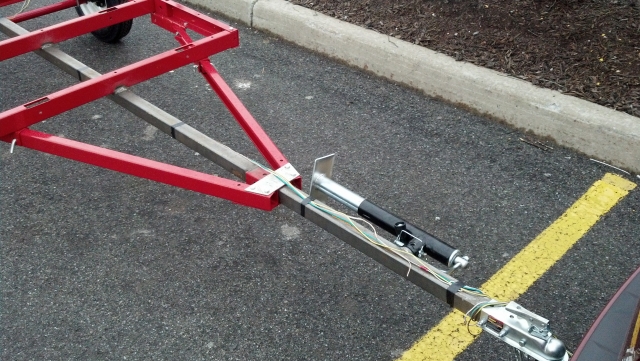
By this time, I'd already bought my Harbor Freight trailer, jack stand etc. I added a 10 foot piece of 2x2 steel tube (1/4 inch thick) to extend the tongue. I plan to build the trailer about 1 foot or so in front of the frame so I need a little wiggle room for turning and backing up.

Image

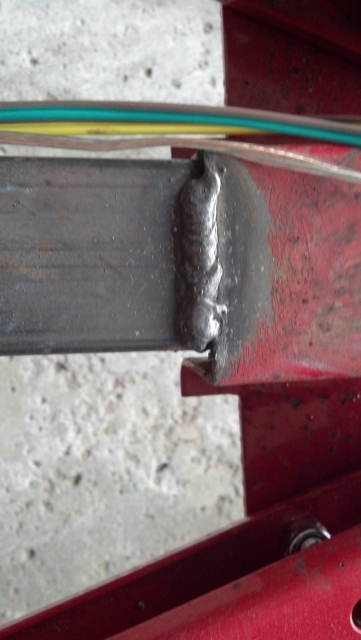
I wired up the lights on the trailer "ghetto" style just so I could get the trailer registered and inspected. Check out the sweet bead! I am not a welder so I got lucky on this one.

Image

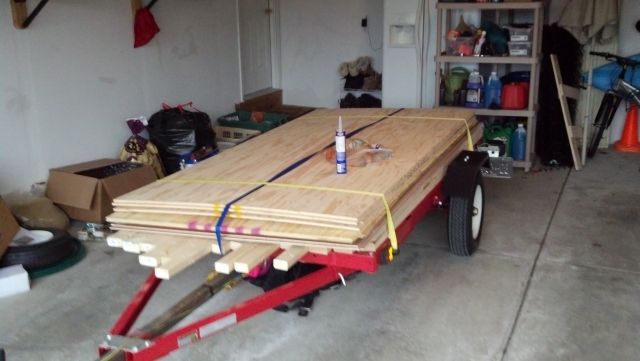
Now, to load up my first batch of supplies!

Image

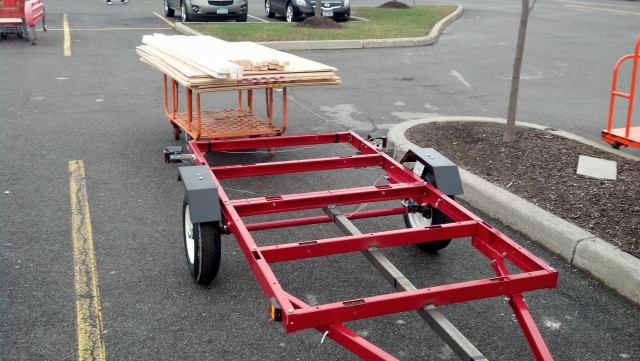
At home in the Schmucker loading dock

Image
Last edited by wingloader on Fri May 24, 2013 9:44 am, edited 7 times in total.
User avatar
wingloader
Donating Member
 
Posts: 81
Images: 84
Joined: Tue Feb 26, 2013 4:17 am
Location: Buffalo, NY

4-16-2013

Postby wingloader » Tue May 21, 2013 11:38 am

Since I'm making the camper large enough to hold a queen size mattress, I am building the deck up by the width of a 2x4 (Zach style) so that I won't have wheel wells in the sleeping compartment.

Image
Last edited by wingloader on Fri May 24, 2013 9:45 am, edited 2 times in total.
User avatar
wingloader
Donating Member
 
Posts: 81
Images: 84
Joined: Tue Feb 26, 2013 4:17 am
Location: Buffalo, NY
Top

4-18-2013

Postby wingloader » Tue May 21, 2013 11:40 am

The deck is on

Image

Image
Last edited by wingloader on Fri May 24, 2013 9:46 am, edited 2 times in total.
User avatar
wingloader
Donating Member
 
Posts: 81
Images: 84
Joined: Tue Feb 26, 2013 4:17 am
Location: Buffalo, NY
Top

Re: Wingloader's first build

Postby wingloader » Tue May 21, 2013 11:59 am

I mounted the side pieces so that I could get the profile cut out. I needed to cover the frame and the deck extension. If I just used a piece of 4x8 the interior would have been really short. I'm 6/4. That wouldn't do. I also extended the nose by 1.5'. This way, I can fit a queen size mattress in it plus a few extra inches because I am a tall dude. I also extended the aft by 10 inches so that the profile would come out the way I wanted it.

The front extension leaves a compartment below the deck that I am using for electrical stuff (like Zach).

Image

As you can see, this took 3 pieces of wood. This added an extra level of complexity but it is worth the extra effort.

Image
Last edited by wingloader on Fri May 24, 2013 9:50 am, edited 3 times in total.
User avatar
wingloader
Donating Member
 
Posts: 81
Images: 84
Joined: Tue Feb 26, 2013 4:17 am
Location: Buffalo, NY
Top

4-20-2013

Postby wingloader » Tue May 21, 2013 12:00 pm

After finishing the rough cut on the profile, I duplicated each of the three pieces EXACTLY.

Image
Last edited by wingloader on Fri May 24, 2013 9:50 am, edited 2 times in total.
User avatar
wingloader
Donating Member
 
Posts: 81
Images: 84
Joined: Tue Feb 26, 2013 4:17 am
Location: Buffalo, NY
Top

4-21-2013

Postby wingloader » Tue May 21, 2013 12:04 pm

I flipped it on the side and gave it a coat of fence post paint. You can't really see it but I also wired the clearance lights. Not shown here, I put foam insulation in each of the rectangular spaced under the deck using the 2 inch or so blue foam that you use for insulating basement walls. I then sealed up any gaps with expanding foam just to keep moisture from getting in between the wood and the foam insulation. In retrospect, the foam insulation was probably a waste of money and effort. I don't plan on camping in cold weather.

Image
Last edited by wingloader on Fri May 24, 2013 9:51 am, edited 2 times in total.
User avatar
wingloader
Donating Member
 
Posts: 81
Images: 84
Joined: Tue Feb 26, 2013 4:17 am
Location: Buffalo, NY
Top

4-26-2013

Postby wingloader » Tue May 21, 2013 12:24 pm

My plan was to build the walls first: outer layer, "framing/studs" and the inner skin. I would leave exactly a 1x2 width between the inner wall and studs so that I could 1) install the sidewalls, 2) put the headliner in, 3) sandwich the headliner with 1x2's and 4) put the outer skin over the entire thing. This would make certain that the structure was square and there would be no gaps on the inside between the walls and the headliner. I would have room in the space between the headliner and the outer skin for wiring. Also, when I put the top skin on, I wouldn't have to be accurate...just get it to overhang the sides and trim it flush.

Here is a "Visi-joe" diagram showing my basic intention. I have a detailed diagram in Sketchup, but this was quick to put together using MS Paint. It is not to scale but hopefully you get the idea.

Image

In order to get the curved 1x2 surface, I tried to "finger" the board. This idea failed miserably.

Image

Image

Instead, I decided to frame up the vertical studs, put the inner skin on, then "fill" the gaps with custom cut/curved pieces of 1x2. This worked well.

Image

Image

Image
Last edited by wingloader on Fri May 24, 2013 9:57 am, edited 3 times in total.
User avatar
wingloader
Donating Member
 
Posts: 81
Images: 84
Joined: Tue Feb 26, 2013 4:17 am
Location: Buffalo, NY
Top

4-27-2013

Postby wingloader » Tue May 21, 2013 12:25 pm

Here is what it looks like after installing the inner skin and putting the filler blocks in place

Image

Image
Last edited by wingloader on Fri May 24, 2013 9:58 am, edited 1 time in total.
User avatar
wingloader
Donating Member
 
Posts: 81
Images: 84
Joined: Tue Feb 26, 2013 4:17 am
Location: Buffalo, NY
Top

5-2-2013

Postby wingloader » Tue May 21, 2013 12:30 pm

Installing the galley "firewall"

Image

Image

Cutting the floor of the front compartment and the filler to connect it to the deck

Image
Last edited by wingloader on Fri May 24, 2013 10:02 am, edited 2 times in total.
User avatar
wingloader
Donating Member
 
Posts: 81
Images: 84
Joined: Tue Feb 26, 2013 4:17 am
Location: Buffalo, NY
Top

5-6-2013

Postby wingloader » Tue May 21, 2013 12:36 pm

More work on the front compartment

Image

Getting ready for the headliner. Test fitting a piece of luan

Image

Image
Last edited by wingloader on Fri May 24, 2013 10:03 am, edited 1 time in total.
User avatar
wingloader
Donating Member
 
Posts: 81
Images: 84
Joined: Tue Feb 26, 2013 4:17 am
Location: Buffalo, NY
Top

5-10-2013

Postby wingloader » Tue May 21, 2013 12:44 pm

Installing the first section of the headliner. Holy crap. Luan does not bend easily. I had to put a 2x4 on the inside, screw it in place and "draw" the end of the Luan into place. I ended up gluing cross supports to the end of the first sheet of luan. Then, I glued another cross support to the next sheet to go on. THEN, I glued and screwed the two sheets together by screwing the two cross members together. Otherwise, I would have NO chance of getting them to look like a continuous sheet on the inside. It would have been butt ugly for sure.

Image

Image

Image

Image

The end result from the inside. The white streaks aren't crack. They were filled by the mfg to make it smooth. It looks bad but it is actually smooth.

Image

I added the piano hinge to the front compartment while waiting for glue to dry. Also, I was just sick of working with luan!!!

Image
Last edited by wingloader on Fri May 24, 2013 10:08 am, edited 1 time in total.
User avatar
wingloader
Donating Member
 
Posts: 81
Images: 84
Joined: Tue Feb 26, 2013 4:17 am
Location: Buffalo, NY
Top

5-11-2013

Postby wingloader » Tue May 21, 2013 12:54 pm

Before putting the last sheet of luan on the top, I framed out some simple cabinets

Image

I added supports to the back of the galley wall for the cabinet on the inside

Image

Image

Now to put the last sheet of luan on the top. I followed a similar process to join the sheets to make them have a smooth curve on the inside.

Image

Image

Image

Now I can put a face on the inside cabinet. I used my biscuit joiner for this. Haven't had a need for that tool in a while!

Image

Image

I installed a piece of oak with a cross support to make sure it stayed straight. This will be the mount for the hurricane hinge.

Image

Image
Last edited by wingloader on Fri May 24, 2013 10:14 am, edited 1 time in total.
User avatar
wingloader
Donating Member
 
Posts: 81
Images: 84
Joined: Tue Feb 26, 2013 4:17 am
Location: Buffalo, NY
Top

5-14-2013

Postby wingloader » Tue May 21, 2013 1:21 pm

Starting the galley lid

Image

I clamped the sides of the galley door to the wall with luan spacers to give clearance.

Image

Image

Image
Last edited by wingloader on Fri May 24, 2013 10:16 am, edited 1 time in total.
User avatar
wingloader
Donating Member
 
Posts: 81
Images: 84
Joined: Tue Feb 26, 2013 4:17 am
Location: Buffalo, NY
Top

5-17-2013

Postby wingloader » Tue May 21, 2013 1:39 pm

Now that I have the door constructed, I put the "door stop" in place.

Image

Skinning the hatch. I screwed the door into the exact position I wanted it so that when I put the outer skin on it, there would be no chance that I would put a twist into it. Fortunately, I was smart enough to screw it in place from the outside...

Image

Image

Image

Image

Image
Last edited by wingloader on Fri May 24, 2013 10:23 am, edited 1 time in total.
User avatar
wingloader
Donating Member
 
Posts: 81
Images: 84
Joined: Tue Feb 26, 2013 4:17 am
Location: Buffalo, NY
Top

Next

Return to Build Journals

Who is online

Users browsing this forum: No registered users and 58 guests