Newest Build, # 5, Road Ready

...ask your questions in the appropriate forums BUT document your build here...preferably in a single thread...dates for updates, are appreciated....

Newest Build, # 5, Road Ready

Postby M C Toyer » Tue Jul 14, 2015 12:25 am

This one was pretty simple; slide-in shell, no floor, plywood walls laminated with FRP, and EMT for roof spars. Still need to add roof edge trim when it arrives.

It is primarily to haul my motorbike out of the weather and my kayak on the roof but has storage for camping gear and a galley inside and is sleepable with the motorbike unloaded.

Image

Image
User avatar
M C Toyer
The 300 Club
 
Posts: 363
Images: 11
Joined: Thu May 31, 2012 8:59 pm
Location: Pilot Point (Denton County) Texas

Re: Newest Build, # 5, Road Ready

Postby Fred Trout » Tue Jul 14, 2015 2:45 pm

Looks very nice

How did you waterproof your rear doors ? Any chance of a detail picture please ? I have to do my rear doors *exactly like yours* in a few days so an example would help.
User avatar
Fred Trout
The 300 Club
 
Posts: 396
Joined: Fri May 08, 2015 4:30 pm
Location: SW Montana

Re: Newest Build, # 5, Road Ready

Postby dogscats » Tue Jul 14, 2015 3:57 pm

I am planing to use EMT for roof spars on my fiberglass component kit . Do you have any more pictures. Any pro are cons you would like sharing . The back doors look great
TODAY IS THE OLDEST YOU'VE EVER BEEN,
YET AT THE SAME TIME, THE YOUNGEST YOU'LL EVER BE,,, SO MAKE THE BEST OF IT WHILE YOU CAN, AND ENJOY THIS DAY WHILE IT LASTS
User avatar
dogscats
Donating Member
 
Posts: 235
Images: 20
Joined: Wed Mar 26, 2014 5:05 pm
Top

Re: Newest Build, # 5, Road Ready

Postby M C Toyer » Tue Jul 14, 2015 4:35 pm

Fred -

I'll have to pull together some better pics but here is a quick overview.

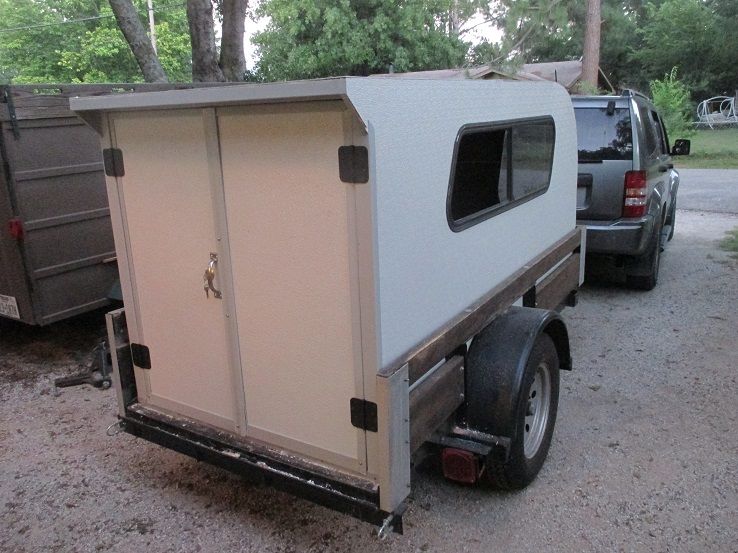
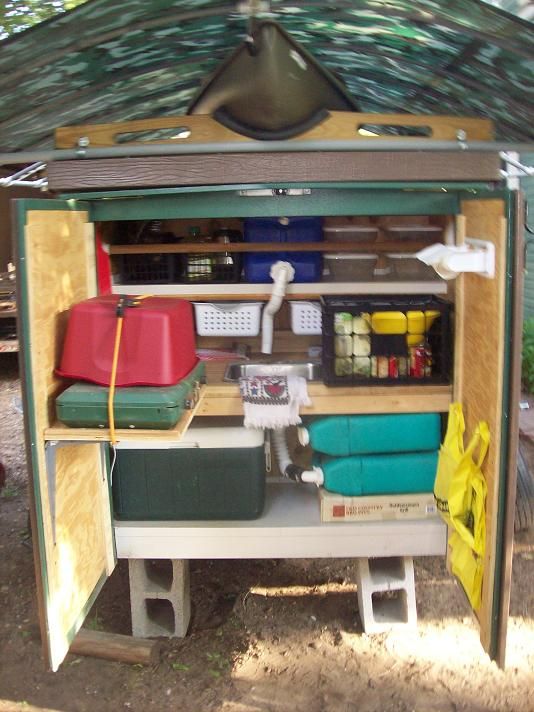
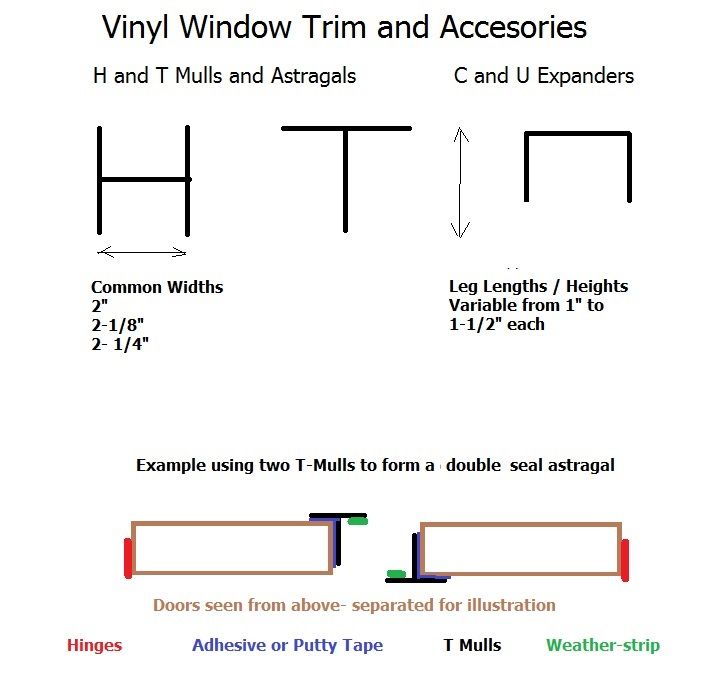
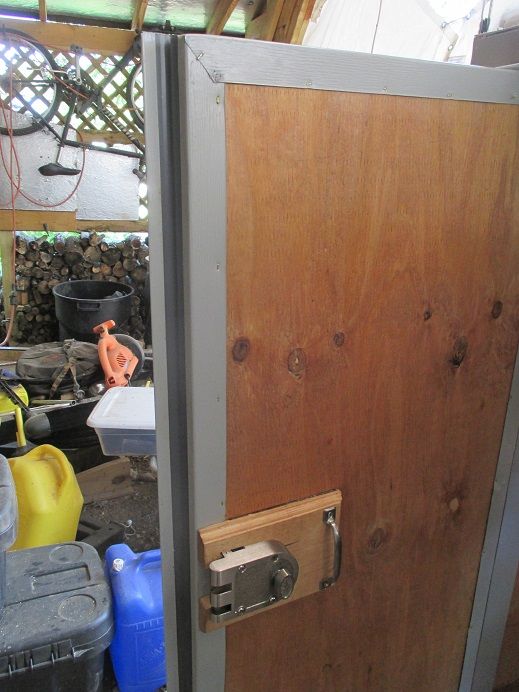
The doors are 5/8" plywood laminated with FRP. They have a u channel surround made from 26 gauge vinyl coated steel sheet. The bottom has an inregral rain cap.
Image
Image

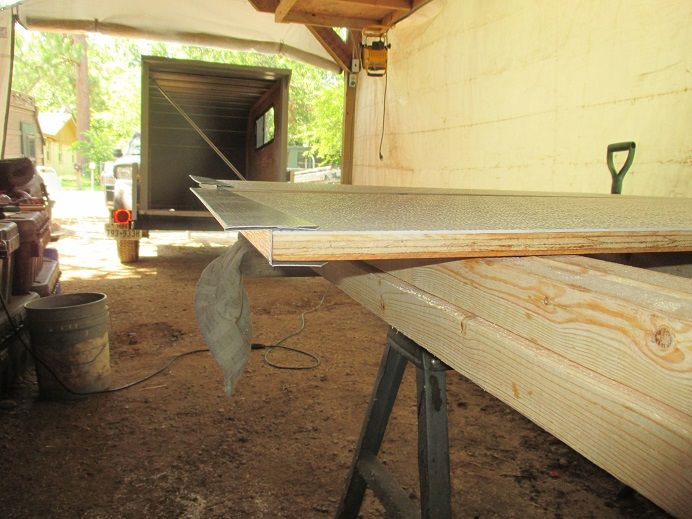
The rain cap overlaps the door sill which is faced with aluminum angle.
Image

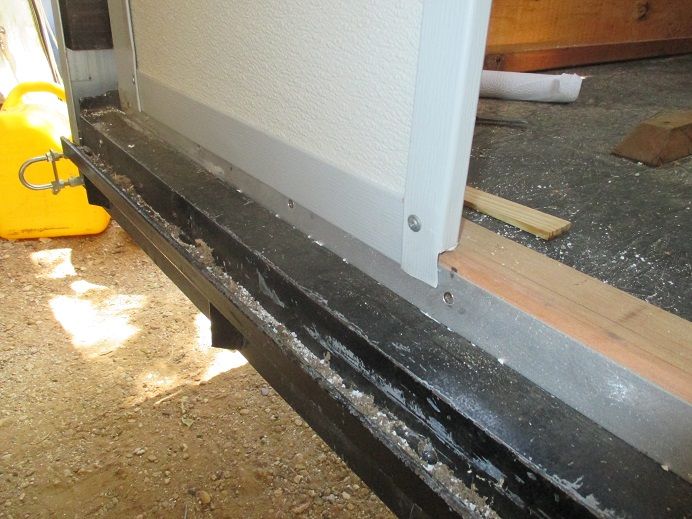
The channel is sealed to the outside face of the door with putty tape and stapled to the inside which will be covered with carpet same as the ceiling,

There is a stop at the inside top of the door frame faced with a self stick closed cell foam rubber strip. Strips are also on the hinge side of the door channel to compress when closed.
Image

The secondary door is secured with barrel bolts top and bottom.
Image

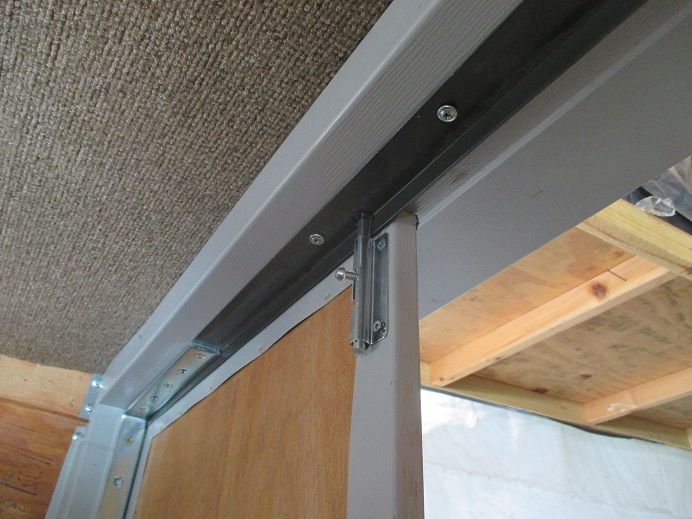
The primary door on the left has an astragal that overlaps the secondary door when closed that will also be weather stripped.
Image

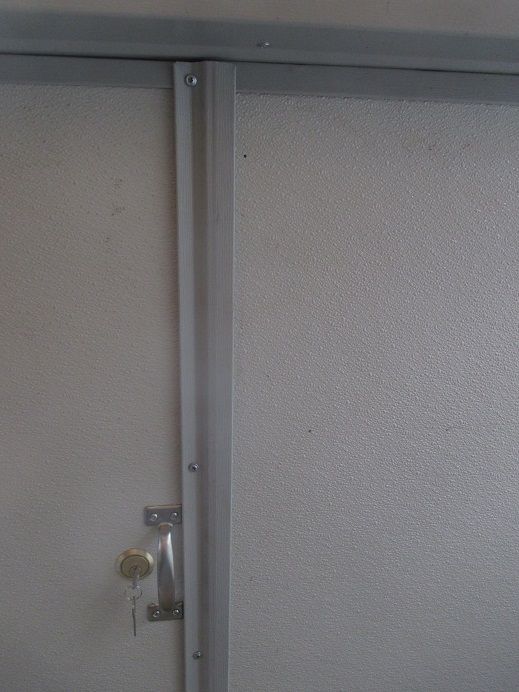
I did not use an astragal on the inside because it would interfere with the surface mount deadbolt lock and striker.
Image

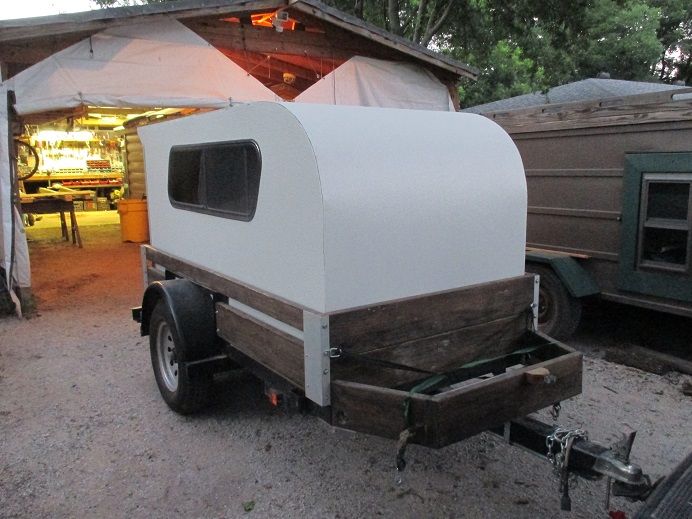
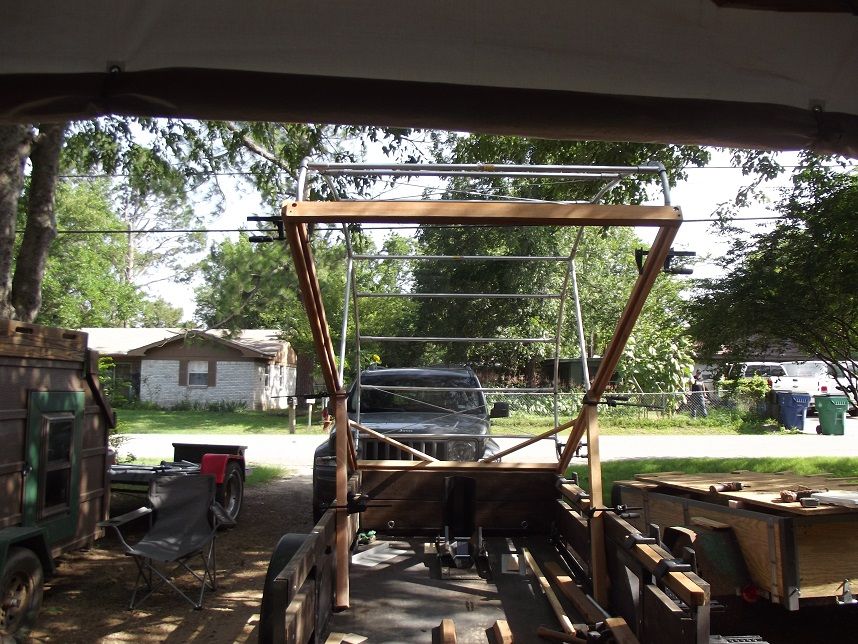
The roof overhangs the top of the doors 4" and extends down the side about 4" also. Clearance is about 1/2". The roof trim will overhang about 1/4" to provide a drip edge to keep rain water from migrating along the underside of the overhang.
Image

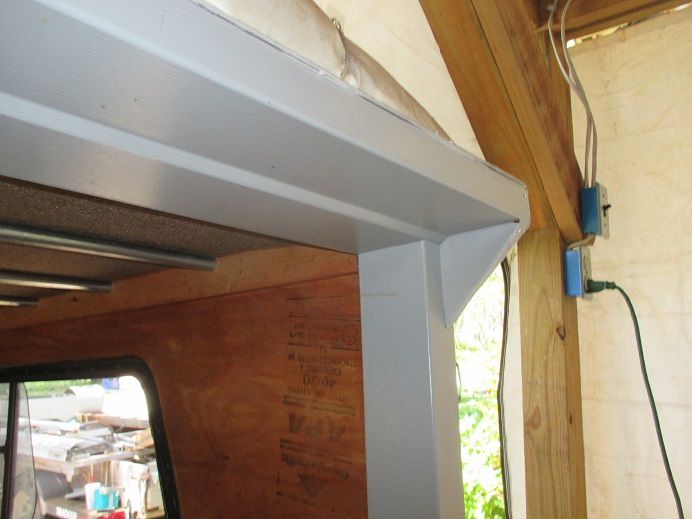
All exterior wood to include the door frame and plywood edges are capped with the same custom formed steel sheeting.

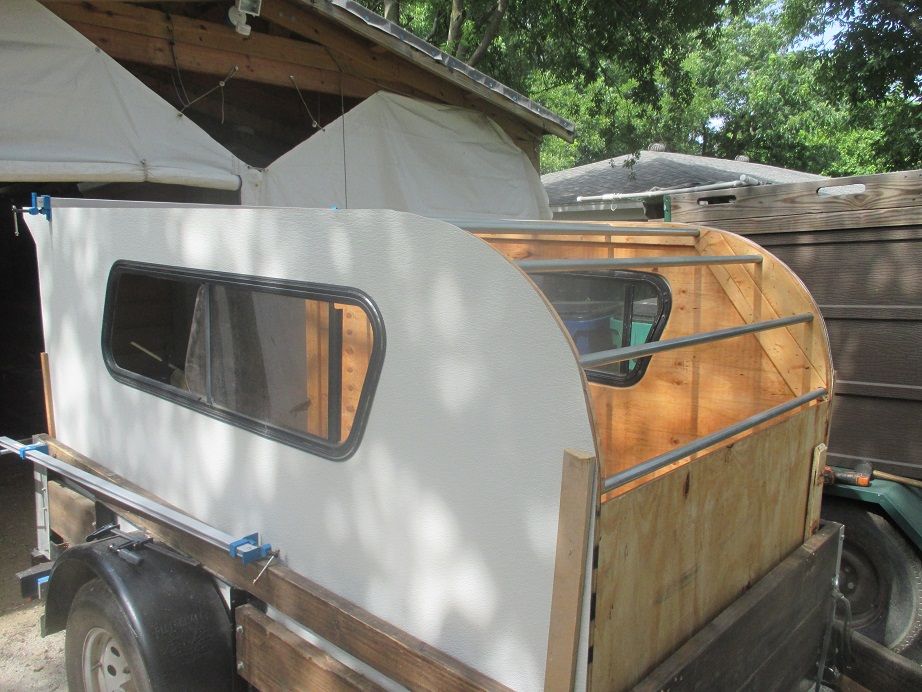
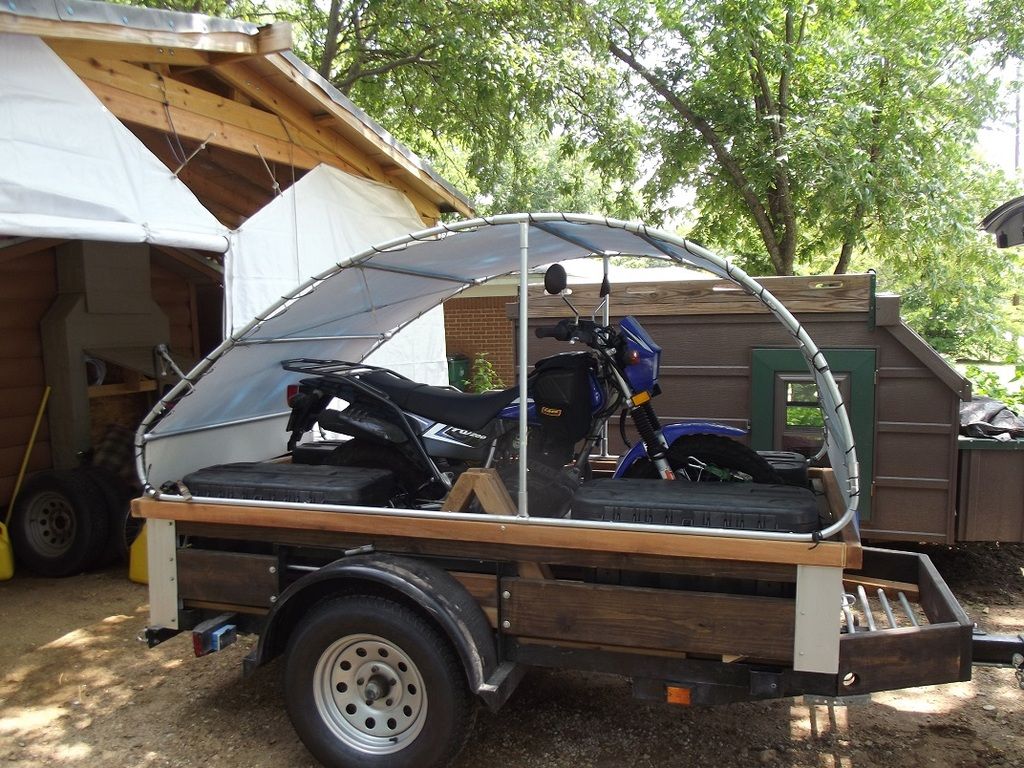
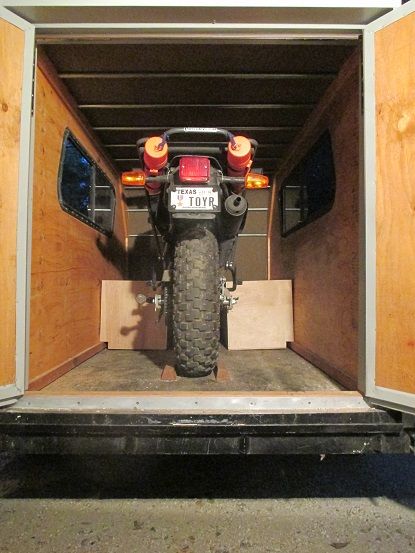
The sizing of the roof overhang was just a happy coincidence. The shell was sized to fit within the existing trailer sidewalls allowing clearance for loading and unloading and a setback from my drop-in tailgate which I am reconfiguring to be a fold down loading ramp for the motorbike. The total length of the shell body was 92" and the top is 96" with the mini "Shasta" wings." The width of the finished shell to include the laminated FRP was 47-1/2" which gave me a little fudge to fit then trim the FRP roof.

I used TiteBond III to laminate the sidewalls. The roof with the VHB tape was a one shot deal like contact cement would be. It was surprisingly easy. I prealigned then tacked the lower front edge, rolled back and applied the VHB tape, then rolled into final position. I had clamps and rope ready, but no helper, but it laid out under its own weight, hugging the radius. I used a roller to further compress and seat the VHB before stapling. The trim will be seated with butyl putty tape and a few screws.

The FRP was off the shelf at Home Depot, light gray color. I may paint later to match my Jeep.
User avatar
M C Toyer
The 300 Club
 
Posts: 363
Images: 11
Joined: Thu May 31, 2012 8:59 pm
Location: Pilot Point (Denton County) Texas
Top

Re: Newest Build, # 5, Road Ready

Postby M C Toyer » Tue Jul 14, 2015 6:51 pm

dogscats wrote:I am planning to use EMT for roof spars on my fiberglass component kit . Do you have any more pictures. Any pro are cons you would like sharing . The back doors look great


The EMT is much stronger than a comparable thickness of wood and easily bent into an arch or bow if desired. Weight would be similar to a 2 x 2 but taking 1/4th the space. It also offers stronger attachment/joints than wood with VHB tape, rivets, screws and/or welding. It does not need to be sealed and won't warp or split. Since I was seating it in wood it was easier to drill round holes than square or rectangular rabbets. Pricewise it is comparable, actually probably less than, quality wood.

I glued and screwed a 1 x 3 along the inside top of the plywood sidewalls with a 3/8" setback to allow for the carpet ceiling and a fiberboard (Thermo-ply) backer for the FRP. The backer was to separate the FRP from the EMT and to round out the front radius (18"). The carpet was for appearance and to also cushion the EMT from the backer.

The 1x3 was predrilled (15/16" is a tight fit) along the upper edge for the 3/4" EMT. The spacing is 8" oc for the radius and 12" oc for the flat. The plywood acts as a stop for the EMT. After clamped and squared the EMT is pinned to the 1 x 3 to prevent spread.

The flat lower plywood section of the front wall is recessed 1/8" for the backer and a 3/8" recessed 2 x 6 cedar beam is at the very rear of the roof to attach corner bracing and be a part of the door frame and overhang.

The carpet was laid first over the EMT, stapled to the 1 x 3, then the backer laid and stapled. The FRP was set to the top of the plywood sidewalls with VHB tape then also stapled. I also put a strip of VHB 1" in over the staples along the backer edge and laterally over each spar just to minimize vibration. The Thermo-ply is flexible enough to compensate for any expansion or contraction of the FRB. There is an overlapping seam in the FRP about midway along the top of the roof also sealed with VHB and directly over one of the spars if I later need to reinforce with rivets.

If I decide later I need insulation in the roof 3/4 or 1" foam board would easily wedge between the EMT spars and could be capped and held in place with a sheet or two of cheap paneling or the non fiberglass bath paneling wedged upward and tacked to the spars in a few places.

I salvaged the sliding windows from a pick-up cap. They have an outer flange set in butyl putty tape. The inner trim ring is laid directly on the FRP and pulled together with screws from the inside so the opening in the plywood was cut 1/2" large than the FRP opening.

Here's a couple of photos - I may have some more but this came together so fast I did not stop to take very many,
Image
Image

The predecessor to this shell was fully framed with EMT shaped to match my 47 KIT profile using a plywood jig. Initially the roof was covered with canvas then switched to FRP. The entire frame was hinged at the front of the trailer and opened like a clamshell. I am rethinking that one to have a rear hatch and covered sidewalls.

Image
Image
Image
Last edited by M C Toyer on Tue Jul 14, 2015 8:54 pm, edited 1 time in total.
User avatar
M C Toyer
The 300 Club
 
Posts: 363
Images: 11
Joined: Thu May 31, 2012 8:59 pm
Location: Pilot Point (Denton County) Texas
Top

Re: Newest Build, # 5, Road Ready

Postby Fred Trout » Tue Jul 14, 2015 6:53 pm

Thanks very much for all that detail & photos. Should help a great deal and it appears we will also be using some of the same structural details on the framing and weather-stripping construction. Need to digest all you have provided and incorporate what I can into my build.

Thanks again !! :thumbsup:
User avatar
Fred Trout
The 300 Club
 
Posts: 396
Joined: Fri May 08, 2015 4:30 pm
Location: SW Montana
Top

Re: Newest Build, # 5, Road Ready

Postby M C Toyer » Tue Jul 14, 2015 8:25 pm

Fred -

I was going to review your build thread but with 14 pages will take a while. I did note on the first couple the discussion re the rear roof overhang.

My first build was somewhat similar to your current and also had barn doors for the galley. My roof was a standing seam design running the length of the trailer. The front and rear caps are somewhat bulky because they have to clear the standing ribs and also allow for drainage so I basically built a box with an internal rain gutter to deflect the runoff to the sides.

Relevant to concerns about bumping your head and providing an overhead shade or rain cover that has not been a problem with my rain gutter which also extends rearward about 4 inches and because the shade / cover can be angled upward, but I did make a mock-up beforehand just to be sure.

I also originally had 13" rims and an old forged drop axle but have switched to a straight axle with 15" rims for better off road clearance and has further alleviated the potential head bump, although my counter with sink is somewhat recessed.

My tail lights limit my doors to opening 90 degrees but since I'm the only cook not a real problem but I made sure on the slide-in that was less of a problem. The doors on both provide good side protection and also support the overhead cover which for now is a couple of tent poles and a small tarp which also drapes over the outside of the doors.

Here's a pic of my very rudimentary galley but does have a sink, gravity flow water supply, gray water tanks, Coleman stove and a bunch of cheap plastic storage boxes. The stove shelf rides just above the counter so clears when the doors close as do the paper towel and trash bag racks.

Image

Are you anywhere neat Fort Missoula? My dad enlisted in the 4th Infantry there in 1938 and its on my bucket list next summer when I attend Wolffarmer's gathering in Idaho.
User avatar
M C Toyer
The 300 Club
 
Posts: 363
Images: 11
Joined: Thu May 31, 2012 8:59 pm
Location: Pilot Point (Denton County) Texas
Top

Re: Newest Build, # 5, Road Ready

Postby dogscats » Tue Jul 14, 2015 8:27 pm

That helps a lot . Thank you.If I find that the fiberglass frame dose not hold up glad I can go with your set up.
TODAY IS THE OLDEST YOU'VE EVER BEEN,
YET AT THE SAME TIME, THE YOUNGEST YOU'LL EVER BE,,, SO MAKE THE BEST OF IT WHILE YOU CAN, AND ENJOY THIS DAY WHILE IT LASTS
User avatar
dogscats
Donating Member
 
Posts: 235
Images: 20
Joined: Wed Mar 26, 2014 5:05 pm
Top

Re: Newest Build, # 5, Road Ready

Postby M C Toyer » Tue Jul 14, 2015 9:12 pm

dogscats wrote:That helps a lot . Thank you.If I find that the fiberglass frame dose not hold up glad I can go with your set up.


Since the welded steel and 2 x wood rails of my base trailer provide all the support I would not have any qualms about using 1/4" or 3'/8" inch plywood on the sidewalls with just a few more 1 x furring strips to keep it straight and join the corners. Even without the sturdy side rails I believe it is doable.

I've got a new still in the box HF trailer, several sheets of 1-1/2" foil faced polyurethane foam board, and really like the versatility of the FRP. My next project will likely finally be a lightweight true teardrop framed with EMT.
User avatar
M C Toyer
The 300 Club
 
Posts: 363
Images: 11
Joined: Thu May 31, 2012 8:59 pm
Location: Pilot Point (Denton County) Texas
Top

Re: Newest Build, # 5, Road Ready

Postby Fred Trout » Tue Jul 14, 2015 11:11 pm

Thanks for further info - it all helps since this is my first build. Just applied the canvas to the outside walls, tomorrow I do the roof, then canvas the main door, build the doors in back. It's a simple 4 wide x 8 long x 4 high all 2" EPS foam build except for the aerodynamic nose. Have the same overhang idea as yours, same barn doors, was planning on mounting a 1x2 all the way around as door-stop & gasket flange but will adjust it to incorporate some of your methods. The flashing on the overhang is to install awning rail, etc. and there is a routed groove drip edge under the overhang. That all gets canvassed up tomorrow.

Image

Are you anywhere neat Fort Missoula?


That's a fair ways from here - about 200 miles ~ 3 hours - Montana is a big state, so not that unusual a trip for us. I drive 2 hours to get to Harbor Freight :lol:
User avatar
Fred Trout
The 300 Club
 
Posts: 396
Joined: Fri May 08, 2015 4:30 pm
Location: SW Montana
Top

Re: Newest Build, # 5, Road Ready

Postby M C Toyer » Wed Jul 15, 2015 1:50 am

Looks straightforward.

On my first trailer with barn doors I actually fabricated a double overlap astragal that requires both doors be closed at the same time and the barrel bolts are on the outside. That was necessitated by the steel board and batten siding I used that does not have a fully flat surface because of the battens and the j-channel trim.

If there are any vinyl window manufacturers, distributors, dealers or installers in your area you might be able to locate some of the extra wide T or H channel used to mull single windows into multiple units. As I recall 2", 2-1/8" and 2-1/4" were fairly common sizes for the widths and 1" to 1-1/2" for each leg. Cutting off one of the legs of the H would give you a combo rain cap - door bottom like the one I made. Two lengths of T on opposite doors, one on the inside and the other outside could be used as an astragal with overlapping weather-strip inside and outside. They also use a C or U channel in the same dimensions as expanders for the height and width of block frame replacement windows if you wanted a complete surround of your door edges to protect the canvas and provide a better surface for the weather-strip.

I always had extras on most every job which were just thrown away.

Crude illustration here: The doors would open and close individually. Barrel bolts or similar could be installed on the door with the T on the inside. With your 2" door thickness you could use standard door hardware and mount the hinges on the jamb and door edge rather that face mount like I had to because of my 1" thickness.


Image
User avatar
M C Toyer
The 300 Club
 
Posts: 363
Images: 11
Joined: Thu May 31, 2012 8:59 pm
Location: Pilot Point (Denton County) Texas
Top

Re: Newest Build, # 5, Road Ready

Postby Fred Trout » Wed Jul 15, 2015 11:31 pm

I can buy an astrigal with a vinyl weatherstrip all complete locally - only need to cut it down to ~ 48" from 84"; should not be a problem. Same with the bottom seal - can use L or Z flashing to overlap the bottom edge, so that should not be an issue. The canvas will be painted and the exposed surface throughout but the sealing surfaces getting gasket will be painted wood. I put penetrating sealer on all wood and caulk all joints but keeping the water away - belts and suspenders - is always good. Will probably mortise my hinges but might apply them on the surface - more wood to screw into with the mortise. In any case, the doors will be very light - 2" foam wrapped on the edges with 1x eight quarter lumber all covered by painted canvas. Will probably embed some wood for mounting drop-down shelf hardware and such.

http://www.homedepot.com/p/MD-Building- ... /205668941
User avatar
Fred Trout
The 300 Club
 
Posts: 396
Joined: Fri May 08, 2015 4:30 pm
Location: SW Montana
Top

Re: Newest Build, # 5, Road Ready

Postby M C Toyer » Thu Jul 23, 2015 1:06 pm

The pups were all excited about the maiden voyage
Image

but a little less enthusiastic about having the bottom bunk. The chuck box is on the right
Image

and swings out for access with or without the bed platform in place when the motorbike is unloaded
Image

these are the forward storage boxes
Image

and this earlier shot checking for clearance with the motorbike loaded
Image

M C
User avatar
M C Toyer
The 300 Club
 
Posts: 363
Images: 11
Joined: Thu May 31, 2012 8:59 pm
Location: Pilot Point (Denton County) Texas
Top

Re: Newest Build, # 5, Road Ready

Postby KCStudly » Thu Jul 23, 2015 1:15 pm

Nice. :thumbsup:
KC
My Build: The Poet Creek Express Hybrid Foamie

Poet Creek Or Bust
Engineering the TLAR way - "That Looks About Right"
TnTTT ORIGINAL 200A LANTERN CLUB = "The 200A Gang"
Green Lantern Corpsmen
User avatar
KCStudly
Donating Member
 
Posts: 9640
Images: 8169
Joined: Mon Feb 06, 2012 10:18 pm
Location: Southeastern CT, USA
Top

Re: Newest Build, # 5, Road Ready

Postby dogscats » Thu Jul 23, 2015 2:03 pm

Lot of great ideals .Thanks
TODAY IS THE OLDEST YOU'VE EVER BEEN,
YET AT THE SAME TIME, THE YOUNGEST YOU'LL EVER BE,,, SO MAKE THE BEST OF IT WHILE YOU CAN, AND ENJOY THIS DAY WHILE IT LASTS
User avatar
dogscats
Donating Member
 
Posts: 235
Images: 20
Joined: Wed Mar 26, 2014 5:05 pm
Top

Next

Return to Build Journals

Who is online

Users browsing this forum: Bing [Bot] and 15 guests