Colorado Flatlander Teardrop build

...ask your questions in the appropriate forums BUT document your build here...preferably in a single thread...dates for updates, are appreciated....

Colorado Flatlander Teardrop build

Postby jack-l57 » Wed Mar 16, 2016 11:23 pm

It's time to start documenting my teardrop build. I am calling it the "Colorado Flatlander" since I live on the eastern plains of Colorado, not in the mountains. I have been thinking about this build for a couple of years, but started studying the process more intently last fall. After many great ideas from the TNTTT members, I ordered my 5x8 trailer and started designing! My original design concept came from the T@G trailer design. I liked the elliptical curve at the front and the sloping rear hatch without the extra ellipse in the back (plus it will be easier to build the hatch... :thumbsup: ) I also wanted a bit more storage, so I basically took the whole teardrop shape and placed it on top of a 9" storage box. My final calculations showed my height was still just a bit over six feet tall, so it should still look like a teardrop. I did this design on Sketchup, but I just didn't have time to learn the program, so I reverted to using a grid in Excel and the drawing tools. This was my original sketch:140242

I hope the image shows, I am a novice on this site. I will add pictures and show my build progress a little bit each day, even though I am about 2-1/2 weeks into my build.
User avatar
jack-l57
Teardrop Builder
 
Posts: 30
Images: 106
Joined: Wed Jan 27, 2016 4:54 am
Location: Yuma, CO

Re: Colorado Flatlander Teardrop build

Postby jack-l57 » Wed Mar 16, 2016 11:43 pm

Pictures of my cardboard "mockup" to see how the general design would look...
140243
140244
User avatar
jack-l57
Teardrop Builder
 
Posts: 30
Images: 106
Joined: Wed Jan 27, 2016 4:54 am
Location: Yuma, CO

Re: Colorado Flatlander Teardrop build

Postby Nobes » Thu Mar 17, 2016 9:17 am

Nice! Desert Moose did some underneath storage you should take a look at. I tried to come up with a plan for doing the same thing but never could make it work. I look forward to seeing your solution and watching your build.
Nobes
Teardrop Master
 
Posts: 214
Images: 508
Joined: Sun Dec 20, 2015 5:01 am
Top

Re: Colorado Flatlander Teardrop build

Postby jack-l57 » Thu Mar 17, 2016 11:58 am

I did see Desert Moose's storage, it sure helped, just like many posts on the site!
I am at a "hurry up and wait" stage of my build (sanding, sealing) so I should have time to get my journal caught up in the next couple of days :pictures:
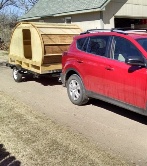
This is the design I developed in an Excel spreadsheet. Of course, it is not going to be as accurate as a good CAD program, so I had to test everything full scale to see if my numbers were coming out right. This page is the sidewall layout. My sidewalls are 3/8" baltic birch panels sandwiched over perimeter and door blocking, with insulation everywhere else. My total length is 9', with the base being 8' 6", so there will be a 6' overlap over the front of the trailer. My rough calculations indicated that this should keep my tongue weight about right when fully loaded.
140249
I hope this is readable, scanning an Excel spreadsheet into a .jpg causes it to lose a little clarity and become quite small. If anybody wants a clearer version, PM me and I will send you either my spreadsheet or a .pdf version of any of these documents.
I used the Cleave Books ellipse calculator to create my front ellipse. I did a simple 60" radius curve for my back half to make building the hatch easy ;) .
Once I had my base design, I started working on the interior. First was the rough cabinet locations. You can still see the trailer ellipse and circle, and I don't have measurements. I determined that I am just not a good enough "architect" to not build things to fit as I went along. I am planning simple shelving versus elaborate cabinetry to save weight. I am truly impressed with the cabinetry that many of the TNTTT members add to their teardrops!
140250
I will probably do a little bit of extra work over time to make the shelving more functional, but this is it now. The small 6" square will have a swing down door and be my electronics area. I will have it vented and have a 110V exterior plug in on the ends of it.
I also decided to add a storage base. The front section will hold the solar panel and possibly chairs or a pop-up canopy. The first interior hatch will be a foot well for sitting up. I am trying to figure out how to make the foot well hatch convert into a table when you are in a sitting position. I am open to ideas! The second interior hatch will be for longer term storage of things that you won't have to get to very often since it will be harder to access. The back of the hatch will be two slide out drawers (hacked from IKEA) that will have a fold down door covering them to make them water tight.
140251
This is the side and top view of the storage base plus the details of my building process. I also added vertical 2x2's at each of the junctions of the 1x4's for additional strength. The bottom is 1/4" baltic birch and the floor is 1/2" baltic birch. I think if I was to do it again, both would be 3/8".
140252
Well, back to work, I have a gallon of spar urethane just waiting for me! :ok:
Last edited by jack-l57 on Fri Mar 18, 2016 2:59 pm, edited 1 time in total.
User avatar
jack-l57
Teardrop Builder
 
Posts: 30
Images: 106
Joined: Wed Jan 27, 2016 4:54 am
Location: Yuma, CO
Top

Re: Colorado Flatlander Teardrop build

Postby KCStudly » Thu Mar 17, 2016 1:51 pm

Welcome to the forum. I like the fact that you are planning things out with as much detail as you can. I think you will find it to be a benefit as you go thru your build. :thumbsup:

jack-l57 wrote:The bottom is 1/4" baltic birch and the floor is 1/2" baltic birch. I think if I was to do it again, both would be 3/8".

Do you say this because you have already put it together and there is something you are unhappy with, or are you just second guessing the plan? I can tell you that with unit construction like that you will be surprised how quickly things strengthen up when they start to come together.

The strength is in the unity of the parts and how well they are put together, not necessarily the strength of each individual part.

Think airplane not house. Think birdcage Maserati not armored tank.
KC
My Build: The Poet Creek Express Hybrid Foamie

Poet Creek Or Bust
Engineering the TLAR way - "That Looks About Right"
TnTTT ORIGINAL 200A LANTERN CLUB = "The 200A Gang"
Green Lantern Corpsmen
User avatar
KCStudly
Donating Member
 
Posts: 9640
Images: 8169
Joined: Mon Feb 06, 2012 10:18 pm
Location: Southeastern CT, USA
Top

Re: Colorado Flatlander Teardrop build

Postby jack-l57 » Thu Mar 17, 2016 8:59 pm

Thanks, KC! I am actually pretty far into my build and I'm trying to catch up in my journal, so to answer your question:

jack-l57 wrote:The bottom is 1/4" baltic birch and the floor is 1/2" baltic birch. I think if I was to do it again, both would be 3/8".

Do you say this because you have already put it together and there is something you are unhappy with, or are you just second guessing the plan?

I have found when I am in the teardrop that any pressure I put on the floor of the foot well with my feet creates quite a flex and creak and seems a bit weak. However, the floor with 1/2" ply is extremely sound, maybe even more than needed. I figure if I had 3/8" in both places I would get equal strength in the foot well and the floor and not add any additional weight. What do you think? Would the 3/8" be strong enough as the teardrop floor? I'm sure it would be fine for the trailer bottom.
User avatar
jack-l57
Teardrop Builder
 
Posts: 30
Images: 106
Joined: Wed Jan 27, 2016 4:54 am
Location: Yuma, CO
Top

Re: Colorado Flatlander Teardrop build

Postby jack-l57 » Thu Mar 17, 2016 9:23 pm

Now for my next topic...drawing the sidewalls full size!
I began by drawing the storage base to use as the reference point for the rest of the teardrop shape:
140255
I used simple jigs to draw my sidewalls. The back curve is a simple 60" radius circle with the axis located below the actual board. I simply created a jig to allow the axis to extend below the actual board:
140256
I used KV shelving supports bolted together to create my drawing/cutting apparatus. It just happens that the adjustment slots on the shelving supports are exactly 1/2" apart, so it was some pretty easy adjusting when I used it for cutting my perimeter blocking for the sidewalls.
140257
For the front ellipse, I had problems getting a smooth line with string and nails, so i bought two screen door rollers and a light weight picture hanging wire to use for the jig. It rolled smoothly and the picture wire didn't stretch, so I was able to create a very accurate circle with little expense or effort.
140258
When I was finished, this was what my rough layout looked like...
140254
I decided I like the shape and didn't feel like the storage base would make the teardrop too tall, so I committed to this design, what do you think? :thinking:
User avatar
jack-l57
Teardrop Builder
 
Posts: 30
Images: 106
Joined: Wed Jan 27, 2016 4:54 am
Location: Yuma, CO
Top

Re: Colorado Flatlander Teardrop build

Postby jack-l57 » Thu Mar 17, 2016 9:40 pm

My trailer was finally delivered! The Colorado Flatlander may just become a reality!
I started with the frame, being extremely careful to make sure it was perfectly square, as other contributors to TNTTT have advised.
140259
In lieu of adding additional frame parts, I did a simple addition to strengthen the tongue bars. By adding spacers and a longer bolt that goes through both sides of the tongue channels, I reduced the length of the channel that was only connected on one side. I don't know the physics of this, but I just think it created a stronger connection than a short bolt through just one side of the channel. Does that make sense? This picture is with the trailer still upside down.
140260
I installed the axle, hubs and wheels, then flipped it over and installed the coupler. I later received a front jack with a wheel and installed it, also.
140261
I was pleasantly surprised how easy it was to put together the trailer. I read a few reviews that made it sound like a nightmare. I think I spent maybe 1-1/2 hours assembling mine... :applause:
User avatar
jack-l57
Teardrop Builder
 
Posts: 30
Images: 106
Joined: Wed Jan 27, 2016 4:54 am
Location: Yuma, CO
Top

Re: Colorado Flatlander Teardrop build

Postby jack-l57 » Thu Mar 17, 2016 9:55 pm

For those who look at the dates to see the progress, remember that I started this journal after I was about 2-1/2 weeks into my build. I can only wish I could accomplish the build as fast as I post these journal entries! :lol:

Once I had my trailer assembled, it was time to start building the base. I began with laying out the base frame. I essentially made two identical frames from 1x4 pine, one for the bottom and one for the floor of the teardrop.
140262
I used a Kreg jig to connect the frame parts together. My wonderful wife got me the jig for Christmas and I now wonder how I ever got by without it!
140263
After attaching the 1/4" baltic birch plywood to the frame with glue and screws, I did a test fit on the trailer...all is well when things fit! :thumbsup:
140265
User avatar
jack-l57
Teardrop Builder
 
Posts: 30
Images: 106
Joined: Wed Jan 27, 2016 4:54 am
Location: Yuma, CO
Top

Re: Colorado Flatlander Teardrop build

Postby TheOtherSean » Thu Mar 17, 2016 10:08 pm

It sure looks like you're starting to make progress. Good luck and keep up the heard work.
User avatar
TheOtherSean
The 300 Club
 
Posts: 407
Images: 111
Joined: Sun May 11, 2008 9:42 pm
Location: Ohio
Top

Re: Colorado Flatlander Teardrop build

Postby jack-l57 » Thu Mar 17, 2016 10:27 pm

After the bottom was completed, it was time to build the storage base. I used 3/8" baltic birch plywood supports to give it exceptional strength. I also added 2 x 2 posts at each intersection of 1x4's to brace the plywood supports. This was partway through the layout process:
140266
After getting the layout just right, which included two interior storage areas and two exterior storage areas, I attached the top frame, the front panel, and the back frame with glue, screws and construction grade staples. I still had a few clamps on the front panel when this picture was taken.
140267
I was fortunate to get a beautiful day to get the storage base sealed. I used multiple coats of spar urethane to seal the unit. That's me in my short sleeve T-shirt and shorts in February!
140268
I finished the storage base by caulking around all the seams with silicone caulking. For some reason, maybe because I didn't let the urethane dry long enough, it took the silicone over two days to set up!
140269
Once everything had dried, I insulated the bottom with 3/4" rigid insulation. As you can see, I used the tried and true TNTTT method of stacking everything I could find in the garage on the insulation to get the glue to set... :drofl:
140295
The finished base, ready to be flipped and bolted to the trailer! It's a nice feeling to connect that first piece to the actual trailer!
140296
User avatar
jack-l57
Teardrop Builder
 
Posts: 30
Images: 106
Joined: Wed Jan 27, 2016 4:54 am
Location: Yuma, CO
Top

Re: Colorado Flatlander Teardrop build

Postby jack-l57 » Thu Mar 17, 2016 10:31 pm

TheOtherSean wrote:It sure looks like you're starting to make progress. Good luck and keep up the heard work.


Thanks! I am sure enjoying the building process!
User avatar
jack-l57
Teardrop Builder
 
Posts: 30
Images: 106
Joined: Wed Jan 27, 2016 4:54 am
Location: Yuma, CO
Top

Re: Colorado Flatlander Teardrop build

Postby Vedette » Sat Mar 19, 2016 10:55 am

Hi Jack
Thanks for including us in your build. Great pictures! :thumbsup:
I almost missed the word "flipped" in your second to last post.......and was wondering how you were going to access your under floor storage? :thinking:
I am just going out to buy my hinges for my under floor storage this morning.
Our Miss Piggy has an 8" deep half "Basement" that we love.
And our new build Kermit has a 9" deep full basement (we now have room for the solar panel to live until such time as we need it). I built vey light weight access door out of aluminum that work great.
Miss Piggy's have to be held up with one hand or your head to get clothes out of the clothes bins, so Kermit is getting gas shocks to make life just a little easier.
I will add pictures to my build journal one day soon ( I am like you...I work and take pictures for a while before I get to sit down and add them to my album)
Keep up the great work! :thumbsup: :thumbsup:
We hope to meet you camping in the 2016 season.
Good Roads
Brian & Sandi
Good Roads
Brian & Sandi
Here is a link to my Build Journal
viewtopic.php?f=50&t=50912
Image109106109111109110138766
User avatar
Vedette
Silver Donating Member
 
Posts: 5141
Images: 443
Joined: Thu Dec 01, 2011 4:28 am
Location: Westbank B.C.
Top

Re: Colorado Flatlander Teardrop build

Postby jack-l57 » Sat Mar 19, 2016 11:44 am

Vedette wrote:Hi Jack
I built very light weight access door out of aluminum that work great.

Good Roads
Brian & Sandi


Thanks Brian and Sandi! I can't wait to get on the road with my teardrop! I just wish there was an easier way to do all the wood sealing, it is driving me nuts.

I am very interested in your aluminum access door build, please post pictures either here or on your build. The side access door for the solar panel storage and the rear drawers are probably the only thing I am not quite sure how I am going to get them watertight and looking nice. Any help is appreciated! :D
User avatar
jack-l57
Teardrop Builder
 
Posts: 30
Images: 106
Joined: Wed Jan 27, 2016 4:54 am
Location: Yuma, CO
Top

Re: Colorado Flatlander Teardrop build

Postby jack-l57 » Sat Mar 19, 2016 8:54 pm

DAY FOUR:
I am finally ready to start cutting my sidewalls. I began by creating a 5' x 10' panel by rimming two sheets of 3/8" baltic birch plywood with 1x2's to keep them together tightly. This will also be my template if I ever want to build a tear with the same shape. Then I drew out my 8' 6" x 9" storage base as a reference point for the teardrop shape. I began by modifying my front jig to get a more precise line. I simply drilled a pencil hole into a short piece of 1x2 and connected the wire from my jig with a couple of screws and washers. It held very well, so I was able to put quite a bit of outward pressure on the jig, resulting in a near perfect ellipse. This is a picture of the jig:
140326
Here is another view...
140327
The back jig used the shelving supports as I had done previously and worked just fine. This is a picture of the two jigs on the board...
140328
I had planned on cutting the curves by hand with a jig saw, then stacking all the pieces and sanding them even. I really didn't want to have to go to all that work, so I attached my jigs to my jig saw and it worked great! These are pictures of how I cut the front ellipse with the jig by using the screen door rollers, picture wire and a wood base attached to the jig saw...
140329
140330
I essentially used the same method for the back curve, and again, it worked like a charm!
140331
I couldn't be happier with the final result! I propped the sidewalls on the trailer to get an idea of the overall size and shape and I love it! :awesome:
This is just the inside wall, the outside wall will include the extra 9" at the bottom to cover the storage box and bind the upper trailer firmly to the lower storage.
140332
Last edited by jack-l57 on Sun Mar 20, 2016 6:04 pm, edited 1 time in total.
User avatar
jack-l57
Teardrop Builder
 
Posts: 30
Images: 106
Joined: Wed Jan 27, 2016 4:54 am
Location: Yuma, CO
Top

Next

Return to Build Journals

Who is online

Users browsing this forum: No registered users and 14 guests