4//11/13 - Eleven months later - back to work. Page 9

Canvas covered foamies (Thrifty Alternatives...)

Moderator: eaglesdare

Re: 5/21 - Houston, we have canvas.

Postby CliffinGA » Tue May 22, 2012 9:23 pm

Mark looks great!!! Man I need to run up that way and take a look at it sometime soon so I can talk the other half into a foamie for build number 2 !

Cliff :thumbsup:
In God we trust, shoot the rest and he will sort out!

My Build:

viewtopic.php?f=50&t=42628
User avatar
CliffinGA
1000 Club
1000 Club
 
Posts: 1499
Images: 207
Joined: Sat Nov 14, 2009 1:29 pm
Location: Jefferson, GA

Re: 5/21 - Houston, we have canvas.

Postby millstone » Wed May 23, 2012 8:04 pm

Cliff: Check your inbox. M.
User avatar
millstone
Silver Donating Member
 
Posts: 74
Images: 0
Joined: Tue Jul 05, 2011 3:53 pm
Location: Georgia

Re: 5/21 - Houston, we have canvas.

Postby CliffinGA » Wed May 23, 2012 8:52 pm

We'll see ya this weekend bud!

Cliff :thumbsup:
In God we trust, shoot the rest and he will sort out!

My Build:

viewtopic.php?f=50&t=42628
User avatar
CliffinGA
1000 Club
1000 Club
 
Posts: 1499
Images: 207
Joined: Sat Nov 14, 2009 1:29 pm
Location: Jefferson, GA
Top

Re: 5/21 - Houston, we have canvas.

Postby millstone » Thu May 24, 2012 5:14 pm

A'ight.
User avatar
millstone
Silver Donating Member
 
Posts: 74
Images: 0
Joined: Tue Jul 05, 2011 3:53 pm
Location: Georgia
Top

Re: 5/26 - canvas complete - ready for paint

Postby millstone » Sat May 26, 2012 9:04 pm

Got all the trimming, and folding, and tucking done on the body.\

The first order of business was to get it up where I could work on it. It had been resting on two 8" tubes. I had to lift it with a forklift to get the tubes out of the way and get some pallets down for it to rest on, so I wasn't standing ON my head to paint down the bottom edge. It's stapled to the wood frame and covered with lotsa block filler.

On the block filler paint:

It's some thick heavy stuff. Lots of solids in the paint. Here's a picture of the resulting wall texture. This is one coat.

Image

It's not exactly the look I was going for, but it looks ok. It'll look even better with a topcoat on it. I now have three coats of block filler on the body, with one pass in between with 80 grit sandpaper, just to knock down the points.

I made an absolute MESS of the cut of the top, so after I got the edges painted down, and the accompanying frayed edges and loose stringies, I ran a line of spackling from the cut end to the edge.

Image

The idea was to make the seam less offending. It worked to a point. If you're looking for it you'll see it, so don't go looking for it.

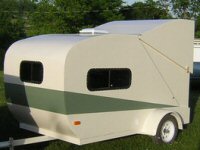
So at the end of this day we have this.

Image

The canvas was cut folded and painted into into the doorway and around my two front holes. The doorway will be finished with door stop moulding, which will cover it completely. I have doors made out of the glue laminated foam that I cut out to make the holes. Gotta wrap them and install

Image

Image

Waiting on hinges and door hardware, so I'm going to the LAKE tomorrow with the fam. Back at it Monday.

Happy Memorial Day. As my program director directed us this week. We celebrate July 4, we REMEMBER Memorial Day.

Mark
User avatar
millstone
Silver Donating Member
 
Posts: 74
Images: 0
Joined: Tue Jul 05, 2011 3:53 pm
Location: Georgia
Top

Re: 5/26 - canvas complete - ready for paint

Postby loaderman » Sat May 26, 2012 10:36 pm

Looks great!!! :applause:
loaderman
The 300 Club
 
Posts: 306
Joined: Fri Jan 27, 2012 12:03 am
Top

Re: 5/26 - canvas complete - ready for paint

Postby atahoekid » Sat May 26, 2012 11:37 pm

Personally, I like the texture that the block filler left. That is looking real good. As far as your taped edge, it looks fine to me!
Mel

"Believe in your abilities... Remember amateurs built the ark, professionals built the Titanic"

"Indecision may or may not be my problem" Jimmy Buffet

Image

The Road Foamie Build Thread: viewtopic.php?t=45698
User avatar
atahoekid
Platinum Donating Member
 
Posts: 1773
Images: 158
Joined: Sat Jul 24, 2010 2:49 am
Location: Incline Village, NV
Top

Re: 5/26 - canvas complete - ready for paint

Postby GPW » Sun May 27, 2012 4:26 am

Fine looking covering job .... :applause:
There’s no place like Foam !
User avatar
GPW
Gold Donating Member
 
Posts: 14920
Images: 546
Joined: Thu Feb 09, 2006 7:58 pm
Location: New Orleans
Top

Re: 5/26 - canvas complete - ready for paint

Postby eaglesdare » Sun May 27, 2012 8:15 am

sure looks good to me!

i now exactly what you are talking about on that top edge canvas seam issue. i had the same problem. my idea to fix it was to fold another piece of canvas and run it from the front to the back (using the sam method of laying canvas). with it being folded you will not see any frayness. now i did do this for one side, PITA! have never completely finished it. i still have to do the other side so that it at least matches. but i think we could use seam tape from a sewing shop to run along that seam and then it will look just right. that is what i am thinking now. i might try to pry off the one i did and do the sewing seam tape thing.

anyway, yours looks real good! :wine:
Louella
May the foam be with you.
User avatar
eaglesdare
Donating Member
 
Posts: 3168
Images: 13
Joined: Tue Aug 26, 2008 7:06 pm
Top

Re: 5/26 - canvas complete - ready for paint

Postby JSadler » Sun May 27, 2012 9:30 am

Nice job covering it :applause:
JSadler
Teardrop Builder
 
Posts: 27
Joined: Fri Mar 23, 2012 5:27 pm
Top

Re: 5/26 - canvas complete - ready for paint

Postby GPW » Sun May 27, 2012 10:45 am

Mill, on a scale from 1 - 10 what do you rate the degree of difficulty in canvas covering as you did it ? Also considering if you had done it in fiberglass... :thinking:
There’s no place like Foam !
User avatar
GPW
Gold Donating Member
 
Posts: 14920
Images: 546
Joined: Thu Feb 09, 2006 7:58 pm
Location: New Orleans
Top

Re: 5/26 - canvas complete - ready for paint

Postby millstone » Sun May 27, 2012 11:39 am

The quick answer is 4. I have a bad habit of tinkering as I go. So looking back there are a few things I would have done differently. Chiefly, cut the top layer to fit. I don't have a clean workspace. Lots of dirt dust and oil. And I don't have a decent place to lay out a six by eleven piece of canvas.

Plus I was concerned about shrinkage. I can safely say my personal concerns with shrinkage were assuaged. With the rosebrand canvas I found no shrinkage at all. I gave it a cursory pass with a steam iron. Maybe because I was laying the canvas up to a rigid surface, that is, already erected, instead of a flat surface that is still flexible.

It took Brook and I about four hours to apply the canvas, then I was there all day yesterday trimming folding tucking, and swearing a bit. But I do that.

I am absolutely sold on the block filler.it goes on so thick that it almost suspends the canvas. It does soak throughand capture the fibers and really goes on thick for a topcoat. And the more coats you give it the thicker the skin gets. Can't be a bad thing.

Never considered fiberglass. Built a couple canoes back in the day. Used glass there. But this way the camper is already primed. I think the work would triple easily with glass.

Im a canvas guy now. LOL

Mark
User avatar
millstone
Silver Donating Member
 
Posts: 74
Images: 0
Joined: Tue Jul 05, 2011 3:53 pm
Location: Georgia
Top

Re: 5/26 - canvas complete - ready for paint

Postby GPW » Sun May 27, 2012 1:19 pm

Thanks !!! That about says it all !!! :thumbsup: 8)
There’s no place like Foam !
User avatar
GPW
Gold Donating Member
 
Posts: 14920
Images: 546
Joined: Thu Feb 09, 2006 7:58 pm
Location: New Orleans
Top

Re: 5/26 - canvas complete - ready for paint

Postby CliffinGA » Sun May 27, 2012 11:25 pm

Mark we'll see ya in the afternoon since its after midnight, 2 pm or so today. I should have my hatch done and skinned by then so we can head over your way!

Cliff :thumbsup:
In God we trust, shoot the rest and he will sort out!

My Build:

viewtopic.php?f=50&t=42628
User avatar
CliffinGA
1000 Club
1000 Club
 
Posts: 1499
Images: 207
Joined: Sat Nov 14, 2009 1:29 pm
Location: Jefferson, GA
Top

Re: 5/26 - canvas complete - ready for paint

Postby mezmo » Mon May 28, 2012 1:10 am

Hi Mark/Millstone,

Great job on the canvas application!
It looks really smooth and soft - like a
giant TD shaped marshmallow! Ha!

It also sounds like it should be very durable
with the thickness of the coating layers.

Cheers,
Norm/mezmo
If you have a house - you have a hobby.
User avatar
mezmo
1000 Club
1000 Club
 
Posts: 1817
Images: 194
Joined: Fri Jan 01, 2010 4:11 am
Location: Columbia, SC
Top

PreviousNext

Return to Foamies

Who is online

Users browsing this forum: No registered users and 7 guests