The Poet Creek Express - Foamie Hybrid

Canvas covered foamies (Thrifty Alternatives...)

Moderator: eaglesdare

Re: The Poet Creek Express - Foamie Hybrid

Postby KCStudly » Sun Sep 15, 2013 8:40 pm

Thanks RandyG and G, No worries. There's plenty of work to do. If I get tired of working on wiring, I can just switch to something else, so long as it doesn't mess up the build sequence.

Beautiful build weather this weekend; cool and dry.

Only half a day’s work today; about 4 hrs.

I decided to add another pair of “spar blocks” under the seam between the front and rear ceiling panels. There will be a backer slat of 5 mm there to reinforce the seam. Thought about putting the extra spar there (or moving the front roof fan spar there), but that would have still left a pretty good sized gap between that location and the front cabinet frame, and I wanted the spars to be more equally spaced. This will give me a nice even spacing between spars and plenty of locations to screw the ceiling panels down nice and tight to the walls.

After deciding on locations and digging out the foam pockets I dry fit each block (labeling for their location and orientation). Here you can see that the block sits just a tad higher than the inner wall skin.
Image

Next I marked the profile on the block…
Image

… and cut to the line on the band saw.
Image

Then a little sanding (sometimes the Surform grater first)…
Image

… and check fit for fairness.
Image

Do that eight times and we get this.
Image
Image

I plan on using GG to glue these in because the pockets are not super precise and there are some irregularities to fill. So I masked off the top edge of the wall to keep goop off of the finish (stuck the tape to my T-shirt first to reduce tack!).
Image

Also, I was a little concerned that the hydraulic force of the expanding glue could bow out the outer surface of the foam, so I clamped this temporary strong back (actually the now obsolete router template I used for the fender and side table blocking recesses) on to the outside of the wall. This will have the added benefit of giving me a backer to clamp the wall/spar block sandwich together during glue up, without crushing the foam.
Image
Image

In addition to that, I drilled a pair of pilot holes thru the top of the wall into each block so that I can pin them into position during glue up. There really was no practical way to clamp or weigh these blocks into the wall so that the GG doesn’t push them out (at least not the ones that aren’t over the doorway). The drywall screw holes will not be noticeable once they are filled with the colored putty.

I decided to wait and do the glue up when I am fresh and rested. Haven’t used the GG lately and I didn’t want to rush into it; it is not very forgiving if you are not good and ready for it!

On a food note, my sister in law always has basil in her herb garden and at the end of the season she gives the harvest to me to make pesto. Yvette had given me a heads up and tonight when I got home there were 2 big grocery bags full. Garlic, macadamia nuts, fresh grated parmesan, kosher salt and EVOO in the processor. Made 2 pts.
KC
My Build: The Poet Creek Express Hybrid Foamie

Poet Creek Or Bust
Engineering the TLAR way - "That Looks About Right"
TnTTT ORIGINAL 200A LANTERN CLUB = "The 200A Gang"
Green Lantern Corpsmen
User avatar
KCStudly
Donating Member
 
Posts: 9640
Images: 8169
Joined: Mon Feb 06, 2012 10:18 pm
Location: Southeastern CT, USA

Re: The Poet Creek Express - Foamie Hybrid

Postby GPW » Mon Sep 16, 2013 7:11 am

Presto Pesto !!! 8) 8) 8) YUMMY!!!!

We’re getting ready to plant our second crop of Basil , due to the longer growing season ... And we grew another Pineapple ... :D

Looking Great KC, all those little details !!! :thumbsup: ... glad your weather is becoming more "build friendly" !!! 8) We can’t say the same here... :rainy: :sweaty:
There’s no place like Foam !
User avatar
GPW
Gold Donating Member
 
Posts: 14920
Images: 546
Joined: Thu Feb 09, 2006 7:58 pm
Location: New Orleans

Re: The Poet Creek Express - Foamie Hybrid

Postby KCStudly » Wed Sep 18, 2013 10:10 pm

Thanks, GPW.

Picking away at it bit by bit, almost 2-1/2 hrs in tonight, although I did take Monday off (wife wanted to grill dinner and I had to go home and make sure that the spare propane bottle had gas and swap it in).

Out at Mecca tonight I started by GG’ing the street side spar blocks in.
Image
Image

I decided to flip the rosin paper mask up and tape the ends to the handles on the clamps forming a bit more of a “drip pan”. I was happy that I did when this drip formed.
Image

While that was kicking off I trimmed an ear off of the cooler glide where it would have interfered with the cover plate over grand central. I also trimmed the lower edge of the cover a tad. This was after the initial trimming; I worked it a bit more with the Bader and some fine files before I was happy with it.
Image
Image

The bearings in the glide don’t travel this far, so the ear that was cut off was not at all critical.

Moving back to the cabinet ledgers: I have it in my head that I want the edges of the ledgers that will be visible under the cabinets to have the same radius as the cabinet face frames and the quarter round underside trim, otherwise the sharp corner would bug me when I lay in bed looking up. However, dealing with the gap that it would create between the radius on the ledgers and the ends of the side trim could become tedious. I guess I would have to deal with that where it meets the back of the cabinet frames anyway, so it was time to do some testing and see what the best way of dealing with this joint configuration is (I have an idea of how to do this quite easily, but I wanted to try an alternate method first).

By putting a piece of tape on the router table and marking the limits of the cutter, I could plunge to start and lift off to finish rounding over the ledger stock rounding over most of a stick, but leaving squared ends.
Image
Image
Image

Not too bad, but not quite what I want.

I didn’t want to change the router setup just yet because it was all dialed in with the 1/4 inch round over bit, but my next plan was to go ahead and radius the full length of the ledger, then cope the ends of the quarter round to fit up against it. I have a 1/4 radius bull nose bit that I can use to cope the trim. To get an idea of how that might work, w/o changing the router, I just used my sanding block and hand coped the end of the trim to see. Kind of crude, but good enough to make up my mind.
Image

Then I proceeded to run the ledgers straight thru on both top and bottom edges.
All of my quick clamps were tied up on the glue job, so I tried using the spring clamps on the feather board setup. They worked fine.
Image

Cut the rest of the long ledgers then ran them all thru both top and bottom, even doing the drops (some of which may get used to trim the galley shelves where the hatch actuator chases will be cut out).
Image

Weather was especially cool and dry; didn’t need to open windows or run fans. Very pleasant.
KC
My Build: The Poet Creek Express Hybrid Foamie

Poet Creek Or Bust
Engineering the TLAR way - "That Looks About Right"
TnTTT ORIGINAL 200A LANTERN CLUB = "The 200A Gang"
Green Lantern Corpsmen
User avatar
KCStudly
Donating Member
 
Posts: 9640
Images: 8169
Joined: Mon Feb 06, 2012 10:18 pm
Location: Southeastern CT, USA
Top

Re: The Poet Creek Express - Foamie Hybrid

Postby KCStudly » Sun Sep 22, 2013 9:48 pm

Thursday I pulled the glue setup off of the street side spar blocking and cleaned up the excess foam muffins from the GG.

Not sure if it was the ‘tamp the tape on your T-shirt’ trick, or the ‘hair dryer to warm the tape for removal’ trick (I used both), but either way none of the finish lifted when removing the tape!! Whooohoo!! Thank you ladies and gentlemen for your support!

I made this little trim channel that will hide the red light zip cord under the lower rear cabinet. I still need to make a little screw block that is a little wider than this for the light to mount to. It will just be glued in place under the cabinet
Image

Experimented with coping the trim using the round tipped router bit. I need to work out a better miter jig to hold the piece more securely (it wanted to pull into the cutter gradually after leaving the fence and using the spring clamps on the radius to try and hold it to the miter guide it wanted to roll the part up off of the table, so…), but here is the idea anyway.
Image
Notice how the base of the cutter is above the level of the table in order to get the proper depth of cut on the part.

Here you can see how I made an initial pass with a 5mm shim under the part so as not to leave a little uncut tag due to the cutter being high. This also helped to reduce how much material would be removed on each pass.
Image

At the back you can see how the vertical wood backer is trimmed out one-for-one with the cutter, supporting the work piece fully to minimize chip out.
Image

Here is a dry fit of the wire trim just using a piece of the 1/4 round to simulate the radius on the ledger stock.
Image

And I ran a test piece of the 1/4 round and test fit that to the wire trim piece.
Image

Each of these cuts took several attempts because they wanted to move around under my grip once they left the main fence and the cutter started pulling them in. I will probably end up making a miter sled with a clamp to lock the part down; I need to be able to get the cut on the other end of the part right the first time once I cut the stock to length.

Also touched up some of those marred areas of finish with stain, including the temp screw holes for the spar block glue up. After that had set for a while I stuffed some colored putty in the holes and wiped it smooth with a rag. Almost invisible.
Image
Image

Need to glue the curb side spar blocks in and get back to the wiring. I’m also considering dyeing the vinyl Wiremold black (even though most of it will be hidden by the mattress); maybe just do the piece for the hatch leads under the galley counter, because that one might be more visible. Maybe use that plastic coat paint instead of the dye because I think I have some and it doesn’t make sense to spend a bunch of money on dye and surface prep for such a small job. (Babble, babble, babble… head spin.)

Anyway, I had some jobs to do around the house so I took Friday and Saturday off from building to get those done.

Now it’s Sunday.

I jumped right in and made the improvements to the router miter jig sled. Screwed the 5mm tray onto the bottom of the vertical pine fence (had to raise the cutter accordingly). Screwed up thru that on the leading edge for a couple of small maple scrap blocks. Then I made a couple of little dog down clamps with wooden pads glued on the tips (with the black overspray) to screw down into the maple blocks. In this pic the work is clamped on top of a slightly thinner shim (note the shadow line under the part).
Image

Here you can see the little wedge shims needed to keep the spring clamps from rocking the sled up off of the table. The cheap plastic miter slide is not square to the table (I’m assuming this is due to the draft, or taper, required for the plastic part to release from its casting mold during manufacture).
Image

Closer look with shim under.
Image

Shim over for second cut.
Image

And another dry fit test. Ah, that’s so much better, and I can get good results reliably on the first try.
Image

Setup and glued in the curb side spar blocking.
Image
Image

Next I strung out all of the wires on the street side and slipped the rear section of Wiremold into position. Shimmed it up off of the floor using a length of the 5mm ply, stuck it to the toe board and screwed it off thru the predrilled holes using the truss head stainless steel screws.
Image

Trained all of the wires into the ‘tray’…
Image

… and closed it up.
Image

Same thing on the curb side, just a lot fewer wires.
Image
Image

Had thought about painting these black, but am getting impatient and trying to focus on details that will be seen. BTW, the sticky backing on these stuck like mad!!! If you use this stuff, be sure you have it where you want it before sticking it down!

Finished out the day (5-1/2 hrs) by rubbing all of the cabinet parts down with oil (Minwax “Natural”).
Image

Having second thoughts about using the small 1/4 round under the cabinet and shelf bottom ends. I think I might switch it up and use the ledger stock on the ends, too. Will need to miter the ‘rear’ corners and fit the fronts similar to the wire trim coping method shown above, but the attachment method to the side walls will be more secure (with screws in the grooves in lieu of little pin nails), and it will trim out the top of the panels as well. :thinking: I should try a mock-up of the 1/4 round before I change my mind.
KC
My Build: The Poet Creek Express Hybrid Foamie

Poet Creek Or Bust
Engineering the TLAR way - "That Looks About Right"
TnTTT ORIGINAL 200A LANTERN CLUB = "The 200A Gang"
Green Lantern Corpsmen
User avatar
KCStudly
Donating Member
 
Posts: 9640
Images: 8169
Joined: Mon Feb 06, 2012 10:18 pm
Location: Southeastern CT, USA
Top

Re: The Poet Creek Express - Foamie Hybrid

Postby RandyG » Sun Sep 22, 2013 10:25 pm

Hmmm... Router porn? :thumbsup:
Randy
Aircraft fabricator, novice carpenter, electrical apprentice, audio engineer dropout.
Build thread - http://www.tnttt.com/viewtopic.php?f=50&t=54126
User avatar
RandyG
500 Club
 
Posts: 695
Images: 115
Joined: Thu May 10, 2012 6:52 pm
Top

Re: The Poet Creek Express - Foamie Hybrid

Postby KCStudly » Sun Sep 22, 2013 10:45 pm

You gotta tool up to make the tool work the way you want it to.

I've said it over and over; just because you think you have all of your ducks in a row, doesn't mean you won't have to jump thru hoops to get from point 'A' to point 'B'.

It took me a while, but I got to where I wanted to be.

Thanks for watching. :thumbsup:
KC
My Build: The Poet Creek Express Hybrid Foamie

Poet Creek Or Bust
Engineering the TLAR way - "That Looks About Right"
TnTTT ORIGINAL 200A LANTERN CLUB = "The 200A Gang"
Green Lantern Corpsmen
User avatar
KCStudly
Donating Member
 
Posts: 9640
Images: 8169
Joined: Mon Feb 06, 2012 10:18 pm
Location: Southeastern CT, USA
Top

Re: The Poet Creek Express - Foamie Hybrid

Postby KCStudly » Mon Sep 23, 2013 10:09 pm

Hit it for nearly 3 hrs again tonight. Went to leave and just kept getting sucked back in!

Here’s the top of the curb side wall with the GG “muffin tops” after gluing in the spar blocking.
Image

And here it is again after shaving them off with the extended razor knife and hitting them a little with the sanding block.
Image

Then I did some experimenting with the pin nailer shooting the maple 1/4 round onto some scraps of cedar to see if: (1) I could hit the little thing accurately (check… for the most part); (2) it would not split (check); and (3) the nailer would perform uniformly, driving the pins far enough without making a big ugly mark from the tool’s anvil (fail… no consistency), but it did show some promise.

Now, I only put blocking in the walls at the “back” of the cabinets and shelves (…I’m using quotations here to indicate relative parts of the cabinets with “back” and “rear” in relation to the face frames, and not the travel direction of the camper), and at the face frames; none in the middle of the sides, so I will only be able to fasten at the ends of the cabinet side trim (plus glue). The 1/4 round is small enough that it has some flex, and that was the main deciding factor that pushed me to changing my mind and using the grooved ledger stock for the sides of the cabinets.

This also has an added benefit. My original plan for assembling the cabinets in place was to hang the ledger, slip the panel into place while also installing the face frame, and then come back and add the 1/4 round underneath. Juggling the face frame and panel while trying to glue it all was going to get interesting, and messy, I am sure.

With the ledgers on the side I will be able to hang the “rear” ledger; then the side ledgers (either by dry fitting the face frame as a reference to fit to or by using my story sticks); then I can slide the panel into the grooves and the ledgers will hold it in place nicely; then it is a simple matter of installing the face frame. Win, win.

So I went ahead and mitered both ends of the 4 “rear” ledgers, and cut and mitered all of the cabin side ledgers.
Image

Here’s a mockup of how the side ledger will meet the “rear” ledger.
Image
Image

Let’s look at that drawing again. The cabinets at the rear of the cabin are shown on the left of the bulkhead (with the galley shelves and counter top on the right). Neither the small side 1/4 round or side ledgers are shown, as I have not bothered to add that detail to the computer model. Also, disregard the large 1/4 round shown; those have been superseded by the ledger stock as shown for the bottom rear of the lower cabinet.
Image

So if you remember or look closely you might be able to see that the bottom “rear” edges of the cabinet face frames have a 1/4 inch radius on them with the panel groove located 3/8 inch up from the bottom. That’s where the cope on the 1/4 round trim would have fit, as well as at the “rear” ledger. Now with the side ledger the cope detail needs to be a little different because of the height of the ledger (it needs to be more “J”-shaped) while the miter between the side and "rear" ledger takes care of that end.

Also, where the lower rear (cabin rear) cabinet butts up under the upper rear cabinet floor, the side ledgers will need to have 3/4 wide dadoes cut up to the bottom of the grooves to accept the lower face frame.

Clear as mud, right?

So I cut all of the side ledgers 1/4 inch long to allow for the cope, and I laid out the dadoes (but will double check fit at install before committing to the cuts).
Image

Started to modify my router mitering jig sled to suit the new cope detail. That’s when the carbide bit found one of those SS screws on the underside. The carbide is hard and the SS is relatively soft, so the carbide won. I labeled this pic, “The Chewed Screw”.
Image

Easy fix; just move the screw over 3/4 of an inch or so.

Here’s the new setup. The work (the side ledger) gets screwed thru its back to attach it to the miter fence in a vertical position (the thing sticking up). The shim taped to the table is just there to help align the work until it has been screwed into position.
Image

Here’s a head on shot. The maple is kind of hard so it will take several passes, raising the cutter each pass until it gets to a reference mark on the dial gage of the router adjustment.
Image

This miter setup on the table saw will complete the ‘J’-shaped cut (shown with a little chunk of ledger just being used as a gage for setup). Depth of blade is set precisely. The wood slat clamped to the miter slide supports the work and helps prevent tear out. The wood slat clamped to the saw fence ends just before the work enters the blade to prevent binding during the cut.
Image
Image

Here is a mockup using a chunk of the ledger in lieu of the a cabinet face frame (on left) with the test piece representing the side ledger on the bottom.
Image

I made a final adjustment to the table saw, and just need to test that with a longer piece of stock to confirm; should tighten up that shadow area by the pencil line just a bit.

Sweat the details. You may think that I am crazy for going to all of this trouble for such a small detail (…and I probably am!!!), but the way I see it is, this is what I will be looking up at when I am lying there in bed, so I want it to be nice!

That’s all for tonight. As usual, thanks for coming along with me.
KC
My Build: The Poet Creek Express Hybrid Foamie

Poet Creek Or Bust
Engineering the TLAR way - "That Looks About Right"
TnTTT ORIGINAL 200A LANTERN CLUB = "The 200A Gang"
Green Lantern Corpsmen
User avatar
KCStudly
Donating Member
 
Posts: 9640
Images: 8169
Joined: Mon Feb 06, 2012 10:18 pm
Location: Southeastern CT, USA
Top

Re: The Poet Creek Express - Foamie Hybrid

Postby tac422 » Tue Sep 24, 2013 6:54 am

KC,
Wow,nice work ! :applause:
I enjoy following this build !
User avatar
tac422
500 Club
 
Posts: 639
Images: 224
Joined: Sun Mar 17, 2013 11:39 am
Top

Re: The Poet Creek Express - Foamie Hybrid

Postby wagondude » Tue Sep 24, 2013 8:56 am

I think we can officially put to bed your early claim of not being a woodworker. You have done as fine a job as any I have ever seen. :thumbsup:
Bill

TnTTT ORIGIONAL 200A LANTERN CLUB
101137
User avatar
wagondude
1000 Club
1000 Club
 
Posts: 1535
Images: 35
Joined: Sun Jan 16, 2011 7:41 pm
Location: Land of the Jayhawks
Top

Re: The Poet Creek Express - Foamie Hybrid

Postby tony.latham » Tue Sep 24, 2013 11:12 am

KC:

I've been skulking and camping all over this forum for the last two or three months. 'Poked around on TNTT off and on for years after I bought my first Tear, a Hunter 4 x 10. What catalyzed my recent TNTT skulk was bumping into a SoCal 5 x 10 tear this summer –and I've been cranking on my 5 x10 ever since. (Aluminum will be here tomorrow!)

Frankly, "Foamie Hybrid" didn't really catch my attention –my build is a somewhat traditional tear build– although repeated forum searches brought stuff up here and there on the PCE thread. But finally last night I opened your thread up. It's more of a large, steel cable of a posting. Spectacular job on the documentation and craftsmanship.

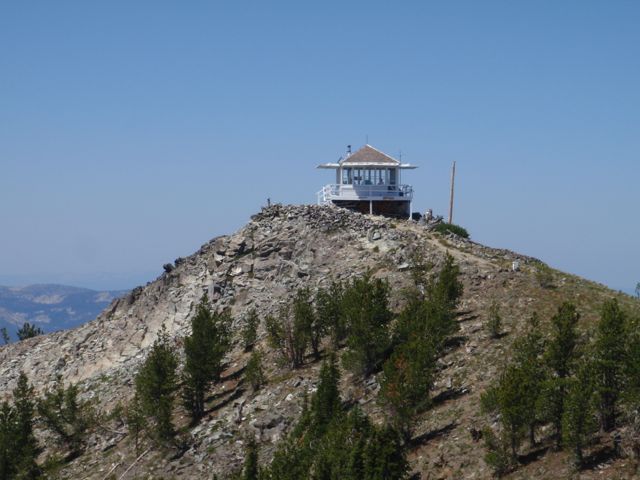
What caught my attention right off the bat was where Poet Creek is –up on the Magruder Corridor. Not too far from my 'hood, at least in air miles. I've spent a fair amount of time at the bottom of Bargamin Creek. Last summer I spent a few days as a volunteer lookout on Salmon Mountain Lookout off the corridor road. That's as far out on the corridor as I've been. Maybe I need to head to Poet Creek with my new Tear next summer. At least to the Selway.

A quick shot of Salmon Mountain Lookout:
Image

That sliver of country you can see past the lookout should be Bargamin CRICK.

After looking through about half the posts, I had to jump to the ending. Did this guy make it to Poet Creek this year?

Anyway, this might not have been a good year to visit the Magruder Corridor. There was a large, 42,000 acre fire burning on the east side of the corridor. The road was closed for most of August. On top of that, a sever thunderstorm put down a deluge a few weeks ago. It caused a blowout that put a large volume of mud, rocks, and logs across the road. I don't recall what drainage it was in but they've got it cleared and the road is back open.

I look forward to more skulking through your post! :thumbsup:

Tony Latham
User avatar
tony.latham
Gold Donating Member
 
Posts: 7076
Images: 17
Joined: Mon Jul 08, 2013 4:03 pm
Location: Middle of Idaho on the edge of nowhere
Top

Re: The Poet Creek Express - Foamie Hybrid

Postby grantstew8 » Tue Sep 24, 2013 12:27 pm

KC
I'm learning from you ! Thanks for the photos it makes it clearer..... :thumbsup:

The wiring on my td is about halfway through and I was thinking I could use my router to make channels to for LED's so I can rotate them and change the "ambiance"
Now I've seen what you've done, and how you've done it, I can do it.

Thanks
User avatar
grantstew8
The 300 Club
 
Posts: 448
Images: 77
Joined: Tue May 28, 2013 5:26 pm
Location: Dunfermline, Scotland
Top

Re: The Poet Creek Express - Foamie Hybrid

Postby KCStudly » Tue Sep 24, 2013 3:15 pm

Tac422, thanks for the kind words. It feeds the fire and helps to justify the time that it takes to post in such detail.

Bill (Wagon dude), Hey, what can I say; a metal gearhead pushing wood is just the proverbial “horse of a different color”. Thank you.
wagondude wrote:You have done as fine a job as any I have ever seen. :thumbsup:

I’ll take that compliment. I’ll argue heartily that it couldn’t possibly be true, but I will take it!

You must have not seen the Little Swiss by Planovet (excellent color, fit and finish); The Silver Beatle and 2Bit’s LT are hard to beat; The Atma Travelear is a cabinet makers wet dream, as well as a first class exercise in artistic design; anything by WoodButcher, especially his Slow Mobile; or anything by Doug Hodder, the master of masters. These are just some of the awe inspiring craftsmen that have inspired me to try to hold a candle and do my part to give back to the forum. I also have to give credit to my good friend Dale and the work that he has done restoring his boats. Of course, none of this would be possible without my best friend Karl’s encouragement and “use of the hall”.

Thank you all so kindly.

Tony, Thank you sir for sharing your experience from the Magruder. Love the pic. I envy you your time there, and the fact that it is “within striking distance” for you. Go there often. Enjoy the solitude and wonder of nature. Catch a nice healthy rainbow for me, brown it up in a skillet with a little flour, crack a beer and think of me, would you?

I do have the number for the ranger station at Elk City and have spoken with the ranger that covers the Poet Creek area. I didn’t bother to call out there this season because there was no way the camper would have been ready and we decided not to tent camp; but I sure will call and check on the conditions well before, and up to the point that we do finally “hitch our wagon” and head out.

The land is resilient and will bounce back, and fortunately there are two ways out if one of them gets blocked while there, albeit a very long and winding way!!!

Thanks Grant. I’m glad I was able to help in some small way. I haven’t seen any updates on your build lately; hope I haven’t been missing them (?).

As always, thank you all for sticking with me and especially for participating. This sure is fun, init-it?
KC
My Build: The Poet Creek Express Hybrid Foamie

Poet Creek Or Bust
Engineering the TLAR way - "That Looks About Right"
TnTTT ORIGINAL 200A LANTERN CLUB = "The 200A Gang"
Green Lantern Corpsmen
User avatar
KCStudly
Donating Member
 
Posts: 9640
Images: 8169
Joined: Mon Feb 06, 2012 10:18 pm
Location: Southeastern CT, USA
Top

Re: The Poet Creek Express - Foamie Hybrid

Postby KCStudly » Thu Sep 26, 2013 11:09 am

Link to debut of my "new" 200A lanterns.

An update from last night's progress, and maybe this evening's coming soon.
KC
My Build: The Poet Creek Express Hybrid Foamie

Poet Creek Or Bust
Engineering the TLAR way - "That Looks About Right"
TnTTT ORIGINAL 200A LANTERN CLUB = "The 200A Gang"
Green Lantern Corpsmen
User avatar
KCStudly
Donating Member
 
Posts: 9640
Images: 8169
Joined: Mon Feb 06, 2012 10:18 pm
Location: Southeastern CT, USA
Top

Re: The Poet Creek Express - Foamie Hybrid

Postby KCStudly » Thu Sep 26, 2013 9:38 pm

Back to coping the side ledger cabinet trim.

For the setup of the router and table saw I crept up on the router to get that set right then made the saw cut fit to the router work. Seemed logical for set up, however, it was a lot of passes and risked having the router not repeat accurately.

So for the “production” work, I changed the order and made the saw cut first.
Image
Image

Then I just used the utility knife to clear the tang and chisel off some of the waste.
Image
Image

While I had everything set up I decided to use the last of the made up ledger stock on the sides of the galley shelves. The length of stock I had left over was about an inch shy of making the four pieces needed, so I decided to shorten the shelves by 3/8 inch (allowing for the saw kerf) moving the face frame closer to the bulkhead slightly. There is plenty of margin in the size of the wall blocking and clearance to the hatch actuator chases. Here are the blanks for that. I didn’t miter cut the end at the bulkhead (yet), because I’m not sure if I’m going to make more ledger stock (probably) or if I can get some larger 3/4 inch 1/4 round trim out of the 1x4 I picked up with the rest of the maple.
Image

Notice that these are pairs of opposite hand parts, so some of them screwed to the router miter fence thru the back, and some with longer screws in thur the groove on the front side.
Image
Image
Image
Image

Worked thru until about 8pm (3 hrs on Wednesday) and with the shorter days it was well past dark out. The lighting in the loft isn’t great and is worse due to the plastic tenting, so took the opportunity to fire up the turd for the first time this season.
Image

Tonight (Thursday) I got out to Mecca a little earlier and put in another 3 hrs. Did a bunch of little detail work on the side ledgers to finish them up.

Decided that everything was coming together with a high degree of accuracy, so I went ahead and cut the dadoes into the side ledgers for the upper rear cabinet. Here are some dry fit mock ups. The oak block represents the top of the lower rear cabinet face frame (the upper cabinet extends past the front of the lower cabinet in typical TD fashion, so the lower is recessed under the upper).
Image
Image

I got ahead of myself and oiled all of these parts before I realized that I had not drilled the screw holes yet. In order to be sure to pick up the wall blocking with the screws, I toed them at an angle. This also will make it easier to fit the cordless drill into the corner of the cabin to drive the screws. The longer SS deck screws with the small heads will work great in the thicker side walls (they were going to be marginally too long going straight into thinner bulkhead, but that is not a problem when screwed into to the thicker side walls at an angle).
Image

Next I sized all of the pilot holes up to clear the threads of the screws. This way I can be sure that the trim will pull up tight to the wall rather than jacking up at the joint between the two.
Image

Also note that I spent a good deal of time with the razor knife trimming all of the chip out and fuzz left by the interrupted cut of the dull countersinking bit. The countersinking bit is a little wider than the panel groove, so you will see all of the little crescents along the edges of the panels. If we ever meet at a gathering and you notice this, please do not mention it. I’m not super happy about it, but will get over it, so long as you don’t point it out to me!

To finish up, literally, I went back and oiled around the lips of all of these little crescents so that they might not stand out as much after poly.
Image

I need to decide if I am going to try and apply the poly before building out the cabinets, or if I am going to apply the poly after they are assembled in place.

At the moment I’m thinking the later.
KC
My Build: The Poet Creek Express Hybrid Foamie

Poet Creek Or Bust
Engineering the TLAR way - "That Looks About Right"
TnTTT ORIGINAL 200A LANTERN CLUB = "The 200A Gang"
Green Lantern Corpsmen
User avatar
KCStudly
Donating Member
 
Posts: 9640
Images: 8169
Joined: Mon Feb 06, 2012 10:18 pm
Location: Southeastern CT, USA
Top

Re: The Poet Creek Express - Foamie Hybrid

Postby GPW » Fri Sep 27, 2013 6:23 am

Poly first ... no dripping on the beautiful finish already established ... :o Too NICE a work to have any accidents happen ... ;)
There’s no place like Foam !
User avatar
GPW
Gold Donating Member
 
Posts: 14920
Images: 546
Joined: Thu Feb 09, 2006 7:58 pm
Location: New Orleans
Top

PreviousNext

Return to Foamies

Who is online

Users browsing this forum: No registered users and 1 guest