Another foam standie...

Canvas covered foamies (Thrifty Alternatives...)

Moderator: eaglesdare

Re: Another foam standie...

Postby PcHistorian » Wed May 09, 2012 7:43 pm

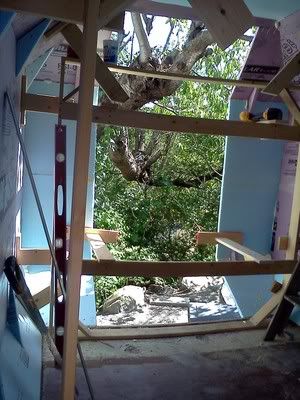
I guess a lot of what I am not seeing is the frame inside. (duh) but seriously you are engineering for verticle weight support, and horizontal "drag" pressures sideways on the design. I can understand the lateral supports of the walls, but it seems like you have bottom angles everywhere you need squared supports... (you probably have a total box frame interior and just the cabinets going out, over the over hangs. It'll be interesting how you fill in all the bottom cabinet triangles (shoe bins/trees) and top cabinet triangles (arge matey, pirate hats go there. and of course speakers for the quad system, top spaces. extra lowers get the sub woofers. (better glass those in good with ports, too. Or you'll litterally blow the bottom out of your trailer, with subwoofer wattage. ;-)

Just throwing ideas at yah mate. yer the one with the "burdens of command" and the final say. :-)
Elf Cottage
Image

Build Documentary
https://sites.google.com/site/pchistorian/home/hobby/camping/elf-build
Build Forum
http://www.tnttt.com/viewtopic.php?t=48462
Build Album
http://www.tnttt.com/gallery/album.php?album_id=42

progress is progress. (don't look a gift "progress" in the mouth.)
User avatar
PcHistorian
The 300 Club
 
Posts: 354
Images: 198
Joined: Fri Dec 09, 2011 1:06 pm
Location: S.E. Michigan

Re: Another foam standie...

Postby mezmo » Thu May 10, 2012 12:49 am

Hi WW,

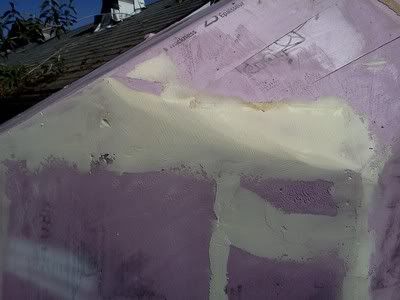
Just wondering if you could us a triangular piece of Lexan, Plexiglass,
or polycarbonate sheet as the top triangle in order to keep
the area aft of the door in the 'aero' mode? That'd still allow
a skylight under it on the top [possibly?]. Since the rest
of the body is more 'aero', using a clear panel on the top aft of the door
may allow you to keep the 'aero' going and still have the skylight.

Cheers,
Norm/mezmo
If you have a house - you have a hobby.
User avatar
mezmo
1000 Club
1000 Club
 
Posts: 1817
Images: 194
Joined: Fri Jan 01, 2010 4:11 am
Location: Columbia, SC

Re: Another foam standie...

Postby Wobbly Wheels » Thu May 10, 2012 8:42 am

That's a good though Norm. Because the forward end would need to match the right angle where the door's header and jamb meet, it would take two triangular pieces with a seam down the middle, or a single pieces formed to a 90 at one end. I like that idea - I'm going to keep that one in mind and get a quote next time I'm in town.

PcH, the value in a monocoque structure is that it doesn't need internal bracing - it forms what are essentially a series of arches. Think of those science experiments in school where you tried so see how much weight you could load onto an egg. Like a sandwich-walled egg , they key is going to be in getting a good bond between the walls and roof so they behave as a single unit, which is one of the strengths of glassing.
Hmmm...new project name: Egg Sandwich ? :lol:
That said, functionality dictates an interior bulkhead and cabinet boxes that will double as bracing, as you mentioned. The storage will be under the dinette seats and under the forward section of the bed. 18" of the bed is cantilevered past the trailer's rear X-member (over the rear slope) and 36" is above the floor. I don't want to load the rear panel under the bed so there will be sloped-back drawer boxes under there and the curb-most one (that won't slide out without hitting the dinette seat) will be a sealed locker accessible from outside. I may do the same thing on the street side as well depending on how far back I put the gable on the end of the galley cabinet. Rather than upper cabinets there will be fixed 'stargazer' skylights in those panels, as I want to keep the top half of the trailer as light as possible. The only significant weight going up there is the solar panels - a necessary compromise.
The bed will have two supporting webs running across the trailer - one will be 36" into the cabin and one will be supported on the rear frame of the trailer. The bed top will be a foam torsion box rather than ply, probably two skins of 1/4" ply and 1" foam. The dinette seat cabinet tops, countertop, toilet pedestal top, etc will be built the same way.

But first, I have to get the shell glassed, so it's off to work I go !
Gotta pay for this 'habit' somehow...
User avatar
Wobbly Wheels
Donating Member
 
Posts: 1080
Joined: Tue Mar 15, 2011 9:51 am
Top

Re: Another foam standie...

Postby PcHistorian » Thu May 10, 2012 9:08 am

I guess in addition to the sandwiched wall is the "build a bridge of triangles" which if the edges are attached well, prevents all flexing at the edges and overall structure. I'll have to examine it in detail after built. think you could do a movie of the interior, short with close ups of the corners and edges, and the way-back's of the full walls? (before you paint it over and cover in the inside.)
Last edited by PcHistorian on Thu May 10, 2012 9:10 am, edited 1 time in total.
Elf Cottage
Image

Build Documentary
https://sites.google.com/site/pchistorian/home/hobby/camping/elf-build
Build Forum
http://www.tnttt.com/viewtopic.php?t=48462
Build Album
http://www.tnttt.com/gallery/album.php?album_id=42

progress is progress. (don't look a gift "progress" in the mouth.)
User avatar
PcHistorian
The 300 Club
 
Posts: 354
Images: 198
Joined: Fri Dec 09, 2011 1:06 pm
Location: S.E. Michigan
Top

Re: Another foam standie...

Postby GPW » Thu May 10, 2012 9:09 am

It’s the “bread” that holds the egg sandwich together .... the Skin ....
There’s no place like Foam !
User avatar
GPW
Gold Donating Member
 
Posts: 14920
Images: 546
Joined: Thu Feb 09, 2006 7:58 pm
Location: New Orleans
Top

Re: Another foam standie...

Postby mezmo » Fri May 11, 2012 12:28 am

Hi WW,

Here are a few links for sources for connection strips for the lexan/plexiglass/
ploycarbonate sheets if you can't get some bent at 90 egress easily. I was thinking
1/4in thick for ease of use/handling/fabrication. Maybe use these and clear silicone
caulk etc.. 'Found them through Googling "1/4in channel/corners/glass moldings/
extrusions etc.".

Acrylic [I believe], black, white, clear
http://displayproductsonline.com/extrus ... dings.html

Aluminum
https://glaziershardware.3dcartstores.c ... _c_98.html
http://www.brunnerent.com/Tools/Portfol ... PageView=0
http://www.mcmaster.com/#catalog/118/3773/=hhe31z

Cheers,
Norm/mezmo
If you have a house - you have a hobby.
User avatar
mezmo
1000 Club
1000 Club
 
Posts: 1817
Images: 194
Joined: Fri Jan 01, 2010 4:11 am
Location: Columbia, SC
Top

Re: Another foam standie...

Postby Wobbly Wheels » Sun May 13, 2012 5:24 pm

Thanks Norm. If this thing proves to be a success, that's going to be one of the first improvements I make.
There is also a plastics shop in town that can probably form exactly what I need, since it would start from a single large triangle, a single long straight bend and some sort of return to give me a mounting flange. I've never priced out that kind of stuff, so it'll be interesting to see what it costs. I should also try a long trip with a canvas cover stretched over that area to see if the reduced drag (improved mileage) is worth the cost.

'The bread in the egg sandwich'
Boy GPW you sure do know how to carry an analogy...I wonder if I'll start getting a craving for one while working on the trailer...
User avatar
Wobbly Wheels
Donating Member
 
Posts: 1080
Joined: Tue Mar 15, 2011 9:51 am
Top

Let the glassing begin

Postby Wobbly Wheels » Sun May 13, 2012 5:49 pm

I got the first panel cut out and onto the table downstairs - the filler is curing as we speak. The last of it started to kick off in the tub (what can I say, I haven't epoxied in a while :lol: ) so I ought to be able to sand it after dinner and hopefully get the first coat of glass on the outside.

I started today by adding more struts to the form to hold the back wall. I cut the panel vertically first so I could line up the pads to span the gap, which gives me a fixed plane to hang the panel on after it's glassed. I'll mate it back into the hole, then cut out the next panel and repeat the process till I get all the way around. The roof will be last.
The cutout panel showing the standoffs:
Image

Image
I gusseted them because they have to extend 24" from a 3/4" edge, unlike the rest of them that are short.

The removed panel, the same width as a piece of cloth:
[img]http://i1202.photobucket.com/albums/bb363/Folder1966/IMG278.jpg
[/img]

Weapons of choice:
Image

Hindsight being what it is, I could have used two triangular panels with beveled edges to form this area. It seems obvious now, but I just couldn't visualize it at the time. I closed off most of it by gluing in foam, then filled the big gaps with canned foam, shaped it , then applied up some filler. I'm using microballoons to thicken the epoxy because they are lightweight and easily sanded. I waited until it was hard enough that I could just dent it with a fingernail, then went at it with a cheese grater (Surform plane). This allows you to know down the high spots quickly and reduce the amount of sanding that would be needed if you let it cure fully (less sanding is ALWAYS a good thing as far as I'm concerned !!)
Image
I'll leave that one a while to get good and hard before I sand that area to its final shape since I have my work cut out for me for the next little while anyway.
User avatar
Wobbly Wheels
Donating Member
 
Posts: 1080
Joined: Tue Mar 15, 2011 9:51 am
Top

Re: Another foam standie...

Postby GPW » Sun May 13, 2012 5:58 pm

Regarding the egg sandwich : ... You don’t want the inside of the egg oozing out , then the Yolk is on you !!! :o :roll: :lol: :lol: (Sorry , couldn’t help myself :oops: )

Cheese grater, you must have done some Body work ??? ;)
Looking Good !!! Really coming along now !!! :thumbsup: Send more :pictures:
There’s no place like Foam !
User avatar
GPW
Gold Donating Member
 
Posts: 14920
Images: 546
Joined: Thu Feb 09, 2006 7:58 pm
Location: New Orleans
Top

Re: Another foam standie...

Postby PcHistorian » Mon May 14, 2012 9:17 am

you are cutting it apart to coat it with glass? I was just going to ask, is there is a difference in the drying expansion/contraction of the glass and is a foam surface susceptible to warping during the hardening process. I guess I wanted to see what mounting framework you had on the inside, I hadn't realized that you were still at a shaping, stiffening phase, until the panels were glassed and hardened. (I use the "cheese grate/plane on wood, too. sort of the in-between a humongoid rasp and an I don't know what... power sander on 35 grit. I mostly use it for fresh cut wood edges, and I have the flat and curved "bits". (long))
Elf Cottage
Image

Build Documentary
https://sites.google.com/site/pchistorian/home/hobby/camping/elf-build
Build Forum
http://www.tnttt.com/viewtopic.php?t=48462
Build Album
http://www.tnttt.com/gallery/album.php?album_id=42

progress is progress. (don't look a gift "progress" in the mouth.)
User avatar
PcHistorian
The 300 Club
 
Posts: 354
Images: 198
Joined: Fri Dec 09, 2011 1:06 pm
Location: S.E. Michigan
Top

Re: Another foam standie...

Postby Wobbly Wheels » Mon May 14, 2012 5:34 pm

Regarding the egg sandwich...


Hmmm...I guess it could be said that the trailer WILL have a hard shell with a soft gooey center...while we're sleeping in it, anyway.

The sections are getting cut out to glass because it's always easier and more productive to lay up panels when they're lying flat. Sometimes it's unavoidable that you have to do a vertical or an overhead lay-up (ugh), but you normally avoid it if at all possible. With the panel horizontal, you can better control the saturation of the cloth so you don't have dry spots, the cloth doesn't sag, and you don't have the floor covered in resin ($$$) when you're done.
The rough shaping is all done now. There will be some filling when it's on the table and I'll sand that area in the pic I posted above, but otherwise I'm done until the final fairing with a longboard when the panels are all back in place and the final layer of glass is on. I got the glass on the outside of the piece I cut yesterday and tonight I'll either get some compound on it to fill the weave and sand that, or flip it over and glass the inside. Some guys like to fill and sand a little as they go, some guys allow imperfections to accumulate and deal with them all at the end - I'm in the former group because fairing is the part I like the least and this way it's broken up within other stages. Also, any compound I put on is thin and is reinforced with glass rather than potentially having a 'plug' of compound that can create problems later.

Epoxy resins don't shrink appreciably as they cure (unlike polystyrene resins), unless you haven't allowed for the heat (exotherm) to dissipate between each layer. Even then it usually just shortens the pot life or out-gasses , but I've seen resin-rich layups actually crack from excessive heat buildup.
User avatar
Wobbly Wheels
Donating Member
 
Posts: 1080
Joined: Tue Mar 15, 2011 9:51 am
Top

Re: Another foam standie...

Postby PcHistorian » Tue May 15, 2012 8:59 am

yeah, I can't think of anyway out of the sag. I was thinking sewing pins, then just pull them but you'll still get some sag. plus runs if too liquidy.

(can't you just pick it up and roll it so whatever side is horizontal? LOL)
Elf Cottage
Image

Build Documentary
https://sites.google.com/site/pchistorian/home/hobby/camping/elf-build
Build Forum
http://www.tnttt.com/viewtopic.php?t=48462
Build Album
http://www.tnttt.com/gallery/album.php?album_id=42

progress is progress. (don't look a gift "progress" in the mouth.)
User avatar
PcHistorian
The 300 Club
 
Posts: 354
Images: 198
Joined: Fri Dec 09, 2011 1:06 pm
Location: S.E. Michigan
Top

Re: Another foam standie...

Postby Wobbly Wheels » Tue May 15, 2012 9:08 am

The problem with pinning cloth is that once you add the weight of the resin the weave slips and opens up. Now you have a sag in the cloth and a bare spot of substrate with no cloth, only resin. Don't get me wrong, vertical and overhead layups can be done, but the process is longer than cutting out core sections and rebonding them. I'll lose no structural strength this way and the project will remain an enjoyable one.
I need the shell glued to the deck because that holds the shape at the bottom until the rigidity of the glass is added. When I do the final coat of glass on the outside, I likely will lift it off the deck so I don't have to get up on a ladder to glass it. It's not a problem to cut through the glue line there and the structural bond will come from an outside wrap of cloth under the deck and an inside wrap onto the floor to close in the 'egg sandwich' (chuckle)
User avatar
Wobbly Wheels
Donating Member
 
Posts: 1080
Joined: Tue Mar 15, 2011 9:51 am
Top

Re: Another foam standie...

Postby GPW » Tue May 15, 2012 10:06 am

Glassing Flat sure is the way to go ... overhead can be a nightmare ... :frightened: 
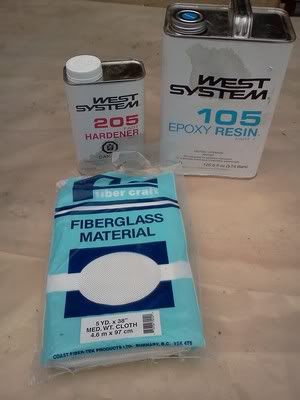
Modular sub assemblies joined together ... Makes good sense on most any build ... especially if you’re going to glass it ... :thinking:
FYI... canvas overhead is not much easier ... :roll:
There’s no place like Foam !
User avatar
GPW
Gold Donating Member
 
Posts: 14920
Images: 546
Joined: Thu Feb 09, 2006 7:58 pm
Location: New Orleans
Top

Re: Another foam standie...

Postby Wobbly Wheels » Tue May 15, 2012 10:49 am

GPW wrote:FYI... canvas overhead is not much easier ...

I've read some of the posts about doing that, especially on the inside of the curve. What I read 'between the lines' are mostly short words that aren't really suitable for a family-friendly forum !
:x :x :lol:
User avatar
Wobbly Wheels
Donating Member
 
Posts: 1080
Joined: Tue Mar 15, 2011 9:51 am
Top

PreviousNext

Return to Foamies

Who is online

Users browsing this forum: DrAlvarez, Google [Bot] and 7 guests