And so it begins...my removable foamie

Canvas covered foamies (Thrifty Alternatives...)

Moderator: eaglesdare

Re: And so it begins...my removable foamie

Postby SteveW » Wed May 30, 2012 3:58 pm

Oh man, $15 per sheet would have been great! I broke down and ordered from www.allenscanvas.com. Not a great price, but I'll have plenty around for the next trailer (which I'm already planning...don't tell my wife!).
Steve
The build is on.
User avatar
SteveW
Teardrop Master
 
Posts: 168
Joined: Thu Feb 02, 2012 7:11 pm
Location: Winter Garden, FL

Re: And so it begins...my removable foamie

Postby SteveW » Fri Jun 01, 2012 8:30 pm

Canvas arrived today, and luckily I got home about 5 minutes before a torrential downpour. I can't imagine how annoying it would be to dry out an entire roll of canvas.

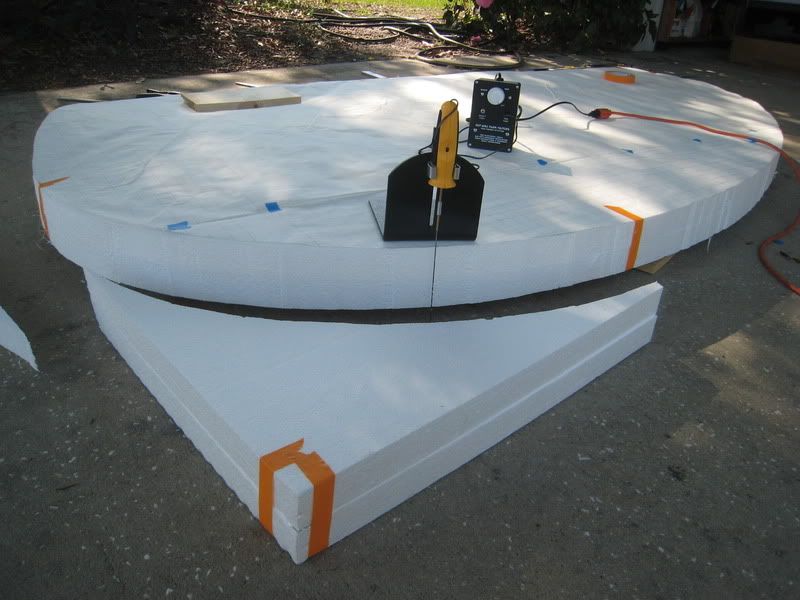
Also I received my hot wire foam cutter from Hot Wire Foam Factory. Let the fun begin!

I have the kids all day tomorrow, so not sure how much progress I'll make. Hopefully I can at least get the pieces cut and dry-fit.

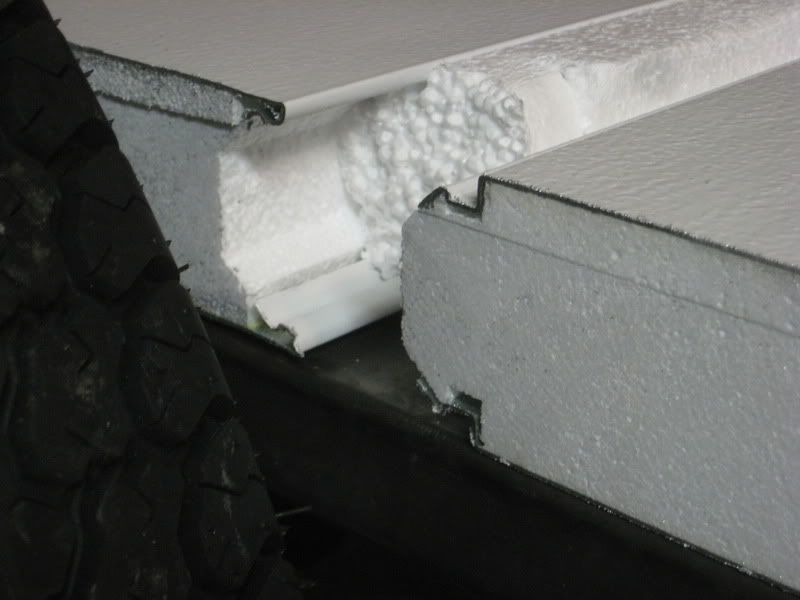
I'll be curious to see how long all the kerfing for the roof takes. I decided to go the hot wire router direction rather than trying to source a transformer that could handle a 64" bow. It's definitely going to take a lot longer than the bow would have.

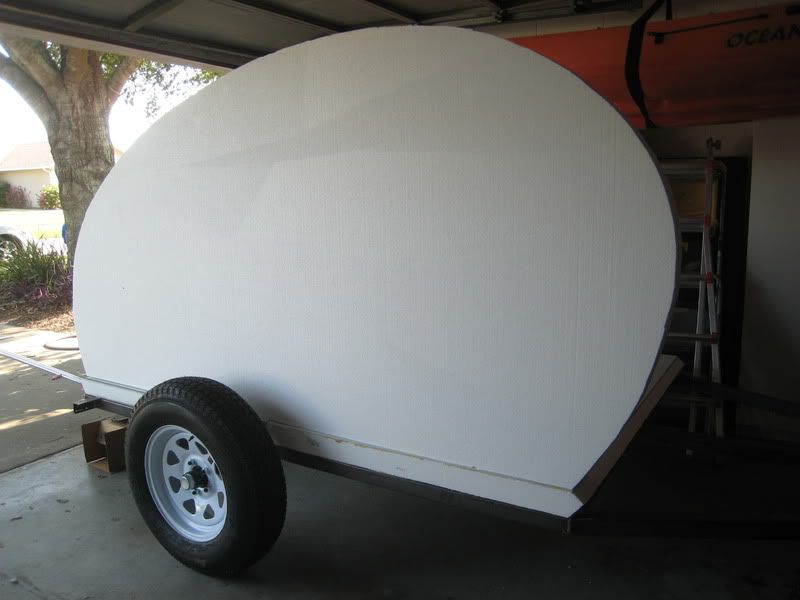
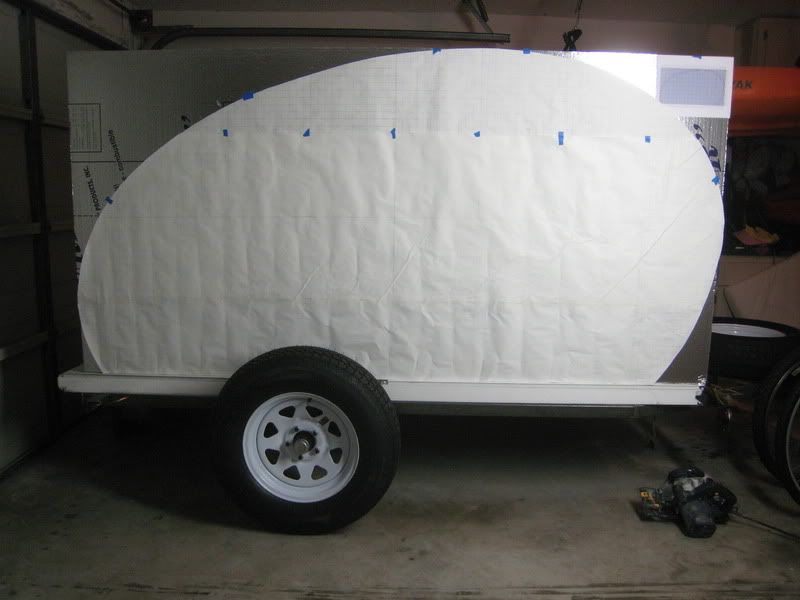
For now, here's my profile tacked to the foam for a visual...
Image
Steve
The build is on.
User avatar
SteveW
Teardrop Master
 
Posts: 168
Joined: Thu Feb 02, 2012 7:11 pm
Location: Winter Garden, FL

Re: And so it begins...my removable foamie

Postby SteveW » Fri Jun 01, 2012 8:36 pm

eaglesdare wrote:maybe i have overlooked it, but what is the material for your floor? it looks like 3" foam.

Image
SIP panels, closeup showing the locking joint between the two pieces.
Steve
The build is on.
User avatar
SteveW
Teardrop Master
 
Posts: 168
Joined: Thu Feb 02, 2012 7:11 pm
Location: Winter Garden, FL
Top

Re: And so it begins...my removable foamie

Postby mezmo » Fri Jun 01, 2012 9:49 pm

Hi Steve W,

Just curious as to how/where you got the Al&Foam SIP panels.
and how you are cutting them and attaching the walls to them.
If you could get enough, cheap enough, they might be a good
option for the walls etc..A member here did build a non-traditional
TD out of old foam garage door panels/elements similar to
what your SIP look like.

Cheers,
Norm/mezmo
If you have a house - you have a hobby.
User avatar
mezmo
1000 Club
1000 Club
 
Posts: 1817
Images: 194
Joined: Fri Jan 01, 2010 4:11 am
Location: Columbia, SC
Top

Re: And so it begins...my removable foamie

Postby SteveW » Fri Jun 01, 2012 10:29 pm

I considered using them for the walls as well. I'm confident in the aluminum working as a skin bonded to the foam for the floor, but wasn't completely confident in the connections between floor/walls/ceiling, etc. would pull everything together into a rigid form like the canvas, especially once I started trimming the panels into curved shapes. I'm sure they could be used, but probably would be better suited for a weekender style or something more angular where the standard connectors could be used. I'm planning to use foam-to-foam bonds as much as possible, trimming back the aluminum where necessary, putting in some wooden dowels or plywood splines to strengthen the joints, then wrapping with canvas.

Plus the panel wasn't as cheap as I first hoped. Like you mentioned, if I got more of them I could probably work a deal. Also, I wasn't able to get contractor pricing, which would bring the cost down even more.

For those who are interested, the panels are designed by Structall (although I got them through a local competitor, Town and Country Industries, who apparently has been paying for rights due to copyright infringement or something of the sort).
Steve
The build is on.
User avatar
SteveW
Teardrop Master
 
Posts: 168
Joined: Thu Feb 02, 2012 7:11 pm
Location: Winter Garden, FL
Top

Re: And so it begins...my removable foamie

Postby GPW » Sat Jun 02, 2012 8:18 am

You “could” do a foam to foam bond , flush the skins together and use some soft Al strips to join , pop riveted with a rubber sealer in between the joins...they you’re done eh ? The Al is the skin ... just needs secure joining ... :thinking:
There’s no place like Foam !
User avatar
GPW
Gold Donating Member
 
Posts: 14912
Images: 546
Joined: Thu Feb 09, 2006 7:58 pm
Location: New Orleans
Top

Re: And so it begins...my removable foamie

Postby SteveW » Sat Jun 02, 2012 1:13 pm

SteveW wrote:
eaglesdare wrote:maybe i have overlooked it, but what is the material for your floor? it looks like 3" foam.

Image
SIP panels, closeup showing the locking joint between the two pieces.

Hmm, just cut the panels to size and fit them for the first time. Much looser than I was hoping. I planned on using a couple aluminum strips to lock the ends of the canvas underneath, but I think the strips might have another purpose as well.

If someone were just making a 4' wide floor, it wouldn't be an issue, but mine is 64" wide, so I had to run the lengths sideways.
Steve
The build is on.
User avatar
SteveW
Teardrop Master
 
Posts: 168
Joined: Thu Feb 02, 2012 7:11 pm
Location: Winter Garden, FL
Top

Re: And so it begins...my removable foamie

Postby SteveW » Sat Jun 02, 2012 8:35 pm

I was in charge of the kids today, so I didn't make as much progress as I hoped, but a little progress is better than none. I'll have to take it when I can get it. My wife is flying out to Germany for a week and I'll be flying solo here at home with two crazed munchkins. I think less than expected progress is about to become what IS expected.

Floors and walls are cut to size. The ceiling and hatch are cut, but not kerfed yet. Spent the majority of the day pulling the stupid foil and plastic coverings off the rest of my panels. I would gladly have spent double to get panels without that stuff on there, but these were the only ones that were available. Hopefully tomorrow I can make up some time and get all the rest of my pieces cut and do the kerfs in the ceiling. I was hoping to be doing the inner skins tomorrow, but that's not gonna happen. Sigh.

On a good note, I LOVE my foam cutting knife.
Image

The floor and walls cut and propped.
Image

The kids stretching out for a break.
Image
Steve
The build is on.
User avatar
SteveW
Teardrop Master
 
Posts: 168
Joined: Thu Feb 02, 2012 7:11 pm
Location: Winter Garden, FL
Top

Re: And so it begins...my removable foamie

Postby atahoekid » Sat Jun 02, 2012 10:31 pm

It looks like you're making a decent amount of progress even with the two little ones around. Been there, done that. My wife used to work weekends so guess who was in charge of child care and feeding... :thinking: :thinking: :thinking: Not much you can do about it so just hang in there and do the best you can. Looks great so far!!
Mel

"Believe in your abilities... Remember amateurs built the ark, professionals built the Titanic"

"Indecision may or may not be my problem" Jimmy Buffet

Image

The Road Foamie Build Thread: viewtopic.php?t=45698
User avatar
atahoekid
Platinum Donating Member
 
Posts: 1773
Images: 158
Joined: Sat Jul 24, 2010 2:49 am
Location: Incline Village, NV
Top

Re: And so it begins...my removable foamie

Postby eaglesdare » Sun Jun 03, 2012 6:33 am

looking good! :wine:
Louella
May the foam be with you.
User avatar
eaglesdare
Donating Member
 
Posts: 3168
Images: 13
Joined: Tue Aug 26, 2008 7:06 pm
Top

Re: And so it begins...my removable foamie

Postby GPW » Sun Jun 03, 2012 6:50 am

I’m just so Happy to see somebody using bead board ... It is an excellent material once skinned ... :thumbsup: 8) :D
There’s no place like Foam !
User avatar
GPW
Gold Donating Member
 
Posts: 14912
Images: 546
Joined: Thu Feb 09, 2006 7:58 pm
Location: New Orleans
Top

Re: And so it begins...my removable foamie

Postby SteveW » Sun Jun 03, 2012 10:30 am

Hoping you're right. It's the only foam my big box stores are selling locally. I was hoping for XPS, but they just stopped carrying it.
Steve
The build is on.
User avatar
SteveW
Teardrop Master
 
Posts: 168
Joined: Thu Feb 02, 2012 7:11 pm
Location: Winter Garden, FL
Top

Re: And so it begins...my removable foamie

Postby GPW » Sun Jun 03, 2012 5:55 pm

Steve, in the past I made what was about a Gazillion bead board foam model airplane wings covered with balsa wood , and they ALWAYS outlasted the rest of the planes ... usually by many years , ended up with a rack of old wings that wouldn’t go away ... Very durable ... just a little more difficult to sand than the extruded foams... sand in one direction only ... :thumbsup: 8)
There’s no place like Foam !
User avatar
GPW
Gold Donating Member
 
Posts: 14912
Images: 546
Joined: Thu Feb 09, 2006 7:58 pm
Location: New Orleans
Top

Re: And so it begins...my removable foamie

Postby SteveW » Sun Jun 03, 2012 7:10 pm

Thanks for the tip! It definitely seems like filling might be easier than sanding with this stuff.

On a good note, I got a bit done today. Kerfs cut for the roof and hatch. I wound up using the circular saw even though I planned to use the hot wire. Just seemed more time efficient, and the GG should fill the gaps anyway. Dry fit them and it looks pretty cool. I also got the front bulkhead sized and cubby holes cut in it.

Tomorrow a lot of goodies from Frank will be arriving, including doors (heaviest part of my entire build I think, but I'm pressed for time and figured prefab would be a lot faster), roof vent, plastic hinge, and various rubber seals. :thumbs up1:

Also, my POR15 and Blackcote should be arriving as well, so attending to the trailer will be my first priority. Don't need this thing rusting apart before I get to use it!

After that I'm hoping to GG a different roof/hatch piece (4 total) each night, as well as get my paper/poly on the interior surfaces before next weekend. That way I can tackle the canvas then... :thinking: hmm, although the canvas might be easier with my wife's help and she won't be home til Tuesday after next weekend. Either way, I have plenty to keep me busy! Just have to remember to feed the kids at least once every couple days. :lol:
Steve
The build is on.
User avatar
SteveW
Teardrop Master
 
Posts: 168
Joined: Thu Feb 02, 2012 7:11 pm
Location: Winter Garden, FL
Top

Re: And so it begins...my removable foamie

Postby mezmo » Mon Jun 04, 2012 1:51 am

Just a fast mention before you do your interior:
Polyester resin melts foam. I don't know if that
is what you were referring to by "poly" in reference
to your interior covering. I'd hate you to see the walls
melt away before your eyes! If it's a thin panel made
of hardened polyester using a foam compatible glue,
then you shouldn't have any problems.

Cheers,
Norm/mezmo
If you have a house - you have a hobby.
User avatar
mezmo
1000 Club
1000 Club
 
Posts: 1817
Images: 194
Joined: Fri Jan 01, 2010 4:11 am
Location: Columbia, SC
Top

PreviousNext

Return to Foamies

Who is online

Users browsing this forum: keeber and 7 guests

cron