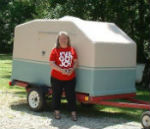
My Foamie Build--Updated --Jul 3 I'm eating an elephant

Canvas covered foamies (Thrifty Alternatives...)

Moderator: eaglesdare

Re: My Foamie Build--Updated 28 May

Postby KCStudly » Tue May 29, 2012 3:16 pm

Bonnie I think I’m missing some information about your trailer. Is it a utility trailer with existing plywood or plank decking?

If so then you are probably in pretty good shape structurally, but will have to do some work to make it weather proof.

If the existing deck is plywood, then they probably didn't do anything to protect the wood, seal the edges or to seal where the wood is in contact with the frame. You may want to start by removing what’s there and using it for one of the skins in the floor that you build, sealing it up right before reattaching the built-up floor to the steel frame.

If it is 2x planks or boards, then you need to worry about the same things as above, plus the gaps in between the boards. If it were me and I had planks to start, I would probably consider removing them altogether (eliminating a source of rot and excess weight) then building a torsion box floor directly over the steel. All sealed up nice and sealed down to the trailer as well. Rip the boards up into smaller pieces of stock and use them elsewhere in the project. Another thing to watch for is with planks they will generally sit down on a shelf or ledge that is surrounded by steel. Moisture and debris can collect between the wood and the steel resulting in rot further down the road. I would consider removing both the wood and the excess steel (weight) and building your floor up on top of the steel. Even if you have to put in a couple of wooden spacers over the cross members, it would still be lighter and less likely to collect moisture, than if you build up on top of an existing wooden floor.

You want whatever you start with to be a long lasting, light weight and sturdy base.

Hope I am interpreting your question well enough that this reply is useful.
KC
My Build: The Poet Creek Express Hybrid Foamie

Poet Creek Or Bust
Engineering the TLAR way - "That Looks About Right"
TnTTT ORIGINAL 200A LANTERN CLUB = "The 200A Gang"
Green Lantern Corpsmen
User avatar
KCStudly
Donating Member
 
Posts: 9640
Images: 8169
Joined: Mon Feb 06, 2012 10:18 pm
Location: Southeastern CT, USA

Re: My Foamie Build--Updated 28 May

Postby bonnie » Tue May 29, 2012 5:52 pm

KC, I don't have a trailer as of yet. I did get a quote to have it built. I am saving for that. I had thought of a torsion box like floor, but have no capicity to rip or plane wood. As i'm saving for the trailer, i'm plugging away at the actual ttt. I have been thinking about the floor of late. How thin an isulated floor can I go with,if I am using a solid hardwwod floor inside?

weather has cooled down. I am going to work a bit on the door tonight. :)
Remember, the turtle won. :)
User avatar
bonnie
Donating Member
 
Posts: 1390
Images: 107
Joined: Sun Jul 24, 2011 4:14 pm
Location: Roxana, IL

Re: My Foamie Build--Updated 28 May

Postby KCStudly » Tue May 29, 2012 7:45 pm

So it all depends on how far apart your side rails and xmbrs are, and how much weight you plan to put on it.

But practically, from what I've read here, when talking top and bottom skins fully adhered to a foam core and some wood framework, it seems like the light weight guys like to go with 1/8 inch (but they cover it with something heavier during the build so they don't put a knee or foot thru it). 5 mm is a bit heavier (about 3/16"). If you are putting true hardwood tongue and groove (HW) over it (which would be heavy), and plan to glue it both together and down, then I would think that you could almost forgo the top plywood skin altogether, but using 1/8 or 5mm would probably make it easier to install the HW.

1/4 inch seems to be the safe bet for those looking for something a bit more rugged, is easier to come by in big box stores, and would definitely be excess under HW.

1/4 inch on top and 1/8 on the bottom has been done successfully, too.

Have you considered one of the thinner prefinished floors, or the snap together laminate faux hardwoods (Pergo, etc.)? They would be much lighter, already finished, and with even the lightest of plywood underlayment/top skins would not necessarily need to be fastened in such a way to be considered a structural addition (which I think would be a lot less work to achieve the look you want). After all, isn't the whole thing going to be covered with bedding, mostly?

Just one opinion.
KC
My Build: The Poet Creek Express Hybrid Foamie

Poet Creek Or Bust
Engineering the TLAR way - "That Looks About Right"
TnTTT ORIGINAL 200A LANTERN CLUB = "The 200A Gang"
Green Lantern Corpsmen
User avatar
KCStudly
Donating Member
 
Posts: 9640
Images: 8169
Joined: Mon Feb 06, 2012 10:18 pm
Location: Southeastern CT, USA
Top

Re: My Foamie Build--Updated 28 May

Postby bonnie » Tue May 29, 2012 8:02 pm

ReStore had this stuff, http://www.lumberliquidators.com/ll/c/Bear-Mountain-Oak-Laminate-Dream-Home-Nirvana-PLUS-10BO/10020517. I got it for $7 a box. Enough to do the trailer and then a bit. I liked the color and the price. :)

Would this be enough to go directly over the foam? For the 5-wide, I'd have to join to pieces of foam first. :thinking:

Bonnie
Remember, the turtle won. :)
User avatar
bonnie
Donating Member
 
Posts: 1390
Images: 107
Joined: Sun Jul 24, 2011 4:14 pm
Location: Roxana, IL
Top

Re: My Foamie Build--Updated 28 May

Postby bonnie » Tue May 29, 2012 8:08 pm

KC, didn't answer part of your questions. :?

After all, isn't the whole thing going to be covered with bedding, mostly? Well, sort of. I wanted a standie for me. I'm 5' so that leaves most folks bent over, so when my brother designed the trailer, he made it so that it will pivot to 6'. In the down position the trailer is 4' 9" tall. I'd have to slouch in it, but I wouldn't have to raise it to sleep. The bottom part of the box is 5x8x43.

I suppose I should have said laminate flooring. Though all 7 boxes weigh almost 80lbs.

Bonnie
Remember, the turtle won. :)
User avatar
bonnie
Donating Member
 
Posts: 1390
Images: 107
Joined: Sun Jul 24, 2011 4:14 pm
Location: Roxana, IL
Top

Re: My Foamie Build--Updated 28 May

Postby KCStudly » Tue May 29, 2012 8:47 pm

It says it is designed to be "floated" and that it has a preinstalled cushioning foam layer underneath, so I don't think you can count on gluing it down, and therefore I don't think that you can count on it for a structural addition to the floor proper. It will add plenty of local strength so you won't have to worry about putting your knee through anything.

I suppose you could experiment with trying to remove the foam backing from a piece and try gluing it to a scrap piece of ply, but doing the whole floor that way sounds tedious to me with the hope of questionable results. Also, it's 'no glue assembly', which means it just sort of snaps together, again "floating".

Building a torsion floor is not the inexpensive way out, neither in time or money. Apparently you can buy 2x2's at the big box, and although they are not as light as some other techniques, they would be a good safe bet for a sturdy sub floor without having to rip from larger stock.

If light weight isn't as important as cost and appearance, then maybe you should think about just using a well supported 1/2, 5/8, or 3/4 ply single layer floor and just assembly the finished laminate over it as per the makers instructions.

Remember, you are in the best position to decide what is right for you. I can only make recommendations and provide input from my perspective, and I do not have first hand knowledge of that specific floor material (to be honest, I only skimmed the info in the site you linked).

As usual, there are so many different ways to do a thing the hardest part is deciding which way to do it, and it seems that there are only a few "wrong" ways. Seal everything well, tie the walls to the floor securely, build the floor sturdy on your trailer and the strength will be there.

Good luck! :thumbsup:

Oh, I see we crossed postings.
Last edited by KCStudly on Sat Jun 02, 2012 6:54 pm, edited 1 time in total.
KC
My Build: The Poet Creek Express Hybrid Foamie

Poet Creek Or Bust
Engineering the TLAR way - "That Looks About Right"
TnTTT ORIGINAL 200A LANTERN CLUB = "The 200A Gang"
Green Lantern Corpsmen
User avatar
KCStudly
Donating Member
 
Posts: 9640
Images: 8169
Joined: Mon Feb 06, 2012 10:18 pm
Location: Southeastern CT, USA
Top

Re: My Foamie Build--Updated June 2

Postby bonnie » Sat Jun 02, 2012 4:33 pm

Today was not a good day. Actually, it was an okay day. I did get the interior door skin glued up.

93027

And attached.

93026

And rough trimmed.

93025

I used waterproof aluminum foil tape on the door edge. It did not like the saw. :oops: It does seem to stick pretty well and should help some with water proofing. The door skin sure is pretty. :thumbsup:

However, it's also a bit crooked. It won't show when everything is said and done and painted, but dang it. :x Of course, the door is also a bit crooked. I used brad nails and clamps to glue things together. I know it doesn't show, but the door bows just a bit. It does stand up straight on the bottom edge and doesn't tip, so at least one part is square, more or less. :)

I am out of anything in the sand paper department but 220, which will not even up the sides at all. :thumbdown: So, I'm going to cut and edge glue the other door skin. It should be easier, as I don't have to worry about an access hatch. Which by the way, needs trimmed some more so it will fit. Seems I glued the skins down a little too close to the lines I drew.

The time consuming part is the measuring and cutting to size + 3/8". I bought and will bend 1/4" aluminum c edging to put around the edge of the outside door skin. That's if I can successfully bend it. I am also going to make a bending form out of some of my scrap 1/4" ply.

But not today. Everything I've tried to do today has been Murphy's playground. I think I'm hanging up the building hat for the day and will see if things look and act better tomorrow. Next week is a pay week, so I can stock up on the stuff to finish the door.

Did I just say that? 8) 8)
Remember, the turtle won. :)
User avatar
bonnie
Donating Member
 
Posts: 1390
Images: 107
Joined: Sun Jul 24, 2011 4:14 pm
Location: Roxana, IL
Top

Re: My Foamie Build--Updated June 2

Postby KCStudly » Sat Jun 02, 2012 7:02 pm

That's some pretty thin tongue and groove cedar (did you say cedar?) . I've not seen that before. Is that available in the big box store?

I'm anxious to see what you build around that door. Keep plugging away at it and eventually you will be done, or at least 95% done (they're never really done, are they?).
Last edited by KCStudly on Sat Jun 02, 2012 7:48 pm, edited 1 time in total.
KC
My Build: The Poet Creek Express Hybrid Foamie

Poet Creek Or Bust
Engineering the TLAR way - "That Looks About Right"
TnTTT ORIGINAL 200A LANTERN CLUB = "The 200A Gang"
Green Lantern Corpsmen
User avatar
KCStudly
Donating Member
 
Posts: 9640
Images: 8169
Joined: Mon Feb 06, 2012 10:18 pm
Location: Southeastern CT, USA
Top

Re: My Foamie Build--Updated June 2

Postby bonnie » Sat Jun 02, 2012 7:37 pm

KC, the cedar plank is actually wall panel boards. Available at the orange box store. One package does one side of the door with some leftover. 17 sq feet, I think. It is 1/4" and finished on one side. It's supposed to be glued or nailed to the wall. It's light, so it doesn't add much weight. I had originally thought about paneling the inside of the trailer, but decided the Hobbit door needed to look like solid wood.

:)

Bonnie
Remember, the turtle won. :)
User avatar
bonnie
Donating Member
 
Posts: 1390
Images: 107
Joined: Sun Jul 24, 2011 4:14 pm
Location: Roxana, IL
Top

Re: My Foamie Build--Updated June 2

Postby atahoekid » Sat Jun 02, 2012 10:43 pm

That cedar planking looks really nice! Good Choice. I've decided that 1) days that aren't going well are just mother natures' way of reminding you to slow down, be methodical and pay attention to the details. Yup, I've had many of those days and 2) I'm never going to complete any task without some issue. I guess it's an issue of being your own worst critic. I try to remember that most of the time nobody else will ever notice the defect but the perfectionist in me keeps nagging me.
Mel

"Believe in your abilities... Remember amateurs built the ark, professionals built the Titanic"

"Indecision may or may not be my problem" Jimmy Buffet

Image

The Road Foamie Build Thread: viewtopic.php?t=45698
User avatar
atahoekid
Platinum Donating Member
 
Posts: 1773
Images: 158
Joined: Sat Jul 24, 2010 2:49 am
Location: Incline Village, NV
Top

Re: My Foamie Build--Updated June 2

Postby KCStudly » Sat Jun 02, 2012 11:10 pm

It's how we learn to do better. Pay attention and learn from your mistakes. Like I said before, you will know what is acceptable and what doesn't pass muster. the closer we pay attention to details the better the overall outcome will be.

I think I mentioned it before (somewhere) but, so long as you maintain the same level of quality throughout you will be happy. As soon as you falter that "wart" will let itself stand proud of the rest and will need to be corrected. Wear the magnifying glasses for each task, but stand back and look every once and a while at the big picture. Be proud of your work.

So far I see no warts.

Once at a cruise in I saw a show quality Pro-Street Nova that had air brush paint details all under the hood and chrome headers and stuff. The thing was fully finished throughout, but when I saw the butcher job on the fender wells where the headers cleared the firewall, well I couldn't help but scoff; one huge wart that stood out horribly. The other guy who had slaved and slogged and put his junk together in his driveway got my respect because he had worked to his own level of ability and had seen the project through himself. Know what I mean?

:thumbsup:
KC
My Build: The Poet Creek Express Hybrid Foamie

Poet Creek Or Bust
Engineering the TLAR way - "That Looks About Right"
TnTTT ORIGINAL 200A LANTERN CLUB = "The 200A Gang"
Green Lantern Corpsmen
User avatar
KCStudly
Donating Member
 
Posts: 9640
Images: 8169
Joined: Mon Feb 06, 2012 10:18 pm
Location: Southeastern CT, USA
Top

Re: My Foamie Build--Updated June 2

Postby bonnie » Sun Jun 03, 2012 6:12 am

I am my worst critic. :) I do know what you mean, KC. I just keep taking time to think and plan. It will come together. I will like it eventually. I think there's a point in any project where you really don't like it anymore. I've hit that wall and will move past it. :)
Remember, the turtle won. :)
User avatar
bonnie
Donating Member
 
Posts: 1390
Images: 107
Joined: Sun Jul 24, 2011 4:14 pm
Location: Roxana, IL
Top

Re: My Foamie Build--Updated June 2

Postby GPW » Sun Jun 03, 2012 6:43 am

A lot of times we develop a pre-concieved notion of how something should come out , and if it doesn’t achieve those lofty goals , it becomes , to us, an Imperfection ... :o The age old conflict of thinking vs. doing ... Thinking we can make it Perfect , Doing means we have to make concessions to unforeseen difficulties that pop up when least expected ... usually the result of the materials itself or something unthought in the planning ... The irony is, nobody else will be looking to find these imperfections ... since they were never partial to the original conception ... If we don’t tell , nobody will know .. :lol:

Bonnie , It looks GREAT !!! :thumbsup: 8)
There’s no place like Foam !
User avatar
GPW
Gold Donating Member
 
Posts: 14920
Images: 546
Joined: Thu Feb 09, 2006 7:58 pm
Location: New Orleans
Top

Re: My Foamie Build--Updated June 2

Postby bonnie » Sun Jun 03, 2012 8:02 am

Thanks, Glenn. You are right, of course. It does look better this morning. Breaks are good. :D
Remember, the turtle won. :)
User avatar
bonnie
Donating Member
 
Posts: 1390
Images: 107
Joined: Sun Jul 24, 2011 4:14 pm
Location: Roxana, IL
Top

Re: My Foamie Build--Updated June 2

Postby bonnie » Sun Jun 03, 2012 6:03 pm

So I took the aluminum back and bought sand paper. :) Then I kinda wandered the local Ace hardware, because I wanted to see the cork based gasket material. No too shabby. Doya think it might work as the door edge? The outside cedar planking will be extended to make a sealing point and I think I will be using PVC or Vinyl edge banding to cover the exposed edge. The inside edge is going to be flush all the way around.

Now, I'm going to go make some more sawdust. Would like to get both skins on the door this week. I have some teak oil finish, would that work to waterproof and finish the door skins? Would I need to add poly or something over it on the outside, if I don't want to paint? Decisions, decisions.

Bonnie
Remember, the turtle won. :)
User avatar
bonnie
Donating Member
 
Posts: 1390
Images: 107
Joined: Sun Jul 24, 2011 4:14 pm
Location: Roxana, IL
Top

PreviousNext

Return to Foamies

Who is online

Users browsing this forum: No registered users and 2 guests