10' Standie Foamie ... on hold

Canvas covered foamies (Thrifty Alternatives...)

Moderator: eaglesdare

Postby mikeschn » Sat Jul 16, 2011 7:10 pm

Thanks for asking G.

Things started off well enough... We figured we would skin the inside wall with canvas... We allowed a little extra canvas on both sides...
Image

We had no clue the canvas would shrink so much...
Image

nor did we know that the canvas would not stick on the edges...
Image

But the final straw was when we picked the wall up to move it. The foam just broke! Right at a critical joint! I threw in the towel, went inside and took a 2 hour nap.
Image

Mike...
The quality is remembered long after the price is forgotten, so build your teardrop with the best materials...
User avatar
mikeschn
Site Admin
 
Posts: 19202
Images: 475
Joined: Tue Apr 13, 2004 11:01 am
Location: MI

Postby eaglesdare » Sat Jul 16, 2011 8:09 pm

:shock: :cry: oh mike, that is horrible.
i always try to look at the bright side though. you should beable to fix that pretty easy. do you have any idea why it cracked like that?

i am so wondering why it would crack. i have my sides done very similiar to yours, so this is kind of scary. makes me want to rethink my shape and size.

:thinking: you think the canvas should go on after the shell is done?

and that shrinking issue, wow. the stuff i used did not shrink at all. i think if anything it stretched out, well i know it stretched out.
Louella
May the foam be with you.
User avatar
eaglesdare
Donating Member
 
Posts: 3168
Images: 13
Joined: Tue Aug 26, 2008 7:06 pm

Postby RAYVILLIAN » Sat Jul 16, 2011 9:21 pm

Mike the shrinkage I can sorta see, some fabric has to be sized You would wash and dry it before cutting because it was prone to shrinkage.

I never had a problem with the fabric not sticking on the edges like that though.

The crack wild guess maybe cause by stress of the unsized cloth scrinking as it dried that broke when you lifted it. Lifting was just one more stress that it couldn't take. Just wild guesses though.

The bed sheet I used were all used and been wash enough to not shrink any.
Hopefully tomorrow will bring a better day.

Gary
Where ever we raise the hatch is home.
Darn blank states keep getting further away and we keep traveling slower ain't never gona get this map full.
111961Image
User avatar
RAYVILLIAN
Lifetime member
 
Posts: 1434
Images: 109
Joined: Thu Aug 05, 2004 9:33 pm
Location: Rayville MO
Top

Postby atahoekid » Sun Jul 17, 2011 12:36 am

mikeschn wrote:
We had no clue the canvas would shrink so much...
Image

nor did we know that the canvas would not stick on the edges...
Image

But the final straw was when we picked the wall up to move it. The foam just broke! Right at a critical joint!
Image

Mike...


Yikes, That stops me right in my tracks... :o :( :shock: If the master teardrop builder of all time has issues with making this work, I think I need to stand down until we find out the reasons why.

Rayvillian had some good guesses as to the root cause, but there aren't yet definitive answers.
Mel

"Believe in your abilities... Remember amateurs built the ark, professionals built the Titanic"

"Indecision may or may not be my problem" Jimmy Buffet

Image

The Road Foamie Build Thread: viewtopic.php?t=45698
User avatar
atahoekid
Platinum Donating Member
 
Posts: 1773
Images: 158
Joined: Sat Jul 24, 2010 2:49 am
Location: Incline Village, NV
Top

Postby elginrunner » Sun Jul 17, 2011 5:07 am

Mike,

I hate that this happened to you. You've done a wonderfull job experimenting with the foam ideas. Don't give up. I know this is a very frustrating set back, but things like this happen when your in uncharted waters.

My wife taught me to sew. ( don't laugh too loud, you might hurt yourself ) One of the hardest lessons for me to learn was making a button up shirt out of high dollar mossey oak camoflauge material, and realize as I was putting it in the washer, hey I don't remember pre-shrinking this material.... yep you guessed it. I looked like jethro with sleeves halfway up to my elbows, and buttons about to pop when I got it out of the drier. It seems the thicker the material, and tighter the weave, the more it shrinks. They suggest for cotton blue jean material to wash it five times before cutting it out for a pattern. That should give you an indication as to how much some material can shrink.

Don't give up. If we need to set up an experimental foamy donation account let me know, I'd be happy to donate. :thumbsup:

Brock in AR
elginrunner
Teardrop Inspector
 
Posts: 14
Joined: Fri Jun 03, 2011 9:32 pm
Location: North East, Arkansas
Top

Postby GPW » Sun Jul 17, 2011 5:56 am

Mike , from your pics , it would appear that the door frame corner failed and took the little bit of foam supporting it... Just not enough foam in that area to support the bending when you lifted it ... And a sharp corner like that creates a stress riser , a weak spot ... :o
You can see on Eagles TD that the top of the door is rounded .... no stress point ... and lots of foam above to support it ...

My door is square also , but again ,there's a good bit of foam to support that area...
I wouldn't blame the foam , but the design ... :roll: I had assumed you'd be doing the plywood skin on the inside which would have provided plenty of support for that configuration ...
Just glue it back up and be careful with the lifting ... with the skin on just one side , and lifting on that side up , there's nothing to stop the bending /breaking at that point ...
There’s no place like Foam !
User avatar
GPW
Gold Donating Member
 
Posts: 14920
Images: 546
Joined: Thu Feb 09, 2006 7:58 pm
Location: New Orleans
Top

Postby mikeschn » Sun Jul 17, 2011 6:02 am

Hi Guys,

I think Gary is right on all counts.

The canvas needs to be sized, like Brock said.

This would keep the stresses from building up. It would also keep the edges from peeling away as it shrinks.

I am going to finish skinning the other side of the wall with un-sized canvas to equalize the stresses. I am also going to put a second coat of paint on the canvas, especially on the edges where it didn't stick.

Then on the other wall I will size the canvas. Since a piece that large won't fit in the washer, I'm thinking about hanging it up on a clothesline, and just hosing it off, and letting it dry.

I was hoping to get the walls up this weekend, but that may not happen. Next weekend I have 3 days, so maybe next weekend.

Brock, thanks for the thought about the donation, but that won't be necessary. We already have all the materials. We just need time.

We are skinning the inside of the wall prior to assembling the wall. That just made more sense.

We can't skin the outside of the wall, because we need access to the keys. Since the keys are not perfectly flush with the foam, we need to make it flush with some vinyl spackling. Then we can skin the wall. Hey, who knows, we might get the walls up today after all!

Mike...

P.S. G, you posted while I was writing this. You're right about the stress riser. I'm thinking about adding a small wooden block in the corner, to which I'll add a nice radius. Otherwise I have to glue in another piece of foam, and cut the top round. That wouldn't be all bad either!
Last edited by mikeschn on Sun Jul 17, 2011 6:16 am, edited 1 time in total.
The quality is remembered long after the price is forgotten, so build your teardrop with the best materials...
User avatar
mikeschn
Site Admin
 
Posts: 19202
Images: 475
Joined: Tue Apr 13, 2004 11:01 am
Location: MI
Top

Postby Conedodger » Sun Jul 17, 2011 6:11 am

Opps Mike: Please dont tell us the exact words you used when it cracked, there are kids reading.

I am amazed that the canvas shrunk so much, did your test piece shrink?

As to the crack, from what i can see I bet the panel was lifted at an end. This stuff is so light that it make you feel you can just lift it without putting it under tension.

Its easy to forget that this Foam only has strength in compression and must never be put under too much tension.

IMO if you look at your images you can see how someone lifting at one end with the extra weight of the canvas would put the weakest point under tensile stress and without doubt on your side the weakest point is where it broke. The top above the weakest point acted like a hinge effect multiplying the lift force as a lever many times at the weakest point.

here is a diagram to explain

Image
Conedodger
Teardrop Master
 
Posts: 129
Joined: Thu May 12, 2011 2:24 pm
Location: United Kingdom
Top

Postby mikeschn » Sun Jul 17, 2011 6:57 am

Cone,

That's exactly right. And yes it cracked when we were lifting it.

And there is so much stress on the crack, that I can't even pull it tight.

So I am thinking about rebuilding the area. And now I am thinking about extending the wood into the foam to eliminate the stress riser.

Mike...
The quality is remembered long after the price is forgotten, so build your teardrop with the best materials...
User avatar
mikeschn
Site Admin
 
Posts: 19202
Images: 475
Joined: Tue Apr 13, 2004 11:01 am
Location: MI
Top

Postby mikeschn » Sun Jul 17, 2011 7:53 am

Here's the beginning of the repair...

Image

Mike...
The quality is remembered long after the price is forgotten, so build your teardrop with the best materials...
User avatar
mikeschn
Site Admin
 
Posts: 19202
Images: 475
Joined: Tue Apr 13, 2004 11:01 am
Location: MI
Top

Postby GPW » Sun Jul 17, 2011 8:17 am

Ya' just gotta' love Foam repairs .... cut out the old piece , put in a new piece... :thumbsup: At times , we've even resorted to Hot Glue ... :o Works fine for small areas ... Quick and stays flexible forever ... You do have to experiment a little to get the right temp .... too cool just fills in, too hot and there will be some Melting of the foam surface ...

Cone's dead on with his description of the failure ... Great illustration !!!

Just as an alternative for building .... The sides can easily be put up whole and then the cutouts made through inner skin and all ... I assume we're all using some type of "moulding" around doors and windows ... huh ???
There’s no place like Foam !
User avatar
GPW
Gold Donating Member
 
Posts: 14920
Images: 546
Joined: Thu Feb 09, 2006 7:58 pm
Location: New Orleans
Top

Postby eaglesdare » Sun Jul 17, 2011 8:45 am

i know my walls are smaller than mikes, but we did put ours up whole. we did the cut outs for the door "after".
one of the guys buildind it is a carpenter. i remember him talking about that area above the corner door. i seem to remember him making sure there was enough room between that and the edge of the wall. i want to say he also mentioned something about the square door and round door issue.

glad to see you are back at it mike.
perhaps putting the canvas on prior to isn't a good idea for larger builds. but it is a pita afterwards no matter what size. :lol:
Louella
May the foam be with you.
User avatar
eaglesdare
Donating Member
 
Posts: 3168
Images: 13
Joined: Tue Aug 26, 2008 7:06 pm
Top

Postby TheOtherSean » Sun Jul 17, 2011 9:32 am

I'm sorry to learn of this setback. Best wishes on getting it resolved - this forum has such a wealth of knowledge I'm sure some useful advice will come.
User avatar
TheOtherSean
The 300 Club
 
Posts: 407
Images: 111
Joined: Sun May 11, 2008 9:42 pm
Location: Ohio
Top

Postby Conedodger » Sun Jul 17, 2011 9:38 am

If your panel is 10 feet long that's the same as two 60" panels joined in the middle on a hinge. When lifted at each end with your pivot point (fulcrum) in the middle of a 2" thick foam your lever is 60" to 2" so the mechanical advantage of 30 to 1.

So for every 1 pound of force you exert on the lever (The end of the panel) there will be 30 pounds exerted on the opposite side of the foam from the pivot.

Lets say your panel weighs 20lbs thats 10lbs each end and with a mechanical advantage of 30 to 1 makes the area of the crack taking 300lbs

The other point is once a crack appears, the slightest thing placed in the gap will stop it going back together.

Remember the old saying "Give a man a long enough lever he can move the world"

I would add "I does not matter how long a lever is you still cannot prize my credit card out of the wife's grip"

:lol:
Conedodger
Teardrop Master
 
Posts: 129
Joined: Thu May 12, 2011 2:24 pm
Location: United Kingdom
Top

Postby mikeschn » Sun Jul 17, 2011 9:56 am

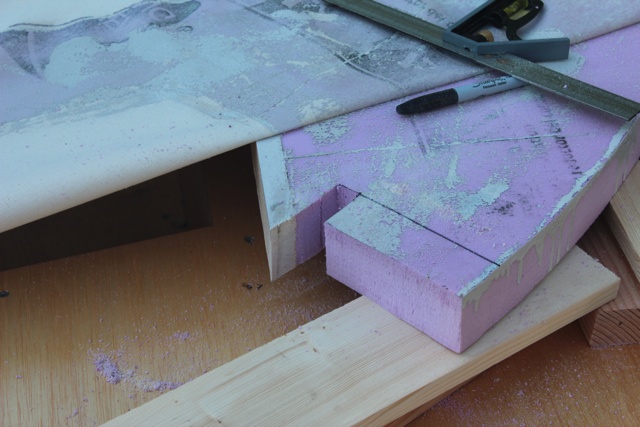
You're looking for advice, eh? My advice is not to build any stress risers into foamie walls.

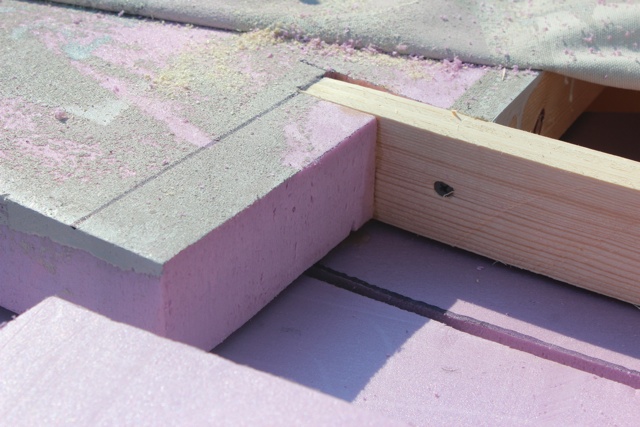
Alright, so how do you do that? One way is to have your framing extend into the foam.

If I was doing it again, I would laminate my framing into the foam.

But my repair is a very close approximation of how I would build...

And for those of you who are following my repair...

Here I am gluing up the framing. Once it's dry I'll cut it to length.
Image

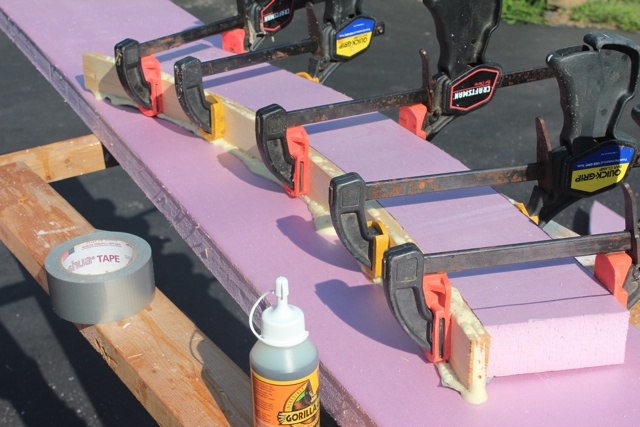
Here's I've used wood glue and a screw. The wood glue was only a dab where the wood touched the wood. Everything else was gorilla glue.
Image

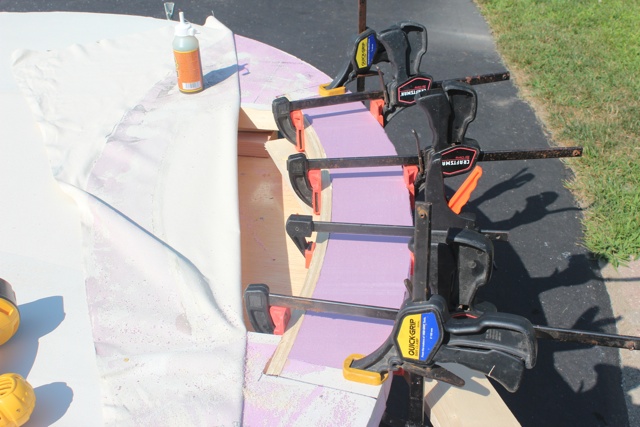
I really like gorilla glue. You can do a complete repair in a fraction of the time that wood glue would take. Here I've glued in the new foam. Once it sets up, in about 1/2 hour at today's temps (80 degrees) I'll trim off the excess, and think about painting it again.
Image

Mike...

P.S. Coming up next, the shrink test...

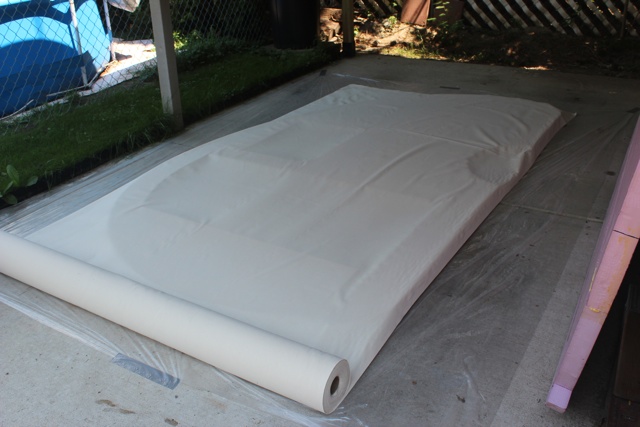
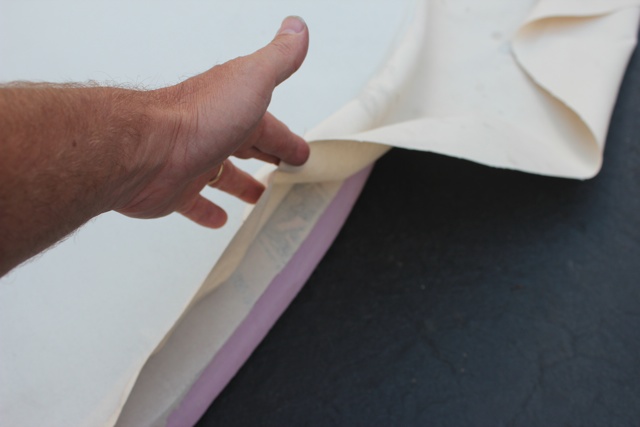
P.P.S. I want you guys to know I had a hard time peeling off the canvas... :thumbsup:
The quality is remembered long after the price is forgotten, so build your teardrop with the best materials...
User avatar
mikeschn
Site Admin
 
Posts: 19202
Images: 475
Joined: Tue Apr 13, 2004 11:01 am
Location: MI
Top

PreviousNext

Return to Foamies

Who is online

Users browsing this forum: No registered users and 15 guests