The Poet Creek Express - Foamie Hybrid

Canvas covered foamies (Thrifty Alternatives...)

Moderator: eaglesdare

Re: The Poet Creek Express - Foamie Hybrid

Postby Wolffarmer » Sat Jun 21, 2014 6:32 am

Its been more than 10 years since I have ridden. Need to get rid of my BMW accumulation. Get a scooter. I have trouble getting my leg over the saddle these days. One of those new supper scoots would be just the ticket. But there is the matter of paying for one to be used only part of the year.

:cry: :cry: Randy
"these guys must be afraid of the dark"
User avatar
Wolffarmer
Donating Member
 
Posts: 4612
Images: 309
Joined: Wed May 02, 2007 1:32 pm
Location: Idaho Rupert

Re: The Poet Creek Express - Foamie Hybrid

Postby KCStudly » Sat Jun 21, 2014 9:41 pm

GPW,
No excuses, just trying to put some “love” into this thing. A semblance of craftsmanship. Simplicity in its most complicated state… or is that the other way around?

Funny you should mention storage, and Randy talking about selling motorcycles. Lately I’ve been thinking about what I might do after finishing TPCE (aside from going camping). This includes casting off several old “projects” that are languishing; the boat, the bike, and the tuner car. That will free up some space. I’d like to get the red truck back up and resembling something nice, and have long threatened to replace the bike with another ‘wind in your hair’, but more comfortable ride, like a scratch built roadster!

Randy, life is but a series of choices and where there is a will, there is a way, so if you put your mind to it, you can find a way to have that scooter and get back in the wind. The sale of the BMW’s will surely generate some cash, and if the ‘new’ scooter is too big of a stretch, take your time and find a good deal on a used one. Another option that could be fun is to find a vintage scooter and do a little resto on it. Redirect your stove and lantern hunting fun money for a short time and the scooter could be all yours (then go back to the WGA’s, of course!).

With hobbies and toys, more often than not I tend to wade in the shallow end of the pool; make sure the water is right before jumping in all the way in… and sometimes never getting in past the knees. Two reasons; first it’s hard to justify the full blown cost of some hobbies. That $4m deep sea racing boat with triple blown big blocks, or going top fuel racing are “just a bit” out of my reach (…that’s sarcasm…), so my little 16ft ’67 Sea Ray with chalky paint and cracked transom, and the now sold Chevelle have acted as substitutes. Second, there are a lot of things that interest me and it is hard to justify a truly big commitment in time and money in any one field of interest. Though the effort I’m putting into TPCE is the start of a new level of commitment; if I want it I have to get off the couch and work on it.

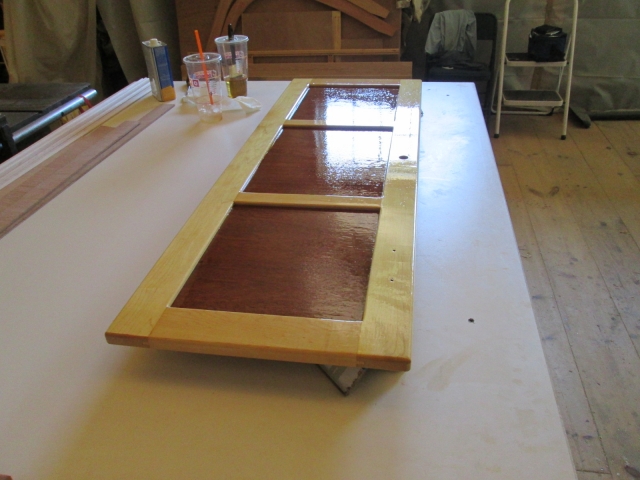
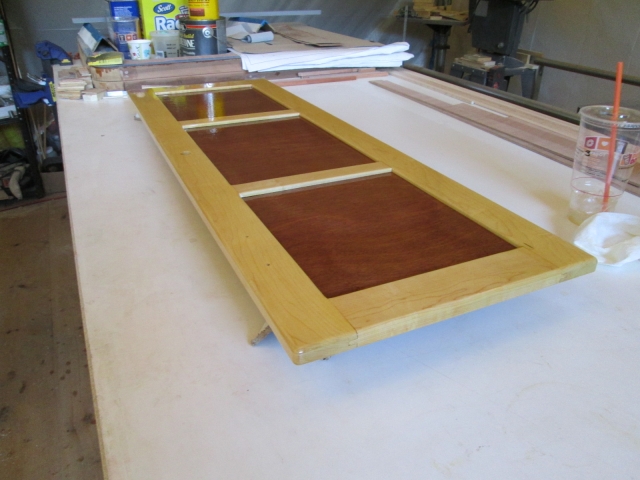
Just a few hours of work today. Scuffed the front of the locker door and put the last coat of poly on it.
Image
Image

That put the kibosh on running the fan or stirring up sawdust, so I tinkered on the splice piece for the front wall to front ceiling panel joint, laying out the screw hole pattern.
Image
Image

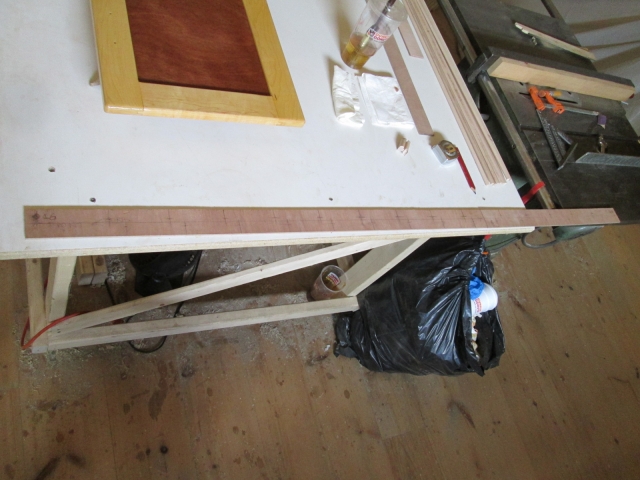
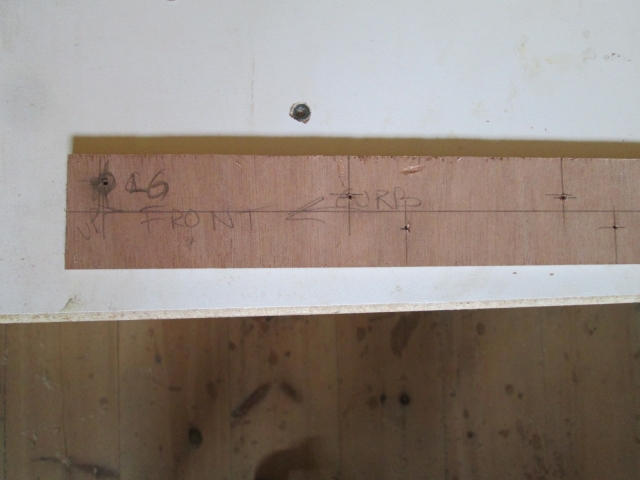
The upper portion will get glued to the lower edge of the ceiling panel, then when it comes time to attach the ceiling to the cabin the lower portion, or flap, will get glued and screwed to the front cabinet ledger. The horizontal line represents the seam between the two panels. The screw hole in the upper left (and corresponding far right) will go into the wall blocking, and the staggered pattern will land between the screw spacing at the top of the front wall. I staggered all of these screws to save the integrity of the relatively small cabinet ledger. Wouldn’t want it to split apart or have screws pull out because they were on top of each other.

Rather than kick up dust flipping ceiling panels around, I called it quits for the day. On the way home I stopped at the local farm stand for a Miracle bar and sat down by the river for a few minutes to enjoy it.
Image
Image

Drags are in Epping, NH this weekend. Had brief thoughts of going up to see them, but will save that for another time when I can drag the camper along and stay for the duration.

No thoughts on the coat hook dilemma? I put the question out there to a bigger audience here.

Also, I’m trying to decide if I can stain and poly the ceiling panels in the flat and then successfully bend them at installation, or if the poly will make them harder to bend and I should preform them first; so I put that up for discussion here.
KC
My Build: The Poet Creek Express Hybrid Foamie

Poet Creek Or Bust
Engineering the TLAR way - "That Looks About Right"
TnTTT ORIGINAL 200A LANTERN CLUB = "The 200A Gang"
Green Lantern Corpsmen
User avatar
KCStudly
Donating Member
 
Posts: 9616
Images: 8169
Joined: Mon Feb 06, 2012 10:18 pm
Location: Southeastern CT, USA

Re: The Poet Creek Express - Foamie Hybrid

Postby GPW » Sun Jun 22, 2014 4:59 am

Hey !!! No Snow !!! Nice !!! :D KC , you don’t need excuses , you have the Proof !!! :thumbsup: 8)
Miracle bar ??? That’ll need a recipe ... :thinking:
There’s no place like Foam !
User avatar
GPW
Gold Donating Member
 
Posts: 14912
Images: 546
Joined: Thu Feb 09, 2006 7:58 pm
Location: New Orleans
Top

Re: The Poet Creek Express - Foamie Hybrid

Postby KCStudly » Sun Jun 22, 2014 8:44 pm

Like I said, the bar was bought at a local farm stand, but there are recipes all over the place for them. Graham cracker crust, sweetened condensed milk (the gooey part that holds the toppings on), coconut, chocolate chips and walnuts. Here’s one recipe.

Today I installed the hardware on the locker door. Here's the front with lock set and handles.
Image

Close up of lock set.
Image

Close up of one of the handles.
Image

The back side with hinged strut to the right in pic.
Image

This is the cam tab that I modified so tediously during the mock-up stage. More on that in a minute. You can also see the double-D pronged anti-rotation washer now installed under the gland nut.
Image

A better look at the strut install.
Image

After installing the door the lock cam did not want to turn and engage the striker, so I used some of the colored wood filler putty as a transfer compound to mark the edge of the cam and see what was hitting what.
Image

I spent a great deal of time fussing with this, bending the cam slightly, shaving it some more, all while installing, removing, climbing in, climbing out, going down to the sander, back upstairs, etc. It turns out that I had not allowed for the vinyl (which lowered the door 1/16 inch), nor the aluminum trim (which moved the door 1/16 inch away from the striker). At one point when I tried to rebend the tab it broke apart. That was actually a good thing because it allowed me to use it as a pattern and quickly make another. That did the trick and it works great now.

Here it is installed. I love it when a plan comes together!
Image
Image
Image

With that out of the way I decided to get on with the ceiling panels, which is when I ran into a problem. Somehow I had spec’ed the wrong cut width for the front ceiling panel. It’s about 11 inches too “short” (narrow). I still haven’t figured out how that happened (maybe I picked the line length off of the model profile incorrectly, or had a mental error), but it doesn’t really matter. What matters is that I don’t have any long pieces of ply leftover.

So I spent some time with the measuring tape. What I decided to do is cut the full width sheet (63x48) down to the 45 inch width I need for the front section. That will put the first seam (what would have been the only seam) over the wall blocking where I had originally intended it to be. Then I will cut the “short” piece slightly so that it covers the rear of the cabin back to the upper rear cabinet face frame. That will hide the new seam. I can take the two panels that were cut out of the door seal flanges, which are wide enough and have the grain running in the correct direction, cut them down and butt them together to make a long enough piece to cover the top of the rear cabinet back to the hinge spar location over the bulkhead. It means that there will be a longitudinal seam visible inside of the rear cabinet, but that will match the one in the bulkhead skin, so it will do. It means another butt joint splice backer, but I have plenty of small stuff that I can piece together to make another one of those.

I was hoping to use those larger scraps to make matching lantern cases, but may still have enough smaller pieces to get those done, too.

Stay tuned. There is plenty more to come before this thing is done, but progress is progress and the train kept’a rollin’.
KC
My Build: The Poet Creek Express Hybrid Foamie

Poet Creek Or Bust
Engineering the TLAR way - "That Looks About Right"
TnTTT ORIGINAL 200A LANTERN CLUB = "The 200A Gang"
Green Lantern Corpsmen
User avatar
KCStudly
Donating Member
 
Posts: 9616
Images: 8169
Joined: Mon Feb 06, 2012 10:18 pm
Location: Southeastern CT, USA
Top

Re: The Poet Creek Express - Foamie Hybrid

Postby S. Heisley » Mon Jun 23, 2014 7:38 pm

The new cabinet door looks really good, KC. But then. everything you're doing does! :thumbsup:
User avatar
S. Heisley
Super Lifetime Member
 
Posts: 8774
Images: 495
Joined: Mon Sep 17, 2007 10:02 am
Location: No. California
Top

Re: The Poet Creek Express - Foamie Hybrid

Postby KCStudly » Mon Jun 23, 2014 10:22 pm

Thank you Sharon! Such kind praise is always appreciated.

Tonight I measured more accurately for the ceiling panels. I cut the larger rear ceiling panel from 48 to 45-5/16 wide (front to back) which left a nice slat drop that I can use for the extra butt splice backer. This is now the front ceiling panel.

It quickly became apparent that my plan to assemble the ceiling as one big panel and start installation from the front was not going to work. The loft rafters are just not high enough and the panel would be unmanageable in the vertical aspect to get the front joint started before bending.

Karl made a good suggestion. Rather than trying to use the steel measuring tape with its cupped shape that tended to kink, we took a thin slat of the ply, cut it to that exact same length (45-5/16) and used that as a story pole to wrap around the front radius and gauge from the top of the front wall skin to the location of the original planned butt joint seam on top of the cabin. Knowing this length and the seam location precisely means that I can work from the bulkhead forward to the reference mark, lay the whole ceiling up on the cabin and then pull the front down. In fact, I can leave the front a little bit long, glue and screw the main section of the panel up top, then do as many dry pulls as it takes on the front radius part, trimming the excess length if necessary, until it conforms and fits well. The front seam does not have to be super precise because it will be hidden by the cabinet shelf ledger, so the Surform rasp can get the length good enough w/o having to worry about a clean glue joint. I should be able to glue the front butt splice backer on using spring clamps before the final gluing and screwing of the tight radius, and by doing the gluing in two stages (stopping the main panel glue up at the beginning of the tight front radius, I should have no trouble lifting the front to get the glue started again with no dry spots. Does that make sense? Mud, right?

So that’s what I started working on tonight. I threw the big panel up front and found that the little lips of foam that I had left around the outside edges of the profile were getting in the way more than they were helping. They were going to have to go in order to get the GS in anyway, so off they came. I used the cheap serrated steak knife (the kind that is only beveled on one side of the blade). By laying the flat side of the blade down against the top edge of the inner wall skin and leading it at a nice long angle along the width of the foam that had been trimmed to the profile previously, it was pretty easy to zip most of the foam lip off almost flush. A little hand work with the small sanding block and the profile was looking a lot crisper.
Image
Image
Image

Next I got the drops from the door seal flanges out and trued them up. To get a nice straight reference edge for the rip fence, I screwed a piece of straight pine overhanging one edge before running the opposite edge thru the saw. Neither blank was wide enough to get the two pieces out of, so I had to cut both, but it did leave a pretty good chunk from each, and I have a bunch more smaller scraps to make those lantern cases out of; so win-win.
Image

I started making the cross cuts, but got called away for dinner, so that was where I left off for tonight.
Last edited by KCStudly on Tue Jun 24, 2014 6:37 am, edited 1 time in total.
KC
My Build: The Poet Creek Express Hybrid Foamie

Poet Creek Or Bust
Engineering the TLAR way - "That Looks About Right"
TnTTT ORIGINAL 200A LANTERN CLUB = "The 200A Gang"
Green Lantern Corpsmen
User avatar
KCStudly
Donating Member
 
Posts: 9616
Images: 8169
Joined: Mon Feb 06, 2012 10:18 pm
Location: Southeastern CT, USA
Top

Re: The Poet Creek Express - Foamie Hybrid

Postby atahoekid » Tue Jun 24, 2014 12:58 am

It's been a couple weeks since my last peek in, you're making beautiful progress. You're getting so close... :thumbsup: :thumbsup:
Mel

"Believe in your abilities... Remember amateurs built the ark, professionals built the Titanic"

"Indecision may or may not be my problem" Jimmy Buffet

Image

The Road Foamie Build Thread: viewtopic.php?t=45698
User avatar
atahoekid
Platinum Donating Member
 
Posts: 1773
Images: 158
Joined: Sat Jul 24, 2010 2:49 am
Location: Incline Village, NV
Top

Re: The Poet Creek Express - Foamie Hybrid

Postby GPW » Tue Jun 24, 2014 6:43 am

Oh !!! I get it now !!! It’s a Camper trailer .... :o ..... 8) :lol: :lol: :lol:
There’s no place like Foam !
User avatar
GPW
Gold Donating Member
 
Posts: 14912
Images: 546
Joined: Thu Feb 09, 2006 7:58 pm
Location: New Orleans
Top

Re: The Poet Creek Express - Foamie Hybrid

Postby KCStudly » Tue Jun 24, 2014 8:48 am

Thanks Mel! :D

GPW wrote:Oh !!! I get it now !!! It’s a Camper trailer .... :o ..... 8) :lol: :lol: :lol:

Yup. Someday. Someday in the not too distant future I will sleep in this thing and it will be official! :FNP :D
KC
My Build: The Poet Creek Express Hybrid Foamie

Poet Creek Or Bust
Engineering the TLAR way - "That Looks About Right"
TnTTT ORIGINAL 200A LANTERN CLUB = "The 200A Gang"
Green Lantern Corpsmen
User avatar
KCStudly
Donating Member
 
Posts: 9616
Images: 8169
Joined: Mon Feb 06, 2012 10:18 pm
Location: Southeastern CT, USA
Top

Re: The Poet Creek Express - Foamie Hybrid

Postby GPW » Tue Jun 24, 2014 9:28 am

...just kidding KC !!! :D It’s really taking shape now , looks Great ... I can visualize it finished ... :SG Gonna’ be COOL !!! 8)
There’s no place like Foam !
User avatar
GPW
Gold Donating Member
 
Posts: 14912
Images: 546
Joined: Thu Feb 09, 2006 7:58 pm
Location: New Orleans
Top

Re: The Poet Creek Express - Foamie Hybrid

Postby KCStudly » Wed Jun 25, 2014 10:14 pm

.
Thanks GPW!

It was hot in the loft this evening.

Still, I got the two rear ceiling panels cut to size and fit for the butt joint (a little work with the sanding block to tighten up the saw cut ends).

Next I clamped one of the pieces to the bench so I could butt the other piece up tight and clamp it. This allowed me to lay a piece of 2 inch blue tape on the seam on the good side. Then I flipped it over, moved it over to the edge of the bench and opened the joint like a hinge.
Image
The bevel on the edge of the bench let the tape separate a little on one side, and I'm sure that some glue got to the good side because of this. If I use this technique again I will put a piece of scrap that has a sharp edge along the edge of the bench to see if that helps. Either that or don’t tamp the tape before application.

Here is the clamp set-up. It’s a 1x3 (or so) on edge clamped across the bench on top of a couple of 1x scraps at each end. After gluing the butt edges, laying the panels flat, gluing the area that I had laid out for the backer piece and the backer piece, then sliding the joint under the clamp “bridge” I added the wedged shims to squeeze it all down tight to the bench. Of course I had done a dry run first.
Image

Here it is with glue.
Image

By doing it this way I can be sure to get an even clamp all across the seam. If I just clamped the bridge directly onto the backer it would not clamp evenly due to bending flex in the clamp board.

I spent a little time sanding a GS filled spot on the street side wall that I had missed, and making another story pole slat; this one for the middle panel of the ceiling.

Then I sat in front of the fan for a few minutes before heading out.
KC
My Build: The Poet Creek Express Hybrid Foamie

Poet Creek Or Bust
Engineering the TLAR way - "That Looks About Right"
TnTTT ORIGINAL 200A LANTERN CLUB = "The 200A Gang"
Green Lantern Corpsmen
User avatar
KCStudly
Donating Member
 
Posts: 9616
Images: 8169
Joined: Mon Feb 06, 2012 10:18 pm
Location: Southeastern CT, USA
Top

Re: The Poet Creek Express - Foamie Hybrid

Postby bonnie » Thu Jun 26, 2014 2:45 am

GPW wrote:Oh !!! I get it now !!! It’s a Camper trailer .... :o ..... 8) :lol: :lol: :lol:
Yup. Someday. Someday in the not too distant future I will sleep in this thing and it will be official! :FNP :D


That's my thoughts exactly. :lol:

You are doing such lovely work. Every step is progress. And even though it is frustrating for you, I enjoy your thought process for fixing your issues. I would not have thought of using the filler to mark the spots. Great idea.
Remember, the turtle won. :)
User avatar
bonnie
Donating Member
 
Posts: 1390
Images: 107
Joined: Sun Jul 24, 2011 4:14 pm
Location: Roxana, IL
Top

Re: The Poet Creek Express - Foamie Hybrid

Postby KCStudly » Thu Jun 26, 2014 7:13 am

bonnie wrote:I would not have thought of using the filler to mark the spots. Great idea.


???

Bonnie, I had used GS to fill in a couple of dings and screw holes in the side walls and needed to shave/sand these flush. It sounds like I have given you some other idea?

As always, thanks for the kind words. :thumbsup:
KC
My Build: The Poet Creek Express Hybrid Foamie

Poet Creek Or Bust
Engineering the TLAR way - "That Looks About Right"
TnTTT ORIGINAL 200A LANTERN CLUB = "The 200A Gang"
Green Lantern Corpsmen
User avatar
KCStudly
Donating Member
 
Posts: 9616
Images: 8169
Joined: Mon Feb 06, 2012 10:18 pm
Location: Southeastern CT, USA
Top

Re: The Poet Creek Express - Foamie Hybrid

Postby RandyG » Thu Jun 26, 2014 8:55 am

Still watching Kc, :thumbsup:

Get rid of that tape measure that lied to ya, 'fool me once...' :lol: I go through alot of tape measures.
Randy
Aircraft fabricator, novice carpenter, electrical apprentice, audio engineer dropout.
Build thread - http://www.tnttt.com/viewtopic.php?f=50&t=54126
User avatar
RandyG
500 Club
 
Posts: 695
Images: 115
Joined: Thu May 10, 2012 6:52 pm
Top

Re: The Poet Creek Express - Foamie Hybrid

Postby KCStudly » Thu Jun 26, 2014 9:19 am

I'm afraid that it must have been operator error and not the tools fault. :frightened: (I guess that I am the "tool"!)

Maybe later this evening I should go back into the program and try to pick that linear distance off again, maybe see where things went wrong. But really, it is no matter. What must be done, must be done.

Truthfully, If I had it to do all over again I would have just sprang for the full 23 count of ply sheets, plus a couple for oops and quality control. That way I could have eliminated a lot of seams in the floor and bulkhead, and could work around any other issues or design changes more easily, w/o having to worry about extra shipping cost or fussing around.

It is only a little frustrating. Mostly it is a puzzling challenge for the mind, and I'm okay with that. Keeps the brain active. :?
KC
My Build: The Poet Creek Express Hybrid Foamie

Poet Creek Or Bust
Engineering the TLAR way - "That Looks About Right"
TnTTT ORIGINAL 200A LANTERN CLUB = "The 200A Gang"
Green Lantern Corpsmen
User avatar
KCStudly
Donating Member
 
Posts: 9616
Images: 8169
Joined: Mon Feb 06, 2012 10:18 pm
Location: Southeastern CT, USA
Top

PreviousNext

Return to Foamies

Who is online

Users browsing this forum: No registered users and 9 guests