
Gee shucks.

Moderator: eaglesdare
![]() by KCStudly » Thu Oct 02, 2014 10:29 am
by KCStudly » Thu Oct 02, 2014 10:29 am

![]() by S. Heisley » Thu Oct 02, 2014 8:07 pm
by S. Heisley » Thu Oct 02, 2014 8:07 pm


![]() by KCStudly » Thu Oct 02, 2014 8:58 pm
by KCStudly » Thu Oct 02, 2014 8:58 pm
![]() by KCStudly » Thu Oct 02, 2014 9:02 pm
by KCStudly » Thu Oct 02, 2014 9:02 pm
![]() by KCStudly » Fri Oct 03, 2014 10:03 pm
by KCStudly » Fri Oct 03, 2014 10:03 pm
 ). I cut a gauge stick that measured off the distance from the inside of the galley wall to the outside of the lower actuator brackets. This made it much easier for me to hold the bracket hard into position with one hand. By letting it hang from the actuator, swinging it hard against the bulkhead and gauge stick at the same time I was able to hold the bracket exactly in position, and plumb, while running the drill thru the guide bushing using the other hand. No slipping around.
![]() by GPW » Sat Oct 04, 2014 7:30 am
by GPW » Sat Oct 04, 2014 7:30 am
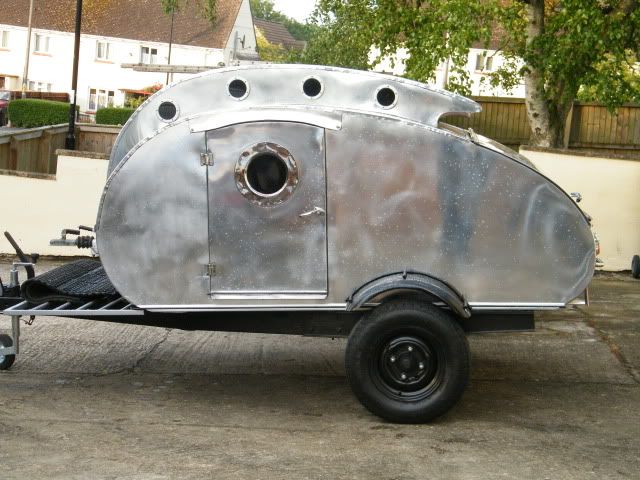
 Wood is one thing , but Metal ...
  You casually popped out that beautiful trailer from scratch
  , and now all these little fittings , Now that’s really IMPRESSIVE ...

![]() by KCStudly » Sat Oct 04, 2014 12:02 pm
by KCStudly » Sat Oct 04, 2014 12:02 pm
![]() by GPW » Sat Oct 04, 2014 1:48 pm
by GPW » Sat Oct 04, 2014 1:48 pm
![]() by KCStudly » Sat Oct 04, 2014 5:47 pm
by KCStudly » Sat Oct 04, 2014 5:47 pm
 ) Had a bad dimmer switch for the track lighting in the kitchen and wanted to switch those over to LED's (used to get too hot in the kitchen when all of the lights were up!). From a cold start the new dimmable LED's pop on at about 20/ct and can then be dimmed back, but even with the slider all the way down they don't go as low as the PAR 20 halogens they replaced. On full they are super bright; brighter than before. Best of all, they don't throw any heat!
![]() by Wolffarmer » Sat Oct 04, 2014 9:55 pm
by Wolffarmer » Sat Oct 04, 2014 9:55 pm

![]() by KCStudly » Sat Oct 04, 2014 10:59 pm
by KCStudly » Sat Oct 04, 2014 10:59 pm
![]() by Ned B » Sat Oct 04, 2014 11:20 pm
by Ned B » Sat Oct 04, 2014 11:20 pm


![]() by atahoekid » Sun Oct 05, 2014 1:21 am
by atahoekid » Sun Oct 05, 2014 1:21 am
KCStudly wrote:Thank you Sharon. I'm happy with how everything is coming out, but I am also looking forward to the day when I can just say, "let's hitch the camper up and get away for the weekend". I'm also having thoughts of becoming an NHRA groupie, chasing the events within driving distance and camping out for the drag races. Let's see, Epping, Maple Grove, Englishtown, definitely Indy, maybe the 4-wide event in Charlotte. (OT: I'm opposed to the 4-wide format because it shortens the race and is harder to follow the action, but who can argue with the nostalgia aspect and the raw energy of 40000HP all at once!!!)
The train she is a rollin'.
I'm not too far from Sonoma, Laguna Seca, Las Vegas is about an 8 hour drive, Utah a bit farther... Food for thought.
![]() by KCStudly » Sun Oct 05, 2014 9:01 am
by KCStudly » Sun Oct 05, 2014 9:01 am
![]() by Wolffarmer » Sun Oct 05, 2014 9:54 am
by Wolffarmer » Sun Oct 05, 2014 9:54 am
Users browsing this forum: No registered users and 3 guests