Thrifty Alternatives ..Building Foam Campers

Canvas covered foamies (Thrifty Alternatives...)

Moderator: eaglesdare

Postby Cliffmeister2000 » Wed Jan 05, 2011 7:12 am

Ah, yes, RTV. Used it in the USAF. "One misplaced drop will cover everything!". And it's red, too! :lol:
God Bless

Cliff

♥God. ♥People.
1 John 4:9-11

My Teardrop build pictures
User avatar
Cliffmeister2000
Titanium Donating Member
 
Posts: 3622
Images: 157
Joined: Thu Jul 26, 2007 10:18 pm
Location: Phoenix, AZ

Postby angib » Wed Jan 05, 2011 9:48 am

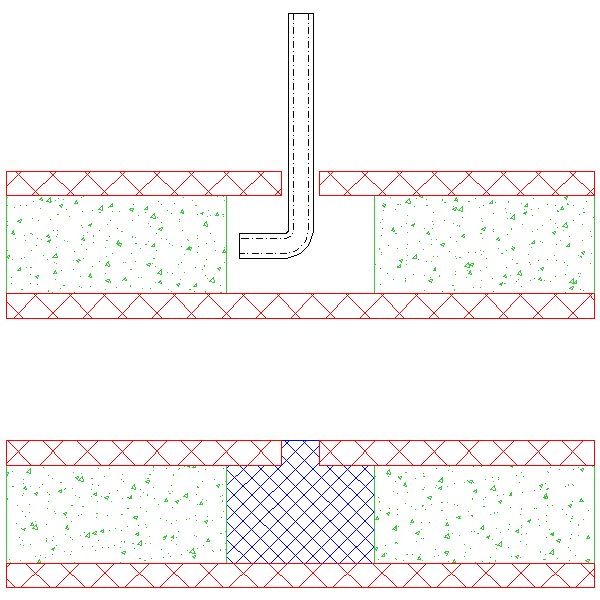
The boatbuilder's solution to adding fasteners where you hadn't thought of them in advance is pretty simple:
- drill a hole in one skin
- force an allen key ('hex key' in the US?) through the hole into the foam;
- put the allen key in the chuck of a drill and 'whirl' a void in the foam;
- fill up the void with thickened epoxy;
- redrill and either tap the epoxy plug for a threaded fastener or bolt thorugh both skins.
Image

Of course the best solution is to plan where you will need fittings and let wood blocks into the foam at those points before the skins are added.

It's very hard to restrain the enthusiasm to just slap the foam toegether but once you've had to add a few unintended fastenings like this, you'll wish you had planned it better!
User avatar
angib
5000 Club
5000 Club
 
Posts: 5783
Images: 231
Joined: Fri Apr 30, 2004 2:04 pm
Location: (Olde) England

Postby GPW » Wed Jan 05, 2011 11:07 am

Write that one down !!!! What a great idea !!! Thanks Angib!!! :thumbsup: 8)
There’s no place like Foam !
User avatar
GPW
Gold Donating Member
 
Posts: 14912
Images: 546
Joined: Thu Feb 09, 2006 7:58 pm
Location: New Orleans
Top

Glue and foam

Postby M B Hamilton » Wed Jan 05, 2011 5:35 pm

Just wanted to pass something along that I came across.

"I had experimented with Dow Corning Styrofoam insulation board and found that it would take epoxy and fiberglass cloth. A slight yellowing of the epoxy was evident, but the fiberglass and epoxy definitely stiffened the surface of the insulation board. I also found that Elmer's ProBond glue, advertised as waterproof, could be used to glue the board together easily. Doorskin plies, plywood, Lauan, and other woods can also be laminated to the insulation board using this glue.

The glue reacts with moisture; therefore users are advised to moisten the surfaces that will be mated before they are glued and lightly clamped. When the glue begins to set, it bubbles and expands significantly. I soon learned to use less glue and place duct tape on cracks so that I would not have to try to sand the glue off the insulation board. The insulation board is so soft that the least bit of careless handling or sanding easily damages the surface." Sheet Foam & Fiberglass Construction, By Dave Gray

The article is on the Puddle Duck Racer site. <http://www.pdracer.com/> It's in the "Building Tips" section, sub-heading "Hull Construction." I haven't tried it myself, but the guy built the boat, and it stayed together.
M B Hamilton
Teardrop Master
 
Posts: 169
Images: 38
Joined: Thu Oct 06, 2005 1:56 pm
Location: Harwinton, CT
Top

Postby kennyrayandersen » Thu Jan 06, 2011 1:34 am

angib wrote:The boatbuilder's solution to adding fasteners where you hadn't thought of them in advance is pretty simple:
- drill a hole in one skin
- force an allen key ('hex key' in the US?) through the hole into the foam;
- put the allen key in the chuck of a drill and 'whirl' a void in the foam;
- fill up the void with thickened epoxy;
- redrill and either tap the epoxy plug for a threaded fastener or bolt thorugh both skins.

Image

Of course the best solution is to plan where you will need fittings and let wood blocks into the foam at those points before the skins are added.

It's very hard to restrain the enthusiasm to just slap the foam toegether but once you've had to add a few unintended fastenings like this, you'll wish you had planned it better!


They make a special (read expensive) little tool to do that, but it looks suspiciously like an Allen wrench!

The other way is to drill a 1 inch diameter hole trough on side only, put in your wood or thickened epoxy plug, and then come over the outside with a couple more plies of fabric. – It’s just not quite as ‘finished’ looking, but would be functionally strong. As Andrew said – thinking ahead is the best way to avoid ‘pain’.
User avatar
kennyrayandersen
1000 Club
1000 Club
 
Posts: 1750
Images: 38
Joined: Sun Apr 29, 2007 10:27 pm
Location: TX
Top

Re: Glue and foam

Postby angib » Thu Jan 06, 2011 5:30 am

M B Hamilton wrote:"I soon learned to use less glue and place duct tape on cracks so that I would not have to try to sand the glue off the insulation board."

With any build method where you are going to add an outside skin afterwards, you need to make sure all the core materials are of similar hard/softness, including any glue.

There are plenty of examples of guys who have assembled solid foam formers from styrofoam or similar and ended up with ridges along the seams between sheets where the harder glue didn't sand down as much as the foam. Worse still, it looks fine at the foam stage and only shows up when the outer skin is on and finished!
User avatar
angib
5000 Club
5000 Club
 
Posts: 5783
Images: 231
Joined: Fri Apr 30, 2004 2:04 pm
Location: (Olde) England
Top

Postby steve smoot » Thu Jan 06, 2011 8:15 am

Andrew, you are the man :thumbsup:
I am not a complete idiot, some parts are missing...
User avatar
steve smoot
Lifetime member
 
Posts: 1355
Images: 62
Joined: Thu Sep 17, 2009 5:42 pm
Location: Boone NC
Top

Postby GPW » Thu Jan 06, 2011 8:20 am

Thanks Angib ... we will be careful with the fit ... :thumbsup:

For some foamie' builds we've done in the past (model Planes), we used common package sealing tape to prevent the spread of PU type glues... Worked , and was Thrifty ...
Problem with foam is all the glues mentioned are stronger than the foam , so the foam will fail long before the glue does... Silicon is interesting because of it's flexibility ... But after the structure is skinned with a healthy thickness of fabric ( canvas in my case) , the strength of the skins will be much more than any foam to foam join ... The skin is Everything !!! ...the foam merely keeps the skins apart , the further apart the skins, the Stronger the structure... Haven't we all seen folks that do a glass job over foam , and then melt the foam away ... leaving only the glass skin as the structure... :o

The advantage of leaving the foam , for us, is the insulation qualities afforded...
There’s no place like Foam !
User avatar
GPW
Gold Donating Member
 
Posts: 14912
Images: 546
Joined: Thu Feb 09, 2006 7:58 pm
Location: New Orleans
Top

Postby sdakotadoug » Thu Jan 06, 2011 8:44 am

Great tip, if Angib writes a book I'm buying. Doug
User avatar
sdakotadoug
Teardrop Advisor
 
Posts: 71
Joined: Sat Jul 10, 2010 6:50 pm
Location: Southeast South Dakota
Top

Postby GPW » Thu Jan 06, 2011 9:20 am

I'd buy that too !!!! :thumbsup:
There’s no place like Foam !
User avatar
GPW
Gold Donating Member
 
Posts: 14912
Images: 546
Joined: Thu Feb 09, 2006 7:58 pm
Location: New Orleans
Top

Postby Ageless » Thu Jan 06, 2011 5:20 pm

How the big boys do it?

:lol:

You need to construct a surface table; 8 x 16 feet, 3" cast aluminum, level to +/- .010". Dill/ream .501" diam holes on a 6" grid to affix clamping devices. Shop wil need to be climate controlled to 69 - 72F with no less than 75% humidity. Floor needs to be a min. of 6" of 'industrial' concrete.

Now for me; I have a 20 x 40 garage/shop with a fairly level floor. Stretch out and smooth sheet plastic; apply Murphy's Oil Soap to prevent sticking. I find that cleaning of the edges is not required unless soiled; then a wipe down with alcohol is all I use.


On another note; you can thread those wood inserts for machine screws. Tap the hole; apply a coat of epoxy with a Q-tip; when hard, run the tap thru again.
Strangers on this road we are on; we are not two, we are one - Raymond Douglas Davies
User avatar
Ageless
Platinum Donating Member
 
Posts: 1603
Images: 8
Joined: Tue Aug 04, 2009 8:34 am
Location: Pt. Orchard, WA
Top

Postby GPW » Fri Jan 07, 2011 7:14 am

Hmmm??? The Big boys have considerably more resources than we have :o
Guess that's out of the question... :oops:
Ageless , I have a similar space as yours ... will proceed in that , more thrifty, manner ... Thinking if the Big Boys built a TD , only the Defense Department could afford one... :roll:
There’s no place like Foam !
User avatar
GPW
Gold Donating Member
 
Posts: 14912
Images: 546
Joined: Thu Feb 09, 2006 7:58 pm
Location: New Orleans
Top

Postby eaglesdare » Fri Jan 07, 2011 10:14 am

i guess i somehow got logged off and never received the notices that new posts have been made.

a lot of chat over the holidays.

gpw, you need to start your build soon! this is the month i am hopfully ordering my trailer. i need to follow your build. between now and mid march i will be getting my supplies, then mid march starts the build. i want you to make all the mistakes first. :lol:
Louella
May the foam be with you.
User avatar
eaglesdare
Donating Member
 
Posts: 3168
Images: 13
Joined: Tue Aug 26, 2008 7:06 pm
Top

Postby angib » Fri Jan 07, 2011 11:08 am

Ageless wrote:How the big boys do it?

You need to construct a surface table; 8 x 16 feet, 3" cast aluminum....

Nope, those are just for little boys in short pants.

Real big boys have a 5-axis CNC milling machine to do all the work for them. If they go to EEW Maschinenbau in Germany they can cut things 500 ft long by 40ft wide by 14 ft high - which should be big enough for most teardrops....

Image Yep, that is a man standing in the middle!

Here is a video of the cutting of a car body. CNC buffs may like to look at this to see a CNC 'splurger' in action - after a cheap foam former has been machined, the mill dispenses a surfacing putty over the whole former and then mills that.

And you just know that these guys can explain how many manhours this mill saves - but look at the video and you will see that it takes 17 expensive guys in suits or white lab coats looking through the windows around the mill to do this work, so how much labour does it really save?
User avatar
angib
5000 Club
5000 Club
 
Posts: 5783
Images: 231
Joined: Fri Apr 30, 2004 2:04 pm
Location: (Olde) England
Top

Postby Miriam C. » Fri Jan 07, 2011 11:20 am

angib wrote:
Ageless wrote:How the big boys do it?

You need to construct a surface table; 8 x 16 feet, 3" cast aluminum....

Nope, those are just for little boys in short pants.

Real big boys have a 5-axis CNC milling machine to do all the work for them. If they go to EEW Maschinenbau in Germany they can cut things 500 ft long by 40ft wide by 14 ft high - which should be big enough for most teardrops....

Image Yep, that is a man standing in the middle!

Here is a video of the cutting of a car body. CNC buffs may like to look at this to see a CNC 'splurger' in action - after a cheap foam former has been machined, the mill dispenses a surfacing putty over the whole former and then mills that.

And you just know that these guys can explain how many manhours this mill saves - but look at the video and you will see that it takes 17 expensive guys in suits or white lab coats looking through the windows around the mill to do this work, so how much labour does it really save?


;) That is not labour it is supervision. LOL
“Forgiveness means giving up all hope for a better past.â€
User avatar
Miriam C.
our Aunti M
 
Posts: 19675
Images: 148
Joined: Wed Feb 15, 2006 3:14 pm
Location: Southwest MO
Top

PreviousNext

Return to Foamies

Who is online

Users browsing this forum: No registered users and 11 guests